Operating Guide
Page 2
... or moisture. WARNING To prevent fire or shock hazard, do not expose the unit to discontinue midway (fail), restart the application or disconnect and connect the communication cable (USB, etc.) again. and CANADA RECYCLING LITHIUM-ION BATTERIES Lithium-Ion batteries are recyclable.
... or moisture. WARNING To prevent fire or shock hazard, do not expose the unit to discontinue midway (fail), restart the application or disconnect and connect the communication cable (USB, etc.) again. and CANADA RECYCLING LITHIUM-ION BATTERIES Lithium-Ion batteries are recyclable.
Operating Guide
Page 3
Declaration of Conformity Trade Name: SONY Model No.: DCR-HC32 Responsible Party: Sony Electronics Inc. If this device must accept any questions about this product. Reorient or relocate the receiving antenna. - Record the serial number in accordance with the Handycam Station Model DCRA-C121 and AC... on , the user is connected. - This equipment generates, uses, and can be used with the instructions, may cause harmful interference to the following two conditions: (1) This device may cause undesired operation. Model No. Note DCR-HC32/HC42 is to provide reasonable ...
Declaration of Conformity Trade Name: SONY Model No.: DCR-HC32 Responsible Party: Sony Electronics Inc. If this device must accept any questions about this product. Reorient or relocate the receiving antenna. - Record the serial number in accordance with the Handycam Station Model DCRA-C121 and AC... on , the user is connected. - This equipment generates, uses, and can be used with the instructions, may cause harmful interference to the following two conditions: (1) This device may cause undesired operation. Model No. Note DCR-HC32/HC42 is to provide reasonable ...
Operating Guide
Page 4
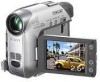
... kinds of recording media you insert the connector plug forcibly in the proper direction. Read this may cause a malfunction of your camcorder. To view your camcorder to another device with a USB or i.LINK cable, be sure to direct sunlight for effective use in color) that is grayed... out is not possible due to a malfunction of the camcorder, storage media, etc. • TV color systems differ depending on the countries/regions. Viewfinder LCD panel Battery pack • Before connecting your recordings on the LCD screen and the viewfinder. These...
... kinds of recording media you insert the connector plug forcibly in the proper direction. Read this may cause a malfunction of your camcorder. To view your camcorder to another device with a USB or i.LINK cable, be sure to direct sunlight for effective use in color) that is grayed... out is not possible due to a malfunction of the camcorder, storage media, etc. • TV color systems differ depending on the countries/regions. Viewfinder LCD panel Battery pack • Before connecting your recordings on the LCD screen and the viewfinder. These...

Operating Guide
Page 7
... Duo" (QUALITY/IMAGE SIZE/BURST/ALL ERASE/NEW FOLDER, etc.) PICT.APPLI. menu 56 (CLOCK SET/WORLD TIME/LANGUAGE) Customizing Personal Menu 57 Dubbing/Editing Connecting to a VCR or TV 59 Dubbing to other basic settings (REC MODE/ MULTI-SOUND/LCD/VF SET/DISP OUTPUT/USB, etc.) TIME/LANGU. Searching for... Playing the picture on a TV 34 Using the Menu Using the menu items 36 Menu items 38 CAMERA SET menu 40 Settings to adjust your camcorder to the recording conditions (EXPOSURE/ WHITE BAL./STEADYSHOT, etc.) MEMORY SET menu 45 Settings for editing or playing back in various modes (VAR.SPD PB...
... Duo" (QUALITY/IMAGE SIZE/BURST/ALL ERASE/NEW FOLDER, etc.) PICT.APPLI. menu 56 (CLOCK SET/WORLD TIME/LANGUAGE) Customizing Personal Menu 57 Dubbing/Editing Connecting to a VCR or TV 59 Dubbing to other basic settings (REC MODE/ MULTI-SOUND/LCD/VF SET/DISP OUTPUT/USB, etc.) TIME/LANGU. Searching for... Playing the picture on a TV 34 Using the Menu Using the menu items 36 Menu items 38 CAMERA SET menu 40 Settings to adjust your camcorder to the recording conditions (EXPOSURE/ WHITE BAL./STEADYSHOT, etc.) MEMORY SET menu 45 Settings for editing or playing back in various modes (VAR.SPD PB...

Operating Guide
Page 8
... "Memory Stick Duo" with specific information (Image protection/Print mark 66 Printing recorded images (PictBridge compliant printer 67 Jacks to connect external devices 69 Using a Computer Before referring to the "First Step Guide" on your computer 70 Installing the software and "First Step..." on a computer 72 Viewing "First Step Guide 76 Creating a DVD (Direct Access to "Click to DVD 77 Connecting an analog VCR to the computer via your camcorder (Signal convert function 80 Troubleshooting Troubleshooting 82 Warning indicators and messages 100 Additional Information Using your...
... "Memory Stick Duo" with specific information (Image protection/Print mark 66 Printing recorded images (PictBridge compliant printer 67 Jacks to connect external devices 69 Using a Computer Before referring to the "First Step Guide" on your computer 70 Installing the software and "First Step..." on a computer 72 Viewing "First Step Guide 76 Creating a DVD (Direct Access to "Click to DVD 77 Connecting an analog VCR to the computer via your camcorder (Signal convert function 80 Troubleshooting Troubleshooting 82 Warning indicators and messages 100 Additional Information Using your...
Operating Guide
Page 9
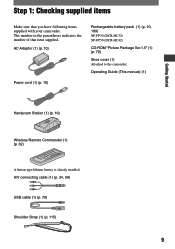
...connecting cable (1) (p. 34, 59) USB cable (1) (p. 70) Shoulder Strap (1) (p. 115) 9 The number in the parentheses indicates the number of that you have following items supplied with your camcorder. Step 1: Checking supplied items Make sure that item supplied. AC Adaptor (1) (p. 10) Power cord (1) (p. 10) Rechargeable battery pack (1) (p. 10, 109) NP-FP30 (DCR-HC32) NP-FP50 (DCR...-HC42) CD-ROM "Picture Package Ver.1.5" (1) (p. 70) Shoe cover (1) Attached to the camcorder. Operating Guide (This manual) (1) Getting Started Handycam Station (1) (p. 10)...
...connecting cable (1) (p. 34, 59) USB cable (1) (p. 70) Shoulder Strap (1) (p. 115) 9 The number in the parentheses indicates the number of that you have following items supplied with your camcorder. Step 1: Checking supplied items Make sure that item supplied. AC Adaptor (1) (p. 10) Power cord (1) (p. 10) Rechargeable battery pack (1) (p. 10, 109) NP-FP30 (DCR-HC32) NP-FP50 (DCR...-HC42) CD-ROM "Picture Package Ver.1.5" (1) (p. 70) Shoe cover (1) Attached to the camcorder. Operating Guide (This manual) (1) Getting Started Handycam Station (1) (p. 10)...
Operating Guide
Page 10
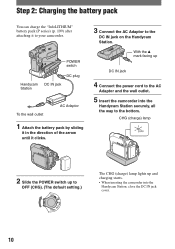
...) (p. 109) after attaching it clicks. 3 Connect the AC Adaptor to your camcorder. CHG (charge) lamp 2 Slide the POWER switch up to OFF (CHG). (The default setting.) The CHG (charge) lamp lights up DC IN jack 4 Connect the power cord to the bottom. POWER switch Handycam Station DC plug DC IN jack To...sliding it in the direction of the arrow until it to the DC IN jack on the Handycam Station. With the mark facing up and charging starts. • When inserting the camcorder into the Handycam Station securely, all the way to the AC Adaptor and the wall outlet. 5 Insert ...
...) (p. 109) after attaching it clicks. 3 Connect the AC Adaptor to your camcorder. CHG (charge) lamp 2 Slide the POWER switch up to OFF (CHG). (The default setting.) The CHG (charge) lamp lights up DC IN jack 4 Connect the power cord to the bottom. POWER switch Handycam Station DC plug DC IN jack To...sliding it in the direction of the arrow until it to the DC IN jack on the Handycam Station. With the mark facing up and charging starts. • When inserting the camcorder into the Handycam Station securely, all the way to the AC Adaptor and the wall outlet. 5 Insert ...
Operating Guide
Page 11
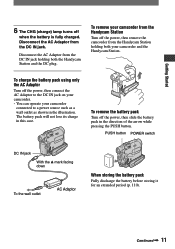
...battery before storing it for an extended period (p. 110). Disconnect the AC Adaptor from the Handycam Station holding both your camcorder and the Handycam Station. To remove the battery pack Turn off the power, then connect the AC Adaptor to a power source such as a wall outlet as shown in this... case. To remove your camcorder connected to the DC IN jack on your camcorder. • You can operate your camcorder from the Handycam Station Turn off when the battery is fully charged. The battery pack will not lose its ...
...battery before storing it for an extended period (p. 110). Disconnect the AC Adaptor from the Handycam Station holding both your camcorder and the Handycam Station. To remove the battery pack Turn off the power, then connect the AC Adaptor to a power source such as a wall outlet as shown in this... case. To remove your camcorder connected to the DC IN jack on your camcorder. • You can operate your camcorder from the Handycam Station Turn off when the battery is fully charged. The battery pack will not lose its ...
Operating Guide
Page 13
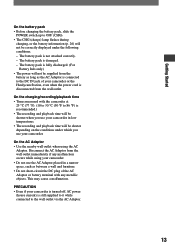
...supplied from the battery as long as between a wall and furniture. • Do not short-circuit the DC plug of your camcorder or the Handycam Station, even when the power cord is disconnected from the wall outlet immediately if any metallic objects. The battery pack is recommended.) ...measured with any malfunction occurs while using the AC Adaptor. This may cause a malfunction. PRECAUTION • Even if your camcorder. The battery pack is still supplied to it while connected to 86 °F) is damaged. - The battery pack is fully discharged. (For Battery Info only.) • ...
...supplied from the battery as long as between a wall and furniture. • Do not short-circuit the DC plug of your camcorder or the Handycam Station, even when the power cord is disconnected from the wall outlet immediately if any metallic objects. The battery pack is recommended.) ...measured with any malfunction occurs while using the AC Adaptor. This may cause a malfunction. PRECAUTION • Even if your camcorder. The battery pack is still supplied to it while connected to 86 °F) is damaged. - The battery pack is fully discharged. (For Battery Info only.) • ...
Operating Guide
Page 26
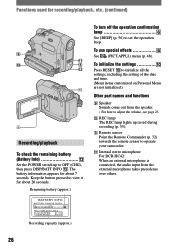
....) menu (p. 48). Remaining battery (approx.) To turn off the operation confirmation beep See [BEEP] (p. 56) to view it for about 20 seconds. Functions used for recording/playback, etc. (continued) 9 qa 0 3 qs qd 6 Recording/playback To check the remaining battery (Battery Info Set...(p. 55). Remote sensor Point the Remote Commander (p. 32) towards the remote sensor to operate your camcorder. Internal stereo microphone For DCR-HC42: When an external microphone is connected, the audio input from the speaker. • For how to adjust the volume, see page 23. &#...
....) menu (p. 48). Remaining battery (approx.) To turn off the operation confirmation beep See [BEEP] (p. 56) to view it for about 20 seconds. Functions used for recording/playback, etc. (continued) 9 qa 0 3 qs qd 6 Recording/playback To check the remaining battery (Battery Info Set...(p. 55). Remote sensor Point the Remote Commander (p. 32) towards the remote sensor to operate your camcorder. Internal stereo microphone For DCR-HC42: When an external microphone is connected, the audio input from the speaker. • For how to adjust the volume, see page 23. &#...
Operating Guide
Page 30
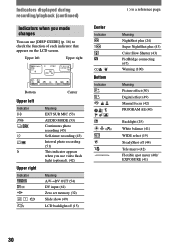
... check the function of each indicator that appears on the LCD screen. Meaning NightShot plus (24) Super NightShot plus (43) Color Slow Shutter (43) PictBridge connecting (67) Warning (100) Meaning Picture effect (50) Digital effect (49) Manual focus (42) PROGRAM AE (40) Backlight (25) White balance (41) WIDE select (19) SteadyShot...
... check the function of each indicator that appears on the LCD screen. Meaning NightShot plus (24) Super NightShot plus (43) Color Slow Shutter (43) PictBridge connecting (67) Warning (100) Meaning Picture effect (50) Digital effect (49) Manual focus (42) PROGRAM AE (40) Backlight (25) White balance (41) WIDE select (19) SteadyShot...

Operating Guide
Page 34
... input selector on the VCR to the playback picture. Playing the picture on a TV Connect your camcorder to the LINE IN input on the VCR. For DCR-HC42: To set the aspect ratio according to the connected TV (16:9/4:3) Change the setting according to the screen size of the TV you set... [TV TYPE] to [16:9]. Refer also to the manual supplied with your camcorder to the input jack of an A/V connecting cable (optional). When...
... input selector on the VCR to the playback picture. Playing the picture on a TV Connect your camcorder to the LINE IN input on the VCR. For DCR-HC42: To set the aspect ratio according to the connected TV (16:9/4:3) Change the setting according to the screen size of the TV you set... [TV TYPE] to [16:9]. Refer also to the manual supplied with your camcorder to the input jack of an A/V connecting cable (optional). When...
Operating Guide
Page 35
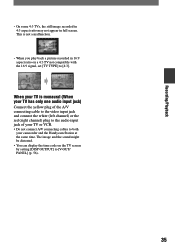
... the 16:9 signal, set [TV TYPE] to both your camcorder and the Handycam Station at the same time. This is monaural (When your TV has only one audio input jack) Connect the yellow plug of the A/V connecting cable to the video input jack and connect the white (left channel) or the red (right channel) plug... to the audio input jack of your TV or VCR. • Do not connect A/V connecting cables to [4:3]. Recording/Playback • On some 4:3 TVs, the still image recorded in 4:3 aspect ratio may not appear in 16:9 aspect ratio on the TV ...
... the 16:9 signal, set [TV TYPE] to both your camcorder and the Handycam Station at the same time. This is monaural (When your TV has only one audio input jack) Connect the yellow plug of the A/V connecting cable to the video input jack and connect the white (left channel) or the red (right channel) plug... to the audio input jack of your TV or VCR. • Do not connect A/V connecting cables to [4:3]. Recording/Playback • On some 4:3 TVs, the still image recorded in 4:3 aspect ratio may not appear in 16:9 aspect ratio on the TV ...
Operating Guide
Page 44
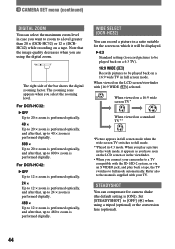
... zooming factor. For DCR-HC32: OFF Up to 20 × zoom is performed optically. 40 × Up to 20 × zoom is performed optically, and after that, up to 40 × zoom is performed digitally. 800 × Up to 20 × zoom is performed optically,...ZOOM You can select the maximum zoom level in case you connect your camcorder to a TV compatible with your TV. When you play back a tape, the TV switches to full mode automatically. When viewed on a standard TV** *Picture appears in full screen mode when the wide-screen TV switches to a level greater than 20 × (DCR-HC32...
... zooming factor. For DCR-HC32: OFF Up to 20 × zoom is performed optically. 40 × Up to 20 × zoom is performed optically, and after that, up to 40 × zoom is performed digitally. 800 × Up to 20 × zoom is performed optically,...ZOOM You can select the maximum zoom level in case you connect your camcorder to a TV compatible with your TV. When you play back a tape, the TV switches to full mode automatically. When viewed on a standard TV** *Picture appears in full screen mode when the wide-screen TV switches to a level greater than 20 × (DCR-HC32...
Operating Guide
Page 50
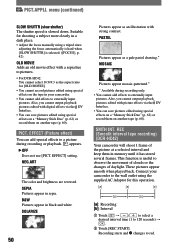
... as a pale pastel drawing.* MOSAIC Pictures appear mosaic-patterned.* * Available during recording or playback. REC (Smooth interval tape recording) (DCR-HC42) Your camcorder will shoot 1 frame of daylight. Recording starts and changes to 120 seconds) . Touch [REC START... • Adjust the focus manually using a tripod since adjusting the focus automatically is hard when [SLOW SHUTTR] is slowed down. Connect your camcorder. • You cannot add effects to externally input pictures. EFFECT (Picture effect) You can add special effects to a picture during ...
... as a pale pastel drawing.* MOSAIC Pictures appear mosaic-patterned.* * Available during recording or playback. REC (Smooth interval tape recording) (DCR-HC42) Your camcorder will shoot 1 frame of daylight. Recording starts and changes to 120 seconds) . Touch [REC START... • Adjust the focus manually using a tripod since adjusting the focus automatically is hard when [SLOW SHUTTR] is slowed down. Connect your camcorder. • You cannot add effects to externally input pictures. EFFECT (Picture effect) You can add special effects to a picture during ...

Operating Guide
Page 52
... picture recorded on the tape on a DVD (Direct Access to "Click to Video CD Burn) using this command. BURN VCD When your camcorder is connected to a personal computer, you can easily burn the picture recorded on the tape on a CD-R (Direct Access to DVD") using this command.... BURN DVD When your camcorder is connected to a Sony VAIO series personal computer, you can play back frame by frame (frame) during frame playback. * Horizontal lines may see mosaic-like images...
... picture recorded on the tape on a DVD (Direct Access to "Click to Video CD Burn) using this command. BURN VCD When your camcorder is connected to a personal computer, you can easily burn the picture recorded on the tape on a CD-R (Direct Access to DVD") using this command.... BURN DVD When your camcorder is connected to a Sony VAIO series personal computer, you can play back frame by frame (frame) during frame playback. * Horizontal lines may see mosaic-like images...
Operating Guide
Page 53
...on one tape, the playback picture may be distorted or the time code may be affected by connecting a microphone (optional). VOLUME See page 23. AUDIO MODE 12BIT Records in the 12-...appear or sound may not be written properly between the scenes. EXT SUR MIC (External surround microphone) (DCR-HC42) WIDE STEREO ( ) Records 2 channel sound with high quality). LCD/VF SET ...not be interrupted when you play back, but cannot record a dual sound track cassette on your camcorder. • The setting returns to play back audio recorded using other basic settings (REC MODE...
...on one tape, the playback picture may be distorted or the time code may be affected by connecting a microphone (optional). VOLUME See page 23. AUDIO MODE 12BIT Records in the 12-...appear or sound may not be written properly between the scenes. EXT SUR MIC (External surround microphone) (DCR-HC42) WIDE STEREO ( ) Records 2 channel sound with high quality). LCD/VF SET ...not be interrupted when you play back, but cannot record a dual sound track cassette on your camcorder. • The setting returns to play back audio recorded using other basic settings (REC MODE...
Operating Guide
Page 54
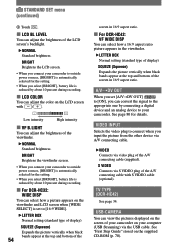
...recording. For DCR-HC32: WIDE DISP You can select how a picture appears on the viewfinder and LCD screen when [WIDE SELECT] is set [A/VDV OUT] ( ) to outside power sources, [BRIGHT] is reduced by connecting a digital device and an analog device to your camcorder to [16:9 WIDE...You can adjust the color on the LCD screen with S VIDEO cable (optional). BRIGHT Brightens the LCD screen. • When you connect your camcorder. TV TYPE (DCR-HC42) See page 34. USB-CAMERA You can select how a 16:9 aspect ratio picture appears in the viewfinder. ...
...recording. For DCR-HC32: WIDE DISP You can select how a picture appears on the viewfinder and LCD screen when [WIDE SELECT] is set [A/VDV OUT] ( ) to outside power sources, [BRIGHT] is reduced by connecting a digital device and an analog device to your camcorder to [16:9 WIDE...You can adjust the color on the LCD screen with S VIDEO cable (optional). BRIGHT Brightens the LCD screen. • When you connect your camcorder. TV TYPE (DCR-HC42) See page 34. USB-CAMERA You can select how a 16:9 aspect ratio picture appears in the viewfinder. ...
Operating Guide
Page 55
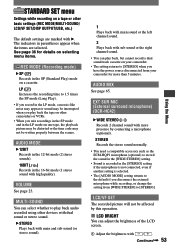
CAMERA DATA (below . • When you set this when you view pictures stored in the same area. This cannot be selected during Easy Handycam operation. 6 0 min 1 0 : 0 0 : 0 0 : 0 0 2 6 5 AUTO 100 AWB F1. 8 9 dB 3 4 SteadyShot off* Exposure* White balance* Gain*... only during recording when you set the POWER switch to PLAY/ EDIT or CAMERA-TAPE with a cassette inserted. • When you connect your camcorder to a PictBridge compliant printer via a USB cable (supplied) (p. 67). STD-USB Displays pictures saved on the "Memory Stick...
CAMERA DATA (below . • When you set this when you view pictures stored in the same area. This cannot be selected during Easy Handycam operation. 6 0 min 1 0 : 0 0 : 0 0 : 0 0 2 6 5 AUTO 100 AWB F1. 8 9 dB 3 4 SteadyShot off* Exposure* White balance* Gain*... only during recording when you set the POWER switch to PLAY/ EDIT or CAMERA-TAPE with a cassette inserted. • When you connect your camcorder to a PictBridge compliant printer via a USB cable (supplied) (p. 67). STD-USB Displays pictures saved on the "Memory Stick...

Operating Guide
Page 56
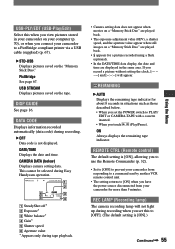
...Portuguese, or Korean. • Traditional Chinese is automatically turned off ) 5 min The camcorder is also available on the LCD screen and in the viewfinder. If you connect your camcorder to a wall outlet, [A.SHUT OFF] is automatically set to be adjusted in Japan (as an... Overseas Model). • Your camcorder offers [ENG[SIMP]] (simplified English) for more than approximately 5...
...Portuguese, or Korean. • Traditional Chinese is automatically turned off ) 5 min The camcorder is also available on the LCD screen and in the viewfinder. If you connect your camcorder to a wall outlet, [A.SHUT OFF] is automatically set to be adjusted in Japan (as an... Overseas Model). • Your camcorder offers [ENG[SIMP]] (simplified English) for more than approximately 5...


