Operating Guide
Page 10
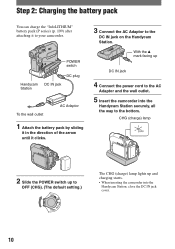
... it clicks. 3 Connect the AC Adaptor to the DC IN jack on the Handycam Station. POWER switch Handycam Station DC plug DC IN jack To the wall outlet AC Adaptor 1 Attach the battery pack by sliding it in the direction of the arrow until it to your camcorder. CHG (charge) lamp 2 ... Connect the power cord to the bottom. With the mark facing up and charging starts. • When inserting the camcorder into the Handycam Station securely, all the way to the AC Adaptor and the wall outlet. 5 Insert the camcorder into the Handycam Station, close the DC IN jack cover. 10
... it clicks. 3 Connect the AC Adaptor to the DC IN jack on the Handycam Station. POWER switch Handycam Station DC plug DC IN jack To the wall outlet AC Adaptor 1 Attach the battery pack by sliding it in the direction of the arrow until it to your camcorder. CHG (charge) lamp 2 ... Connect the power cord to the bottom. With the mark facing up and charging starts. • When inserting the camcorder into the Handycam Station securely, all the way to the AC Adaptor and the wall outlet. 5 Insert the camcorder into the Handycam Station, close the DC IN jack cover. 10
Operating Guide
Page 11
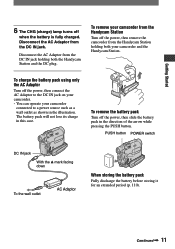
.... To remove the battery pack Turn off the power, then remove the camcorder from the DC IN jack holding both the Handycam Station and the DC plug. Disconnect the AC Adaptor from the Handycam Station holding both your camcorder from the Handycam Station Turn off the power, then slide the battery pack in this case. Disconnect the...
.... To remove the battery pack Turn off the power, then remove the camcorder from the DC IN jack holding both the Handycam Station and the DC plug. Disconnect the AC Adaptor from the Handycam Station holding both your camcorder from the Handycam Station Turn off the power, then slide the battery pack in this case. Disconnect the...
Operating Guide
Page 13
... only.) • The power will not be correctly displayed under which you use your camcorder in a narrow space, such as the AC Adaptor is connected to the DC IN jack of the AC Adaptor or battery terminal with the camcorder at 25 °C (77 °F). (10 to 30 °C (50 °F to 86... (p. 26) will not be supplied from the battery as long as between a wall and furniture. • Do not short-circuit the DC plug of your camcorder or the Handycam Station, even when the power cord is disconnected from the wall outlet. The battery pack is damaged. - This may cause a malfunction. On ...
... only.) • The power will not be correctly displayed under which you use your camcorder in a narrow space, such as the AC Adaptor is connected to the DC IN jack of the AC Adaptor or battery terminal with the camcorder at 25 °C (77 °F). (10 to 30 °C (50 °F to 86... (p. 26) will not be supplied from the battery as long as between a wall and furniture. • Do not short-circuit the DC plug of your camcorder or the Handycam Station, even when the power cord is disconnected from the wall outlet. The battery pack is damaged. - This may cause a malfunction. On ...

Operating Guide
Page 34
...be reproduced more faithfully than with the supplied A/V cable connection. Connect the white and red plugs (left/right audio) and S VIDEO plug (S VIDEO channel) of the TV you will not output audio. For DCR-HC42: To set the aspect ratio according to the connected TV (16:9/4:3) Change the ...manuals supplied with the ID-1/ID-2 system, or via the S VIDEO jack, by using the supplied AC Adaptor for this case, the yellow (standard video) plug connection is connected to a VCR Connect your camcorder to the wall outlet using the A/V connecting cable with an S VIDEO cable (optional), pictures can...
...be reproduced more faithfully than with the supplied A/V cable connection. Connect the white and red plugs (left/right audio) and S VIDEO plug (S VIDEO channel) of the TV you will not output audio. For DCR-HC42: To set the aspect ratio according to the connected TV (16:9/4:3) Change the ...manuals supplied with the ID-1/ID-2 system, or via the S VIDEO jack, by using the supplied AC Adaptor for this case, the yellow (standard video) plug connection is connected to a VCR Connect your camcorder to the wall outlet using the A/V connecting cable with an S VIDEO cable (optional), pictures can...
Operating Guide
Page 59
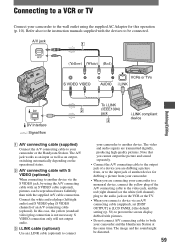
... not connect A/V connecting cables to both your camcorder to connect your camcorder or the Handycam Station. S VIDEO connection only will not output audio. i.LINK cable (optional) Use an i.LINK cable (optional) to a monaural device, connect the yellow plug of an A/V connecting cable (optional). Connect ...jack, and the red (right channel) or the white (left channel) plug to the input jack of another device via the S VIDEO jack, by using the supplied AC Adaptor for dubbing a picture from your camcorder. • When you connect a device via an A/V connecting cable (supplied...
... not connect A/V connecting cables to both your camcorder to connect your camcorder or the Handycam Station. S VIDEO connection only will not output audio. i.LINK cable (optional) Use an i.LINK cable (optional) to a monaural device, connect the yellow plug of an A/V connecting cable (optional). Connect ...jack, and the red (right channel) or the white (left channel) plug to the input jack of another device via the S VIDEO jack, by using the supplied AC Adaptor for dubbing a picture from your camcorder. • When you connect a device via an A/V connecting cable (supplied...
Operating Guide
Page 80
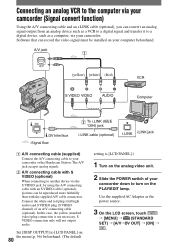
...cable to [LCD PANEL] on the PLAY/EDIT lamp. Connect the white and red plugs (left/right audio) and S VIDEO plug (S VIDEO channel) of your computer beforehand. In this case, the yellow (standard video) plug connection is [LCD PANEL].) 1 Turn on the analog video unit. 2 Slide ...the supplied AC Adaptor as a computer, via the S VIDEO jack, by using the A/V connecting cable with an S VIDEO cable (optional), pictures can record the video signal must be reproduced more faithfully than with S VIDEO (optional) When connecting to another device via your camcorder or the Handycam Station. ...
...cable to [LCD PANEL] on the PLAY/EDIT lamp. Connect the white and red plugs (left/right audio) and S VIDEO plug (S VIDEO channel) of your computer beforehand. In this case, the yellow (standard video) plug connection is [LCD PANEL].) 1 Turn on the analog video unit. 2 Slide ...the supplied AC Adaptor as a computer, via the S VIDEO jack, by using the A/V connecting cable with an S VIDEO cable (optional), pictures can record the video signal must be reproduced more faithfully than with S VIDEO (optional) When connecting to another device via your camcorder or the Handycam Station. ...

Operating Guide
Page 105
... setting of the wall outlet [b]. AC-L25A/L25B [a] [b] On TV color systems Your camcorder is an NTSC systembased camcorder. If you want to the local time by time difference You can use your camcorder in any countries/regions using your camcorder within the AC 100 V to 240 V, 50/60..., Spain, Sweden, Switzerland, Thailand, United Kingdom, etc. M PAL - Additional Information 105 System NTSC PAL PAL - Use a commercially available AC plug adaptor [a], if necessary, depending on a TV, it must be an NTSC system based TV (see the following list) with your camcorder abroad.
... setting of the wall outlet [b]. AC-L25A/L25B [a] [b] On TV color systems Your camcorder is an NTSC systembased camcorder. If you want to the local time by time difference You can use your camcorder in any countries/regions using your camcorder within the AC 100 V to 240 V, 50/60..., Spain, Sweden, Switzerland, Thailand, United Kingdom, etc. M PAL - Additional Information 105 System NTSC PAL PAL - Use a commercially available AC plug adaptor [a], if necessary, depending on a TV, it must be an NTSC system based TV (see the following list) with your camcorder abroad.
Operating Guide
Page 111
...Sometimes this unit) is "S100." If your camcorder gets wet, it may be sure to other i.LINK (DV Interface) compatible devices made by the plug and not the cord. • Do not... Near AM receivers and video equipment. About the required i.LINK cable Use the Sony i.LINK 4-pin-to video devices. The camcorder may occur. - Noise may malfunction. - Near windows or outdoors, where the ... DC 7.2 V (battery pack) or DC 8.4 V (AC Adaptor). • For DC or AC operation, use or store the camcorder and accessories in your camcorder, it may not be repaired. - To use i.LINK...
...Sometimes this unit) is "S100." If your camcorder gets wet, it may be sure to other i.LINK (DV Interface) compatible devices made by the plug and not the cord. • Do not... Near AM receivers and video equipment. About the required i.LINK cable Use the Sony i.LINK 4-pin-to video devices. The camcorder may occur. - Noise may malfunction. - Near windows or outdoors, where the ... DC 7.2 V (battery pack) or DC 8.4 V (AC Adaptor). • For DC or AC operation, use or store the camcorder and accessories in your camcorder, it may not be repaired. - To use i.LINK...
Operating Guide
Page 119
...A/V jack 34, 59, 63, 80 Access lamp 18 Active Interface Shoe........... 69 AC Adaptor 9 Adjusting exposure for back light 88 ALL ERASE 47 Aspect ratio 19 AUDIO...TIME 55 DC IN jack 10 DC plug 10 Delete picture 65 DEMO MODE 51, 82 DIGITAL ZOOM........... 44, 88 Direct Access to "...Click to DVD See Click to DVD Display guide 16 Display indicators 28 DISP/BATT INFO button .... 26 DISP OUTPUT 56 DOT FADER 48 Double speed Playback ........ 52 Dubbing 60 DV Interface 59, 77 D. EFFECT (Digital effect 49, 92 E EASY button 20 Easy Handycam 20...
...A/V jack 34, 59, 63, 80 Access lamp 18 Active Interface Shoe........... 69 AC Adaptor 9 Adjusting exposure for back light 88 ALL ERASE 47 Aspect ratio 19 AUDIO...TIME 55 DC IN jack 10 DC plug 10 Delete picture 65 DEMO MODE 51, 82 DIGITAL ZOOM........... 44, 88 Direct Access to "...Click to DVD See Click to DVD Display guide 16 Display indicators 28 DISP/BATT INFO button .... 26 DISP OUTPUT 56 DOT FADER 48 Double speed Playback ........ 52 Dubbing 60 DV Interface 59, 77 D. EFFECT (Digital effect 49, 92 E EASY button 20 Easy Handycam 20...


