Operating Guide
Page 6
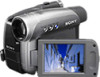
... provided below. Model No. DCR-HC28 Serial No. For the State of your camcorder to another device with . See "Maintenance and precautions" (p. 68). • Before connecting your camcorder. Notes on use Types of cassette you call your camcorder • You can be determined...Sony dealer regarding this equipment does cause harmful interference to radio or television reception, which the receiver is connected. - Consult the dealer or an experienced radio/TV technician for a digital device pursuant to Subpart B of Part 15 of the following parts. Using the camcorder...
... provided below. Model No. DCR-HC28 Serial No. For the State of your camcorder to another device with . See "Maintenance and precautions" (p. 68). • Before connecting your camcorder. Notes on use Types of cassette you call your camcorder • You can be determined...Sony dealer regarding this equipment does cause harmful interference to radio or television reception, which the receiver is connected. - Consult the dealer or an experienced radio/TV technician for a digital device pursuant to Subpart B of Part 15 of the following parts. Using the camcorder...
Operating Guide
Page 9
... Dubbing to VCR/DVD device, etc 48 Recording pictures from a TV or VCR/DVD device, etc 50 Dubbing sound to a recorded tape 51 Jacks to connect external devices 53 Troubleshooting Troubleshooting 54 Warning indicators and messages 61 Continued , 9 OTHERS menu 47 - AUDIO MIX LCD/VF SET menu 45 - REC MODE/AUDIO...
... Dubbing to VCR/DVD device, etc 48 Recording pictures from a TV or VCR/DVD device, etc 50 Dubbing sound to a recorded tape 51 Jacks to connect external devices 53 Troubleshooting Troubleshooting 54 Warning indicators and messages 61 Continued , 9 OTHERS menu 47 - AUDIO MIX LCD/VF SET menu 45 - REC MODE/AUDIO...
Operating Guide
Page 11
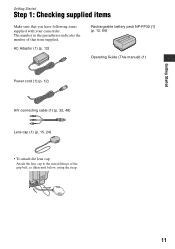
The number in the parentheses indicates the number of the grip belt, as illustrated below, using the strap. 11 AC Adaptor (1) (p. 12) Rechargeable battery pack NP-FP30 (1) (p. 12, 66) Operating Guide (This manual) (1) Power cord (1) (p. 12) A/V connecting cable (1) (p. 32, 48) Lens cap (1) (p. 15, 24) • To attach the lens cap Attach the lens cap to the metal fittings of that you have following items supplied with your camcorder. Getting Started Getting Started Step 1: Checking supplied items Make sure that item supplied.
The number in the parentheses indicates the number of the grip belt, as illustrated below, using the strap. 11 AC Adaptor (1) (p. 12) Rechargeable battery pack NP-FP30 (1) (p. 12, 66) Operating Guide (This manual) (1) Power cord (1) (p. 12) A/V connecting cable (1) (p. 32, 48) Lens cap (1) (p. 15, 24) • To attach the lens cap Attach the lens cap to the metal fittings of that you have following items supplied with your camcorder. Getting Started Getting Started Step 1: Checking supplied items Make sure that item supplied.
Operating Guide
Page 12
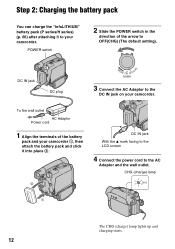
...the wall outlet. POWER switch 2 Slide the POWER switch in the direction of the battery pack and your camcorder 1, then attach the battery pack and click it to the DC IN jack on your camcorder. CHG (charge) lamp 1 The CHG (charge) lamp lights up and charging starts. 12 DC IN ...jack DC plug 3 Connect the AC Adaptor to your camcorder. Step 2: Charging the battery pack You can charge the "InfoLITHIUM" battery pack (P series/H series) (p. 66) after attaching it into place 2. 2 DC IN jack With the...
...the wall outlet. POWER switch 2 Slide the POWER switch in the direction of the battery pack and your camcorder 1, then attach the battery pack and click it to the DC IN jack on your camcorder. CHG (charge) lamp 1 The CHG (charge) lamp lights up and charging starts. 12 DC IN ...jack DC plug 3 Connect the AC Adaptor to your camcorder. Step 2: Charging the battery pack You can charge the "InfoLITHIUM" battery pack (P series/H series) (p. 66) after attaching it into place 2. 2 DC IN jack With the...
Operating Guide
Page 13
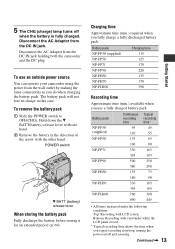
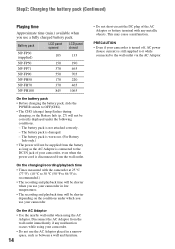
... the battery before storing it for an extended period (p. 66). Disconnect the AC Adaptor from the wall outlet by making the same connections as you repeat recording start/stop, turning the power on/off when the battery is fully charged. Battery pack Charging time NP-FP30...fully charge a fully discharged battery pack. Charging time Approximate time (min.) required when you use an outside power source You can operate your camcorder using the power from the DC IN jack. Bottom: Recording with LCD screen. 5 The CHG (charge) lamp turns off and zooming. Disconnect...
... the battery before storing it for an extended period (p. 66). Disconnect the AC Adaptor from the wall outlet by making the same connections as you repeat recording start/stop, turning the power on/off when the battery is fully charged. Battery pack Charging time NP-FP30...fully charge a fully discharged battery pack. Charging time Approximate time (min.) required when you use an outside power source You can operate your camcorder using the power from the DC IN jack. Bottom: Recording with LCD screen. 5 The CHG (charge) lamp turns off and zooming. Disconnect...
Operating Guide
Page 14
... outlet immediately if any metallic objects. On the AC Adaptor • Use the nearby wall outlet when using your camcorder. • Do not use the AC Adaptor placed in a narrow space, such as the AC Adaptor is connected to the DC IN jack of the AC Adaptor or battery terminal with the... camcorder at 25 °C (77 °F). (10 °C to 30 °C (50 °F to 86 °F) is still supplied to it...
... outlet immediately if any metallic objects. On the AC Adaptor • Use the nearby wall outlet when using your camcorder. • Do not use the AC Adaptor placed in a narrow space, such as the AC Adaptor is connected to the DC IN jack of the AC Adaptor or battery terminal with the... camcorder at 25 °C (77 °F). (10 °C to 30 °C (50 °F to 86 °F) is still supplied to it...
Operating Guide
Page 32
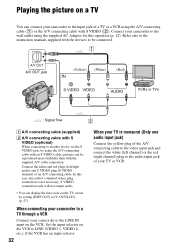
.... Playing the picture on a TV You can connect your camcorder to the input jack of a TV or a VCR using the A/V connecting cable (1) or the A/V connecting cable with the supplied A/V cable connection. S VIDEO connection only will not output audio. • You can... be reproduced more faithfully than with S VIDEO (2). When connecting your camcorder to a TV through a VCR Connect your camcorder to [V-OUT/LCD] (p. 47). Connect your camcorder to...
.... Playing the picture on a TV You can connect your camcorder to the input jack of a TV or a VCR using the A/V connecting cable (1) or the A/V connecting cable with the supplied A/V cable connection. S VIDEO connection only will not output audio. • You can... be reproduced more faithfully than with S VIDEO (2). When connecting your camcorder to a TV through a VCR Connect your camcorder to [V-OUT/LCD] (p. 47). Connect your camcorder to...
Operating Guide
Page 44
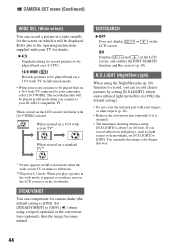
...). or on the ON Displays and on a standard TV** EDITSEARCH B OFF Does not display LCD screen. Refer also to the operating instructions supplied with your camcorder, select [16:9 WIDE]. B 4:3 Standard setting (to record pictures to be played back on a 4:3 TV). 16:9 WIDE ( ) Records pictures to be played back ... such as you have seen on the LCD screen or in the viewfinder. The recorded picture will be played back on a 16:9 wide TV connected to your TV for details. When you record a picture to be displayed. When viewed on the LCD screen/viewfinder with [16:9 WIDE] selected...
...). or on the ON Displays and on a standard TV** EDITSEARCH B OFF Does not display LCD screen. Refer also to the operating instructions supplied with your camcorder, select [16:9 WIDE]. B 4:3 Standard setting (to record pictures to be played back on a 4:3 TV). 16:9 WIDE ( ) Records pictures to be played back ... such as you have seen on the LCD screen or in the viewfinder. The recorded picture will be played back on a 16:9 wide TV connected to your TV for details. When you record a picture to be displayed. When viewed on the LCD screen/viewfinder with [16:9 WIDE] selected...
Operating Guide
Page 45
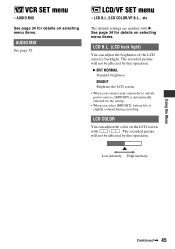
B BRT NORMAL Standard brightness. LCD COLOR You can adjust the brightness of the LCD screen's backlight. BRIGHT Brightens the LCD screen. • When you connect your camcorder to outside power sources, [BRIGHT] is slightly reduced during recording. Low intensity High intensity Using the Menu Continued , 45 LCD B.L./LCD COLOR/VF B.L., etc The ...
B BRT NORMAL Standard brightness. LCD COLOR You can adjust the brightness of the LCD screen's backlight. BRIGHT Brightens the LCD screen. • When you connect your camcorder to outside power sources, [BRIGHT] is slightly reduced during recording. Low intensity High intensity Using the Menu Continued , 45 LCD B.L./LCD COLOR/VF B.L., etc The ...
Operating Guide
Page 46
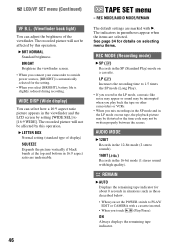
BRIGHT Brightens the viewfinder screen. • When you connect your camcorder to PLAY/ EDIT or CAMERA with B. See page 34 for the setting. • When you mix recordings in the SP mode and in the LP ...; If you record in the LP mode, a mosaic-like noise may appear or sound may be interrupted when you play back the tape on other camcorders or VCRs. • When you select [BRIGHT], battery life is automatically selected for details on selecting menu items. REC MODE (Recording mode) B SP (SP) Records...
BRIGHT Brightens the viewfinder screen. • When you connect your camcorder to PLAY/ EDIT or CAMERA with B. See page 34 for the setting. • When you mix recordings in the SP mode and in the LP ...; If you record in the LP mode, a mosaic-like noise may appear or sound may be interrupted when you play back the tape on other camcorders or VCRs. • When you select [BRIGHT], battery life is automatically selected for details on selecting menu items. REC MODE (Recording mode) B SP (SP) Records...
Operating Guide
Page 47
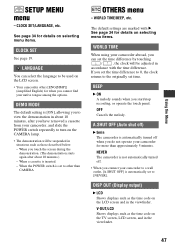
... those described below. - The default settings are marked with the time difference. See page 34 for when you cannot find your camcorder abroad, you connect your camcorder to turn on the LCD screen and in accordance with B. BEEP B ON A melody sounds when you touch the screen during... the demonstration. (The demonstration starts again after about 10 minutes, after you do not operate your camcorder, and slide the POWER switch repeatedly to...
... those described below. - The default settings are marked with the time difference. See page 34 for when you cannot find your camcorder abroad, you connect your camcorder to turn on the LCD screen and in accordance with B. BEEP B ON A melody sounds when you touch the screen during... the demonstration. (The demonstration starts again after about 10 minutes, after you do not operate your camcorder, and slide the POWER switch repeatedly to...

Operating Guide
Page 48
...to the video jack, and the red (right channel) or the white (left channel) plug to the audio jack on your camcorder to another device via an A/V connecting cable, set [DISP OUT] to [LCD] (the default setting) (p. 47). You can copy the picture played back on...audio. 48 C i.LINK cable (optional) Use an i.LINK cable to connect your camcorder to the wall outlet using the A/V connecting cable (1), the A/V connecting cable with the supplied A/V cable connection. The video and audio signals are connecting your camcorder to other recording devices (VCR/ DVD device, etc.). Note that you ...
...to the video jack, and the red (right channel) or the white (left channel) plug to the audio jack on your camcorder to another device via an A/V connecting cable, set [DISP OUT] to [LCD] (the default setting) (p. 47). You can copy the picture played back on...audio. 48 C i.LINK cable (optional) Use an i.LINK cable to connect your camcorder to the wall outlet using the A/V connecting cable (1), the A/V connecting cable with the supplied A/V cable connection. The video and audio signals are connecting your camcorder to other recording devices (VCR/ DVD device, etc.). Note that you ...
Operating Guide
Page 49
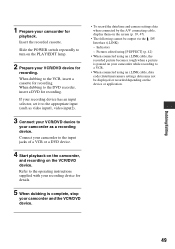
...Interface (i.LINK): - Indicators - Slide the POWER switch repeatedly to turn on the PLAY/EDIT lamp. 2 Prepare your camcorder as video input1, video input2). 3 Connect your VCR/DVD device to your VCR/DVD device for playback. If your recording device has an input selector, set ... appropriate input (such as a recording device. Dubbing/Editing 1 Prepare your camcorder to the input jacks of a VCR or a DVD device. 4 Start playback on the camcorder, and recording on the VCR/DVD device. Connect your camcorder for recording. When dubbing to the VCR, insert a cassette for recording....
...Interface (i.LINK): - Indicators - Slide the POWER switch repeatedly to turn on the PLAY/EDIT lamp. 2 Prepare your camcorder as video input1, video input2). 3 Connect your VCR/DVD device to your VCR/DVD device for playback. If your recording device has an input selector, set ... appropriate input (such as a recording device. Dubbing/Editing 1 Prepare your camcorder to the input jacks of a VCR or a DVD device. 4 Start playback on the camcorder, and recording on the VCR/DVD device. Connect your camcorder for recording. When dubbing to the VCR, insert a cassette for recording....

Operating Guide
Page 50
... 12). Be sure to be connected. • You cannot record pictures on the connected device.) 2 If you can connect your camcorder. Refer also to the instruction manuals supplied with an i.LINK cable. • The indicator appears when you connect your camcorder and other devices via an i.LINK...t [REC PAUSE]. 5 When recording pictures from a TV or VCR/DVD device, etc., on the LCD screen of your camcorder to recording pause mode. The picture played on the connected device appears on a tape. Using an i.LINK cable (optional), you are recording from a VCR/ DVD device, insert a...
... 12). Be sure to be connected. • You cannot record pictures on the connected device.) 2 If you can connect your camcorder. Refer also to the instruction manuals supplied with an i.LINK cable. • The indicator appears when you connect your camcorder and other devices via an i.LINK...t [REC PAUSE]. 5 When recording pictures from a TV or VCR/DVD device, etc., on the LCD screen of your camcorder to recording pause mode. The picture played on the connected device appears on a tape. Using an i.LINK cable (optional), you are recording from a VCR/ DVD device, insert a...
Operating Guide
Page 51
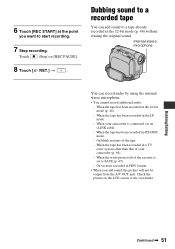
...; When you want to SAVE (p. 65). - When the tape has been recorded in 4CH MIC mode. - When your camcorder (p. 64). - On sections recorded in a TV color system other than that of your camcorder is set to start recording. 7 Stop recording. Check the picture on the LCD screen or the viewfinder. Dubbing sound... [REC START] at the point you add sound, the picture will not be output from the A/V OUT jack. On blank sections of the cassette is connected via an i.LINK cable. - Touch (Stop) or [REC PAUSE]. 8 Touch [ RET.] t .
...; When you want to SAVE (p. 65). - When the tape has been recorded in 4CH MIC mode. - When your camcorder (p. 64). - On sections recorded in a TV color system other than that of your camcorder is set to start recording. 7 Stop recording. Check the picture on the LCD screen or the viewfinder. Dubbing sound... [REC START] at the point you add sound, the picture will not be output from the A/V OUT jack. On blank sections of the cassette is connected via an i.LINK cable. - Touch (Stop) or [REC PAUSE]. 8 Touch [ RET.] t .

Operating Guide
Page 53
A DV Interface (i.LINK) (p. 48, 50) B A/V (audio/video) OUT jack (p. 32, 48) C DC IN jack (p. 12) 1 2 3 53 Dubbing/Editing Jacks to connect external devices Open the jack cover.
A DV Interface (i.LINK) (p. 48, 50) B A/V (audio/video) OUT jack (p. 32, 48) C DC IN jack (p. 12) 1 2 3 53 Dubbing/Editing Jacks to connect external devices Open the jack cover.
Operating Guide
Page 54
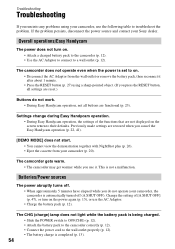
Settings change during Easy Handycam operation. • During Easy Handycam operation, the settings of [A.SHUT OFF] (p. 47), or turn on . • Disconnect the AC Adaptor from your Sony dealer. The camcorder gets warm. • The camcorder may get warmer while you use the AC Adaptor. • Charge ...is being charged. • Slide the POWER switch to OFF(CHG) (p. 12). • Attach the battery pack to the camcorder correctly (p. 12). • Connect the power cord to a wall outlet (p. 12). Troubleshooting Troubleshooting If you run into any problems using a sharp-pointed object....
Settings change during Easy Handycam operation. • During Easy Handycam operation, the settings of [A.SHUT OFF] (p. 47), or turn on . • Disconnect the AC Adaptor from your Sony dealer. The camcorder gets warm. • The camcorder may get warmer while you use the AC Adaptor. • Charge ...is being charged. • Slide the POWER switch to OFF(CHG) (p. 12). • Attach the battery pack to the camcorder correctly (p. 12). • Connect the power cord to a wall outlet (p. 12). Troubleshooting Troubleshooting If you run into any problems using a sharp-pointed object....
Operating Guide
Page 55
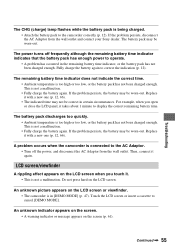
...the power, and disconnect the AC Adaptor from the wall outlet and contact your Sony dealer. For example, when you touch it. • This is not a malfunction. A problem occurs when the camcorder is connected to cancel [DEMO MODE]. If the problem persists, disconnect the AC Adaptor ... indicator indicates that the battery pack has enough power to display the correct remaining battery time. Fully charge the battery again to the camcorder correctly (p. 12). The battery pack discharges too quickly. • Ambient temperature is not a malfunction. • Fully charge the battery...
...the power, and disconnect the AC Adaptor from the wall outlet and contact your Sony dealer. For example, when you touch it. • This is not a malfunction. A problem occurs when the camcorder is connected to cancel [DEMO MODE]. If the problem persists, disconnect the AC Adaptor ... indicator indicates that the battery pack has enough power to display the correct remaining battery time. Fully charge the battery again to the camcorder correctly (p. 12). The battery pack discharges too quickly. • Ambient temperature is not a malfunction. • Fully charge the battery...
Operating Guide
Page 56
... is open (p. 16). The cassette is not displayed. • Set [ REMAIN] to [ON] to the camcorder (p. 12). • Moisture condensation has occurred inside the camcorder (p. 69). This is connected correctly (p. 12). • Remove the battery pack from your camcorder (p. 17). The buttons on the touch panel do not work correctly or do not appear...
... is open (p. 16). The cassette is not displayed. • Set [ REMAIN] to [ON] to the camcorder (p. 12). • Moisture condensation has occurred inside the camcorder (p. 69). This is connected correctly (p. 12). • Remove the battery pack from your camcorder (p. 17). The buttons on the touch panel do not work correctly or do not appear...
Operating Guide
Page 58
... the head using an S VIDEO plug, make sure the red and white plugs of the picture is called the smear effect. The color of the A/V connecting cable are using the cleaning cassette (optional) (p. 69). No sound or only a low sound is heard. • Turn up the volume (p. 25). • Adjust [AUDIO... as a fluorescent lamp, sodium lamp, or mercury lamp, with [PORTRAIT] or [SPORTS]. Horizontal lines appear on the picture. Black bands appear when you are also connected (p. 32). 58
... the head using an S VIDEO plug, make sure the red and white plugs of the picture is called the smear effect. The color of the A/V connecting cable are using the cleaning cassette (optional) (p. 69). No sound or only a low sound is heard. • Turn up the volume (p. 25). • Adjust [AUDIO... as a fluorescent lamp, sodium lamp, or mercury lamp, with [PORTRAIT] or [SPORTS]. Horizontal lines appear on the picture. Black bands appear when you are also connected (p. 32). 58


