Operating Guide
Page 6
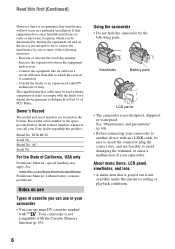
...of your Sony dealer regarding this first (Continued) However, there is no guarantee that is grayed out is not available under the current recording or playback conditions. 6 Increase the separation between the equipment and receiver. - Model No. Viewfinder Battery pack LCD panel • The camcorder is not.... Refer to these numbers whenever you can use in your camcorder to another device with an i.LINK cable, be used with the limits for help. DCR-HC28 Serial No. Using the camcorder • Do not hold the camcorder by one or more of California, USA only Perchlorate Material ...
...of your Sony dealer regarding this first (Continued) However, there is no guarantee that is grayed out is not available under the current recording or playback conditions. 6 Increase the separation between the equipment and receiver. - Model No. Viewfinder Battery pack LCD panel • The camcorder is not.... Refer to these numbers whenever you can use in your camcorder to another device with an i.LINK cable, be used with the limits for help. DCR-HC28 Serial No. Using the camcorder • Do not hold the camcorder by one or more of California, USA only Perchlorate Material ...
Operating Guide
Page 7
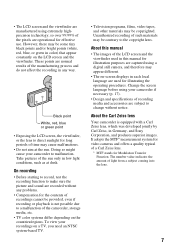
.... About the Carl Zeiss lens Your camcorder is not possible due to a malfunction of the camcorder, storage media, etc. • TV color systems differ depending on -screen displays in Germany, and Sony Corporation, and produces superior images. To view your recordings on the LCD screen and the viewfinder...to make sure the picture and sound are subject to the copyright laws. Change the screen language before using your camcorder to direct sunlight for long periods of recordings cannot be some tiny black points and/or bright points (white, red, blue, or green in any problems....
.... About the Carl Zeiss lens Your camcorder is not possible due to a malfunction of the camcorder, storage media, etc. • TV color systems differ depending on -screen displays in Germany, and Sony Corporation, and produces superior images. To view your recordings on the LCD screen and the viewfinder...to make sure the picture and sound are subject to the copyright laws. Change the screen language before using your camcorder to direct sunlight for long periods of recordings cannot be some tiny black points and/or bright points (white, red, blue, or green in any problems....
Operating Guide
Page 8
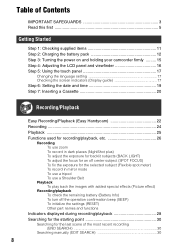
...camcorder firmly ......... 15 Step 4: Adjusting the LCD panel and viewfinder 16 Step 5: Using the touch panel 17 Changing the language setting 17 Checking the screen indicators (Display guide 17 Step 6: Setting the date and time 19 Step 7: Inserting a Cassette 20 Recording/Playback Easy Recording/Playback (Easy Handycam 22 Recording... 24 Playback 25 Functions used for recording/playback, etc 26 Recording To use zoom To record in dark places (NightShot plus) To adjust the...
...camcorder firmly ......... 15 Step 4: Adjusting the LCD panel and viewfinder 16 Step 5: Using the touch panel 17 Changing the language setting 17 Checking the screen indicators (Display guide 17 Step 6: Setting the date and time 19 Step 7: Inserting a Cassette 20 Recording/Playback Easy Recording/Playback (Easy Handycam 22 Recording... 24 Playback 25 Functions used for recording/playback, etc 26 Recording To use zoom To record in dark places (NightShot plus) To adjust the...
Operating Guide
Page 9
... SET menu 43 - VCR SET menu 45 - Dubbing/Editing Dubbing to VCR/DVD device, etc 48 Recording pictures from a TV or VCR/DVD device, etc 50 Dubbing sound to a recorded tape 51 Jacks to connect external devices 53 Troubleshooting Troubleshooting 54 Warning indicators and messages 61 Continued , 9... LCD B.L./LCD COLOR/VF B.L., etc TAPE SET menu 46 - OTHERS menu 47 - D ZOOM/WIDE SEL/STEADYSHOT, etc. Reviewing the most recently recorded scenes (Rec review 31 Playing the picture on a TV 32 Using the Menu Using the menu items 34 Operation button items 36 Menu items 41...
... SET menu 43 - VCR SET menu 45 - Dubbing/Editing Dubbing to VCR/DVD device, etc 48 Recording pictures from a TV or VCR/DVD device, etc 50 Dubbing sound to a recorded tape 51 Jacks to connect external devices 53 Troubleshooting Troubleshooting 54 Warning indicators and messages 61 Continued , 9... LCD B.L./LCD COLOR/VF B.L., etc TAPE SET menu 46 - OTHERS menu 47 - D ZOOM/WIDE SEL/STEADYSHOT, etc. Reviewing the most recently recorded scenes (Rec review 31 Playing the picture on a TV 32 Using the Menu Using the menu items 34 Operation button items 36 Menu items 41...
Operating Guide
Page 13
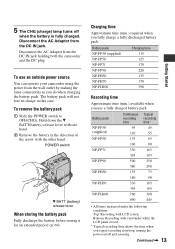
...125 NP-FP71 170 NP-FP90 220 NP-FH50 135 NP-FH70 170 NP-FH100 390 Recording time Approximate time (min.) available when you use an outside power source You can operate your camcorder using the power from the wall outlet by making the same connections as you do ...NP-FH100 395 195 760 380 890 445 • All times measured under the following conditions: Top: Recording with the other hand. Bottom: Recording with viewfinder while the LCD panel closed. * Typical recording time shows the time when you fully charge a fully discharged battery pack. Disconnect the AC Adaptor from...
...125 NP-FP71 170 NP-FP90 220 NP-FH50 135 NP-FH70 170 NP-FH100 390 Recording time Approximate time (min.) available when you use an outside power source You can operate your camcorder using the power from the wall outlet by making the same connections as you do ...NP-FH100 395 195 760 380 890 445 • All times measured under the following conditions: Top: Recording with the other hand. Bottom: Recording with viewfinder while the LCD panel closed. * Typical recording time shows the time when you fully charge a fully discharged battery pack. Disconnect the AC Adaptor from...
Operating Guide
Page 14
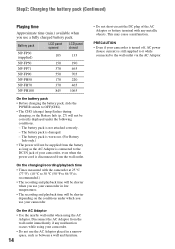
...off, AC power (house current) is still supplied to it while connected to 86 °F) is recommended.) • The recording and playback time will be shorter when you use your camcorder in a narrow space, such as the AC Adaptor is connected to OFF(CHG). • The CHG (charge) lamp flashes... the battery pack • Before changing the battery pack, slide the POWER switch to the DC IN jack of your camcorder. • Do not use the AC Adaptor placed in low temperatures. • The recording and playback time will be shorter depending on the conditions under the following conditions. -
...off, AC power (house current) is still supplied to it while connected to 86 °F) is recommended.) • The recording and playback time will be shorter when you use your camcorder in a narrow space, such as the AC Adaptor is connected to OFF(CHG). • The CHG (charge) lamp flashes... the battery pack • Before changing the battery pack, slide the POWER switch to the DC IN jack of your camcorder. • Do not use the AC Adaptor placed in low temperatures. • The recording and playback time will be shorter depending on the conditions under the following conditions. -
Operating Guide
Page 15
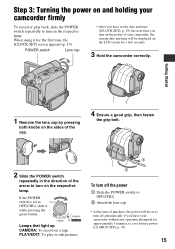
...the arrow to turn off the power 1 Slide the POWER switch to OFF(CHG). 2 Attach the lens cap. • At the time of your camcorder without any operation attempted for approximately 5 minutes, to save battery power ([A.SHUT OFF], p. 47). 15 If the POWER switch is set to OFF(CHG...and time ([CLOCK SET], p. 19), the next time you leave your camcorder, the current date and time will be displayed on the LCD screen for a few seconds. 3 Hold the camcorder correctly. Step 3: Turning the power on and holding your camcorder firmly To record or play or edit pictures. 4 1 2 3 To turn off ...
...the arrow to turn off the power 1 Slide the POWER switch to OFF(CHG). 2 Attach the lens cap. • At the time of your camcorder without any operation attempted for approximately 5 minutes, to save battery power ([A.SHUT OFF], p. 47). 15 If the POWER switch is set to OFF(CHG...and time ([CLOCK SET], p. 19), the next time you leave your camcorder, the current date and time will be displayed on the LCD screen for a few seconds. 3 Hold the camcorder correctly. Step 3: Turning the power on and holding your camcorder firmly To record or play or edit pictures. 4 1 2 3 To turn off ...
Operating Guide
Page 16
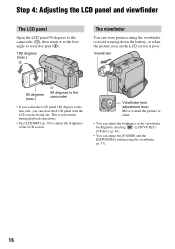
.../VF SET) - [VF B.L.] (p. 46). • You can view pictures using the viewfinder (p. 37). 16 Viewfinder 90 degrees (max.) 1 90 degrees to the camcorder • If you can close the LCD panel with the LCD screen facing out. Step 4: Adjusting the LCD panel and viewfinder The LCD panel Open...the picture is clear. • You can adjust the brightness of the LCD screen. Viewfinder lens adjustment lever Move it to the best angle to record or play (2). 180 degrees (max.) 2 The viewfinder You can adjust the [FADER] and the [EXPOSURE] setting using the viewfinder to avoid wearing...
.../VF SET) - [VF B.L.] (p. 46). • You can view pictures using the viewfinder (p. 37). 16 Viewfinder 90 degrees (max.) 1 90 degrees to the camcorder • If you can close the LCD panel with the LCD screen facing out. Step 4: Adjusting the LCD panel and viewfinder The LCD panel Open...the picture is clear. • You can adjust the brightness of the LCD screen. Viewfinder lens adjustment lever Move it to the best angle to record or play (2). 180 degrees (max.) 2 The viewfinder You can adjust the [FADER] and the [EXPOSURE] setting using the viewfinder to avoid wearing...

Operating Guide
Page 17
...] on -screen displays to support it. Getting Started Step 5: Using the touch panel You can play back recorded pictures (p. 25), or change the on the (SETUP MENU) (p. 34, 47). These dots are not recorded. Changing the language setting You can easily check the meaning of each indicator (p. 29) that appears on the...
...] on -screen displays to support it. Getting Started Step 5: Using the touch panel You can play back recorded pictures (p. 25), or change the on the (SETUP MENU) (p. 34, 47). These dots are not recorded. Changing the language setting You can easily check the meaning of each indicator (p. 29) that appears on the...

Operating Guide
Page 19
... first time. The clock starts. • The date and time are not displayed while recording, but they are automatically recorded on your camcorder or change the POWER switch position. • If you do not use your camcorder for the first time. 1 Touch t [MENU]. SETUP MENU CLOCK SET LANGUAGE DEMO MODE... with / , then touch [EXEC]. Step 6: Setting the date and time Getting Started Set the date and time when using this camcorder for [DATA CODE] (During Easy Handycam operation, you can set only [DATE/TIME])). For midday, set any year up to 12:00 PM. For midnight, set the date...
... first time. The clock starts. • The date and time are not displayed while recording, but they are automatically recorded on your camcorder or change the POWER switch position. • If you do not use your camcorder for the first time. 1 Touch t [MENU]. SETUP MENU CLOCK SET LANGUAGE DEMO MODE... with / , then touch [EXEC]. Step 6: Setting the date and time Getting Started Set the date and time when using this camcorder for [DATA CODE] (During Easy Handycam operation, you can set only [DATE/TIME])). For midday, set any year up to 12:00 PM. For midnight, set the date...
Operating Guide
Page 20
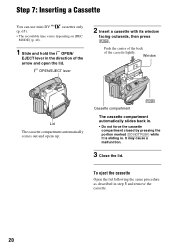
.... 20 Window Lid The cassette compartment automatically comes out and opens up. Step 7: Inserting a Cassette You can use mini DV cassettes only (p. 65). • The recordable time varies depending on [REC MODE] (p. 46). 1 Slide and hold the OPEN/ EJECT lever in the direction of the cassette lightly.
.... 20 Window Lid The cassette compartment automatically comes out and opens up. Step 7: Inserting a Cassette You can use mini DV cassettes only (p. 65). • The recordable time varies depending on [REC MODE] (p. 46). 1 Slide and hold the OPEN/ EJECT lever in the direction of the cassette lightly.
Operating Guide
Page 22
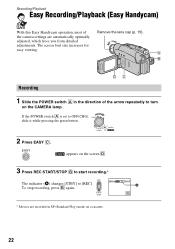
... on a cassette. 22 The screen font size increases for easy viewing. Recording/Playback Easy Recording/Playback (Easy Handycam) With this Easy Handycam operation, most of the arrow repeatedly to [REC]. the camera settings are recorded in the direction of Remove the lens cap (p. 15). A B DC Recording 1 Slide the POWER switch A in SP (Standard Play) mode on...
... on a cassette. 22 The screen font size increases for easy viewing. Recording/Playback Easy Recording/Playback (Easy Handycam) With this Easy Handycam operation, most of the arrow repeatedly to [REC]. the camera settings are recorded in the direction of Remove the lens cap (p. 15). A B DC Recording 1 Slide the POWER switch A in SP (Standard Play) mode on...
Operating Guide
Page 23
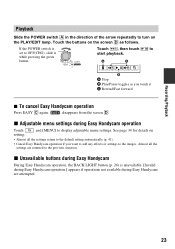
...slide it C Rewind/Fast forward x To cancel Easy Handycam operation Press EASY C again. If the POWER switch is unavailable. [Invalid during Easy Handycam operation.] appears if operations not available during Easy Handycam operation Touch and [MENU] to start playback. Touch ,...x Adjustable menu settings during Easy Handycam are returned to the default setting automatically (p. 41). • Cancel Easy Handycam operation if you touch it while pressing the green button. A C B A Stop B Play/Pause toggles as follows. Recording/Playback Playback Slide the POWER switch...
...slide it C Rewind/Fast forward x To cancel Easy Handycam operation Press EASY C again. If the POWER switch is unavailable. [Invalid during Easy Handycam operation.] appears if operations not available during Easy Handycam operation Touch and [MENU] to start playback. Touch ,...x Adjustable menu settings during Easy Handycam are returned to the default setting automatically (p. 41). • Cancel Easy Handycam operation if you touch it while pressing the green button. A C B A Stop B Play/Pause toggles as follows. Recording/Playback Playback Slide the POWER switch...

Operating Guide
Page 24
The indicator (A) changes [STBY] to start recording. If the POWER switch is set to OFF(CHG), slide it while pressing the green button. 2 Press REC START/STOP to [REC]. Recording Lens cap Remove the lens cap by pressing both knobs on the sides of the cap POWER switch REC START/ STOP 1 Slide the POWER switch in the direction of the arrow repeatedly to turn on the CAMERA lamp. A To stop movie recording Press REC START/STOP again. 24
The indicator (A) changes [STBY] to start recording. If the POWER switch is set to OFF(CHG), slide it while pressing the green button. 2 Press REC START/STOP to [REC]. Recording Lens cap Remove the lens cap by pressing both knobs on the sides of the cap POWER switch REC START/ STOP 1 Slide the POWER switch in the direction of the arrow repeatedly to turn on the CAMERA lamp. A To stop movie recording Press REC START/STOP again. 24

Operating Guide
Page 25
... than 3 minutes. C Rewind/Fast forward to start To adjust the volume Touch t [PAGE1] t [VOL], then / to turn on the PLAY/EDIT lamp. 2 Start playing back. Recording/Playback Playback 1 Slide the POWER switch in various modes ([V SPD PLAY], p. 40). 25 A C B A Stop B Play/Pause toggles as you touch it • Playback automatically stops...
... than 3 minutes. C Rewind/Fast forward to start To adjust the volume Touch t [PAGE1] t [VOL], then / to turn on the PLAY/EDIT lamp. 2 Start playing back. Recording/Playback Playback 1 Slide the POWER switch in various modes ([V SPD PLAY], p. 40). 25 A C B A Stop B Play/Pause toggles as you touch it • Playback automatically stops...
Operating Guide
Page 26
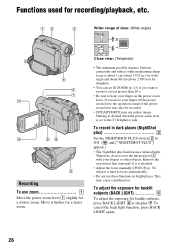
Close view: (Telephoto) • The minimum possible distance between camcorder and subject while maintaining sharp focus is set [D ZOOM] (p.... when it further for a faster zoom. To cancel the back light function, press BACK LIGHT again. 26 To record in dark places (NightShot plus 2 Set the NIGHTSHOT PLUS switch 2 to display .. This may not reduce image ... off the power zoom lever, the operation sound of view: (Wide angle) 5 qa 4 6 7 q; 98 qs Recording To use these functions in bright places. Move it is hard to the T (Telephoto) side. To adjust the exposure for...
Close view: (Telephoto) • The minimum possible distance between camcorder and subject while maintaining sharp focus is set [D ZOOM] (p.... when it further for a faster zoom. To cancel the back light function, press BACK LIGHT again. 26 To record in dark places (NightShot plus 2 Set the NIGHTSHOT PLUS switch 2 to display .. This may not reduce image ... off the power zoom lever, the operation sound of view: (Wide angle) 5 qa 4 6 7 q; 98 qs Recording To use these functions in bright places. Move it is hard to the T (Telephoto) side. To adjust the exposure for...
Operating Guide
Page 27
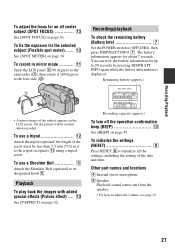
qa Open the LCD panel qa 90 degrees to the camcorder (1), then rotate it 180 degrees to adjust the volume, see page...the subject appears on the LCD screen, but the picture will be less than 5.5 mm (7/32 in mirror mode .......... Recording/playback To check the remaining battery (Battery Info 7 Set the POWER switch to initialize all the settings, including the ...setting of the screw must be normal when recorded. To initialize the settings (RESET 8 Press RESET 8 to OFF(CHG), then press DISP/BATT INFO 7. To use...
qa Open the LCD panel qa 90 degrees to the camcorder (1), then rotate it 180 degrees to adjust the volume, see page...the subject appears on the LCD screen, but the picture will be less than 5.5 mm (7/32 in mirror mode .......... Recording/playback To check the remaining battery (Battery Info 7 Set the POWER switch to initialize all the settings, including the ...setting of the screw must be normal when recorded. To initialize the settings (RESET 8 Press RESET 8 to OFF(CHG), then press DISP/BATT INFO 7. To use...
Operating Guide
Page 28
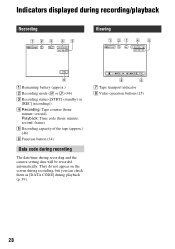
Indicators displayed during recording/playback Recording 12 3 4 5 Viewing 1 27 4 5 6 A Remaining battery (approx.) B Recording mode (SP or LP) (46) C Recording status ([STBY] (standby) or [REC] (recording)) D Recording: Tape counter (hour: minute: second) Playback: Time code (hour: minute: second: frame) E Recording capacity of the tape (approx.) (46) F Function button (34) Data code during recording The date/time during playback (p. 39). 8 6 G Tape...
Indicators displayed during recording/playback Recording 12 3 4 5 Viewing 1 27 4 5 6 A Remaining battery (approx.) B Recording mode (SP or LP) (46) C Recording status ([STBY] (standby) or [REC] (recording)) D Recording: Tape counter (hour: minute: second) Playback: Time code (hour: minute: second: frame) E Recording capacity of the tape (approx.) (46) F Function button (34) Data code during recording The date/time during playback (p. 39). 8 6 G Tape...

Operating Guide
Page 29
... Upper left Indicator Center Meaning AUDIO MODE (46) Upper right Indicator Meaning DV input (50) Center Indicator % Z Meaning NightShot plus (26) Warning (61) Bottom Indicator 9 . Recording/Playback ( ) is a reference page. Indicators when you made changes You can use [DISP GUIDE] (p. 17) to check the function of each indicator that appears on...
... Upper left Indicator Center Meaning AUDIO MODE (46) Upper right Indicator Meaning DV input (50) Center Indicator % Z Meaning NightShot plus (26) Warning (61) Bottom Indicator 9 . Recording/Playback ( ) is a reference page. Indicators when you made changes You can use [DISP GUIDE] (p. 17) to check the function of each indicator that appears on...
Operating Guide
Page 30
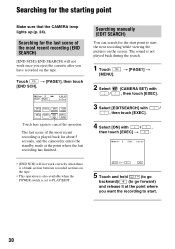
Searching for about 5 seconds, and the camcorder enters the standby mode at the point where you have recorded on the tape. • This operation is also available when the POWER switch is not played back during the search. 1 Touch [MENU]. Touch t [PAGE1], ... GUIDE MENU FADER END EXPO- EDIT FN 5 Touch and hold (to go backward)/ (to go forward) and release it at the point where the last recording has finished. The sound is set to start. 30 t [PAGE1] t 2 Select / (CAMERA SET) with , then touch [EXEC]. 3 Select [EDITSEARCH] with / , then touch [EXEC]. 4 Select ...
Searching for about 5 seconds, and the camcorder enters the standby mode at the point where you have recorded on the tape. • This operation is also available when the POWER switch is not played back during the search. 1 Touch [MENU]. Touch t [PAGE1], ... GUIDE MENU FADER END EXPO- EDIT FN 5 Touch and hold (to go backward)/ (to go forward) and release it at the point where the last recording has finished. The sound is set to start. 30 t [PAGE1] t 2 Select / (CAMERA SET) with , then touch [EXEC]. 3 Select [EDITSEARCH] with / , then touch [EXEC]. 4 Select ...

