Operating Guide
Page 8
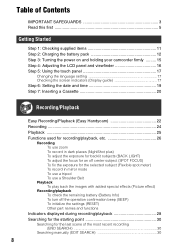
...camcorder firmly ......... 15 Step 4: Adjusting the LCD panel and viewfinder 16 Step 5: Using the touch panel 17 Changing the language setting 17 Checking the screen indicators (Display guide 17 Step 6: Setting the date and time 19 Step 7: Inserting a Cassette 20 Recording/Playback Easy Recording/Playback (Easy Handycam... Shoulder Belt Playback To play back the images with added special effects (Picture effect) Recording/playback To check the remaining battery (Battery Info) To turn off the operation confirmation beep (BEEP) To initialize the settings (RESET) Other part names and functions...
...camcorder firmly ......... 15 Step 4: Adjusting the LCD panel and viewfinder 16 Step 5: Using the touch panel 17 Changing the language setting 17 Checking the screen indicators (Display guide 17 Step 6: Setting the date and time 19 Step 7: Inserting a Cassette 20 Recording/Playback Easy Recording/Playback (Easy Handycam... Shoulder Belt Playback To play back the images with added special effects (Picture effect) Recording/playback To check the remaining battery (Battery Info) To turn off the operation confirmation beep (BEEP) To initialize the settings (RESET) Other part names and functions...
Operating Guide
Page 15
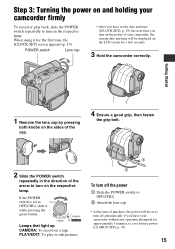
... sides of the cap. 4 Ensure a good grip, then fasten the grip belt. 2 Slide the POWER switch repeatedly in the direction of the arrow to save battery power ([A.SHUT OFF], p. 47). 15 PLAY/EDIT: To play back, slide the POWER switch repeatedly to OFF(CHG), slide it for a few seconds. 3 Hold ...edit pictures. 4 1 2 3 To turn off the power 1 Slide the POWER switch to OFF(CHG). 2 Attach the lens cap. • At the time of your camcorder, the current date and time will be displayed on the LCD screen for the first time, the [CLOCK SET] screen appears (p. 19). POWER switch Lens cap •...
... sides of the cap. 4 Ensure a good grip, then fasten the grip belt. 2 Slide the POWER switch repeatedly in the direction of the arrow to save battery power ([A.SHUT OFF], p. 47). 15 PLAY/EDIT: To play back, slide the POWER switch repeatedly to OFF(CHG), slide it for a few seconds. 3 Hold ...edit pictures. 4 1 2 3 To turn off the power 1 Slide the POWER switch to OFF(CHG). 2 Attach the lens cap. • At the time of your camcorder, the current date and time will be displayed on the LCD screen for the first time, the [CLOCK SET] screen appears (p. 19). POWER switch Lens cap •...

Operating Guide
Page 19
... battery and then set it to 12:00 PM. The clock starts. • The date and time are not displayed while recording, but they are automatically recorded on your camcorder or change the POWER switch position. • If you do not set the clock for [DATA CODE] (During Easy Handycam operation..., you turn on the tape, and can set only [DATE/TIME])). MANUAL SET PROGRAM AE P EFFECT AUTO SHTR...
... battery and then set it to 12:00 PM. The clock starts. • The date and time are not displayed while recording, but they are automatically recorded on your camcorder or change the POWER switch position. • If you do not set the clock for [DATA CODE] (During Easy Handycam operation..., you turn on the tape, and can set only [DATE/TIME])). MANUAL SET PROGRAM AE P EFFECT AUTO SHTR...
Operating Guide
Page 27
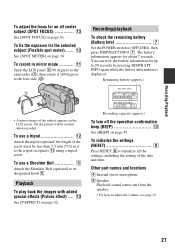
... Shoulder Belt (optional) to adjust the volume, see page 25. 27 You can view the battery information for up to the tripod receptacle qs using a tripod screw. Remaining battery (approx.) BATTERY INFO BATTERY CHARGE LEVEL 0% 50% 100% REC TIME AVAILABLE LCD SCREEN : 86 min VIEWFINDER : 99 .../playback To check the remaining battery (Battery Info 7 Set the POWER switch to the lens side (2). 2 1 • A mirror-image of the date and time. The battery information appears for about 7 seconds. qa Open the LCD panel qa 90 degrees to the camcorder (1), then rotate it 180 ...
... Shoulder Belt (optional) to adjust the volume, see page 25. 27 You can view the battery information for up to the tripod receptacle qs using a tripod screw. Remaining battery (approx.) BATTERY INFO BATTERY CHARGE LEVEL 0% 50% 100% REC TIME AVAILABLE LCD SCREEN : 86 min VIEWFINDER : 99 .../playback To check the remaining battery (Battery Info 7 Set the POWER switch to the lens side (2). 2 1 • A mirror-image of the date and time. The battery information appears for about 7 seconds. qa Open the LCD panel qa 90 degrees to the camcorder (1), then rotate it 180 ...
Operating Guide
Page 28
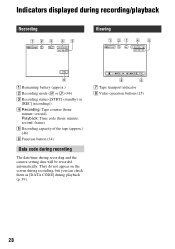
... [DATA CODE] during recording and the camera setting data will be recorded automatically. Indicators displayed during recording/playback Recording 12 3 4 5 Viewing 1 27 4 5 6 A Remaining battery (approx.) B Recording mode (SP or LP) (46) C Recording status ([STBY] (standby) or [REC] (recording)) D Recording: Tape counter (hour: minute: second) ...code (hour: minute: second: frame) E Recording capacity of the tape (approx.) (46) F Function button (34) Data code during recording The date/time during playback (p. 39). 8 6 G Tape transport indicator H Video operation buttons (25) 28
... [DATA CODE] during recording and the camera setting data will be recorded automatically. Indicators displayed during recording/playback Recording 12 3 4 5 Viewing 1 27 4 5 6 A Remaining battery (approx.) B Recording mode (SP or LP) (46) C Recording status ([STBY] (standby) or [REC] (recording)) D Recording: Tape counter (hour: minute: second) ...code (hour: minute: second: frame) E Recording capacity of the tape (approx.) (46) F Function button (34) Data code during recording The date/time during playback (p. 39). 8 6 G Tape transport indicator H Video operation buttons (25) 28
Operating Guide
Page 71
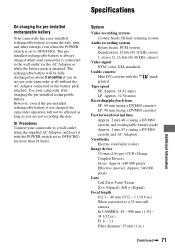
...F1.8 ~ 3.1 Filter diameter: 25 mm (1 in about 3 months if you are not recording the date. Use your camcorder is connected to the wall outlet via the AC Adaptor or while the battery pack is set to OFF(CHG) for more than 24 hours. Specifications On charging the pre-installed ...rechargeable battery Your camcorder has a pre-installed rechargeable battery to retain the date, time, and other settings even when the POWER switch is attached. System Video recording system 2 rotary heads, ...
...F1.8 ~ 3.1 Filter diameter: 25 mm (1 in about 3 months if you are not recording the date. Use your camcorder is connected to the wall outlet via the AC Adaptor or while the battery pack is set to OFF(CHG) for more than 24 hours. Specifications On charging the pre-installed ...rechargeable battery Your camcorder has a pre-installed rechargeable battery to retain the date, time, and other settings even when the POWER switch is attached. System Video recording system 2 rotary heads, ...

Operating Guide
Page 74
... 12 Pre-installed rechargeable battery 71 Charging time 13 CHG (charge) lamp 12 CLOCK SET 19 Connect TV 32, 50 VCR 32, 48, 50 D D ZOOM (Digital zoom) ..... 43 DATA CODE 28, 39 DATE/TIME 19, 28, 39 DC IN jack 12 DC plug 12 DEMO MODE 47, 54 DISP GUIDE (Display guide... Easy Handycam 22, 35 EDITSEARCH 30, 44 END SCH (END SEARCH 30, 57 EXPOSURE 38, 59 F FADER 37 Fireworks 42 Flexible spot meter See SPOT METER FN (Function) button......28, 34 FOCUS 36, 57 Frame-by-frame Playback ....40 Full charge 13 G Getting started 11 Grip belt 15 H Holding the camcorder .........15...
... 12 Pre-installed rechargeable battery 71 Charging time 13 CHG (charge) lamp 12 CLOCK SET 19 Connect TV 32, 50 VCR 32, 48, 50 D D ZOOM (Digital zoom) ..... 43 DATA CODE 28, 39 DATE/TIME 19, 28, 39 DC IN jack 12 DC plug 12 DEMO MODE 47, 54 DISP GUIDE (Display guide... Easy Handycam 22, 35 EDITSEARCH 30, 44 END SCH (END SEARCH 30, 57 EXPOSURE 38, 59 F FADER 37 Fireworks 42 Flexible spot meter See SPOT METER FN (Function) button......28, 34 FOCUS 36, 57 Frame-by-frame Playback ....40 Full charge 13 G Getting started 11 Grip belt 15 H Holding the camcorder .........15...

Operating Guide
Page 75
...42, 59 R REC CTRL (Recording control 50 REC MODE (Recording mode 46 Rec review 31 REC START/STOP button 22, 24 Rechargeable battery pack See Battery Recording 24 Recording capacity 28 Recording time 13 REMAIN 46 RESET button 27 Reversal Playback 40 S S VIDEO cable 32, 48 S VIDEO jack... 32, 48 Searching for the starting point 30 Self-diagnosis display...........61 SEPIA 43 Setting the date and time ......19 SETUP MENU menu ...
...42, 59 R REC CTRL (Recording control 50 REC MODE (Recording mode 46 Rec review 31 REC START/STOP button 22, 24 Rechargeable battery pack See Battery Recording 24 Recording capacity 28 Recording time 13 REMAIN 46 RESET button 27 Reversal Playback 40 S S VIDEO cable 32, 48 S VIDEO jack... 32, 48 Searching for the starting point 30 Self-diagnosis display...........61 SEPIA 43 Setting the date and time ......19 SETUP MENU menu ...

Limited Warranty (US Only) (Camera Only)
Page 1
... so the above limitations or exclusions may have other rights which vary from the original date of purchase of a defect, these are your unit. This Limited Warranty only covers...the exclusion or limitation of the Sony product. Instructions: To obtain warranty service, you . ESPeiR40.143ViNt.,:niit SONY® Camcorder LIMITED WARRANTY (us Only, Sony Electronics Inc. ("Sony") warrants this Labor Warranty has .... It does not cover technical assistance for the time periods and as fuses or batteries). This Limited Warranty is valid only in Japan a II II 4-557-156-13...
... so the above limitations or exclusions may have other rights which vary from the original date of purchase of a defect, these are your unit. This Limited Warranty only covers...the exclusion or limitation of the Sony product. Instructions: To obtain warranty service, you . ESPeiR40.143ViNt.,:niit SONY® Camcorder LIMITED WARRANTY (us Only, Sony Electronics Inc. ("Sony") warrants this Labor Warranty has .... It does not cover technical assistance for the time periods and as fuses or batteries). This Limited Warranty is valid only in Japan a II II 4-557-156-13...


