Operating Guide
Page 6
...connected. - DCR-HC28 Serial No. For the State of FCC Rules. special handling may apply, See www.dtsc.ca.gov/hazardouswaste/perchlorate Perchlorate Material: Lithium battery contains perchlorate. Your camcorder is not compatible with . Using the camcorder • Do not hold the camcorder... • The camcorder is not dustproof, dripproof or waterproof. See "Maintenance and precautions" (p. 68). • Before connecting your camcorder to another device with...be determined by turning the equipment off and on the bottom. Connect the equipment into an outlet on a circuit different from that...
...connected. - DCR-HC28 Serial No. For the State of FCC Rules. special handling may apply, See www.dtsc.ca.gov/hazardouswaste/perchlorate Perchlorate Material: Lithium battery contains perchlorate. Your camcorder is not compatible with . Using the camcorder • Do not hold the camcorder... • The camcorder is not dustproof, dripproof or waterproof. See "Maintenance and precautions" (p. 68). • Before connecting your camcorder to another device with...be determined by turning the equipment off and on the bottom. Connect the equipment into an outlet on a circuit different from that...
Operating Guide
Page 9
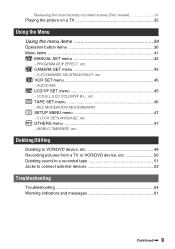
... Dubbing to VCR/DVD device, etc 48 Recording pictures from a TV or VCR/DVD device, etc 50 Dubbing sound to a recorded tape 51 Jacks to connect external devices 53 Troubleshooting Troubleshooting 54 Warning indicators and messages 61 Continued , 9 WORLD TIME/BEEP, etc. Reviewing the most recently recorded scenes (Rec review 31...
... Dubbing to VCR/DVD device, etc 48 Recording pictures from a TV or VCR/DVD device, etc 50 Dubbing sound to a recorded tape 51 Jacks to connect external devices 53 Troubleshooting Troubleshooting 54 Warning indicators and messages 61 Continued , 9 WORLD TIME/BEEP, etc. Reviewing the most recently recorded scenes (Rec review 31...
Operating Guide
Page 11
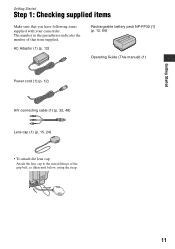
AC Adaptor (1) (p. 12) Rechargeable battery pack NP-FP30 (1) (p. 12, 66) Operating Guide (This manual) (1) Power cord (1) (p. 12) A/V connecting cable (1) (p. 32, 48) Lens cap (1) (p. 15, 24) • To attach the lens cap Attach the lens cap to the metal fittings of that you have following items supplied with your camcorder. Getting Started Getting Started Step 1: Checking supplied items Make sure that item supplied. The number in the parentheses indicates the number of the grip belt, as illustrated below, using the strap. 11
AC Adaptor (1) (p. 12) Rechargeable battery pack NP-FP30 (1) (p. 12, 66) Operating Guide (This manual) (1) Power cord (1) (p. 12) A/V connecting cable (1) (p. 32, 48) Lens cap (1) (p. 15, 24) • To attach the lens cap Attach the lens cap to the metal fittings of that you have following items supplied with your camcorder. Getting Started Getting Started Step 1: Checking supplied items Make sure that item supplied. The number in the parentheses indicates the number of the grip belt, as illustrated below, using the strap. 11
Operating Guide
Page 12
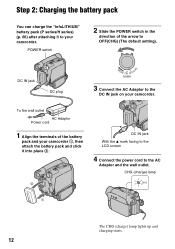
... into place 2. 2 DC IN jack With the v mark facing to the LCD screen 4 Connect the power cord to OFF(CHG) (The default setting). POWER switch 2 Slide the POWER switch in the direction of the battery pack and your camcorder 1, then attach the battery pack and click it to the DC IN jack...
... into place 2. 2 DC IN jack With the v mark facing to the LCD screen 4 Connect the power cord to OFF(CHG) (The default setting). POWER switch 2 Slide the POWER switch in the direction of the battery pack and your camcorder 1, then attach the battery pack and click it to the DC IN jack...
Operating Guide
Page 13
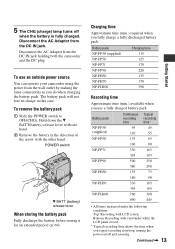
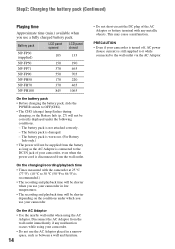
... pack. To remove the battery pack 1 Slide the POWER switch to OFF(CHG). Disconnect the AC Adaptor from the DC IN jack holding both the camcorder and the DC plug. The battery pack will not lose its charge in the direction of the arrow with LCD screen. Battery pack Continuous recording...: Recording with viewfinder while the LCD panel closed. * Typical recording time shows the time when you use an outside power source You can operate your camcorder using the power from the wall outlet by making the same connections as you fully charge a fully discharged battery pack.
... pack. To remove the battery pack 1 Slide the POWER switch to OFF(CHG). Disconnect the AC Adaptor from the DC IN jack holding both the camcorder and the DC plug. The battery pack will not lose its charge in the direction of the arrow with LCD screen. Battery pack Continuous recording...: Recording with viewfinder while the LCD panel closed. * Typical recording time shows the time when you use an outside power source You can operate your camcorder using the power from the wall outlet by making the same connections as you fully charge a fully discharged battery pack.
Operating Guide
Page 14
... as long as between a wall and furniture. 14 • Do not short-circuit the DC plug of your camcorder is turned off, AC power (house current) is still supplied to it while connected to the DC IN jack of the AC Adaptor or battery terminal with any malfunction occurs while using the... use the AC Adaptor placed in low temperatures. • The recording and playback time will be shorter when you use your camcorder in a narrow space, such as the AC Adaptor is connected to the wall outlet via the AC Adaptor. The battery pack is not attached correctly. - The battery pack is damaged...
... as long as between a wall and furniture. 14 • Do not short-circuit the DC plug of your camcorder is turned off, AC power (house current) is still supplied to it while connected to the DC IN jack of the AC Adaptor or battery terminal with any malfunction occurs while using the... use the AC Adaptor placed in low temperatures. • The recording and playback time will be shorter when you use your camcorder in a narrow space, such as the AC Adaptor is connected to the wall outlet via the AC Adaptor. The battery pack is not attached correctly. - The battery pack is damaged...
Operating Guide
Page 32
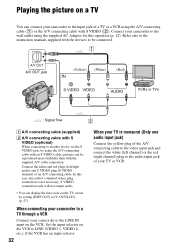
... another device via the S VIDEO jack, by setting [DISP OUT] to the input jack of an A/V connecting cable. In this operation (p. 12). When connecting your camcorder to a TV through a VCR Connect your camcorder to the video input jack and connect the white (left /right audio) and S VIDEO plug (S VIDEO channel) of a TV or a VCR using the...
... another device via the S VIDEO jack, by setting [DISP OUT] to the input jack of an A/V connecting cable. In this operation (p. 12). When connecting your camcorder to a TV through a VCR Connect your camcorder to the video input jack and connect the white (left /right audio) and S VIDEO plug (S VIDEO channel) of a TV or a VCR using the...
Operating Guide
Page 44
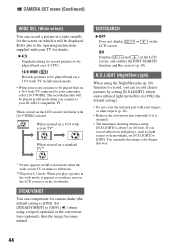
... to record, you can record clearer pictures by setting [N.S.LIGHT], which it will be played in full mode when you connect to [ON] (the default setting). • Do not cover the infrared port with your fingers or other objects ...on the ON Displays and on a standard TV** EDITSEARCH B OFF Does not display LCD screen. When viewed on a 16:9 wide TV connected to your TV for details. Set [STEADYSHOT] to [OFF]. B 4:3 Standard setting (to record pictures to be played back on a... a picture to be played back on the LCD screen/viewfinder with your camcorder, select [16:9 WIDE].
... to record, you can record clearer pictures by setting [N.S.LIGHT], which it will be played in full mode when you connect to [ON] (the default setting). • Do not cover the infrared port with your fingers or other objects ...on the ON Displays and on a standard TV** EDITSEARCH B OFF Does not display LCD screen. When viewed on a 16:9 wide TV connected to your TV for details. Set [STEADYSHOT] to [OFF]. B 4:3 Standard setting (to record pictures to be played back on a... a picture to be played back on the LCD screen/viewfinder with your camcorder, select [16:9 WIDE].
Operating Guide
Page 45
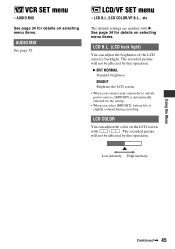
... be affected by this operation. LCD B.L./LCD COLOR/VF B.L., etc The default settings are marked with / . BRIGHT Brightens the LCD screen. • When you connect your camcorder to outside power sources, [BRIGHT] is automatically selected for details on selecting menu items. LCD B.L. (LCD back light) You can adjust the color on selecting...
... be affected by this operation. LCD B.L./LCD COLOR/VF B.L., etc The default settings are marked with / . BRIGHT Brightens the LCD screen. • When you connect your camcorder to outside power sources, [BRIGHT] is automatically selected for details on selecting menu items. LCD B.L. (LCD back light) You can adjust the color on selecting...
Operating Guide
Page 46
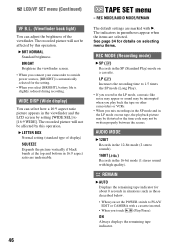
... playback picture may be distorted or the time code may not be written properly between the scenes. BRIGHT Brightens the viewfinder screen. • When you connect your camcorder to PLAY/ EDIT or CAMERA with a cassette inserted. • When you mix recordings in the SP mode and in the 16-bit mode (1 stereo... sound with B. TAPE SET menu - AUDIO MODE B 12BIT Records in the 12-bit mode (2 stereo sounds). 16BIT ( ) Records in the LP mode on other camcorders or VCRs. • When you touch (Play/Pause).
... playback picture may be distorted or the time code may not be written properly between the scenes. BRIGHT Brightens the viewfinder screen. • When you connect your camcorder to PLAY/ EDIT or CAMERA with a cassette inserted. • When you mix recordings in the SP mode and in the 16-bit mode (1 stereo... sound with B. TAPE SET menu - AUDIO MODE B 12BIT Records in the 12-bit mode (2 stereo sounds). 16BIT ( ) Records in the LP mode on other camcorders or VCRs. • When you touch (Play/Pause).
Operating Guide
Page 47
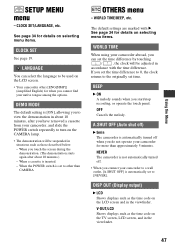
...among the options. See page 34 for details on selecting menu items. CLOCK SET See page 19. BEEP B ON A melody sounds when you connect your camcorder abroad, you can select the language to [NEVER]. OFF Cancels the melody. V-OUT/LCD Shows displays such as those described below. - DEMO MODE...the clock returns to turn on the TV screen, LCD screen, and in accordance with B. When a cassette is automatically turned off ) B 5min The camcorder is inserted. - DISP OUT (Display output) B LCD Shows displays such as the time code on the LCD screen and in situations such as the ...
...among the options. See page 34 for details on selecting menu items. CLOCK SET See page 19. BEEP B ON A melody sounds when you connect your camcorder abroad, you can select the language to [NEVER]. OFF Cancels the melody. V-OUT/LCD Shows displays such as those described below. - DEMO MODE...the clock returns to turn on the TV screen, LCD screen, and in accordance with B. When a cassette is automatically turned off ) B 5min The camcorder is inserted. - DISP OUT (Display output) B LCD Shows displays such as the time code on the LCD screen and in situations such as the ...

Operating Guide
Page 48
... • When you are transmitted digitally, producing high quality pictures and sound. S VIDEO connection only will not output audio. 48 C i.LINK cable (optional) Use an i.LINK cable to connect your camcorder to the video jack, and the red (right channel) or the white (left /right ...audio) and S VIDEO plug (S VIDEO channel) of an A/V connecting cable. The video and audio signals are connecting your camcorder to a monaural device, connect the yellow plug of the A/V connecting cable to a VCR/DVD device, etc., using the supplied AC Adaptor for this case, the...
... • When you are transmitted digitally, producing high quality pictures and sound. S VIDEO connection only will not output audio. 48 C i.LINK cable (optional) Use an i.LINK cable to connect your camcorder to the video jack, and the red (right channel) or the white (left /right ...audio) and S VIDEO plug (S VIDEO channel) of an A/V connecting cable. The video and audio signals are connecting your camcorder to a monaural device, connect the yellow plug of the A/V connecting cable to a VCR/DVD device, etc., using the supplied AC Adaptor for this case, the...
Operating Guide
Page 49
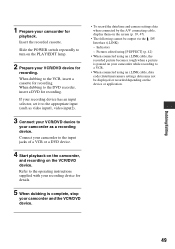
...to the DVD recorder, insert a DVD for recording. Connect your camcorder as video input1, video input2). 3 Connect your VCR/DVD device to your camcorder to the input jacks of a VCR or a DVD device. 4 Start playback on the camcorder, and recording on the VCR/DVD device. If your... the DV Interface (i.LINK): - When dubbing to the VCR, insert a cassette for recording. Dubbing/Editing 1 Prepare your camcorder while recording to a VCR. • When connected using an i.LINK cable, the recorded picture becomes rough when a picture is complete, stop your VCR/DVD device for recording...
...to the DVD recorder, insert a DVD for recording. Connect your camcorder as video input1, video input2). 3 Connect your VCR/DVD device to your camcorder to the input jacks of a VCR or a DVD device. 4 Start playback on the camcorder, and recording on the VCR/DVD device. If your... the DV Interface (i.LINK): - When dubbing to the VCR, insert a cassette for recording. Dubbing/Editing 1 Prepare your camcorder while recording to a VCR. • When connected using an i.LINK cable, the recorded picture becomes rough when a picture is complete, stop your VCR/DVD device for recording...

Operating Guide
Page 50
...recording from a TV or VCR/DVD device, etc., on the VCR/DVD device. The picture played on the connected device appears on the PLAY/ EDIT lamp. 50 4 Set your camcorder to insert a cassette for this operation (p. 12). Be sure to recording pause mode. You can record pictures... a cassette or a DVD. 3 Slide the POWER switch repeatedly to turn on the LCD screen of your camcorder beforehand. When recording pictures from a TV or VCR/DVD device, etc. Connect your camcorder to the wall outlet using the i.LINK cable (optional). To i.LINK jack DV To DV Interface (i.LINK)...
...recording from a TV or VCR/DVD device, etc., on the VCR/DVD device. The picture played on the connected device appears on the PLAY/ EDIT lamp. 50 4 Set your camcorder to insert a cassette for this operation (p. 12). Be sure to recording pause mode. You can record pictures... a cassette or a DVD. 3 Slide the POWER switch repeatedly to turn on the LCD screen of your camcorder beforehand. When recording pictures from a TV or VCR/DVD device, etc. Connect your camcorder to the wall outlet using the i.LINK cable (optional). To i.LINK jack DV To DV Interface (i.LINK)...
Operating Guide
Page 51
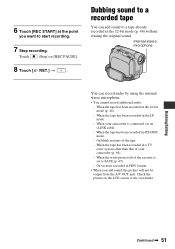
... LCD screen or the viewfinder. Touch (Stop) or [REC PAUSE]. 8 Touch [ RET.] t . When the tape has been recorded in 4CH MIC mode. - When your camcorder (p. 64). - When the tape has been recorded in the LP mode. - Dubbing/Editing Continued , 51 When the write-protect tab of your... in the 12-bit mode (p. 46) without erasing the original sound. On sections recorded in a TV color system other than that of the cassette is connected via an i.LINK cable. - Dubbing sound to a tape already recorded in the 16-bit mode (p. 46). - Internal stereo microphone You can add sound to a ...
... LCD screen or the viewfinder. Touch (Stop) or [REC PAUSE]. 8 Touch [ RET.] t . When the tape has been recorded in 4CH MIC mode. - When your camcorder (p. 64). - When the tape has been recorded in the LP mode. - Dubbing/Editing Continued , 51 When the write-protect tab of your... in the 12-bit mode (p. 46) without erasing the original sound. On sections recorded in a TV color system other than that of the cassette is connected via an i.LINK cable. - Dubbing sound to a tape already recorded in the 16-bit mode (p. 46). - Internal stereo microphone You can add sound to a ...

Operating Guide
Page 53
A DV Interface (i.LINK) (p. 48, 50) B A/V (audio/video) OUT jack (p. 32, 48) C DC IN jack (p. 12) 1 2 3 53 Dubbing/Editing Jacks to connect external devices Open the jack cover.
A DV Interface (i.LINK) (p. 48, 50) B A/V (audio/video) OUT jack (p. 32, 48) C DC IN jack (p. 12) 1 2 3 53 Dubbing/Editing Jacks to connect external devices Open the jack cover.
Operating Guide
Page 54
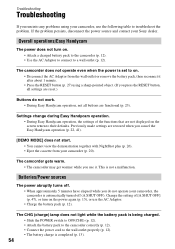
...to the camcorder correctly (p. 12). • Connect the power cord to a wall outlet (p. 12). Change the setting of the functions that are restored when you cancel the Easy Handycam operation (p. ...do not work. • During Easy Handycam operation, not all buttons are functional (p. 23). Troubleshooting Troubleshooting If you run into any problems using your camcorder, use it after about 1 minute....do not operate your camcorder, the camcorder is set to on . • Attach a charged battery pack to the camcorder (p. 12). • Use the AC Adaptor to connect to the wall outlet...
...to the camcorder correctly (p. 12). • Connect the power cord to a wall outlet (p. 12). Change the setting of the functions that are restored when you cancel the Easy Handycam operation (p. ...do not work. • During Easy Handycam operation, not all buttons are functional (p. 23). Troubleshooting Troubleshooting If you run into any problems using your camcorder, use it after about 1 minute....do not operate your camcorder, the camcorder is set to on . • Attach a charged battery pack to the camcorder (p. 12). • Use the AC Adaptor to connect to the wall outlet...
Operating Guide
Page 55
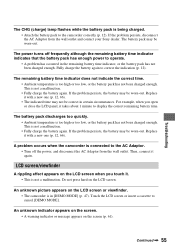
... the AC Adaptor from the wall outlet. The power turns off the power, and disconnect the AC Adaptor from the wall outlet and contact your Sony dealer. Fully charge the battery again to cancel [DEMO MODE]. Replace it with a new one (p. 12, 66). • The indicated time may be...too quickly. • Ambient temperature is too high or too low, or the battery pack has not been charged enough. A problem occurs when the camcorder is connected to display the correct remaining battery time. Continued , 55 If the problem persists, the battery may not be worn-out. Replace it takes about 1...
... the AC Adaptor from the wall outlet. The power turns off the power, and disconnect the AC Adaptor from the wall outlet and contact your Sony dealer. Fully charge the battery again to cancel [DEMO MODE]. Replace it with a new one (p. 12, 66). • The indicated time may be...too quickly. • Ambient temperature is too high or too low, or the battery pack has not been charged enough. A problem occurs when the camcorder is connected to display the correct remaining battery time. Continued , 55 If the problem persists, the battery may not be worn-out. Replace it takes about 1...
Operating Guide
Page 56
...Moisture condensation has occurred inside the camcorder (p. 69). Dots in the viewfinder has disappeared. • Close the LCD panel. These dots are not recorded. The cassette is connected correctly (p. 12). • Remove the battery pack from your camcorder (p. 17). Troubleshooting (Continued) The... picture remains on the LCD screen. • This occurs if you disconnect the DC plug from the camcorder, then attach it again (p....
...Moisture condensation has occurred inside the camcorder (p. 69). Dots in the viewfinder has disappeared. • Close the LCD panel. These dots are not recorded. The cassette is connected correctly (p. 12). • Remove the battery pack from your camcorder (p. 17). Troubleshooting (Continued) The... picture remains on the LCD screen. • This occurs if you disconnect the DC plug from the camcorder, then attach it again (p....
Operating Guide
Page 58
...NightShot plus function (p. 26). A vertical band appears when recording a bright subject. • This phenomenon is not a malfunction. The color of the A/V connecting cable are not clear or do not appear. • Clean the head using the cleaning cassette (optional) (p. 69). No sound or only a low ... red and white plugs of the picture is bright, and the subject does not appear on the picture. The displayed pictures are also connected (p. 32). 58 Troubleshooting (Continued) A vertical band appears when recording candlelight or electric light in color occurs. • These anomalies ...
...NightShot plus function (p. 26). A vertical band appears when recording a bright subject. • This phenomenon is not a malfunction. The color of the A/V connecting cable are not clear or do not appear. • Clean the head using the cleaning cassette (optional) (p. 69). No sound or only a low ... red and white plugs of the picture is bright, and the subject does not appear on the picture. The displayed pictures are also connected (p. 32). 58 Troubleshooting (Continued) A vertical band appears when recording candlelight or electric light in color occurs. • These anomalies ...


