Operating Guide
Page 6
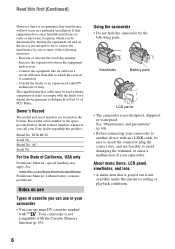
... off and on use Types of your Sony dealer regarding this first (Continued) However, there is connected. - For the State of the following parts. See "Maintenance and precautions" (p. 68). • Before connecting your camcorder to avoid damaging the terminal, or cause...particular installation. DCR-HC28 Serial No. special handling may apply, See www.dtsc.ca.gov/hazardouswaste/perchlorate Perchlorate Material: Lithium battery contains perchlorate. Viewfinder Battery pack LCD panel • The camcorder is not compatible with the limits for help. Owner's Record The model...
... off and on use Types of your Sony dealer regarding this first (Continued) However, there is connected. - For the State of the following parts. See "Maintenance and precautions" (p. 68). • Before connecting your camcorder to avoid damaging the terminal, or cause...particular installation. DCR-HC28 Serial No. special handling may apply, See www.dtsc.ca.gov/hazardouswaste/perchlorate Perchlorate Material: Lithium battery contains perchlorate. Viewfinder Battery pack LCD panel • The camcorder is not compatible with the limits for help. Owner's Record The model...
Operating Guide
Page 7
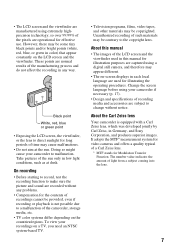
...extremely highprecision technology, so over 99.99% of the pixels are normal results of recordings cannot be some tiny black points and/or bright points (white, red, blue, or green in Germany, and Sony Corporation, and produces superior images. Black point White, red, blue or green ... other materials may be contrary to the copyright laws. To view your camcorder to malfunction. The number value indicates the amount of time may cause malfunctions. • Do not aim at dusk. Unauthorized recording of the camcorder, storage media, etc. • TV color systems differ depending on ...
...extremely highprecision technology, so over 99.99% of the pixels are normal results of recordings cannot be some tiny black points and/or bright points (white, red, blue, or green in Germany, and Sony Corporation, and produces superior images. Black point White, red, blue or green ... other materials may be contrary to the copyright laws. To view your camcorder to malfunction. The number value indicates the amount of time may cause malfunctions. • Do not aim at dusk. Unauthorized recording of the camcorder, storage media, etc. • TV color systems differ depending on ...
Operating Guide
Page 8
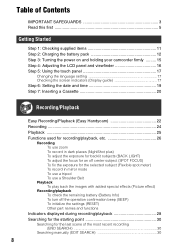
...camcorder firmly ......... 15 Step 4: Adjusting the LCD panel and viewfinder 16 Step 5: Using the touch panel 17 Changing the language setting 17 Checking the screen indicators (Display guide 17 Step 6: Setting the date and time 19 Step 7: Inserting a Cassette 20 Recording/Playback Easy Recording/Playback (Easy Handycam 22 Recording... 24 Playback 25 Functions used for recording/playback, etc 26 Recording To use zoom To record in dark places (NightShot plus) To adjust the...
...camcorder firmly ......... 15 Step 4: Adjusting the LCD panel and viewfinder 16 Step 5: Using the touch panel 17 Changing the language setting 17 Checking the screen indicators (Display guide 17 Step 6: Setting the date and time 19 Step 7: Inserting a Cassette 20 Recording/Playback Easy Recording/Playback (Easy Handycam 22 Recording... 24 Playback 25 Functions used for recording/playback, etc 26 Recording To use zoom To record in dark places (NightShot plus) To adjust the...
Operating Guide
Page 9
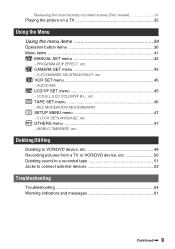
...REC MODE/AUDIO MODE/REMAIN SETUP MENU menu 47 - Dubbing/Editing Dubbing to VCR/DVD device, etc 48 Recording pictures from a TV or VCR/DVD device, etc 50 Dubbing sound to a recorded tape 51 Jacks to connect external devices 53 Troubleshooting Troubleshooting 54 Warning indicators and messages 61 Continued , 9... 45 - CLOCK SET/LANGUAGE, etc. VCR SET menu 45 - PROGRAM AE/P EFFECT, etc. CAMERA SET menu 43 - Reviewing the most recently recorded scenes (Rec review 31 Playing the picture on a TV 32 Using the Menu Using the menu items 34 Operation button items 36 Menu items 41...
...REC MODE/AUDIO MODE/REMAIN SETUP MENU menu 47 - Dubbing/Editing Dubbing to VCR/DVD device, etc 48 Recording pictures from a TV or VCR/DVD device, etc 50 Dubbing sound to a recorded tape 51 Jacks to connect external devices 53 Troubleshooting Troubleshooting 54 Warning indicators and messages 61 Continued , 9... 45 - CLOCK SET/LANGUAGE, etc. VCR SET menu 45 - PROGRAM AE/P EFFECT, etc. CAMERA SET menu 43 - Reviewing the most recently recorded scenes (Rec review 31 Playing the picture on a TV 32 Using the Menu Using the menu items 34 Operation button items 36 Menu items 41...
Operating Guide
Page 13
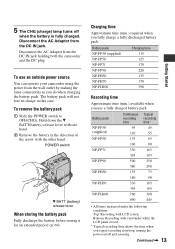
... battery pack. Hold down the V BATT(battery) release lever with one hand. 2 Remove the battery in this case. Battery pack Continuous recording time Typical recording time* NP-FP30 (supplied) 95 45 110 55 NP-FP50 135 65 160 80 NP-FP71 330 165 395 195 NP-FP90 500 250... OFF(CHG). Charging time Approximate time (min.) required when you use an outside power source You can operate your camcorder using the power from the DC IN jack holding both the camcorder and the DC plug. Continued , 13 Getting Started 5 The CHG (charge) lamp turns off and zooming.
... battery pack. Hold down the V BATT(battery) release lever with one hand. 2 Remove the battery in this case. Battery pack Continuous recording time Typical recording time* NP-FP30 (supplied) 95 45 110 55 NP-FP50 135 65 160 80 NP-FP71 330 165 395 195 NP-FP90 500 250... OFF(CHG). Charging time Approximate time (min.) required when you use an outside power source You can operate your camcorder using the power from the DC IN jack holding both the camcorder and the DC plug. Continued , 13 Getting Started 5 The CHG (charge) lamp turns off and zooming.
Operating Guide
Page 14
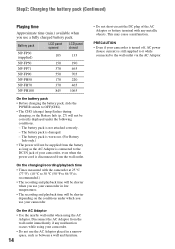
...from the battery as long as the AC Adaptor is connected to the DC IN jack of your camcorder. • Do not use the AC Adaptor placed in low temperatures. • The recording and playback time will not be supplied from the wall outlet. The battery pack is damaged. -... Step2: Charging the battery pack (Continued) Playing time Approximate time (min.) available when you use your camcorder. On the charging/recording/playback time • Times measured with the camcorder at 25 °C (77 °F). (10 °C to 30 °C (50 °F to the wall outlet via...
...from the battery as long as the AC Adaptor is connected to the DC IN jack of your camcorder. • Do not use the AC Adaptor placed in low temperatures. • The recording and playback time will not be supplied from the wall outlet. The battery pack is damaged. -... Step2: Charging the battery pack (Continued) Playing time Approximate time (min.) available when you use your camcorder. On the charging/recording/playback time • Times measured with the camcorder at 25 °C (77 °F). (10 °C to 30 °C (50 °F to the wall outlet via...
Operating Guide
Page 15
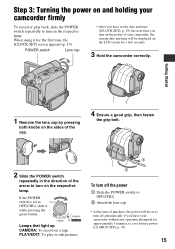
...switch repeatedly in the direction of the arrow to turn on the respective lamp. Lamps that light up CAMERA: To record on a tape. Step 3: Turning the power on and holding your camcorder firmly To record or play or edit pictures. 4 1 2 3 To turn off automatically if you turn on the power of ...your camcorder, the current date and time will be displayed on the LCD screen for the first time, the [CLOCK SET] screen ...
...switch repeatedly in the direction of the arrow to turn on the respective lamp. Lamps that light up CAMERA: To record on a tape. Step 3: Turning the power on and holding your camcorder firmly To record or play or edit pictures. 4 1 2 3 To turn off automatically if you turn on the power of ...your camcorder, the current date and time will be displayed on the LCD screen for the first time, the [CLOCK SET] screen ...
Operating Guide
Page 16
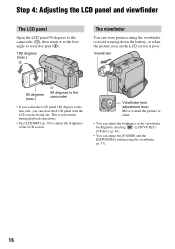
Viewfinder lens adjustment lever Move it to the best angle to record or play (2). 180 degrees (max.) 2 The viewfinder You can view pictures using the viewfinder (p. 37). 16 Viewfinder 90 degrees (max.) 1 90 degrees to the camcorder • If you rotate the LCD panel 180 degrees to the lens side... panel with the LCD screen facing out. Step 4: Adjusting the LCD panel and viewfinder The LCD panel Open the LCD panel 90 degrees to the camcorder (1), then rotate it until the picture is clear. • You can adjust the brightness of the viewfinder backlight by selecting (LCD/VF SET) - [...
Viewfinder lens adjustment lever Move it to the best angle to record or play (2). 180 degrees (max.) 2 The viewfinder You can view pictures using the viewfinder (p. 37). 16 Viewfinder 90 degrees (max.) 1 90 degrees to the camcorder • If you rotate the LCD panel 180 degrees to the lens side... panel with the LCD screen facing out. Step 4: Adjusting the LCD panel and viewfinder The LCD panel Open the LCD panel 90 degrees to the camcorder (1), then rotate it until the picture is clear. • You can adjust the brightness of the viewfinder backlight by selecting (LCD/VF SET) - [...

Operating Guide
Page 17
... may appear on the screen. Getting Started Step 5: Using the touch panel You can play back recorded pictures (p. 25), or change the on-screen displays to show messages in a specified language. These dots are not recorded. Changing the language setting You can easily check the meaning of the LCD panel to toggle...
... may appear on the screen. Getting Started Step 5: Using the touch panel You can play back recorded pictures (p. 25), or change the on-screen displays to show messages in a specified language. These dots are not recorded. Changing the language setting You can easily check the meaning of the LCD panel to toggle...

Operating Guide
Page 19
... any year up to 12:00 AM. The clock starts. • The date and time are not displayed while recording, but they are automatically recorded on your camcorder for [DATA CODE] (During Easy Handycam operation, you do not set the date and time again (p. 71). MANUAL SET PROGRAM AE P EFFECT AUTO SHTR... and time settings may be cleared from the memory. Step 6: Setting the date and time Getting Started Set the date and time when using this camcorder for [D] (day), [H] (hour) and [M] (minute). In that case, charge the rechargeable battery and then set the date and time, the [CLOCK SET] ...
... any year up to 12:00 AM. The clock starts. • The date and time are not displayed while recording, but they are automatically recorded on your camcorder for [DATA CODE] (During Easy Handycam operation, you do not set the date and time again (p. 71). MANUAL SET PROGRAM AE P EFFECT AUTO SHTR... and time settings may be cleared from the memory. Step 6: Setting the date and time Getting Started Set the date and time when using this camcorder for [D] (day), [H] (hour) and [M] (minute). In that case, charge the rechargeable battery and then set the date and time, the [CLOCK SET] ...
Operating Guide
Page 20
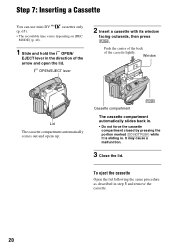
... the center of the back of the arrow and open the lid. Step 7: Inserting a Cassette You can use mini DV cassettes only (p. 65). • The recordable time varies depending on [REC MODE] (p. 46). 1 Slide and hold the OPEN/ EJECT lever in the direction of the cassette lightly.
... the center of the back of the arrow and open the lid. Step 7: Inserting a Cassette You can use mini DV cassettes only (p. 65). • The recordable time varies depending on [REC MODE] (p. 46). 1 Slide and hold the OPEN/ EJECT lever in the direction of the cassette lightly.
Operating Guide
Page 22
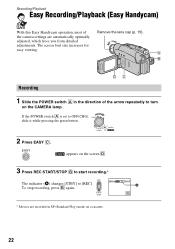
Recording/Playback Easy Recording/Playback (Easy Handycam) With this Easy Handycam operation, most of the arrow repeatedly to turn on the CAMERA lamp. To stop recording, press B again. 60min REC 0:00:00 A FN * Movies are automatically optimally adjusted, which frees you from detailed adjustments. The screen font size increases for easy viewing. A B DC Recording... 1 Slide the POWER switch A in SP (Standard Play) mode on the screen D. 3 Press REC START/STOP B to start recording.* The indicator (A) changes [STBY] to OFF(...
Recording/Playback Easy Recording/Playback (Easy Handycam) With this Easy Handycam operation, most of the arrow repeatedly to turn on the CAMERA lamp. To stop recording, press B again. 60min REC 0:00:00 A FN * Movies are automatically optimally adjusted, which frees you from detailed adjustments. The screen font size increases for easy viewing. A B DC Recording... 1 Slide the POWER switch A in SP (Standard Play) mode on the screen D. 3 Press REC START/STOP B to start recording.* The indicator (A) changes [STBY] to OFF(...
Operating Guide
Page 23
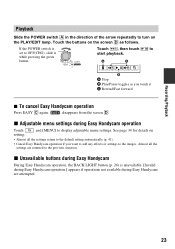
...adjustable menu settings. Almost all the settings return to the default setting automatically (p. 41). • Cancel Easy Handycam operation if you touch it while pressing the green button. Recording/Playback Playback Slide the POWER switch A in the direction of the arrow repeatedly to turn on the screen ...D as you want to add any effects or settings to the images. x Adjustable menu settings during Easy Handycam are returned to OFF(CHG...
...adjustable menu settings. Almost all the settings return to the default setting automatically (p. 41). • Cancel Easy Handycam operation if you touch it while pressing the green button. Recording/Playback Playback Slide the POWER switch A in the direction of the arrow repeatedly to turn on the screen ...D as you want to add any effects or settings to the images. x Adjustable menu settings during Easy Handycam are returned to OFF(CHG...

Operating Guide
Page 24
A To stop movie recording Press REC START/STOP again. 24 If the POWER switch is set to OFF(CHG), slide it while pressing the green button. 2 Press REC START/STOP to turn on the CAMERA lamp. Recording Lens cap Remove the lens cap by pressing both knobs on the sides of the cap POWER switch REC START/ STOP 1 Slide the POWER switch in the direction of the arrow repeatedly to start recording. The indicator (A) changes [STBY] to [REC].
A To stop movie recording Press REC START/STOP again. 24 If the POWER switch is set to OFF(CHG), slide it while pressing the green button. 2 Press REC START/STOP to turn on the CAMERA lamp. Recording Lens cap Remove the lens cap by pressing both knobs on the sides of the cap POWER switch REC START/ STOP 1 Slide the POWER switch in the direction of the arrow repeatedly to start recording. The indicator (A) changes [STBY] to [REC].

Operating Guide
Page 25
... tape (Skip Scan). • You can play back in the direction of the arrow repeatedly to turn on the PLAY/EDIT lamp. 2 Start playing back. Recording/Playback Playback 1 Slide the POWER switch in various modes ([V SPD PLAY], p. 40). 25
... tape (Skip Scan). • You can play back in the direction of the arrow repeatedly to turn on the PLAY/EDIT lamp. 2 Start playing back. Recording/Playback Playback 1 Slide the POWER switch in various modes ([V SPD PLAY], p. 40). 25
Operating Guide
Page 26
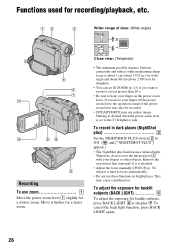
..., do not cover the infrared port 3 with your finger on the power zoom lever. Close view: (Telephoto) • The minimum possible distance between camcorder and subject while maintaining sharp focus is set [D ZOOM] (p. 43) if you move your finger off the power zoom lever, the operation sound of ...view: (Wide angle) 5 qa 4 6 7 q; 98 qs Recording To use these functions in bright places. If you want to zoom to a level greater than 20 ×. • Be sure to focus automatically. •...
..., do not cover the infrared port 3 with your finger on the power zoom lever. Close view: (Telephoto) • The minimum possible distance between camcorder and subject while maintaining sharp focus is set [D ZOOM] (p. 43) if you move your finger off the power zoom lever, the operation sound of ...view: (Wide angle) 5 qa 4 6 7 q; 98 qs Recording To use these functions in bright places. If you want to zoom to a level greater than 20 ×. • Be sure to focus automatically. •...
Operating Guide
Page 27
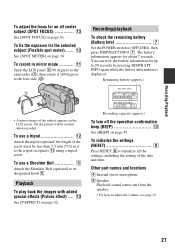
... than 5.5 mm (7/32 in mirror mode .......... To initialize the settings (RESET 8 Press RESET 8 to OFF(CHG), then press DISP/BATT INFO 7. To record in .)) to 20 seconds by pressing DISP/BATT INFO again while the battery information is displayed. The battery information appears for the selected subject (Flexible... (BEEP 0 See [BEEP] on page 42. To fix the exposure for about 7 seconds. qa Open the LCD panel qa 90 degrees to the camcorder (1), then rotate it 180 degrees to its designated hook 5. To use a tripod qs Attach the tripod (optional: the length of the screw must be...
... than 5.5 mm (7/32 in mirror mode .......... To initialize the settings (RESET 8 Press RESET 8 to OFF(CHG), then press DISP/BATT INFO 7. To record in .)) to 20 seconds by pressing DISP/BATT INFO again while the battery information is displayed. The battery information appears for the selected subject (Flexible... (BEEP 0 See [BEEP] on page 42. To fix the exposure for about 7 seconds. qa Open the LCD panel qa 90 degrees to the camcorder (1), then rotate it 180 degrees to its designated hook 5. To use a tripod qs Attach the tripod (optional: the length of the screw must be...
Operating Guide
Page 28
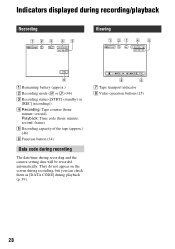
They do not appear on the screen during recording, but you can check them as [DATA CODE] during recording and the camera setting data will be recorded automatically. Indicators displayed during recording/playback Recording 12 3 4 5 Viewing 1 27 4 5 6 A Remaining battery (approx.) B Recording mode (SP or LP) (46) C Recording status ([STBY] (standby) or [REC] (recording)) D Recording: Tape counter (hour: minute: second) Playback...
They do not appear on the screen during recording, but you can check them as [DATA CODE] during recording and the camera setting data will be recorded automatically. Indicators displayed during recording/playback Recording 12 3 4 5 Viewing 1 27 4 5 6 A Remaining battery (approx.) B Recording mode (SP or LP) (46) C Recording status ([STBY] (standby) or [REC] (recording)) D Recording: Tape counter (hour: minute: second) Playback...

Operating Guide
Page 29
... Upper left Indicator Center Meaning AUDIO MODE (46) Upper right Indicator Meaning DV input (50) Center Indicator % Z Meaning NightShot plus (26) Warning (61) Bottom Indicator 9 . Recording/Playback ( ) is a reference page. Meaning Flexible spot meter (36)/ Manual exposure (38) Manual focus (36) Backlight (26) PROGRAM AE (42) n / EDIT + Picture effect (42) White...
... Upper left Indicator Center Meaning AUDIO MODE (46) Upper right Indicator Meaning DV input (50) Center Indicator % Z Meaning NightShot plus (26) Warning (61) Bottom Indicator 9 . Recording/Playback ( ) is a reference page. Meaning Flexible spot meter (36)/ Manual exposure (38) Manual focus (36) Backlight (26) PROGRAM AE (42) n / EDIT + Picture effect (42) White...
Operating Guide
Page 30
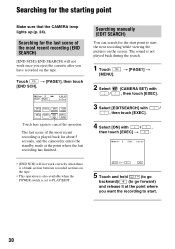
Searching manually (EDIT SEARCH) You can search for about 5 seconds, and the camcorder enters the standby mode at the point where you have recorded on the screen. t [PAGE1] t 2 Select / (CAMERA SET) with , then touch [EXEC]. 3 Select [EDITSEARCH] with / , then touch [EXEC]. 4 Select [ON] with / , then touch... EDIT FN 5 Touch and hold (to go forward) and release it at the point where the last recording has finished. Searching for the last scene of the most recent recording (END SEARCH) [END SCH] (END SEARCH) will not work once you eject the cassette after you want...
Searching manually (EDIT SEARCH) You can search for about 5 seconds, and the camcorder enters the standby mode at the point where you have recorded on the screen. t [PAGE1] t 2 Select / (CAMERA SET) with , then touch [EXEC]. 3 Select [EDITSEARCH] with / , then touch [EXEC]. 4 Select [ON] with / , then touch... EDIT FN 5 Touch and hold (to go forward) and release it at the point where the last recording has finished. Searching for the last scene of the most recent recording (END SEARCH) [END SCH] (END SEARCH) will not work once you eject the cassette after you want...

