Operating Guide
Page 7
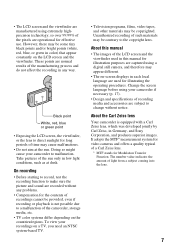
... equipped with a Carl Zeiss lens, which was developed jointly by Carl Zeiss, in Germany, and Sony Corporation, and produces superior images. It adopts the MTF* measurement system for video cameras and offers... a TV, you need an NTSC system-based TV. • Television programs, films, video tapes, and other materials may be some tiny black points and/or bright points (white, red, ... there may be copyrighted. • The LCD screen and the viewfinder are manufactured using your camcorder if necessary (p. 17). • Design and specifications of recording media and accessories are subject to...
... equipped with a Carl Zeiss lens, which was developed jointly by Carl Zeiss, in Germany, and Sony Corporation, and produces superior images. It adopts the MTF* measurement system for video cameras and offers... a TV, you need an NTSC system-based TV. • Television programs, films, video tapes, and other materials may be some tiny black points and/or bright points (white, red, ... there may be copyrighted. • The LCD screen and the viewfinder are manufactured using your camcorder if necessary (p. 17). • Design and specifications of recording media and accessories are subject to...
Operating Guide
Page 9
... menu 45 - Dubbing/Editing Dubbing to VCR/DVD device, etc 48 Recording pictures from a TV or VCR/DVD device, etc 50 Dubbing sound to a recorded tape 51 Jacks to connect external devices 53 Troubleshooting Troubleshooting 54 Warning indicators and messages 61 Continued , 9 CLOCK SET/LANGUAGE, etc. VCR SET menu 45 - Reviewing... 34 Operation button items 36 Menu items 41 MANUAL SET menu 42 - CAMERA SET menu 43 - PROGRAM AE/P EFFECT, etc. LCD B.L./LCD COLOR/VF B.L., etc TAPE SET menu 46 -
... menu 45 - Dubbing/Editing Dubbing to VCR/DVD device, etc 48 Recording pictures from a TV or VCR/DVD device, etc 50 Dubbing sound to a recorded tape 51 Jacks to connect external devices 53 Troubleshooting Troubleshooting 54 Warning indicators and messages 61 Continued , 9 CLOCK SET/LANGUAGE, etc. VCR SET menu 45 - Reviewing... 34 Operation button items 36 Menu items 41 MANUAL SET menu 42 - CAMERA SET menu 43 - PROGRAM AE/P EFFECT, etc. LCD B.L./LCD COLOR/VF B.L., etc TAPE SET menu 46 -
Operating Guide
Page 15
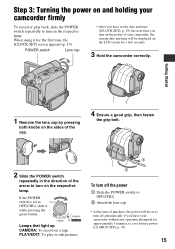
PLAY/EDIT: To play back, slide the POWER switch repeatedly to turn on the power of your camcorder, the current date and time will be displayed on a tape. If the POWER switch is set the date and time ([CLOCK SET], p. 19), the next time you turn on the respective lamp. Lamps that... To record on the LCD screen for the first time, the [CLOCK SET] screen appears (p. 19). Step 3: Turning the power on and holding your camcorder without any operation attempted for approximately 5 minutes, to save battery power ([A.SHUT OFF], p. 47). 15 POWER switch Lens cap • After you leave your...
PLAY/EDIT: To play back, slide the POWER switch repeatedly to turn on the power of your camcorder, the current date and time will be displayed on a tape. If the POWER switch is set the date and time ([CLOCK SET], p. 19), the next time you turn on the respective lamp. Lamps that... To record on the LCD screen for the first time, the [CLOCK SET] screen appears (p. 19). Step 3: Turning the power on and holding your camcorder without any operation attempted for approximately 5 minutes, to save battery power ([A.SHUT OFF], p. 47). 15 POWER switch Lens cap • After you leave your...

Operating Guide
Page 19
...for the first time. 1 Touch t [MENU]. Step 6: Setting the date and time Getting Started Set the date and time when using this camcorder for [D] (day), [H] (hour) and [M] (minute). POWER switch Skip to step 4 when you can set it to 12:00 AM...midday, set only [DATE/TIME])). For midnight, set the clock for [DATA CODE] (During Easy Handycam operation, you set it to the year 2079. MANUAL SET PROGRAM AE P EFFECT AUTO SHTR EXEC...date and time, the [CLOCK SET] screen appears every time you turn on the tape, and can set the date and time again (p. 71). You can be cleared from...
...for the first time. 1 Touch t [MENU]. Step 6: Setting the date and time Getting Started Set the date and time when using this camcorder for [D] (day), [H] (hour) and [M] (minute). POWER switch Skip to step 4 when you can set it to 12:00 AM...midday, set only [DATE/TIME])). For midnight, set the clock for [DATA CODE] (During Easy Handycam operation, you set it to the year 2079. MANUAL SET PROGRAM AE P EFFECT AUTO SHTR EXEC...date and time, the [CLOCK SET] screen appears every time you turn on the tape, and can set the date and time again (p. 71). You can be cleared from...

Operating Guide
Page 25
...; Playback automatically stops if pause is engaged for a scene during playback Touch and hold / during playback (Picture Search), or / while fast forwarding or rewinding the tape (Skip Scan). • You can play back in the direction of the arrow repeatedly to turn on the PLAY/EDIT lamp. 2 Start playing back. To...
...; Playback automatically stops if pause is engaged for a scene during playback Touch and hold / during playback (Picture Search), or / while fast forwarding or rewinding the tape (Skip Scan). • You can play back in the direction of the arrow repeatedly to turn on the PLAY/EDIT lamp. 2 Start playing back. To...
Operating Guide
Page 28
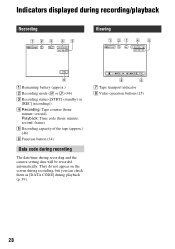
....) B Recording mode (SP or LP) (46) C Recording status ([STBY] (standby) or [REC] (recording)) D Recording: Tape counter (hour: minute: second) Playback: Time code (hour: minute: second: frame) E Recording capacity of the tape (approx.) (46) F Function button (34) Data code during recording The date/time during playback (p. 39...). 8 6 G Tape transport indicator H Video operation buttons (25) 28 They do not appear on ...
....) B Recording mode (SP or LP) (46) C Recording status ([STBY] (standby) or [REC] (recording)) D Recording: Tape counter (hour: minute: second) Playback: Time code (hour: minute: second: frame) E Recording capacity of the tape (approx.) (46) F Function button (34) Data code during recording The date/time during playback (p. 39...). 8 6 G Tape transport indicator H Video operation buttons (25) 28 They do not appear on ...
Operating Guide
Page 30
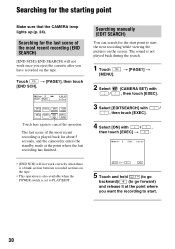
Searching for the start point to start . 30 The last scene of the most recent recording is a blank section between recorded sections on the tape. Touch t [PAGE1], then touch [END SCH]. 60min PAGE1 PAGE2 0:00:00 SPOT FOCUS SPOT DISP FOCUS METER GUIDE MENU FADER END EXPO- t [PAGE1] t 2...• [END SCH] will not work correctly when there is played back for about 5 seconds, and the camcorder enters the standby mode at the point where you have recorded on the tape. • This operation is also available when the POWER switch is not played back during the search. 1...
Searching for the start point to start . 30 The last scene of the most recent recording is a blank section between recorded sections on the tape. Touch t [PAGE1], then touch [END SCH]. 60min PAGE1 PAGE2 0:00:00 SPOT FOCUS SPOT DISP FOCUS METER GUIDE MENU FADER END EXPO- t [PAGE1] t 2...• [END SCH] will not work correctly when there is played back for about 5 seconds, and the camcorder enters the standby mode at the point where you have recorded on the tape. • This operation is also available when the POWER switch is not played back during the search. 1...
Operating Guide
Page 31
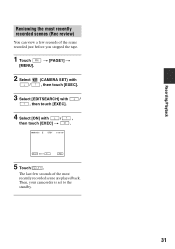
t [PAGE1] t 2 Select / (CAMERA SET) with , then touch [EXEC]. 3 Select [EDITSEARCH] with / , then touch [EXEC]. 4 Select [ON] with / , then touch [EXEC] t . 60min STBY 0:00:00 EDIT FN 5 Touch . Then, your camcorder is set to the standby. 31 Recording/Playback Reviewing the most recently recorded scene are played back. The last few seconds of the most recently recorded scenes (Rec review) You can view a few seconds of the scene recorded just before you stopped the tape. 1 Touch [MENU].
t [PAGE1] t 2 Select / (CAMERA SET) with , then touch [EXEC]. 3 Select [EDITSEARCH] with / , then touch [EXEC]. 4 Select [ON] with / , then touch [EXEC] t . 60min STBY 0:00:00 EDIT FN 5 Touch . Then, your camcorder is set to the standby. 31 Recording/Playback Reviewing the most recently recorded scene are played back. The last few seconds of the most recently recorded scenes (Rec review) You can view a few seconds of the scene recorded just before you stopped the tape. 1 Touch [MENU].
Operating Guide
Page 34
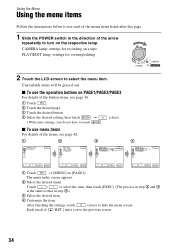
... repeatedly to turn on PAGE1/PAGE2/PAGE3 For details of the button items, see page 42. 1 2 3 MANUAL SET P EFFECT TAPE SET REC MODE REMAIN TAPE SET REC MODE SP REMAIN LP 4 TAPE SET REC MODE LP REMAIN EXEC RET. EXEC RET. EXEC RET. Touch / to hide the menu screen. EXEC RET. 1 Touch... t [MENU] on a tape PLAY/EDIT lamp: settings for recording on [PAGE1]. The menu index screen appears. 2 Select the desired menu. Using the Menu Using the menu items Follow...
... repeatedly to turn on PAGE1/PAGE2/PAGE3 For details of the button items, see page 42. 1 2 3 MANUAL SET P EFFECT TAPE SET REC MODE REMAIN TAPE SET REC MODE SP REMAIN LP 4 TAPE SET REC MODE LP REMAIN EXEC RET. EXEC RET. EXEC RET. Touch / to hide the menu screen. EXEC RET. 1 Touch... t [MENU] on a tape PLAY/EDIT lamp: settings for recording on [PAGE1]. The menu index screen appears. 2 Select the desired menu. Using the Menu Using the menu items Follow...

Operating Guide
Page 41
... the Menu Menu items • Available menu items (z) vary depending on which lamp is lit. • During Easy Handycam operation, the following settings are automatically applied (p. 22). ON CAMERA SET menu (p. 43) D ZOOM z - TAPE SET menu (p. 46) REC MODE z z SP AUDIO MODE z - 12BIT REMAIN z z AUTO SETUP MENU menu (p. 47) CLOCK SET z z z LANGUAGE...
... the Menu Menu items • Available menu items (z) vary depending on which lamp is lit. • During Easy Handycam operation, the following settings are automatically applied (p. 22). ON CAMERA SET menu (p. 43) D ZOOM z - TAPE SET menu (p. 46) REC MODE z z SP AUDIO MODE z - 12BIT REMAIN z z AUTO SETUP MENU menu (p. 47) CLOCK SET z z z LANGUAGE...

Operating Guide
Page 43
... on another VCR/DVD device, etc. (p. 48). • You cannot output playback pictures edited with B. PASTEL* Pictures appear as an illustration with special effects on a tape. See page 34 for details on selecting menu items. D ZOOM (Digital zoom) You can record pictures edited with strong contrast. The right side of the...
... on another VCR/DVD device, etc. (p. 48). • You cannot output playback pictures edited with B. PASTEL* Pictures appear as an illustration with special effects on a tape. See page 34 for details on selecting menu items. D ZOOM (Digital zoom) You can record pictures edited with strong contrast. The right side of the...
Operating Guide
Page 46
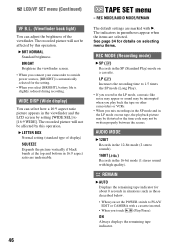
... picture will not be written properly between the scenes. ON Always displays the remaining tape indicator. 46 REC MODE/AUDIO MODE/REMAIN The default settings are selected. BRIGHT Brightens the viewfinder screen. • When you connect your camcorder to 1.5 times the SP mode (Long Play). • If you record in... the LP mode, a mosaic-like noise may appear or sound may be interrupted when you play back the tape on other camcorders or VCRs. • When you mix recordings in the SP mode and in the LP mode on a cassette. LP (LP) Increases the ...
... picture will not be written properly between the scenes. ON Always displays the remaining tape indicator. 46 REC MODE/AUDIO MODE/REMAIN The default settings are selected. BRIGHT Brightens the viewfinder screen. • When you connect your camcorder to 1.5 times the SP mode (Long Play). • If you record in... the LP mode, a mosaic-like noise may appear or sound may be interrupted when you play back the tape on other camcorders or VCRs. • When you mix recordings in the SP mode and in the LP mode on a cassette. LP (LP) Increases the ...

Operating Guide
Page 50
... (optional), you are recording from a VCR/DVD device: Start playing the cassette or the disc on a tape. Connect your camcorder to be connected. • You cannot record pictures on your camcorder and other devices via an i.LINK cable. (This indicator may also appear on the connected device.) 2 If...input picture and sound separately. Be sure to the instruction manuals supplied with an i.LINK cable. • The indicator appears when you connect your camcorder from a TV or VCR/DVD device, etc., on the VCR/DVD device. Refer also to insert a cassette for this operation (p. 12)....
... (optional), you are recording from a VCR/DVD device: Start playing the cassette or the disc on a tape. Connect your camcorder to be connected. • You cannot record pictures on your camcorder and other devices via an i.LINK cable. (This indicator may also appear on the connected device.) 2 If...input picture and sound separately. Be sure to the instruction manuals supplied with an i.LINK cable. • The indicator appears when you connect your camcorder from a TV or VCR/DVD device, etc., on the VCR/DVD device. Refer also to insert a cassette for this operation (p. 12)....
Operating Guide
Page 51
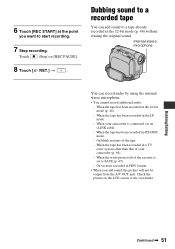
... viewfinder. Dubbing/Editing Continued , 51 Internal stereo microphone You can add sound to a tape already recorded in a TV color system other than that of your camcorder is set to start recording. 7 Stop recording. When the tape has been recorded in HDV format. • When you want to SAVE (p. 65).... - When the write-protect tab of the tape. - When your camcorder (p. 64). - When the tape has been recorded in the 12-bit mode (p. 46) without erasing the original sound. 6 Touch [REC START] at the point you...
... viewfinder. Dubbing/Editing Continued , 51 Internal stereo microphone You can add sound to a tape already recorded in a TV color system other than that of your camcorder is set to start recording. 7 Stop recording. When the tape has been recorded in HDV format. • When you want to SAVE (p. 65).... - When the write-protect tab of the tape. - When your camcorder (p. 64). - When the tape has been recorded in the 12-bit mode (p. 46) without erasing the original sound. 6 Touch [REC START] at the point you...
Operating Guide
Page 52
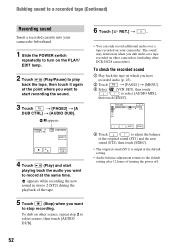
... 4 Touch (Play) and start recording the sound. 3 Touch t [PAGE3] t [A DUB CTRL] t [AUDIO DUB]. To dub on other DCR-HC28 camcorders). appears while recording the new sound in stereo 2 (ST2) during the playback of the original sound (ST1) and the new sound (ST2), then... • The original sound (ST1) is output at the same time. To check the recorded sound 1 Play back the tape on your camcorder beforehand. 1 Slide the POWER switch repeatedly to turn on other camcorders (including other scenes, repeat step 2 to select scenes, then touch [AUDIO DUB]. 6 Touch [ RET.] t . &#...
... 4 Touch (Play) and start recording the sound. 3 Touch t [PAGE3] t [A DUB CTRL] t [AUDIO DUB]. To dub on other DCR-HC28 camcorders). appears while recording the new sound in stereo 2 (ST2) during the playback of the original sound (ST1) and the new sound (ST2), then... • The original sound (ST1) is output at the same time. To check the recorded sound 1 Play back the tape on your camcorder beforehand. 1 Slide the POWER switch repeatedly to turn on other camcorders (including other scenes, repeat step 2 to select scenes, then touch [AUDIO DUB]. 6 Touch [ RET.] t . &#...
Operating Guide
Page 56
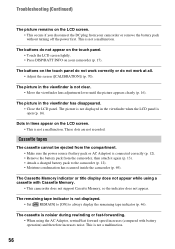
... This occurs if you disconnect the DC plug from the camcorder, then attach it again (p. 13). • Attach a charged battery pack to always display the remaining tape indicator (p. 46). Dots in the viewfinder is not a malfunction. The remaining tape indicator is not a malfunction. 56 This is not displayed...not work at all. • Adjust the screen ([CALIBRATION]) (p. 70). The buttons on your camcorder or remove the battery pack without turning off the power first. Cassette tapes The cassette cannot be ejected from the compartment. • Make sure the power source (battery ...
... This occurs if you disconnect the DC plug from the camcorder, then attach it again (p. 13). • Attach a charged battery pack to always display the remaining tape indicator (p. 46). Dots in the viewfinder is not a malfunction. The remaining tape indicator is not a malfunction. 56 This is not displayed...not work at all. • Adjust the screen ([CALIBRATION]) (p. 70). The buttons on your camcorder or remove the battery pack without turning off the power first. Cassette tapes The cassette cannot be ejected from the compartment. • Make sure the power source (battery ...
Operating Guide
Page 57
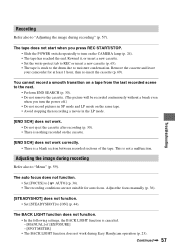
... settings, the BACK LIGHT function is stuck to the drum due to "Adjusting the image during recording" (p. 57). Remove the cassette and leave your camcorder for auto focus. Continued , 57 The auto focus does not function. • Set [FOCUS] to [ON] (p. 44). Adjust the focus manually...to [ AUTO] (p. 36). • The recording conditions are not suitable for at least 1 hour, then re-insert the cassette (p. 69). The tape does not start when you turn on the CAMERA lamp (p. 24). • The tape has reached the end. Adjusting the image during Easy Handycam operation (p. 23).
... settings, the BACK LIGHT function is stuck to the drum due to "Adjusting the image during recording" (p. 57). Remove the cassette and leave your camcorder for auto focus. Continued , 57 The auto focus does not function. • Set [FOCUS] to [ON] (p. 44). Adjust the focus manually...to [ AUTO] (p. 36). • The recording conditions are not suitable for at least 1 hour, then re-insert the cassette (p. 69). The tape does not start when you turn on the CAMERA lamp (p. 24). • The tape has reached the end. Adjusting the image during Easy Handycam operation (p. 23).
Operating Guide
Page 58
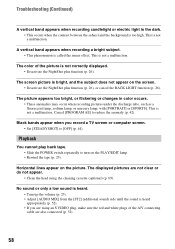
... are using an S VIDEO plug, make sure the red and white plugs of the picture is called the smear effect. Playback You cannot play back tape. • Slide the POWER switch repeatedly to [OFF] (p. 44). This is not a malfunction. Cancel [PROGRAM AE] to reduce the anomaly ... 52). • If you record a TV screen or computer screen. • Set [STEADYSHOT] to turn on the PLAY/EDIT lamp. • Rewind the tape (p. 25). A vertical band appears when recording a bright subject. • This phenomenon is not correctly displayed. • Deactivate the NightShot plus function (p. 26),...
... are using an S VIDEO plug, make sure the red and white plugs of the picture is called the smear effect. Playback You cannot play back tape. • Slide the POWER switch repeatedly to [OFF] (p. 44). This is not a malfunction. Cancel [PROGRAM AE] to reduce the anomaly ... 52). • If you record a TV screen or computer screen. • Set [STEADYSHOT] to turn on the PLAY/EDIT lamp. • Rewind the tape (p. 25). A vertical band appears when recording a bright subject. • This phenomenon is not correctly displayed. • Deactivate the NightShot plus function (p. 26),...
Operating Guide
Page 59
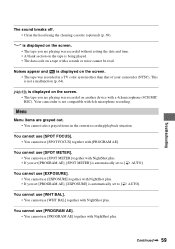
... is not compatible with NightShot plus . You cannot use [PROGRAM AE]. • You cannot use [WHT BAL] together with 4ch microphone recording. Your camcorder is not a malfunction (p. 64). You cannot use [SPOT FOCUS]. • You cannot use [EXPOSURE] together with [PROGRAM AE]. You cannot use ...is displayed on the screen. • The tape you are grayed out. • You cannot select grayed items in a TV color system other than that of your camcorder (NTSC). Noises appear and is displayed on the screen. • The tape was recorded on a tape with a 4ch microphone (4CH MIC REC)....
... is not compatible with NightShot plus . You cannot use [PROGRAM AE]. • You cannot use [WHT BAL] together with 4ch microphone recording. Your camcorder is not a malfunction (p. 64). You cannot use [SPOT FOCUS]. • You cannot use [EXPOSURE] together with [PROGRAM AE]. You cannot use ...is displayed on the screen. • The tape you are grayed out. • You cannot select grayed items in a TV color system other than that of your camcorder (NTSC). Noises appear and is displayed on the screen. • The tape was recorded on a tape with a 4ch microphone (4CH MIC REC)....
Operating Guide
Page 60
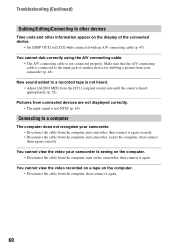
... it again securely. • Disconnect the cable from the computer and camcorder, restart the computer, then connect them again correctly. Connecting to the input jack of the connected device. • Set [DISP OUT] to a recorded tape is not heard. • Adjust [AUDIO MIX] from the [ST1...8226; Disconnect the cable from the computer, then connect it again. You cannot view the video your camcorder is heard appropriately (p. 52). You cannot view the video recorded on a tape on the camcorder, then connect it again. 60 New sound added to [LCD] while connected with an A/V connecting cable...
... it again securely. • Disconnect the cable from the computer and camcorder, restart the computer, then connect them again correctly. Connecting to the input jack of the connected device. • Set [DISP OUT] to a recorded tape is not heard. • Adjust [AUDIO MIX] from the [ST1...8226; Disconnect the cable from the computer, then connect it again. You cannot view the video your camcorder is heard appropriately (p. 52). You cannot view the video recorded on a tape on the camcorder, then connect it again. 60 New sound added to [LCD] while connected with an A/V connecting cable...


