
Operating Guide
Page 3
... on an unstable cart, stand, tripod, bracket, or table. Overloading Do not overload wall outlets, extension cords or convenience receptacles beyond their capacity, since this manual for example, near a bathtub, washbowl, kitchen sink, or laundry tub, in cabinet, unless proper ventilation is a safety feature. Attachments Do not use liquid cleaners or...
... on an unstable cart, stand, tripod, bracket, or table. Overloading Do not overload wall outlets, extension cords or convenience receptacles beyond their capacity, since this manual for example, near a bathtub, washbowl, kitchen sink, or laundry tub, in cabinet, unless proper ventilation is a safety feature. Attachments Do not use liquid cleaners or...
Operating Guide
Page 5
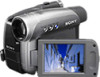
... may not cause harmful interference, and (2) this device must accept any changes or modifications not expressly approved in this manual could void your used in a residential installation. and CANADA RECYCLING LITHIUM-ION BATTERIES Lithium-Ion batteries are designed to...interference in accordance with Part 15 of Conformity Trade Name: SONY Model No.: DCR-HC28 Responsible Party: Sony Electronics Inc. For more information regarding recycling of rechargeable batteries, call : Sony Customer Information Center 1-800222-SONY (7669). If you have any interference received, including ...
... may not cause harmful interference, and (2) this device must accept any changes or modifications not expressly approved in this manual could void your used in a residential installation. and CANADA RECYCLING LITHIUM-ION BATTERIES Lithium-Ion batteries are designed to...interference in accordance with Part 15 of Conformity Trade Name: SONY Model No.: DCR-HC28 Responsible Party: Sony Electronics Inc. For more information regarding recycling of rechargeable batteries, call : Sony Customer Information Center 1-800222-SONY (7669). If you have any interference received, including ...
Operating Guide
Page 7
...and the viewfinder used for effective use. Take pictures of time may be copyrighted. About this manual for Modulation Transfer Function. Change the screen language before using your camcorder to the copyright laws. It adopts the MTF* measurement system for the contents of recordings ...cannot be some tiny black points and/or bright points (white, red, blue, or green in Germany, and Sony Corporation, and produces superior images...
...and the viewfinder used for effective use. Take pictures of time may be copyrighted. About this manual for Modulation Transfer Function. Change the screen language before using your camcorder to the copyright laws. It adopts the MTF* measurement system for the contents of recordings ...cannot be some tiny black points and/or bright points (white, red, blue, or green in Germany, and Sony Corporation, and produces superior images...
Operating Guide
Page 8
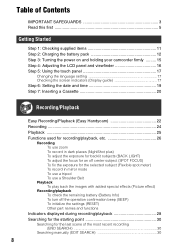
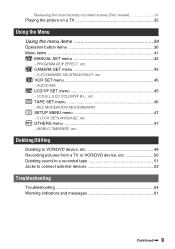
... Step 1: Checking supplied items 11 Step 2: Charging the battery pack 12 Step 3: Turning the power on and holding your camcorder firmly ......... 15 Step 4: Adjusting the LCD panel and viewfinder 16 Step 5: Using the touch panel 17 Changing the language ... Step 6: Setting the date and time 19 Step 7: Inserting a Cassette 20 Recording/Playback Easy Recording/Playback (Easy Handycam 22 Recording 24 Playback 25 Functions used for recording/playback, etc 26 Recording To use zoom To record in dark ... last scene of the most recent recording (END SEARCH 30 Searching manually (EDIT SEARCH 30 8
... Step 1: Checking supplied items 11 Step 2: Charging the battery pack 12 Step 3: Turning the power on and holding your camcorder firmly ......... 15 Step 4: Adjusting the LCD panel and viewfinder 16 Step 5: Using the touch panel 17 Changing the language ... Step 6: Setting the date and time 19 Step 7: Inserting a Cassette 20 Recording/Playback Easy Recording/Playback (Easy Handycam 22 Recording 24 Playback 25 Functions used for recording/playback, etc 26 Recording To use zoom To record in dark ... last scene of the most recent recording (END SEARCH 30 Searching manually (EDIT SEARCH 30 8
Operating Guide
Page 9
... scenes (Rec review 31 Playing the picture on a TV 32 Using the Menu Using the menu items 34 Operation button items 36 Menu items 41 MANUAL SET menu 42 - CAMERA SET menu 43 - WORLD TIME/BEEP, etc. PROGRAM AE/P EFFECT, etc. VCR SET menu 45 - AUDIO MIX LCD/VF SET menu...
... scenes (Rec review 31 Playing the picture on a TV 32 Using the Menu Using the menu items 34 Operation button items 36 Menu items 41 MANUAL SET menu 42 - CAMERA SET menu 43 - WORLD TIME/BEEP, etc. PROGRAM AE/P EFFECT, etc. VCR SET menu 45 - AUDIO MIX LCD/VF SET menu...
Operating Guide
Page 11
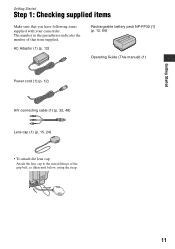
The number in the parentheses indicates the number of the grip belt, as illustrated below, using the strap. 11 Getting Started Getting Started Step 1: Checking supplied items Make sure that item supplied. AC Adaptor (1) (p. 12) Rechargeable battery pack NP-FP30 (1) (p. 12, 66) Operating Guide (This manual) (1) Power cord (1) (p. 12) A/V connecting cable (1) (p. 32, 48) Lens cap (1) (p. 15, 24) • To attach the lens cap Attach the lens cap to the metal fittings of that you have following items supplied with your camcorder.
The number in the parentheses indicates the number of the grip belt, as illustrated below, using the strap. 11 Getting Started Getting Started Step 1: Checking supplied items Make sure that item supplied. AC Adaptor (1) (p. 12) Rechargeable battery pack NP-FP30 (1) (p. 12, 66) Operating Guide (This manual) (1) Power cord (1) (p. 12) A/V connecting cable (1) (p. 32, 48) Lens cap (1) (p. 15, 24) • To attach the lens cap Attach the lens cap to the metal fittings of that you have following items supplied with your camcorder.
Operating Guide
Page 18
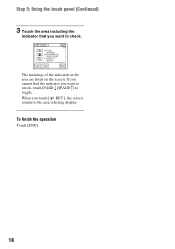
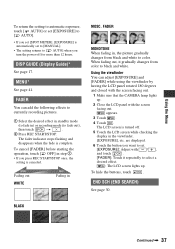
When you touch [ RET.], the screen returns to the area selecting display. If you cannot find the indicator you want to check. To finish the operation Touch [END]. 18 The meanings of the indicators in the area are listed on the screen. Step 5: Using the touch panel (Continued) 3 Touch the area including the indicator that you want to check, touch [PAGE r]/[PAGE R] to toggle. DISP GUIDE FOCUS: MANUAL PROGRAM AE: SPOTLIGHT P EFFECT: SEPIA END 1/2 PAGE PAGE RET.
When you touch [ RET.], the screen returns to the area selecting display. If you cannot find the indicator you want to check. To finish the operation Touch [END]. 18 The meanings of the indicators in the area are listed on the screen. Step 5: Using the touch panel (Continued) 3 Touch the area including the indicator that you want to check, touch [PAGE r]/[PAGE R] to toggle. DISP GUIDE FOCUS: MANUAL PROGRAM AE: SPOTLIGHT P EFFECT: SEPIA END 1/2 PAGE PAGE RET.

Operating Guide
Page 19
MANUAL SET PROGRAM AE P EFFECT AUTO SHTR EXEC RET. 2 Select / (SETUP MENU) with / , then touch . The clock starts. • The date and time are not displayed while recording, but they are automatically recorded on your camcorder or change the POWER switch position. • If ...during playback (see page 39 for the first time. 1 Touch t [MENU]. For midday, set the clock for [DATA CODE] (During Easy Handycam operation, you do not use your camcorder for [D] (day), [H] (hour) and [M] (minute). SETUP MENU CLOCK SET LANGUAGE DEMO MODE --:--:-- 3 Select [CLOCK SET] with / ...
MANUAL SET PROGRAM AE P EFFECT AUTO SHTR EXEC RET. 2 Select / (SETUP MENU) with / , then touch . The clock starts. • The date and time are not displayed while recording, but they are automatically recorded on your camcorder or change the POWER switch position. • If ...during playback (see page 39 for the first time. 1 Touch t [MENU]. For midday, set the clock for [DATA CODE] (During Easy Handycam operation, you do not use your camcorder for [D] (day), [H] (hour) and [M] (minute). SETUP MENU CLOCK SET LANGUAGE DEMO MODE --:--:-- 3 Select [CLOCK SET] with / ...
Operating Guide
Page 26
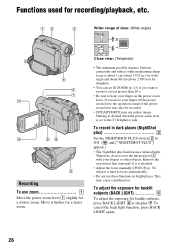
... your fingers or other objects. This may not reduce image blurring as desired when the power zoom lever is attached. • Adjust the focus manually ([FOCUS], p. 36) when it further for a faster zoom. To adjust the exposure for backlit subjects (BACK LIGHT 6 To adjust the exposure... Set the NIGHTSHOT PLUS switch 2 to keep your finger on the power zoom lever. Close view: (Telephoto) • The minimum possible distance between camcorder and subject while maintaining sharp focus is hard to focus automatically. • Do not use zoom 1 Move the power zoom lever 1 slightly for a...
... your fingers or other objects. This may not reduce image blurring as desired when the power zoom lever is attached. • Adjust the focus manually ([FOCUS], p. 36) when it further for a faster zoom. To adjust the exposure for backlit subjects (BACK LIGHT 6 To adjust the exposure... Set the NIGHTSHOT PLUS switch 2 to keep your finger on the power zoom lever. Close view: (Telephoto) • The minimum possible distance between camcorder and subject while maintaining sharp focus is hard to focus automatically. • Do not use zoom 1 Move the power zoom lever 1 slightly for a...

Operating Guide
Page 29
... MODE (46) Upper right Indicator Meaning DV input (50) Center Indicator % Z Meaning NightShot plus (26) Warning (61) Bottom Indicator 9 . Meaning Flexible spot meter (36)/ Manual exposure (38) Manual focus (36) Backlight (26) PROGRAM AE (42) n / EDIT + Picture effect (42) White balance (38) Wide select (44) SteadyShot off (44) Panel off (37) EDITSEARCH...
... MODE (46) Upper right Indicator Meaning DV input (50) Center Indicator % Z Meaning NightShot plus (26) Warning (61) Bottom Indicator 9 . Meaning Flexible spot meter (36)/ Manual exposure (38) Manual focus (36) Backlight (26) PROGRAM AE (42) n / EDIT + Picture effect (42) White balance (38) Wide select (44) SteadyShot off (44) Panel off (37) EDITSEARCH...
Operating Guide
Page 30
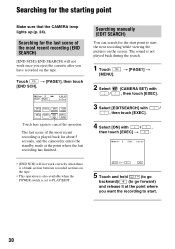
... again to go forward) and release it at the point where the last recording has finished. Searching for the start point to start . 30 Searching manually (EDIT SEARCH) You can search for the last scene of the most recent recording (END SEARCH) [END SCH] (END SEARCH) will not work...FOCUS METER GUIDE MENU FADER END EXPO- The sound is a blank section between recorded sections on the tape. Searching for about 5 seconds, and the camcorder enters the standby mode at the point where you have recorded on the tape. • This operation is also available when the POWER switch is...
... again to go forward) and release it at the point where the last recording has finished. Searching for the start point to start . 30 Searching manually (EDIT SEARCH) You can search for the last scene of the most recent recording (END SEARCH) [END SCH] (END SEARCH) will not work...FOCUS METER GUIDE MENU FADER END EXPO- The sound is a blank section between recorded sections on the tape. Searching for about 5 seconds, and the camcorder enters the standby mode at the point where you have recorded on the tape. • This operation is also available when the POWER switch is...
Operating Guide
Page 32
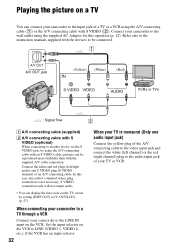
...OUT jack (Yellow) (White) (Red) VCRs or TVs : Signal flow 2 A A/V connecting cable (supplied) B A/V connecting cable with an S VIDEO cable, pictures can connect your camcorder to the LINE IN input on the VCR to LINE (VIDEO 1, VIDEO 2, etc.), if the VCR has an input selector. 32 When your TV is...jack of an A/V connecting cable. Refer also to the instruction manuals supplied with the devices to be reproduced more faithfully than with the supplied A/V cable connection. Set the input selector on the VCR. Connect your camcorder to the video input jack and connect the white (left /right...
...OUT jack (Yellow) (White) (Red) VCRs or TVs : Signal flow 2 A A/V connecting cable (supplied) B A/V connecting cable with an S VIDEO cable, pictures can connect your camcorder to the LINE IN input on the VCR to LINE (VIDEO 1, VIDEO 2, etc.), if the VCR has an input selector. 32 When your TV is...jack of an A/V connecting cable. Refer also to the instruction manuals supplied with the devices to be reproduced more faithfully than with the supplied A/V cable connection. Set the input selector on the VCR. Connect your camcorder to the video input jack and connect the white (left /right...
Operating Guide
Page 34
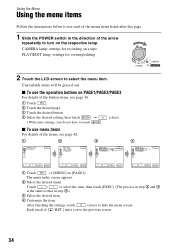
... of [ RET.] takes you do not have to touch . (close ) to turn on PAGE1/PAGE2/PAGE3 For details of the button items, see page 42. 1 2 3 MANUAL SET P EFFECT TAPE SET REC MODE REMAIN TAPE SET REC MODE SP REMAIN LP 4 TAPE SET REC MODE LP REMAIN EXEC RET. x To use each...
... of [ RET.] takes you do not have to touch . (close ) to turn on PAGE1/PAGE2/PAGE3 For details of the button items, see page 42. 1 2 3 MANUAL SET P EFFECT TAPE SET REC MODE REMAIN TAPE SET REC MODE SP REMAIN LP 4 TAPE SET REC MODE LP REMAIN EXEC RET. x To use each...
Operating Guide
Page 36
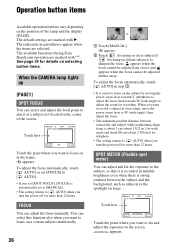
...point to aim it is recorded in suitable brightness even when there is automatically set [SPOT FOCUS], [FOCUS] is strong contrast between camcorder and subject while maintaining sharp focus is about 1 cm (about 13/32 in the frame. 9 appears. Operation button items Available ...operation buttons vary depending on the position of the screen. You can adjust the focus manually. The available functions during Easy Handycam operation are marked with B. Touch here 60min STBY SPOT FOCUS 0:00:00 AUTO OK Touch the point where you ...
...point to aim it is recorded in suitable brightness even when there is automatically set [SPOT FOCUS], [FOCUS] is strong contrast between camcorder and subject while maintaining sharp focus is about 1 cm (about 13/32 in the frame. 9 appears. Operation button items Available ...operation buttons vary depending on the position of the screen. You can adjust the focus manually. The available functions during Easy Handycam operation are marked with B. Touch here 60min STBY SPOT FOCUS 0:00:00 AUTO OK Touch the point where you ...
Operating Guide
Page 37
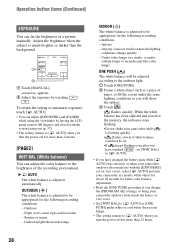
... pictures. 1 Select the desired effect in standby mode (to fade in) or recording mode (to black and white. The LCD screen is automatically set to [MANUAL]. • The setting returns to [ AUTO] when you turn the power off . 5 Touch the LCD screen while checking the display in the viewfinder. [EXPOSURE], etc...
... pictures. 1 Select the desired effect in standby mode (to fade in) or recording mode (to black and white. The LCD screen is automatically set to [MANUAL]. • The setting returns to [ AUTO] when you turn the power off . 5 Touch the LCD screen while checking the display in the viewfinder. [EXPOSURE], etc...
Operating Guide
Page 38
... will shoot the subject. 3 Touch . Operation button items (Continued) EXPOSURE You can adjust the color balance to the brightness of a picture manually. Night views, neon signs and fireworks - Under daylight fluorescent lamps INDOOR (n) The white balance is adjusted to [ AUTO] when you turn ...:00 OK 1 MANU- Sunrise or sunset - Under video lamps in the memory, the indicator stops flashing. •Do not shake your camcorder outdoors from inside use with the screen facing out (p. 37). • The setting returns to be appropriate for the following recording conditions: ...
... will shoot the subject. 3 Touch . Operation button items (Continued) EXPOSURE You can adjust the color balance to the brightness of a picture manually. Night views, neon signs and fireworks - Under daylight fluorescent lamps INDOOR (n) The white balance is adjusted to [ AUTO] when you turn ...:00 OK 1 MANU- Sunrise or sunset - Under video lamps in the memory, the indicator stops flashing. •Do not shake your camcorder outdoors from inside use with the screen facing out (p. 37). • The setting returns to be appropriate for the following recording conditions: ...

Operating Guide
Page 41
...z -* BEEP z z z A.SHUT OFF z z 5min DISP OUT z z LCD * The value set before Easy Handycam operation will be retained during Easy Handycam operation. 41 LCD/VF SET menu (p. 45) LCD B.L. z z BRT NORMAL LCD COLOR z z - Using the ...Menu Menu items • Available menu items (z) vary depending on which lamp is lit. • During Easy Handycam operation, the following settings are automatically applied (p. 22). CAMERA PLAY/EDIT Easy Handycam MANUAL...
...z -* BEEP z z z A.SHUT OFF z z 5min DISP OUT z z LCD * The value set before Easy Handycam operation will be retained during Easy Handycam operation. 41 LCD/VF SET menu (p. 45) LCD B.L. z z BRT NORMAL LCD COLOR z z - Using the ...Menu Menu items • Available menu items (z) vary depending on which lamp is lit. • During Easy Handycam operation, the following settings are automatically applied (p. 22). CAMERA PLAY/EDIT Easy Handycam MANUAL...
Operating Guide
Page 42
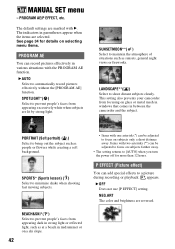
... or metal mesh in windows that comes in various situations with B. P EFFECT (Picture effect) You can record pictures effectively in between the camcorder and the subject. Items with one asterisk (*) can be adjusted to bring out the subject such as sunsets, general night views or fireworks.....ART The color and brightness are marked with the PROGRAM AE function. appears. PROGRAM AE/P EFFECT, etc. This setting also prevents your camcorder from appearing dark in strong light or reflected light, such as at a beach in parentheses appear when the items are lit by strong...
... or metal mesh in windows that comes in various situations with B. P EFFECT (Picture effect) You can record pictures effectively in between the camcorder and the subject. Items with one asterisk (*) can be adjusted to bring out the subject such as sunsets, general night views or fireworks.....ART The color and brightness are marked with the PROGRAM AE function. appears. PROGRAM AE/P EFFECT, etc. This setting also prevents your camcorder from appearing dark in strong light or reflected light, such as at a beach in parentheses appear when the items are lit by strong...

Operating Guide
Page 48
...connecting to [LCD] (the default setting) (p. 47). Connect the white and red plugs (left channel) plug to the audio jack on your camcorder to VCR/DVD device, etc. Note that you cannot output picture and sound separately. • When you are transmitted digitally, producing high quality... pictures and sound. Refer also to the instruction manuals supplied with the devices to be connected. 1 A/V OUT A/V OUT jack AUDIO/ VIDEO jacks (Yellow) (White) (Red) VCR/DVD device To...
...connecting to [LCD] (the default setting) (p. 47). Connect the white and red plugs (left channel) plug to the audio jack on your camcorder to VCR/DVD device, etc. Note that you cannot output picture and sound separately. • When you are transmitted digitally, producing high quality... pictures and sound. Refer also to the instruction manuals supplied with the devices to be connected. 1 A/V OUT A/V OUT jack AUDIO/ VIDEO jacks (Yellow) (White) (Red) VCR/DVD device To...

Operating Guide
Page 50
You can connect your camcorder to the instruction manuals supplied with an i.LINK cable. • The indicator appears when you connect your camcorder and other devices via an i.LINK cable. (This indicator may also appear on the connected device.) 2 If you can record pictures or TV programs from a ...
You can connect your camcorder to the instruction manuals supplied with an i.LINK cable. • The indicator appears when you connect your camcorder and other devices via an i.LINK cable. (This indicator may also appear on the connected device.) 2 If you can record pictures or TV programs from a ...


