
Operating Guide
Page 10
...camcorder 24 Step 4: Adjusting the LCD screen and viewfinder 25 Step 5: Using the touch panel 26 Step 6: Setting the date and time 27 Step 7: Inserting a disc or a "Memory Stick Duo 28 Step 8: Selecting the aspect ratio (16:9 or 4:3) of Contents Enjoying with your DVD Handycam What you can do with your DVD Handycam... 14 Choosing a disc 16 Using your DVD Handycam 18 Getting Started Step 1: Checking supplied items 20 Step 2: Charging the battery pack 21 ...
...camcorder 24 Step 4: Adjusting the LCD screen and viewfinder 25 Step 5: Using the touch panel 26 Step 6: Setting the date and time 27 Step 7: Inserting a disc or a "Memory Stick Duo 28 Step 8: Selecting the aspect ratio (16:9 or 4:3) of Contents Enjoying with your DVD Handycam What you can do with your DVD Handycam... 14 Choosing a disc 16 Using your DVD Handycam 18 Getting Started Step 1: Checking supplied items 20 Step 2: Charging the battery pack 21 ...
Operating Guide
Page 16
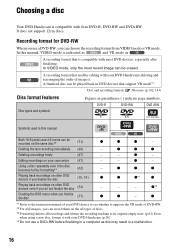
... see whether it with your DVD Handycam (p.28). *4 Do not use a DVD-RW, you finalize the disc (38, 54) z Playing back recordings on your camcorder (87) - z - - A recording format that support VR mode*1. Editing recordings on other DVD devices if you can be recorded on the all types of images). DVD-R DVD-RW DVD+RW Disc types and symbols...
... see whether it with your DVD Handycam (p.28). *4 Do not use a DVD-RW, you finalize the disc (38, 54) z Playing back recordings on your camcorder (87) - z - - A recording format that support VR mode*1. Editing recordings on other DVD devices if you can be recorded on the all types of images). DVD-R DVD-RW DVD+RW Disc types and symbols...
Operating Guide
Page 29
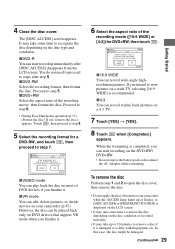
...disc cover. You do not need to proceed to step 6. • During Easy Handycam operation (p.33), [Format the disc? Proceed to steps after [DISC ACCESS] disappears from the LCD screen. FORMAT : VIDEO Can playback on DVD devices that case, the disc might be recorded. If not, remove the disc.]... or vibration to be damaged. 29 Getting Started Proceed to step 7. x4:3 You can edit, delete pictures, or divide movies on your camcorder while the ACCESS lamp lights up or flashes, or [DISC ACCESS] or [PREPARING TO OPEN] is displayed on the disc condition or recorded...
...disc cover. You do not need to proceed to step 6. • During Easy Handycam operation (p.33), [Format the disc? Proceed to steps after [DISC ACCESS] disappears from the LCD screen. FORMAT : VIDEO Can playback on DVD devices that case, the disc might be recorded. If not, remove the disc.]... or vibration to be damaged. 29 Getting Started Proceed to step 7. x4:3 You can edit, delete pictures, or divide movies on your camcorder while the ACCESS lamp lights up or flashes, or [DISC ACCESS] or [PREPARING TO OPEN] is displayed on the disc condition or recorded...
Operating Guide
Page 33
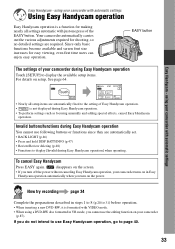
... a function for easy viewing, even first time users can enjoy easy operation. using a DVD-RW disc formatted in Easy Handycam operation automatically when you cannot use Easy Handycam operation, go to display the available setup items. For details on your camcorder turns on in VR mode, you turn off the power without canceling Easy...
... a function for easy viewing, even first time users can enjoy easy operation. using a DVD-RW disc formatted in Easy Handycam operation automatically when you cannot use Easy Handycam operation, go to display the available setup items. For details on your camcorder turns on in VR mode, you turn off the power without canceling Easy...
Operating Guide
Page 35
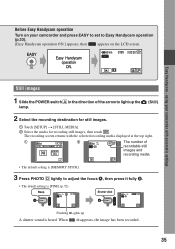
... A, then press it fully B. • The deault setting is heard. Before Easy Handycam operation Turn on the LCD screen. using your camcorder and press EASY to set to Easy Handycam operation (p.33). [Easy Handycam operation ON.] appears, then appears on your camcorder with the selected recording media displayed at the top right. 1 2 The number of... for still images. 1 Touch [SETUP] t [STILL MEDIA]. 2 Select the media for recording still images, then touch . When disappears, the image has been recorded. 35 Easy Handycam -
... A, then press it fully B. • The deault setting is heard. Before Easy Handycam operation Turn on the LCD screen. using your camcorder and press EASY to set to Easy Handycam operation (p.33). [Easy Handycam operation ON.] appears, then appears on your camcorder with the selected recording media displayed at the top right. 1 2 The number of... for still images. 1 Touch [SETUP] t [STILL MEDIA]. 2 Select the media for recording still images, then touch . When disappears, the image has been recorded. 35 Easy Handycam -
Operating Guide
Page 37
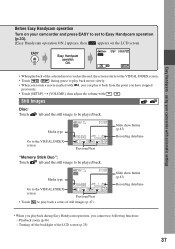
... type Go to the VISUAL INDEX screen Previous/Next "Memory Stick Duo": Touch tab and the still image to Easy Handycam operation (p.33). [Easy Handycam operation ON.] appears, then appears on your camcorder with i, you touch a movie marked with automatic settings • When playback of the LCD screen (p.25) 37 Turning off the...
... type Go to the VISUAL INDEX screen Previous/Next "Memory Stick Duo": Touch tab and the still image to Easy Handycam operation (p.33). [Easy Handycam operation ON.] appears, then appears on your camcorder with i, you touch a movie marked with automatic settings • When playback of the LCD screen (p.25) 37 Turning off the...
Operating Guide
Page 38
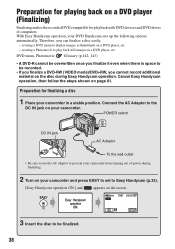
..., then follow the steps shown on page 61. With Easy Handycam operation, your camcorder in a stable position. Preparation for playback with DVD devices and DVD drives of power during Easy Handycam operation. Preparation for playing back on a DVD player (Finalizing) Finalizing makes the recorded DVD compatible for finalizing a disc 1 Place your DVD Handycam sets up the following options automatically.
..., then follow the steps shown on page 61. With Easy Handycam operation, your camcorder in a stable position. Preparation for playback with DVD devices and DVD drives of power during Easy Handycam operation. Preparation for playing back on a DVD player (Finalizing) Finalizing makes the recorded DVD compatible for finalizing a disc 1 Place your DVD Handycam sets up the following options automatically.
Operating Guide
Page 39
...; Do not apply shock or vibration to record in the following steps. 1 2 3 Easy Handycam - If you want to reuse a DVD-RW to your camcorder. Enjoy watching images on the DVD device or DVD drive, etc. Completed a disc Remove the disc from your camcorder, and do not disconnect the AC adaptor during finalizing. • The shorter the...
...; Do not apply shock or vibration to record in the following steps. 1 2 3 Easy Handycam - If you want to reuse a DVD-RW to your camcorder. Enjoy watching images on the DVD device or DVD drive, etc. Completed a disc Remove the disc from your camcorder, and do not disconnect the AC adaptor during finalizing. • The shorter the...
Operating Guide
Page 63
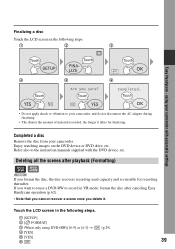
Cancel the protection with the original devices, and then format it. 63 Using the Recorded disc (DVD-RW/DVD+RW) • During Easy Handycam operation (p.33), the screen in step 5 does not appear even if you insert a DVD-RW in your camcorder. Proceed to step 7. • You cannot format a disc that has been protected on other devices.
Cancel the protection with the original devices, and then format it. 63 Using the Recorded disc (DVD-RW/DVD+RW) • During Easy Handycam operation (p.33), the screen in step 5 does not appear even if you insert a DVD-RW in your camcorder. Proceed to step 7. • You cannot format a disc that has been protected on other devices.
Operating Guide
Page 67
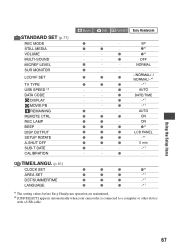
... LAMP BEEP DISP OUTPUT SETUP ROTATE A.SHUT OFF SUB-T DATE CALIBRATION Movie Still PLAY/EDIT Easy Handycam z - - TIME/LANGU. (p.81) CLOCK SET z z z z*1 AREA SET z z z -*1 DST/SUMMERTIME z z z -*1 LANGUAGE z z z -*1 *1 The setting values before Easy Handycam operation are maintained. *2 [USB SELECT] appears automatically when your camcorder is connected to a computer or other device with a USB cable. z*1 - -
... LAMP BEEP DISP OUTPUT SETUP ROTATE A.SHUT OFF SUB-T DATE CALIBRATION Movie Still PLAY/EDIT Easy Handycam z - - TIME/LANGU. (p.81) CLOCK SET z z z z*1 AREA SET z z z -*1 DST/SUMMERTIME z z z -*1 LANGUAGE z z z -*1 *1 The setting values before Easy Handycam operation are maintained. *2 [USB SELECT] appears automatically when your camcorder is connected to a computer or other device with a USB cable. z*1 - -
Operating Guide
Page 84
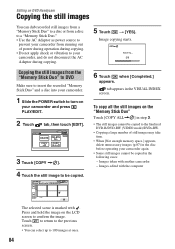
... 3. • The still images cannot be copied to the finalized DVD-R/DVD-RW (VIDEO mode)/DVD+RW. • Copying a large number of power during operation during copying. 5 Touch t [YES]. tab appears in the disc before operating your camcorder, and do not disconnect the AC Adaptor during copying. • ... to confirm the image. Press and hold the image on the LCD screen to your camcorder again. • Some still images cannot be copied. 6 Touch when [Completed.] appears. Editing on DVD Handycam Copying the still images You can select up to 100 images at once. 84 Copying ...
... 3. • The still images cannot be copied to the finalized DVD-R/DVD-RW (VIDEO mode)/DVD+RW. • Copying a large number of power during operation during copying. 5 Touch t [YES]. tab appears in the disc before operating your camcorder, and do not disconnect the AC Adaptor during copying. • ... to confirm the image. Press and hold the image on the LCD screen to your camcorder again. • Some still images cannot be copied. 6 Touch when [Completed.] appears. Editing on DVD Handycam Copying the still images You can select up to 100 images at once. 84 Copying ...
Operating Guide
Page 85
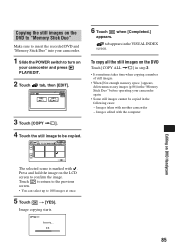
... number of still images. • When [Not enough memory space.] appears, delete unnecessary images (p.86) in the "Memory Stick Duo" before operating your camcorder and press PLAY/EDIT. 2 Touch tab, then [EDIT]. 3 Touch [COPY ]. 4 Touch the still image to be copied in the following cases: ...the computer Editing on DVD Handycam The selected scene is marked with another camcorder - Copying the still images on the DVD to "Memory Stick Duo" Make sure to insert the recorded DVD and "Memory Stick Duo" into your camcorder. 1 Slide the POWER switch to turn on your camcorder again. • ...
... number of still images. • When [Not enough memory space.] appears, delete unnecessary images (p.86) in the "Memory Stick Duo" before operating your camcorder and press PLAY/EDIT. 2 Touch tab, then [EDIT]. 3 Touch [COPY ]. 4 Touch the still image to be copied in the following cases: ...the computer Editing on DVD Handycam The selected scene is marked with another camcorder - Copying the still images on the DVD to "Memory Stick Duo" Make sure to insert the recorded DVD and "Memory Stick Duo" into your camcorder. 1 Slide the POWER switch to turn on your camcorder again. • ...
Operating Guide
Page 87
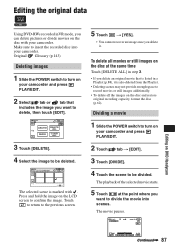
... be deleted. Press and hold the image on the LCD screen to turn on your camcorder. The playback of the selected movie starts. 5 Touch at the same time Touch [DELETE ALL] in a Playlist (p.88), it . Editing on DVD Handycam 87 Touch to return to the previous screen. 5 Touch t [YES]. • You cannot recover...
... be deleted. Press and hold the image on the LCD screen to turn on your camcorder. The playback of the selected movie starts. 5 Touch at the same time Touch [DELETE ALL] in a Playlist (p.88), it . Editing on DVD Handycam 87 Touch to return to the previous screen. 5 Touch t [YES]. • You cannot recover...
Operating Guide
Page 89
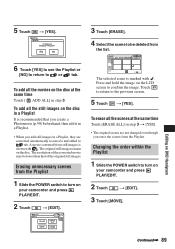
... converted from the list. 6 Touch [YES] to see the Playlist or [NO] to return to or tab. The original still images remain on DVD Handycam 89 Press and hold the image on the LCD screen to the previous screen. 5 Touch t [YES]. Touch to return to confirm the image. The... disc in a Playlist It is shown with . Editing on the disc. Changing the order within the Playlist 1 Slide the POWER switch to turn on your camcorder and press PLAY/EDIT. 2 Touch t [EDIT]. 3 Touch [MOVE]. Erasing unnecessary scenes from the Playlist. 5 Touch t [YES]. 3 Touch [ERASE]. 4 Select the ...
... converted from the list. 6 Touch [YES] to see the Playlist or [NO] to return to or tab. The original still images remain on DVD Handycam 89 Press and hold the image on the LCD screen to the previous screen. 5 Touch t [YES]. Touch to return to confirm the image. The... disc in a Playlist It is shown with . Editing on the disc. Changing the order within the Playlist 1 Slide the POWER switch to turn on your camcorder and press PLAY/EDIT. 2 Touch t [EDIT]. 3 Touch [MOVE]. Erasing unnecessary scenes from the Playlist. 5 Touch t [YES]. 3 Touch [ERASE]. 4 Select the ...
Operating Guide
Page 91
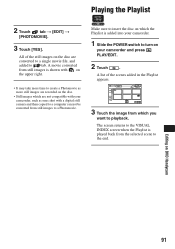
...converted from still images is played back from which you want to create a Photomovie as ones shot with your camcorder and press PLAY/EDIT. 2 Touch . A list of the still images on DVD Handycam 91 The screen returns to the VISUAL INDEX screen when the Playlist is shown with on the upper right.... • It may take more still images are converted to a single movie file, and added to the end. Editing on the disc are recorded on your camcorder, such ...
...converted from still images is played back from which you want to create a Photomovie as ones shot with your camcorder and press PLAY/EDIT. 2 Touch . A list of the still images on DVD Handycam 91 The screen returns to the VISUAL INDEX screen when the Playlist is shown with on the upper right.... • It may take more still images are converted to a single movie file, and added to the end. Editing on the disc are recorded on your camcorder, such ...
Operating Guide
Page 105
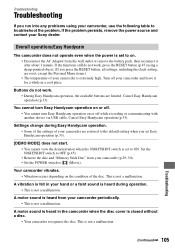
... your camcorder are ...camcorder periodically. • This is not a malfunction. Cancel Easy Handycam...camcorder, use the following table to on the condition of your hand or a faint sound is heard during Easy Handycam...Handycam operation (p.33). [DEMO MODE] does not start. • You cannot view the demonstration when the NIGHTSHOT switch is closed without a disc. • Your camcorder recognizes the disc. A vibration is felt in the camcorder...camcorder (p.29, 30). • Set the POWER switch to ON. A motor sound is set to (Movie). Overall operations/Easy Handycam The camcorder...
... your camcorder are ...camcorder periodically. • This is not a malfunction. Cancel Easy Handycam...camcorder, use the following table to on the condition of your hand or a faint sound is heard during Easy Handycam...Handycam operation (p.33). [DEMO MODE] does not start. • You cannot view the demonstration when the NIGHTSHOT switch is closed without a disc. • Your camcorder recognizes the disc. A vibration is felt in the camcorder...camcorder (p.29, 30). • Set the POWER switch to ON. A motor sound is set to (Movie). Overall operations/Easy Handycam The camcorder...
Operating Guide
Page 107
... connected to cancel [DEMO MODE]. An unknown indicator appears on the screen. • The camcorder is not clear. • Use the viewfinder lens adjustment lever to adjust the lens (p.25). Then, connect it again. Touch the LCD screen or insert a ... the touch panel. • Touch the LCD screen lightly. • Press DISP/BATT INFO on your camcorder (or DISPLAY on /off the power first. You cannot turn the LCD backlight off. • During Easy Handycam operation (p.33), you disconnect the AC Adaptor from the wall outlet. The picture in the viewfinder is...
... connected to cancel [DEMO MODE]. An unknown indicator appears on the screen. • The camcorder is not clear. • Use the viewfinder lens adjustment lever to adjust the lens (p.25). Then, connect it again. Touch the LCD screen or insert a ... the touch panel. • Touch the LCD screen lightly. • Press DISP/BATT INFO on your camcorder (or DISPLAY on /off the power first. You cannot turn the LCD backlight off. • During Easy Handycam operation (p.33), you disconnect the AC Adaptor from the wall outlet. The picture in the viewfinder is...
Operating Guide
Page 113
... be played back on an image in the current situation. " " is not a malfunction. For DVD-RW (VIDEO mode)/ DVD+RW, make the disc capable of the playback device. The DVD menu may freeze for an instant between the scenes. • The image may be displayed correctly. ... playback device for an instant between scenes depending on the DVD device being used. Cancel Easy Handycam operation (p.33). 113 Troubleshooting Check the compatibility in the instruction manual of additional recording (p.61), then remake the DVD menu by your camcorder when . This is indicated on a device that does...
... be played back on an image in the current situation. " " is not a malfunction. For DVD-RW (VIDEO mode)/ DVD+RW, make the disc capable of the playback device. The DVD menu may freeze for an instant between the scenes. • The image may be displayed correctly. ... playback device for an instant between scenes depending on the DVD device being used. Cancel Easy Handycam operation (p.33). 113 Troubleshooting Check the compatibility in the instruction manual of additional recording (p.61), then remake the DVD menu by your camcorder when . This is indicated on a device that does...
Operating Guide
Page 118
...] window appears. 5 Make sure that [SONY DDX-C1002 USB Device] appears in [DVD/CD-ROM drives], [Generic volume] in [Storage volumes], and [USB Mass Storage Device] in Easy Handycam operation. Cancel Easy Handycam operation (p.33) to unfinalize. • You cannot unfinalize a DVD-R/DVD-RW (VR mode)/DVD+RW (p.61). • Your camcorder is installed correctly. Remove the disc...
...] window appears. 5 Make sure that [SONY DDX-C1002 USB Device] appears in [DVD/CD-ROM drives], [Generic volume] in [Storage volumes], and [USB Mass Storage Device] in Easy Handycam operation. Cancel Easy Handycam operation (p.33) to unfinalize. • You cannot unfinalize a DVD-R/DVD-RW (VR mode)/DVD+RW (p.61). • Your camcorder is installed correctly. Remove the disc...

Operating Guide
Page 121
... [FULL SPEED] (p.79), it does not effect to the images or sounds transferred to turn on the screen of your camcorder. • You cannot start or cancel Easy Handycam operation while the USB cable is not removed with your computer. However, it does not effect to the images or sounds transferred.... • The computer does not recognize the "Memory Stick Duo" during camcorder operation such as disc playback or editing. You cannot copy the disc to the 12cm DVD using the USB cable. • The disc is not written to the computer again and transfer the data. However, it may stop ...
... [FULL SPEED] (p.79), it does not effect to the images or sounds transferred to turn on the screen of your camcorder. • You cannot start or cancel Easy Handycam operation while the USB cable is not removed with your computer. However, it does not effect to the images or sounds transferred.... • The computer does not recognize the "Memory Stick Duo" during camcorder operation such as disc playback or editing. You cannot copy the disc to the 12cm DVD using the USB cable. • The disc is not written to the computer again and transfer the data. However, it may stop ...


