
Operating Instructions
Page 11
... USB driver 90 Installing software 91 Connecting your camcorder to the computer 92 Consulting the on-line help (operating instructions) of ImageMixer Ver.1.5 for Sony DVD Handycam 97 Viewing scenes recorded on your computer 98 Viewing scenes on your camcorder - Getting Started Table of contents Using a disc...disc 102 Making a menu 102 Editing the contents 103 Recording on your computer Connecting your camcorder to a TV or a VCR 107 Dubbing onto a disc 107 Customizing your camcorder Changing the SETUP display 108 Selecting the option of each item 109 Troubleshooting Types of ...
... USB driver 90 Installing software 91 Connecting your camcorder to the computer 92 Consulting the on-line help (operating instructions) of ImageMixer Ver.1.5 for Sony DVD Handycam 97 Viewing scenes recorded on your computer 98 Viewing scenes on your camcorder - Getting Started Table of contents Using a disc...disc 102 Making a menu 102 Editing the contents 103 Recording on your computer Connecting your camcorder to a TV or a VCR 107 Dubbing onto a disc 107 Customizing your camcorder Changing the SETUP display 108 Selecting the option of each item 109 Troubleshooting Types of ...
Operating Instructions
Page 12
...cm (2.5 type) DVD300 3.8 mm (1/4.7 type) CCD, gross approx. 1 070 000 pixels 8.8 cm (3.5 type) Note on TV color systems TV color systems differ depending on your camcorder. Getting Started - You cannot dub copyright protected software on the country or region. Using this manual The instructions in this manual ...and operating your camcorder, check the model number by looking at the bottom of the camcorder, storage media, etc. 12 - Before you need an NTSC system-based TV. The DCR-DVD200 is not made due to copyright...
...cm (2.5 type) DVD300 3.8 mm (1/4.7 type) CCD, gross approx. 1 070 000 pixels 8.8 cm (3.5 type) Note on TV color systems TV color systems differ depending on your camcorder. Getting Started - You cannot dub copyright protected software on the country or region. Using this manual The instructions in this manual ...and operating your camcorder, check the model number by looking at the bottom of the camcorder, storage media, etc. 12 - Before you need an NTSC system-based TV. The DCR-DVD200 is not made due to copyright...
Operating Instructions
Page 45
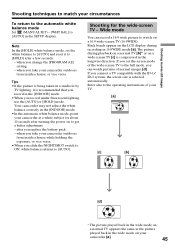
.... after turning the power on a wide-screen TV [c] is recommended that you record in the longwise direction. Refer also to the operating instructions of the wide-screen TV to the full mode, you take your circumstances To return to the automatic white balance mode Set (MANUAL SET)...or vice versa. Tips •If the picture is being taken in the SETUP display. Shooting movies/still images Shooting techniques to match your camcorder outdoors from inside a house while holding the exposure, or vice versa. •When you replace the battery pack. - Black bands appear...
.... after turning the power on a wide-screen TV [c] is recommended that you record in the longwise direction. Refer also to the operating instructions of the wide-screen TV to the full mode, you take your circumstances To return to the automatic white balance mode Set (MANUAL SET)...or vice versa. Tips •If the picture is being taken in the SETUP display. Shooting movies/still images Shooting techniques to match your camcorder outdoors from inside a house while holding the exposure, or vice versa. •When you replace the battery pack. - Black bands appear...
Operating Instructions
Page 62
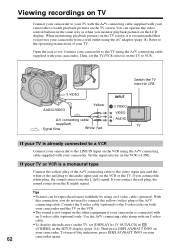
...: Signal flow White Red Switch the TV input to the operating instructions of your TV. Connect the S video cable (optional) to the S video jacks on both your camcorder and the TV or the VCR. • The sound is not.../BATT INFO on the TV screen, it is already connected to a VCR Connect your camcorder to the LINE IN input on the VCR using the AC adaptor (page 18). When monitoring playback pictures on... your 62 camcorder again. Refer to LINE. INPUT S VIDEO VIDEO AUDIO TV If your TV is recommended that...
...: Signal flow White Red Switch the TV input to the operating instructions of your TV. Connect the S video cable (optional) to the S video jacks on both your camcorder and the TV or the VCR. • The sound is not.../BATT INFO on the TV screen, it is already connected to a VCR Connect your camcorder to the LINE IN input on the VCR using the AC adaptor (page 18). When monitoring playback pictures on... your 62 camcorder again. Refer to LINE. INPUT S VIDEO VIDEO AUDIO TV If your TV is recommended that...
Operating Instructions
Page 63
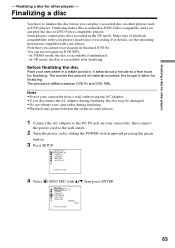
... AC adaptor during finalizing, the disc may be damaged. •Do not vibrate your camcorder during finalizing. •Playback may pause between DVD-Rs and DVD-RWs. For details, see the operating instructions supplied with v/V, then press ENTER. In VR mode: the disc is recordable if unfinalized.... - Notes •Power your camcorder from a wall outlet using the AC adaptor. •If you cannot record ...
... AC adaptor during finalizing, the disc may be damaged. •Do not vibrate your camcorder during finalizing. •Playback may pause between DVD-Rs and DVD-RWs. For details, see the operating instructions supplied with v/V, then press ENTER. In VR mode: the disc is recordable if unfinalized.... - Notes •Power your camcorder from a wall outlet using the AC adaptor. •If you cannot record ...

Operating Instructions
Page 68
Tip You can play back the disc on a computer without a DVD drive, by connecting your camcorder to the DVD drive of your computer. Or, double-click the [My Computer] icon on the volume label of the disc. When the DVD playback ... playback application must have been installed on your computer. •When playing back movies from the [Start] menu of your computer. For details, see operating instructions of your computer. Following screens are example of Microsoft Windows XP Professional. 1 Turn on your computer. 2 Insert the finalized disc to your computer (page 89...
Tip You can play back the disc on a computer without a DVD drive, by connecting your camcorder to the DVD drive of your computer. Or, double-click the [My Computer] icon on the volume label of the disc. When the DVD playback ... playback application must have been installed on your computer. •When playing back movies from the [Start] menu of your computer. For details, see operating instructions of your computer. Following screens are example of Microsoft Windows XP Professional. 1 Turn on your computer. 2 Insert the finalized disc to your computer (page 89...
Operating Instructions
Page 69
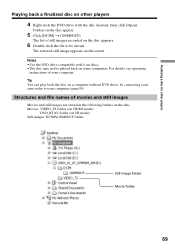
Finalizing a disc for other players 4 Right-click the DVD drive with 8 cm discs. •The disc may not be shown. For details, see operating instructions of movies and still images Movies and still images are stored in the disc appear. 5 Click [DCIM] t [100MSDCF]. Structures and file names of your computer (... 69 Folders in the following folders on the disc. Movies: VIDEO_TS folder (on VIDEO mode) DVD_RTAV folder (on a computer without DVD drive, by connecting your camcorder to be played back on the disc appears. 6 Double-click the file to your computer.
Finalizing a disc for other players 4 Right-click the DVD drive with 8 cm discs. •The disc may not be shown. For details, see operating instructions of movies and still images Movies and still images are stored in the disc appear. 5 Click [DCIM] t [100MSDCF]. Structures and file names of your computer (... 69 Folders in the following folders on the disc. Movies: VIDEO_TS folder (on VIDEO mode) DVD_RTAV folder (on a computer without DVD drive, by connecting your camcorder to be played back on the disc appears. 6 Double-click the file to your computer.
Operating Instructions
Page 92
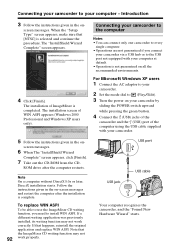
...WIN ASPI. USB port USB jack USB cable Your computer recognizes the camcorder, and the "Found New Hardware Wizard" starts. ROM drive after the installation is complete. Introduction 3 Follow the instructions given in the on -screen messages and restart the computer after the ...computer restarts. Connecting your camcorder to the USB port not equipped with your camcorder. 5 Follow the instructions given in the on- Connecting your camcorder to the computer Notes •You can connect only one camcorder to every single computer. •Operations are ...
...WIN ASPI. USB port USB jack USB cable Your computer recognizes the camcorder, and the "Found New Hardware Wizard" starts. ROM drive after the installation is complete. Introduction 3 Follow the instructions given in the on -screen messages and restart the computer after the ...computer restarts. Connecting your camcorder to the USB port not equipped with your camcorder. 5 Follow the instructions given in the on- Connecting your camcorder to the computer Notes •You can connect only one camcorder to every single computer. •Operations are ...

Operating Instructions
Page 94
...jack USB cable Your computer recognizes the camcorder, and the "Found New Hardware" dialog box appears. 5 Follow the instructions given in the on your camcorder by sliding the POWER switch upward while pressing the green button. 4 Connect the (USB) jacks of the camcorder and the (USB) port of ...the computer using the USB cable supplied with your camcorder and the computer is completed...
...jack USB cable Your computer recognizes the camcorder, and the "Found New Hardware" dialog box appears. 5 Follow the instructions given in the on your camcorder by sliding the POWER switch upward while pressing the green button. 4 Connect the (USB) jacks of the camcorder and the (USB) port of ...the computer using the USB cable supplied with your camcorder and the computer is completed...

Operating Instructions
Page 95
...[Device Manager]. "Device Manager" screen appears. 5 Make sure that "SONY DDX-A1000 USB Device" appears in DVD/CD-ROM drives, "Generic volume" in Storage volumes, and "USB Mass Storage Device" in the on your camcorder by sliding the POWER switch upward while pressing the green button. 4 Connect...install the USB driver" (page 97). USB port USB jack USB cable Your computer recognizes the camcorder, and the "New Hardware Found" dialog box appears. 5 Follow the instructions given in Universal Serial Bus controllers respectively. When all the devices appear, the USB driver is completed...
...[Device Manager]. "Device Manager" screen appears. 5 Make sure that "SONY DDX-A1000 USB Device" appears in DVD/CD-ROM drives, "Generic volume" in Storage volumes, and "USB Mass Storage Device" in the on your camcorder by sliding the POWER switch upward while pressing the green button. 4 Connect...install the USB driver" (page 97). USB port USB jack USB cable Your computer recognizes the camcorder, and the "New Hardware Found" dialog box appears. 5 Follow the instructions given in Universal Serial Bus controllers respectively. When all the devices appear, the USB driver is completed...
Operating Instructions
Page 97
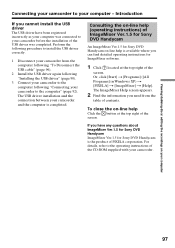
... at the top right of the screen. Consulting the on-line help (operating instructions) of ImageMixer Ver.1.5 for Sony DVD Handycam An ImageMixer Ver.1.5 for ImageMixer software. 1 Click located at the top right of the screen. Connecting your camcorder to your camcorder before the installation of the USB driver was completed. If you can find...
... at the top right of the screen. Consulting the on-line help (operating instructions) of ImageMixer Ver.1.5 for Sony DVD Handycam An ImageMixer Ver.1.5 for ImageMixer software. 1 Click located at the top right of the screen. Connecting your camcorder to your camcorder before the installation of the USB driver was completed. If you can find...
Operating Instructions
Page 100
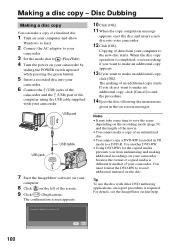
... click [OK]. Use another DVD-RW. •Using DVD-RWs for the copied media prevents you want to record additional material on your camcorder because the format of copied media is different from that of data from unfinalizing and making of a finalized disc. 1 Turn on your computer... pressing the green button. 5 Insert a recorded disc into your computer to end the procedure. 14 Eject the disc following the instructions given in VR mode to your camcorder. When the disc copy operation is required. Disc Dubbing Making a disc copy You can make a copy of an unfinalized disc....
... click [OK]. Use another DVD-RW. •Using DVD-RWs for the copied media prevents you want to record additional material on your camcorder because the format of copied media is different from that of data from unfinalizing and making of a finalized disc. 1 Turn on your computer... pressing the green button. 5 Insert a recorded disc into your computer to end the procedure. 14 Eject the disc following the instructions given in VR mode to your camcorder. When the disc copy operation is required. Disc Dubbing Making a disc copy You can make a copy of an unfinalized disc....

Operating Instructions
Page 104
... the computer with the USB cable, then insert a blank disc into your camcorder. 4 Click . Recording on the upper left of the screen, and preview the contents. If you want to end the procedure. 7 Eject the disc following the instructions given in the on the left of the screen. Creating an original disc... [Cancel] to make an additional copy, click [OK]. The "Writing mode" screen appears. 3 When you have checked that all the contents are right, connect your camcorder to the menu. 5 Click [OK].
... the computer with the USB cable, then insert a blank disc into your camcorder. 4 Click . Recording on the upper left of the screen, and preview the contents. If you want to end the procedure. 7 Eject the disc following the instructions given in the on the left of the screen. Creating an original disc... [Cancel] to make an additional copy, click [OK]. The "Writing mode" screen appears. 3 When you have checked that all the contents are right, connect your camcorder to the menu. 5 Click [OK].

Operating Instructions
Page 106
... recording on the edited tape: - Refer the operating instructions of the VCR. 3 Play back the recorded disc on your camcorder. 106 DISPLAY/BATT INFO - When you want to record over) into your VCR. Insert a blank tape (or a tape you have finished dubbing Stop ...recording on the VCR, then press x on the Remote Commander - Set the input selector to LINE. Refer to the operating instructions of your camcorder. 2 Prepare the VCR for recording. Dubbing a disc to a tape Dubbing to a tape Before operation •Set [DISPLAY] in (OTHERS) to LCD in ...
... recording on the edited tape: - Refer the operating instructions of the VCR. 3 Play back the recorded disc on your camcorder. 106 DISPLAY/BATT INFO - When you want to record over) into your VCR. Insert a blank tape (or a tape you have finished dubbing Stop ...recording on the VCR, then press x on the Remote Commander - Set the input selector to LINE. Refer to the operating instructions of your camcorder. 2 Prepare the VCR for recording. Dubbing a disc to a tape Dubbing to a tape Before operation •Set [DISPLAY] in (OTHERS) to LCD in ...

Operating Instructions
Page 107
... REC button x button AUDIO/ VIDEO : Signal flow S VIDEO Dubbing onto a disc Set [DISPLAY] in (OTHERS) to [LCD] in the viewfinder. 6 Press z on your camcorder. 3 Insert a blank disc (or a disc you want to start recording. The Visual Index display disappears, and the image from the LINE appears. 5 Press N on the... Prepare the TV/VCR. Format the disc in VIDEO mode or in VR mode (page 7) following the instructions on the LCD display. 4 Press VISUAL INDEX on the VCR. 107 Use your camcorder. If you are recording from the VCR or TV appears on the LCD display or in the SETUP display...
... REC button x button AUDIO/ VIDEO : Signal flow S VIDEO Dubbing onto a disc Set [DISPLAY] in (OTHERS) to [LCD] in the viewfinder. 6 Press z on your camcorder. 3 Insert a blank disc (or a disc you want to start recording. The Visual Index display disappears, and the image from the LINE appears. 5 Press N on the... Prepare the TV/VCR. Format the disc in VIDEO mode or in VR mode (page 7) following the instructions on the LCD display. 4 Press VISUAL INDEX on the VCR. 107 Use your camcorder. If you are recording from the VCR or TV appears on the LCD display or in the SETUP display...
Operating Instructions
Page 130
... (or vice versa) or when you use the accessories recommended in summer, your camcorder may be used in a plastic bag and tightly seal it. How to OFF (CHG) when you are closed in these operating instructions. •If any further. •Avoid rough handling or mechanical shock. On ... solid object or liquid gets inside the casing, unplug your camcorder and have it checked by a Sony dealer before operating it is in use or not, avoid leaving your camcorder in a hot place as follows: •You bring your camcorder from a cold place to malfunction. Doing so may cause ...
... (or vice versa) or when you use the accessories recommended in summer, your camcorder may be used in a plastic bag and tightly seal it. How to OFF (CHG) when you are closed in these operating instructions. •If any further. •Avoid rough handling or mechanical shock. On ... solid object or liquid gets inside the casing, unplug your camcorder and have it checked by a Sony dealer before operating it is in use or not, avoid leaving your camcorder in a hot place as follows: •You bring your camcorder from a cold place to malfunction. Doing so may cause ...
Operating Instructions
Page 138
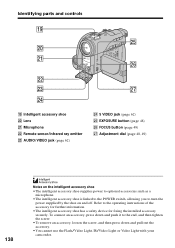
To connect an accessory, press down and push it to the operating instructions of the accessory for further information. •The intelligent accessory shoe has a safety device for fixing the installed accessory securely. Refer to the end, and ..., and then press down and pull out the accessory. •You cannot use the Flash/Video Light, IR/Video Light or Video Light with your camcorder. Lens wa Microphone ws Remote sensor/Infrared ray emitter wd AUDIO/VIDEO jack (page 62) wf S VIDEO jack (page 62) wg EXPOSURE button (page 48...
To connect an accessory, press down and push it to the operating instructions of the accessory for further information. •The intelligent accessory shoe has a safety device for fixing the installed accessory securely. Refer to the end, and ..., and then press down and pull out the accessory. •You cannot use the Flash/Video Light, IR/Video Light or Video Light with your camcorder. Lens wa Microphone ws Remote sensor/Infrared ray emitter wd AUDIO/VIDEO jack (page 62) wf S VIDEO jack (page 62) wg EXPOSURE button (page 48...


