Operating Instructions
Page 4
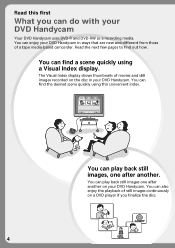
...you can find a scene quickly using this first What you finalize the disc. 4 Read this convenient index. You can do with your DVD Handycam. You can find out how. You can play back still images one after another . You can play back still images, one after another... on your DVD Handycam in your DVD Handycam Your DVD Handycam uses DVD-R and DVD-RW as a recording media. The Visual Index display shows thumbnails of a tape media-based camcorder. You can enjoy your DVD...
...you can find a scene quickly using this first What you finalize the disc. 4 Read this convenient index. You can do with your DVD Handycam. You can find out how. You can play back still images one after another . You can play back still images, one after another... on your DVD Handycam in your DVD Handycam Your DVD Handycam uses DVD-R and DVD-RW as a recording media. The Visual Index display shows thumbnails of a tape media-based camcorder. You can enjoy your DVD...
Operating Instructions
Page 7
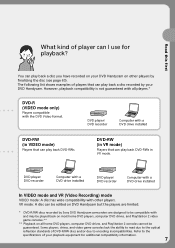
...and PlayStation 2 consoles cannot be guaranteed. DVD-RW (in VR mode) Players that can play back a disc you have recorded on your DVD Handycam on all players.* DVD-R (VIDEO mode only) Players compatible with a DVD drive installed DVD-RW (in VR mode. DVD player/ DVD recorder ...Computer with the DVD Video format. Refer to encoding incompatibilities. You can be edited on DVD Handycam but the players are limited. * DVD-R/RW discs recorded by Sony DVD Handycam camcorders are designed to be played back on most home DVD players, computer DVD drives, and PlayStation 2 video...
...and PlayStation 2 consoles cannot be guaranteed. DVD-RW (in VR mode) Players that can play back a disc you have recorded on your DVD Handycam on all players.* DVD-R (VIDEO mode only) Players compatible with a DVD drive installed DVD-RW (in VR mode. DVD player/ DVD recorder ...Computer with the DVD Video format. Refer to encoding incompatibilities. You can be edited on DVD Handycam but the players are limited. * DVD-R/RW discs recorded by Sony DVD Handycam camcorders are designed to be played back on most home DVD players, computer DVD drives, and PlayStation 2 video...
Operating Instructions
Page 10
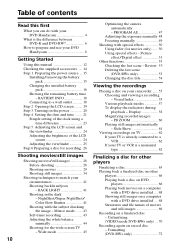
... 28 Before shooting 28 Shooting movies 29 Shooting still images 34 Shooting techniques to prepare and use your DVD Handycam 8 Getting Started Using this first What you can do with your DVD Handycam 4 What is a monaural type 62 Finalizing a disc for other players Finalizing a disc 63 Playing back...TV is already connected to a VCR 62 If your TV or VCR is the difference between DVD-R and DVD-RW 6 How to match your camcorder ...... 55 Choosing and viewing a recording - Picture effect/Digital effect 51 Other functions 53 Checking the last scene - NightShot/Super NightShot/ Color ...
... 28 Before shooting 28 Shooting movies 29 Shooting still images 34 Shooting techniques to prepare and use your DVD Handycam 8 Getting Started Using this first What you can do with your DVD Handycam 4 What is a monaural type 62 Finalizing a disc for other players Finalizing a disc 63 Playing back...TV is already connected to a VCR 62 If your TV or VCR is the difference between DVD-R and DVD-RW 6 How to match your camcorder ...... 55 Choosing and viewing a recording - Picture effect/Digital effect 51 Other functions 53 Checking the last scene - NightShot/Super NightShot/ Color ...

Operating Instructions
Page 11
...Started Table of ImageMixer Ver.1.5 for Sony DVD Handycam 97 Viewing scenes recorded on your computer 98 Viewing scenes on the disc 98 Making a disc copy - Introduction 89 System requirements 89 Installing the USB driver 90 Installing software 91 Connecting your camcorder to the computer 92 Consulting the on...-line help (operating instructions) of contents Using a disc in VR mode (DVD-RWs only) Selecting the playing order on your camcorder - Disc Dubbing . 100 Making a disc copy 100 Editing and saving scenes 101 Editing movies 101 Saving the movie on your computer 101 ...
...Started Table of ImageMixer Ver.1.5 for Sony DVD Handycam 97 Viewing scenes recorded on your computer 98 Viewing scenes on the disc 98 Making a disc copy - Introduction 89 System requirements 89 Installing the USB driver 90 Installing software 91 Connecting your camcorder to the computer 92 Consulting the on...-line help (operating instructions) of contents Using a disc in VR mode (DVD-RWs only) Selecting the playing order on your camcorder - Disc Dubbing . 100 Making a disc copy 100 Editing and saving scenes 101 Editing movies 101 Saving the movie on your computer 101 ...
Operating Instructions
Page 12
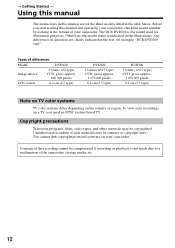
... laws. You cannot dub copyright protected software on the country or region. Contents of the camcorder, storage media, etc. 12 Before you need an NTSC system-based TV. The DCR-DVD200 is indicated in the illustrations. To view your recordings on a TV, you start ... (2.5 type) DVD200 3.8 mm (1/4.7 type) CCD, gross approx. 1 070 000 pixels 6.2 cm (2.5 type) DVD300 3.8 mm (1/4.7 type) CCD, gross approx. 1 070 000 pixels 8.8 cm (3.5 type) Note on TV color systems TV color systems differ depending on your camcorder. - Otherwise, the model name is the model used for example...
... laws. You cannot dub copyright protected software on the country or region. Contents of the camcorder, storage media, etc. 12 Before you need an NTSC system-based TV. The DCR-DVD200 is indicated in the illustrations. To view your recordings on a TV, you start ... (2.5 type) DVD200 3.8 mm (1/4.7 type) CCD, gross approx. 1 070 000 pixels 6.2 cm (2.5 type) DVD300 3.8 mm (1/4.7 type) CCD, gross approx. 1 070 000 pixels 8.8 cm (3.5 type) Note on TV color systems TV color systems differ depending on your camcorder. - Otherwise, the model name is the model used for example...
Operating Instructions
Page 13
Getting Started Using this manual Camcorder care LCD screen/finder The LCD screen and the finder are manufactured using extremely high-precision technology...DVD players that appear constantly on a finalized disc recorded in VR mode. Disc compatibility with other players Discs recorded on your camcorder on the LCD screen and the finder. On DVD-RW, you finalize it . You can play back DVD-RWs in VR... details on a disc recorded in VIDEO mode once you can be able to play with your camcorder must finalize a disc after all the recording is required only when other players.
Getting Started Using this manual Camcorder care LCD screen/finder The LCD screen and the finder are manufactured using extremely high-precision technology...DVD players that appear constantly on a finalized disc recorded in VR mode. Disc compatibility with other players Discs recorded on your camcorder on the LCD screen and the finder. On DVD-RW, you finalize it . You can play back DVD-RWs in VR... details on a disc recorded in VIDEO mode once you can be able to play with your camcorder must finalize a disc after all the recording is required only when other players.
Operating Instructions
Page 14
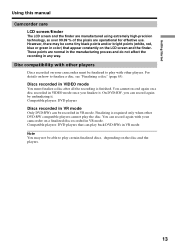
CD-ROM (SPVD-011 USB Driver) (1) qa Cleaning cloth (1) 14 Checking the supplied accessories Make sure that the following accessories are supplied with your camcorder. 1 2 3 4 5 6 7 8 9 0 qa 1 Wireless Remote Commander (1) (page 141) 2 AC-L15A AC adaptor (1), Power cord (1) (page 16) 3 Size AA (R6) battery for the Remote Commander (2) (page 142) 4 NP-FM50 rechargeable battery pack (1) (page 15) 5 A/V connecting cable (1) 6 Shoulder strap (1) 7 Lens cap (1) (page 29) 8 USB cable (1) (page 92) 9 DVD-R (DMR30) (1) q;
CD-ROM (SPVD-011 USB Driver) (1) qa Cleaning cloth (1) 14 Checking the supplied accessories Make sure that the following accessories are supplied with your camcorder. 1 2 3 4 5 6 7 8 9 0 qa 1 Wireless Remote Commander (1) (page 141) 2 AC-L15A AC adaptor (1), Power cord (1) (page 16) 3 Size AA (R6) battery for the Remote Commander (2) (page 142) 4 NP-FM50 rechargeable battery pack (1) (page 15) 5 A/V connecting cable (1) 6 Shoulder strap (1) 7 Lens cap (1) (page 29) 8 USB cable (1) (page 92) 9 DVD-R (DMR30) (1) q;
Operating Instructions
Page 16
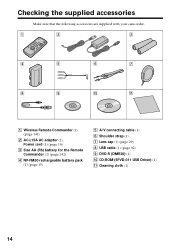
.../BATT INFO button With the v mark facing up 1 Make sure that the battery pack is installed on the camcorder. 2 Open the DC IN jack cover, then connect the AC adaptor supplied with your camcorder to the DC IN jack on the AC adaptor •Prevent metallic objects from coming into contact with... The POWER/CHG lamp lights in the center. Open the DC IN jack cover. Step 1 Preparing the power source Charging the installed battery pack Your camcorder operates only with this unit while using the AC adaptor, disconnect the plug from the wall outlet as soon as possible to the wall outlet...
.../BATT INFO button With the v mark facing up 1 Make sure that the battery pack is installed on the camcorder. 2 Open the DC IN jack cover, then connect the AC adaptor supplied with your camcorder to the DC IN jack on the AC adaptor •Prevent metallic objects from coming into contact with... The POWER/CHG lamp lights in the center. Open the DC IN jack cover. Step 1 Preparing the power source Charging the installed battery pack Your camcorder operates only with this unit while using the AC adaptor, disconnect the plug from the wall outlet as soon as possible to the wall outlet...
Operating Instructions
Page 17
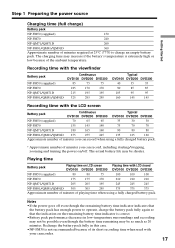
... time indicator is not recommended because of its short recording time when used with LCD closed DVD100 DVD200 DVD300 DVD100 DVD200 DVD300 NP-FM50 (supplied) 80 80 75 100 100 100 NP-FM70 175 175 170 210 210 210 ... 105 95 95 160 145 145 Recording time with the LCD screen Battery pack Continuous Typical DVD100 DVD200 DVD300 DVD100 DVD200 DVD300 NP-FM50 (supplied) 70 65 65 35 30 30 NP-FM70 155 145 140 75 70 70... pack fully again so that the indication on LCD screen Playing time with your camcorder. 17 The charging time may be as much as 20 minutes.
... time indicator is not recommended because of its short recording time when used with LCD closed DVD100 DVD200 DVD300 DVD100 DVD200 DVD300 NP-FM50 (supplied) 80 80 75 100 100 100 NP-FM70 175 175 170 210 210 210 ... 105 95 95 160 145 145 Recording time with the LCD screen Battery pack Continuous Typical DVD100 DVD200 DVD300 DVD100 DVD200 DVD300 NP-FM50 (supplied) 70 65 65 35 30 30 NP-FM70 155 145 140 75 70 70... pack fully again so that the indication on LCD screen Playing time with your camcorder. 17 The charging time may be as much as 20 minutes.
Operating Instructions
Page 18
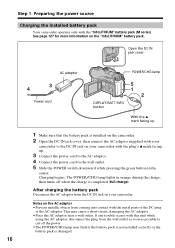
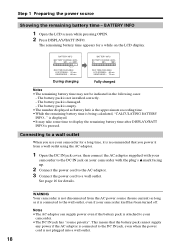
...long as Battery Info is the approximate recording time. •While the remaining battery time is being calculated, "CALCULATING BATTERY INFO..." WARNING Your camcorder is not disconnected from a wall outlet using the AC adaptor. 1 Open the DC IN jack cover, then connect the AC adaptor supplied ...with the plug's v mark facing up. 2 Connect the power cord to the AC adaptor. 3 Connect the power cord to your camcorder itself has been turned off. BATTERY INFO BATTERY CHARGE LEVEL 0% 50% 100% BATTERY INFO BATTERY CHARGE LEVEL 0% 50% 100% REC TIME AVAILABLE LCD...
...long as Battery Info is the approximate recording time. •While the remaining battery time is being calculated, "CALCULATING BATTERY INFO..." WARNING Your camcorder is not disconnected from a wall outlet using the AC adaptor. 1 Open the DC IN jack cover, then connect the AC adaptor supplied ...with the plug's v mark facing up. 2 Connect the power cord to the AC adaptor. 3 Connect the power cord to your camcorder itself has been turned off. BATTERY INFO BATTERY CHARGE LEVEL 0% 50% 100% BATTERY INFO BATTERY CHARGE LEVEL 0% 50% 100% REC TIME AVAILABLE LCD...

Operating Instructions
Page 19
You can turn the LCD screen over and move it into the camcorder body. •When the LCD screen is moved back to the camcorder while recording or while in various angles, and reviewing recorded images. 2 180º OPEN button 90º 1 90º 1 Open the LCD screen while pressing ...OPEN. 2 Adjust the direction of the LCD screen, make sure if the LCD screen is opened up to the camcorder body with the LCD screen facing out as changing settings, shooting images in standby to record, the screen backlight is fixed to the desired position...
You can turn the LCD screen over and move it into the camcorder body. •When the LCD screen is moved back to the camcorder while recording or while in various angles, and reviewing recorded images. 2 180º OPEN button 90º 1 90º 1 Open the LCD screen while pressing ...OPEN. 2 Adjust the direction of the LCD screen, make sure if the LCD screen is opened up to the camcorder body with the LCD screen facing out as changing settings, shooting images in standby to record, the screen backlight is fixed to the desired position...
Operating Instructions
Page 20
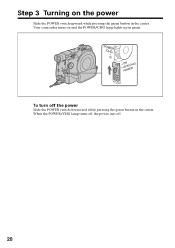
Step 3 Turning on and the POWER/CHG lamp lights up in green. To turn off . 20 Your camcorder turns on the power Slide the POWER switch upward while pressing the green button in the center. When the POWER/CHG lamp turns off, the power cuts off the power Slide the POWER switch downward while pressing the green button in the center.
Step 3 Turning on and the POWER/CHG lamp lights up in green. To turn off . 20 Your camcorder turns on the power Slide the POWER switch upward while pressing the green button in the center. When the POWER/CHG lamp turns off, the power cuts off the power Slide the POWER switch downward while pressing the green button in the center.
Operating Instructions
Page 21
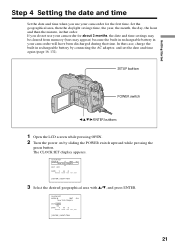
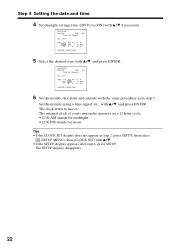
..., then the daylight savings time, the year, the month, the day, the hour and then the minute, in that case, charge the built-in your camcorder for the first time. CLOCK SET AREA 26 GMT -5.0 New Yor k,Bogota DST OFF DATE Y M D : [ ENTER ] : NEXT ITEM 3 Select the desired geographical ...NEXT ITEM 21 In that order. Getting Started Step 4 Setting the date and time Set the date and time when you do not use your camcorder for about 3 months, the date and time settings may be cleared from memory (bars may appear) because the built-in rechargeable battery in rechargeable...
..., then the daylight savings time, the year, the month, the day, the hour and then the minute, in that case, charge the built-in your camcorder for the first time. CLOCK SET AREA 26 GMT -5.0 New Yor k,Bogota DST OFF DATE Y M D : [ ENTER ] : NEXT ITEM 3 Select the desired geographical ...NEXT ITEM 21 In that order. Getting Started Step 4 Setting the date and time Set the date and time when you do not use your camcorder for about 3 months, the date and time settings may be cleared from memory (bars may appear) because the built-in rechargeable battery in rechargeable...
Operating Instructions
Page 22
The clock starts to [ON] with v/V, and press ENTER. The internal clock of your camcorder operates on a 12-hour cycle. •12:00 AM stands for midnight. •12:00 PM stands for noon. Step 4 Setting the date and time 4 ...
The clock starts to [ON] with v/V, and press ENTER. The internal clock of your camcorder operates on a 12-hour cycle. •12:00 AM stands for midnight. •12:00 PM stands for noon. Step 4 Setting the date and time 4 ...
Operating Instructions
Page 25
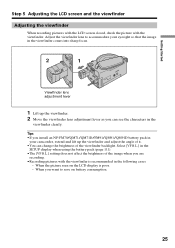
... 1 Lift up the viewfinder. 2 Move the viewfinder lens adjustment lever as you install an NP-FM70/QM71/QM71D/FM91/QM91/QM91D battery pack in your camcorder, extend and lift up the viewfinder and adjust the angle of it. •You can see the characters in the following cases: - Adjust the viewfinder...
... 1 Lift up the viewfinder. 2 Move the viewfinder lens adjustment lever as you install an NP-FM70/QM71/QM71D/FM91/QM91/QM91D battery pack in your camcorder, extend and lift up the viewfinder and adjust the angle of it. •You can see the characters in the following cases: - Adjust the viewfinder...
Operating Instructions
Page 26
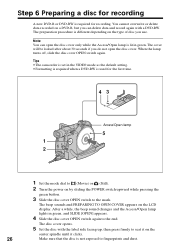
... in green. You cannot overwrite or delete data recorded on the LCD display. The preparation procedure is not exposed to the mark. Tips •The camcorder is set in green, and SLIDE [OPEN] appears. 4 Slide the disc cover OPEN switch again to the end. When the lamp turns off, slide the...
... in green. You cannot overwrite or delete data recorded on the LCD display. The preparation procedure is not exposed to the mark. Tips •The camcorder is set in green, and SLIDE [OPEN] appears. 4 Slide the disc cover OPEN switch again to the end. When the lamp turns off, slide the...
Operating Instructions
Page 27
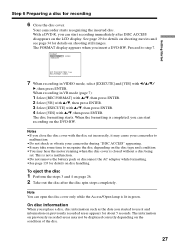
... disc for details on the DVD-RW. The FORMAT display appears when you started to use it may cause your camcorder to malfunction. •Do not shock or vibrate your camcorder during "DISC ACCESS" appearing. •It may not be displayed correctly depending on the LCD display. To eject ... FORMAT EXECUTE VIDEO EST. Notes •If you can start recording immediately after the disc spin stops completely. The disc formatting starts. Your camcorder starts recognizing the inserted disc. With a DVD-R, you can open the disc cover only while the Access/Open lamp is closed without a ...
... disc for details on the DVD-RW. The FORMAT display appears when you started to use it may cause your camcorder to malfunction. •Do not shock or vibrate your camcorder during "DISC ACCESS" appearing. •It may not be displayed correctly depending on the LCD display. To eject ... FORMAT EXECUTE VIDEO EST. Notes •If you can start recording immediately after the disc spin stops completely. The disc formatting starts. Your camcorder starts recognizing the inserted disc. With a DVD-R, you can open the disc cover only while the Access/Open lamp is closed without a ...
Operating Instructions
Page 28
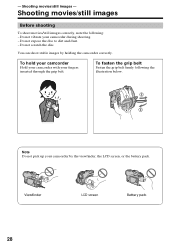
... LCD screen Battery pack 28 Do not vibrate your fingers inserted through the grip belt. To hold your camcorder Hold your camcorder with your camcorder during shooting. - Note Do not pick up your camcorder by holding the camcorder correctly. - To fasten the grip belt Fasten the grip belt firmly following : - Do not expose the disc...
... LCD screen Battery pack 28 Do not vibrate your fingers inserted through the grip belt. To hold your camcorder Hold your camcorder with your camcorder during shooting. - Note Do not pick up your camcorder by holding the camcorder correctly. - To fasten the grip belt Fasten the grip belt firmly following : - Do not expose the disc...
Operating Instructions
Page 29
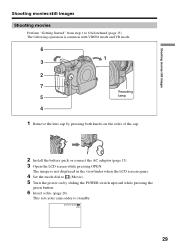
STBY0:00:00 -R VIDEO 29 This sets your camcorder to (Movie). 5 Turn the power on by pressing both knobs on the sides of the cap. 2 Install the battery pack or connect the AC adaptor (...
STBY0:00:00 -R VIDEO 29 This sets your camcorder to (Movie). 5 Turn the power on by pressing both knobs on the sides of the cap. 2 Install the battery pack or connect the AC adaptor (...
Operating Instructions
Page 30
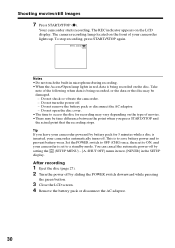
... the power off . - The REC indicator appears on the front of movies. •There may be time difference between the point when you leave your camcorder powered by battery pack for recording may be damaged. - Set the POWER switch to OFF (CHG) once, then set to prevent battery wear. REC ... Access/Open lamp lights in the SETUP display. Take note of the following when data is to save battery power and to ON, and your camcorder automatically turns off by sliding the POWER switch downward while pressing the green button. 3 Close the LCD screen. 4 Remove the battery pack or disconnect ...
... the power off . - The REC indicator appears on the front of movies. •There may be time difference between the point when you leave your camcorder powered by battery pack for recording may be damaged. - Set the POWER switch to OFF (CHG) once, then set to prevent battery wear. REC ... Access/Open lamp lights in the SETUP display. Take note of the following when data is to save battery power and to ON, and your camcorder automatically turns off by sliding the POWER switch downward while pressing the green button. 3 Close the LCD screen. 4 Remove the battery pack or disconnect ...


