Operating Guide
Page 6
...Memory Stick Duo" marked with two kinds of operations guides. - On the discs you can use in your camcorder) "Memory Stick" (You cannot use it in CANADA "Battery pack" THIS CLASS B DIGITAL APPARATUS COMPLIES ...must be used with the equipment in your camcorder with marks listed below. "First Step Guide" for help. Connect the equipment into an outlet on the supplied CD-ROM)* * The DCR-DVD105/DVD205/DVD605/ DVD705 do not include "First Step...Consult the dealer or an experienced radio/ TV technician for using your camcorder You can use 8cm DVD-Rs, 8cm DVD-RWs and 8cm DVD+RWs only.
...Memory Stick Duo" marked with two kinds of operations guides. - On the discs you can use in your camcorder) "Memory Stick" (You cannot use it in CANADA "Battery pack" THIS CLASS B DIGITAL APPARATUS COMPLIES ...must be used with the equipment in your camcorder with marks listed below. "First Step Guide" for help. Connect the equipment into an outlet on the supplied CD-ROM)* * The DCR-DVD105/DVD205/DVD605/ DVD705 do not include "First Step...Consult the dealer or an experienced radio/ TV technician for using your camcorder You can use 8cm DVD-Rs, 8cm DVD-RWs and 8cm DVD+RWs only.
Operating Guide
Page 7
...viewfinder are manufactured using extremely highprecision technology, so over 99.99% of the pixels are normal. Viewfinder LCD screen Battery • The camcorder is on the LCD screen and the viewfinder. If you insert the connector plug forcibly in the wrong direction, the terminal may cause malfunctions... red, blue, or green in low light conditions, such as at the sun. Doing so might cause your camcorder to another device with "Memory Stick" compatible equipment (For DCR-DVD305/DVD755) Be sure to insert the "Memory Stick Duo" into the Memory Stick Duo Adaptor. Be careful when...
...viewfinder are manufactured using extremely highprecision technology, so over 99.99% of the pixels are normal. Viewfinder LCD screen Battery • The camcorder is on the LCD screen and the viewfinder. If you insert the connector plug forcibly in the wrong direction, the terminal may cause malfunctions... red, blue, or green in low light conditions, such as at the sun. Doing so might cause your camcorder to another device with "Memory Stick" compatible equipment (For DCR-DVD305/DVD755) Be sure to insert the "Memory Stick Duo" into the Memory Stick Duo Adaptor. Be careful when...
Operating Guide
Page 8
...copyright laws. The following marks are captured using your camcorder. DVD +RW • The on the countries/regions. Unauthorized recording of the camcorder, storage media, etc. • TV color systems differ depending on -screen displays in Germany, and Sony Corporation, and produces superior images. On this Operating... developed jointly by Carl Zeiss, in each local language are used on this manual are used on a DVD-R. You cannot dub copyright protected software on the model DCR-DVD305. • Disc in this manual • The images of the LCD screen and the viewfinder ...
...copyright laws. The following marks are captured using your camcorder. DVD +RW • The on the countries/regions. Unauthorized recording of the camcorder, storage media, etc. • TV color systems differ depending on -screen displays in Germany, and Sony Corporation, and produces superior images. On this Operating... developed jointly by Carl Zeiss, in each local language are used on this manual are used on a DVD-R. You cannot dub copyright protected software on the model DCR-DVD305. • Disc in this manual • The images of the LCD screen and the viewfinder ...
Operating Guide
Page 10
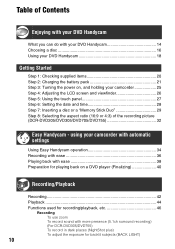
... your DVD Handycam What you can do with your DVD Handycam 14 Choosing a disc 16 Using your DVD Handycam 18 Getting Started Step 1: Checking supplied items 20 Step 2: Charging the battery pack 21 Step 3: Turning the power on, and holding your camcorder with automatic settings Using Easy Handycam operation ... use zoom To record sound with more presence (5.1ch surround recording) (For DCR-DVD305/DVD755) To record in dark places (NightShot plus) To adjust the exposure for backlit subjects (BACK LIGHT) 10 Table of the recording picture (DCR-DVD205/DVD305/DVD705/DVD755 32 Easy Handycam -
... your DVD Handycam What you can do with your DVD Handycam 14 Choosing a disc 16 Using your DVD Handycam 18 Getting Started Step 1: Checking supplied items 20 Step 2: Charging the battery pack 21 Step 3: Turning the power on, and holding your camcorder with automatic settings Using Easy Handycam operation ... use zoom To record sound with more presence (5.1ch surround recording) (For DCR-DVD305/DVD755) To record in dark places (NightShot plus) To adjust the exposure for backlit subjects (BACK LIGHT) 10 Table of the recording picture (DCR-DVD205/DVD305/DVD705/DVD755 32 Easy Handycam -
Operating Guide
Page 11
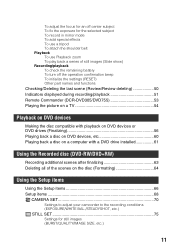
... 50 Indicators displayed during recording/playback 51 Remote Commander (DCR-DVD305/DVD755 53 Playing the picture on a TV 54 Playback on DVD devices Making the disc compatible with playback on DVD devices or DVD drives (Finalizing 56 Playing back a disc on DVD devices, etc 60 Playing back a disc on a computer...Using the Recorded disc (DVD-RW/DVD+RW) Recording additional scenes after finalizing 63 Deleting all of the scenes on the disc (Formatting 64 Using the Setup items Using the Setup items 66 Setup items 68 CAMERA SET 70 Settings to adjust your camcorder to the recording conditions ...
... 50 Indicators displayed during recording/playback 51 Remote Commander (DCR-DVD305/DVD755 53 Playing the picture on a TV 54 Playback on DVD devices Making the disc compatible with playback on DVD devices or DVD drives (Finalizing 56 Playing back a disc on DVD devices, etc 60 Playing back a disc on a computer...Using the Recorded disc (DVD-RW/DVD+RW) Recording additional scenes after finalizing 63 Deleting all of the scenes on the disc (Formatting 64 Using the Setup items Using the Setup items 66 Setup items 68 CAMERA SET 70 Settings to adjust your camcorder to the recording conditions ...
Operating Guide
Page 13
Troubleshooting Troubleshooting 109 Warning indicators and messages 127 Additional Information Using your camcorder abroad 132 About the disc 134 About the "Memory Stick" (DCR-DVD305/DVD755 135 About the "InfoLITHIUM" battery pack 137 Maintenance and precautions 139 Specifications 143 Glossary, Index Glossary 146 Index...148 13
Troubleshooting Troubleshooting 109 Warning indicators and messages 127 Additional Information Using your camcorder abroad 132 About the disc 134 About the "Memory Stick" (DCR-DVD305/DVD755 135 About the "InfoLITHIUM" battery pack 137 Maintenance and precautions 139 Specifications 143 Glossary, Index Glossary 146 Index...148 13
Operating Guide
Page 16
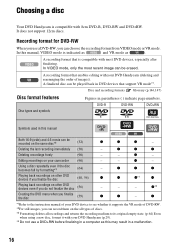
... VR mode*1. z - - Choosing a disc Your DVD Handycam is indicated as and VR mode as this manual Both 16:9 (wide) and 4:3 movie can choose the recording format from VIDEO mode or VR mode. DVD-R DVD-RW DVD+RW Symbols used in this may result in a computer... is compatible with your camcorder (90) - Editing recordings on other DVD devices if you can be played back in parentheses ( ) indicate page numbers. z z z z *1z*1 z Playing back recordings on your DVD Handycam (deleting and rearranging the order of your DVD device to the instruction manual...
... VR mode*1. z - - Choosing a disc Your DVD Handycam is indicated as and VR mode as this manual Both 16:9 (wide) and 4:3 movie can choose the recording format from VIDEO mode or VR mode. DVD-R DVD-RW DVD+RW Symbols used in this may result in a computer... is compatible with your camcorder (90) - Editing recordings on other DVD devices if you can be played back in parentheses ( ) indicate page numbers. z z z z *1z*1 z Playing back recordings on your DVD Handycam (deleting and rearranging the order of your DVD device to the instruction manual...
Operating Guide
Page 20
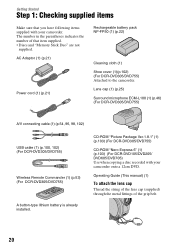
... the metal fittings of that you have following items supplied with your camcorder. CD-ROM "Picture Package Ver.1.8.1" (1) (p.103) (For DCR-DVD305/DVD755) CD-ROM "Nero Express 6" (1) (p.103) (For DCR-DVD105/DVD205/ DVD605/DVD705) Use when copying a disc recorded with your camcorder onto a 12cm DVD. AC Adaptor (1) (p.21) Power cord (1) (p.21) Rechargeable battery pack NP-FP50...
... the metal fittings of that you have following items supplied with your camcorder. CD-ROM "Picture Package Ver.1.8.1" (1) (p.103) (For DCR-DVD305/DVD755) CD-ROM "Nero Express 6" (1) (p.103) (For DCR-DVD105/DVD205/ DVD605/DVD705) Use when copying a disc recorded with your camcorder onto a 12cm DVD. AC Adaptor (1) (p.21) Power cord (1) (p.21) Rechargeable battery pack NP-FP50...
Operating Guide
Page 21
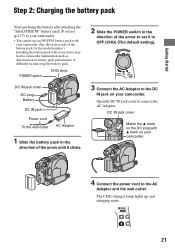
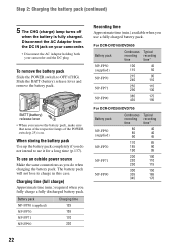
...cover Match the v mark on the DC plug with excess force may lead to camcorder malfunction such as deterioration in battery pack performance or difficulty in the direction of ...the battery after attaching the "InfoLITHIUM" battery pack (P series) (p.137) to your camcorder. • You cannot use an NP-FP30 battery pack with your camcorder. (See the reverse side of the battery pack for the model number.) Installing the... battery pack with v mark on your camcorder. The CHG (charge) lamp lights up and charging starts. 21 Open the DC IN ...
...cover Match the v mark on the DC plug with excess force may lead to camcorder malfunction such as deterioration in battery pack performance or difficulty in the direction of ...the battery after attaching the "InfoLITHIUM" battery pack (P series) (p.137) to your camcorder. • You cannot use an NP-FP30 battery pack with your camcorder. (See the reverse side of the battery pack for the model number.) Installing the... battery pack with v mark on your camcorder. The CHG (charge) lamp lights up and charging starts. 21 Open the DC IN ...
Operating Guide
Page 22
...-FP50 (supplied) 100 045 115 050 NP-FP70 215 095 240 110 NP-FP71 255 115 290 130 NP-FP90 385 175 435 195 For DCR-DVD205/DVD705 Battery pack Continuous Typical recording recording time time* NP-FP50 (supplied) 080 040 085 040 090 045 NP-FP70 170 085 185 090 190... Adaptor from the DC IN jack on . Step 2: Charging the battery pack (continued) 5 The CHG (charge) lamp turns off when the battery is on your camcorder. • Disconnect the AC Adaptor holding both your...
...-FP50 (supplied) 100 045 115 050 NP-FP70 215 095 240 110 NP-FP71 255 115 290 130 NP-FP90 385 175 435 195 For DCR-DVD205/DVD705 Battery pack Continuous Typical recording recording time time* NP-FP50 (supplied) 080 040 085 040 090 045 NP-FP70 170 085 185 090 190... Adaptor from the DC IN jack on . Step 2: Charging the battery pack (continued) 5 The CHG (charge) lamp turns off when the battery is on your camcorder. • Disconnect the AC Adaptor holding both your...
Operating Guide
Page 23
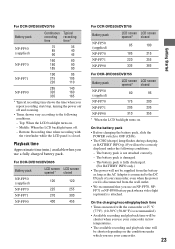
...(77°F). (10-30°C (50-86°F) is recommended.) • Available recording and playback time will be shorter when you use your camcorder in low temperatures. • The available recording and playback time will not be shorter depending on the conditions under the following conditions. - The battery pack... screen LCD screen opened* closed NP-FP50 (supplied) 105 120 NP-FP70 225 255 NP-FP71 270 300 NP-FP90 400 455 For DCR-DVD205/DVD705 Battery pack LCD screen LCD screen opened* closed NP-FP50 (supplied) 085 100 NP-FP70 185 215 NP-FP71 220 255 NP-...
...(77°F). (10-30°C (50-86°F) is recommended.) • Available recording and playback time will be shorter when you use your camcorder in low temperatures. • The available recording and playback time will not be shorter depending on the conditions under the following conditions. - The battery pack... screen LCD screen opened* closed NP-FP50 (supplied) 105 120 NP-FP70 225 255 NP-FP71 270 300 NP-FP90 400 455 For DCR-DVD205/DVD705 Battery pack LCD screen LCD screen opened* closed NP-FP50 (supplied) 085 100 NP-FP70 185 215 NP-FP71 220 255 NP-...
Operating Guide
Page 25
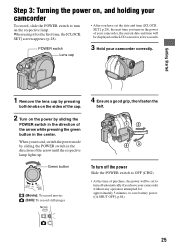
.... 2 Turn on the respective lamp. Green button (Movie): To record movies (Still): To record still images To turn off automatically if you leave your camcorder without any operation attempted for the first time, the [CLOCK SET] screen appears (p.28). • After you have set to turn on the power of... your camcorder correctly. Step 3: Turning the power on, and holding your camcorder To record, slide the POWER switch to turn on the power by sliding the POWER switch in the direction of the...
.... 2 Turn on the respective lamp. Green button (Movie): To record movies (Still): To record still images To turn off automatically if you leave your camcorder without any operation attempted for the first time, the [CLOCK SET] screen appears (p.28). • After you have set to turn on the power of... your camcorder correctly. Step 3: Turning the power on, and holding your camcorder To record, slide the POWER switch to turn on the power by sliding the POWER switch in the direction of the...
Operating Guide
Page 26
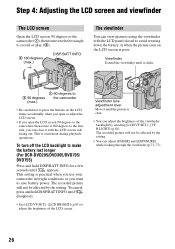
To turn off the LCD backlight to make the battery last longer (For DCR-DVD205/DVD305/DVD705/ DVD755) Press and hold DISP/BATT INFO until appears. This is practical when you use your camcorder in bright conditions or you can close it to the best angle to record or play (2). 2 180 degrees...] while looking through the viewfinder (p.71, 77). 26 Viewfinder lens adjustment lever Move it until it clicks. 1 90 degrees to 2 90 degrees the camcorder (max.) • Be careful not to press the buttons on the LCD frame accidentally when you open or adjust the LCD screen. • If ...
To turn off the LCD backlight to make the battery last longer (For DCR-DVD205/DVD305/DVD705/ DVD755) Press and hold DISP/BATT INFO until appears. This is practical when you use your camcorder in bright conditions or you can close it to the best angle to record or play (2). 2 180 degrees...] while looking through the viewfinder (p.71, 77). 26 Viewfinder lens adjustment lever Move it until it clicks. 1 90 degrees to 2 90 degrees the camcorder (max.) • Be careful not to press the buttons on the LCD frame accidentally when you open or adjust the LCD screen. • If ...
Operating Guide
Page 28
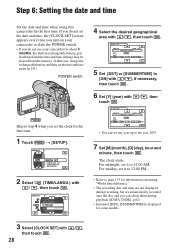
... battery and then set the date and time, the [CLOCK SET] screen appears every time you turn on your camcorder or slide the POWER switch. • If you do not use your camcorder for information concerning "World time difference." • The recording date and time are not displayed during recording, but ... not set the date and time again (p.141). The clock starts. Step 6: Setting the date and time Set the date and time when using this camcorder for some models. 3 Select [CLOCK SET] with / , then touch . 28 POWER switch Skip to step 4 when you set the clock for the first time. 1 ...
... battery and then set the date and time, the [CLOCK SET] screen appears every time you turn on your camcorder or slide the POWER switch. • If you do not use your camcorder for information concerning "World time difference." • The recording date and time are not displayed during recording, but ... not set the date and time again (p.141). The clock starts. Step 6: Setting the date and time Set the date and time when using this camcorder for some models. 3 Select [CLOCK SET] with / , then touch . 28 POWER switch Skip to step 4 when you set the clock for the first time. 1 ...
Operating Guide
Page 29
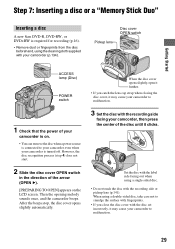
... the disc cover, it clicks. Set the disc with the label side facing out when using the cleaning cloth supplied with your camcorder to malfunction. 29 After the beeps stop, the disc cover opens slightly automatically. When the disc cover opens slightly, open it ...disc with the recording side facing your camcorder, then press the center of your camcorder is turned off. Then the opening melody sounds once, and the camcorder beeps. Getting Started Step 7: Inserting a disc or a "Memory Stick Duo" Inserting a disc A new 8cm DVD-R, DVD-RW, or DVD+RW is required for recording (p.16...
... the disc cover, it clicks. Set the disc with the label side facing out when using the cleaning cloth supplied with your camcorder to malfunction. 29 After the beeps stop, the disc cover opens slightly automatically. When the disc cover opens slightly, open it ...disc with the recording side facing your camcorder, then press the center of your camcorder is turned off. Then the opening melody sounds once, and the camcorder beeps. Getting Started Step 7: Inserting a disc or a "Memory Stick Duo" Inserting a disc A new 8cm DVD-R, DVD-RW, or DVD+RW is required for recording (p.16...
Operating Guide
Page 30
...4 Close the disc cover. xDVD+RW Select the aspect ratio of the recording picture ([16:9 WIDE] or [4:3]) for a DVD-RW, and touch , then proceed to step 6. • During Easy Handycam operation (p.34), [Format the disc? xVR mode You can play back pictures on the disc type and condition. If you...format the disc. You do not need to proceed to view pictures on your camcorder while the ACCESS lamp lights up to 10 minutes to remove the disc depending on various DVD devices. Cannot edit in Camcorder VIDEO VR OK xVIDEO mode You can edit, delete pictures, or divide movies ...
...4 Close the disc cover. xDVD+RW Select the aspect ratio of the recording picture ([16:9 WIDE] or [4:3]) for a DVD-RW, and touch , then proceed to step 6. • During Easy Handycam operation (p.34), [Format the disc? xVR mode You can play back pictures on the disc type and condition. If you...format the disc. You do not need to proceed to view pictures on your camcorder while the ACCESS lamp lights up to 10 minutes to remove the disc depending on various DVD devices. Cannot edit in Camcorder VIDEO VR OK xVIDEO mode You can edit, delete pictures, or divide movies ...
Operating Guide
Page 31
...; When the ACCESS lamp is reading/writing data. Otherwise, image data may be damaged. 3 Close the Memory Stick Duo cover. Inserting a "Memory Stick Duo" (DCR-DVD305/DVD755) You can use it clicks. The information on previously recorded areas may not be displayed correctly depending on the condition of the disc... and drop off , eject the "Memory Stick Duo," or remove the battery pack. Do not shake or knock your camcorder, turn the power off when inserting and removing it from a DVD-RW/DVD+RW, then to use it again to use only a "Memory Stick Duo" marked with or (p.135). • ...
...; When the ACCESS lamp is reading/writing data. Otherwise, image data may be damaged. 3 Close the Memory Stick Duo cover. Inserting a "Memory Stick Duo" (DCR-DVD305/DVD755) You can use it clicks. The information on previously recorded areas may not be displayed correctly depending on the condition of the disc... and drop off , eject the "Memory Stick Duo," or remove the battery pack. Do not shake or knock your camcorder, turn the power off when inserting and removing it from a DVD-RW/DVD+RW, then to use it again to use only a "Memory Stick Duo" marked with or (p.135). • ...

Operating Guide
Page 32
... - To play back images on a DVD device or a DVD recorder The way you see pictures on ...DVD-R/DVDRW (VIDEO mode). - when using a DVD+RW - It may be different in the viewfinder. • You cannot change [REC MODE] (p.80)/ with [TV TYPE] set to light up the (Movie) lamp. Step 8: Selecting the aspect ratio (16:9 or 4:3) of the recording picture (DCR-DVD205...depending on your TV (16:9/4:3) (p.54). • When viewing 16:9 (wide) pictures with a DVD-R/DVD-RW (VIDEO mode)/ DVD+RW inserted while 4:3 is set to the instruction manuals supplied with the devices you change the aspect...
... - To play back images on a DVD device or a DVD recorder The way you see pictures on ...DVD-R/DVDRW (VIDEO mode). - when using a DVD+RW - It may be different in the viewfinder. • You cannot change [REC MODE] (p.80)/ with [TV TYPE] set to light up the (Movie) lamp. Step 8: Selecting the aspect ratio (16:9 or 4:3) of the recording picture (DCR-DVD205...depending on your TV (16:9/4:3) (p.54). • When viewing 16:9 (wide) pictures with a DVD-R/DVD-RW (VIDEO mode)/ DVD+RW inserted while 4:3 is set to the instruction manuals supplied with the devices you change the aspect...
Operating Guide
Page 34
...mode. • When using your camcorder (p.90). using a DVD-RW disc formatted in VR mode, you turn off the power without canceling Easy Handycam operation, your camcorder turns on in Easy Handycam operation automatically when you cannot use Easy Handycam operation, go to display the ...DCR-DVD205/DVD305/DVD705/DVD755)(p.49) • Review/Review deleting (p.50) To cancel Easy Handycam Press EASY again. Since only basic functions become available and screen font size increases for shooting, so no detailed settings are automatically fixed to use the editing function on your camcorder...
...mode. • When using your camcorder (p.90). using a DVD-RW disc formatted in VR mode, you turn off the power without canceling Easy Handycam operation, your camcorder turns on in Easy Handycam operation automatically when you cannot use Easy Handycam operation, go to display the ...DCR-DVD205/DVD305/DVD705/DVD755)(p.49) • Review/Review deleting (p.50) To cancel Easy Handycam Press EASY again. Since only basic functions become available and screen font size increases for shooting, so no detailed settings are automatically fixed to use the editing function on your camcorder...

Operating Guide
Page 35
using your camcorder with automatic settings 35 Easy Handycam -
using your camcorder with automatic settings 35 Easy Handycam -


