Operating Instructions
Page 1
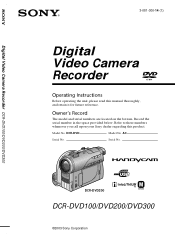
Serial No. Serial No. DCR-DVD Model No. Record the serial number in the space provided below. Owner's Record The model and serial numbers are located on the bottom. AC- Model No. Refer to these numbers whenever you call upon your Sony dealer regarding this manual thoroughly, and retain it for future reference. DCR-DVD200 TM SERIES DCR-DVD100/DVD200/DVD300 ©2003 Sony Corporation Digital Video Camera Recorder DCR-DVD100/DVD200/DVD300 3-081-300-14 (1) Digital Video Camera Recorder Operating Instructions Before operating the unit, please read this product.
Serial No. Serial No. DCR-DVD Model No. Record the serial number in the space provided below. Owner's Record The model and serial numbers are located on the bottom. AC- Model No. Refer to these numbers whenever you call upon your Sony dealer regarding this manual thoroughly, and retain it for future reference. DCR-DVD200 TM SERIES DCR-DVD100/DVD200/DVD300 ©2003 Sony Corporation Digital Video Camera Recorder DCR-DVD100/DVD200/DVD300 3-081-300-14 (1) Digital Video Camera Recorder Operating Instructions Before operating the unit, please read this product.
Operating Instructions
Page 2
...electricity or electromagnetism causes data transfer to rain or moisture. Regulatory Information Declaration of important operating and maintenance (servicing) instructions in hazardous radiation exposure. Operation is intended to alert the user to the presence of uninsulated "dangerous voltage" ...use of electric shock to use. Your Handycam is very easy to persons. Congratulations on your used rechargeable batteries to the presence of Conformity Trade Name: SONY Model No.: DCR-DVD100 Responsible Party:Sony Electronics Inc. For more information regarding ...
...electricity or electromagnetism causes data transfer to rain or moisture. Regulatory Information Declaration of important operating and maintenance (servicing) instructions in hazardous radiation exposure. Operation is intended to alert the user to the presence of uninsulated "dangerous voltage" ...use of electric shock to use. Your Handycam is very easy to persons. Congratulations on your used rechargeable batteries to the presence of Conformity Trade Name: SONY Model No.: DCR-DVD100 Responsible Party:Sony Electronics Inc. For more information regarding ...
Operating Instructions
Page 3
...receiving antenna. - The supplied interface cable must be determined by one or more of Conformity Trade Name: SONY Model No.: DCR-DVD200 Responsible Party:Sony Electronics Inc. Certain countries may regulate disposal of FCC Rules. Telephone No.: 201-930-6972 This device ... including interference that to which can radiate radio frequency energy and, if not installed and used in accordance with the instructions, may cause harmful interference to radio communications. Address: 680 Kinderkamack Road, Oradell, NJ 07649 U.S.A. Operation is encouraged to...
...receiving antenna. - The supplied interface cable must be determined by one or more of Conformity Trade Name: SONY Model No.: DCR-DVD200 Responsible Party:Sony Electronics Inc. Certain countries may regulate disposal of FCC Rules. Telephone No.: 201-930-6972 This device ... including interference that to which can radiate radio frequency energy and, if not installed and used in accordance with the instructions, may cause harmful interference to radio communications. Address: 680 Kinderkamack Road, Oradell, NJ 07649 U.S.A. Operation is encouraged to...

Operating Instructions
Page 11
Introduction 89 System requirements 89 Installing the USB driver 90 Installing software 91 Connecting your camcorder to the computer 92 Consulting the on-line help (operating instructions) of trouble and corrective action 116 Self-diagnosis display 123 Warning indicators 124 Warning messages 125 ...108 Selecting the option of each item 109 Troubleshooting Types of ImageMixer Ver.1.5 for Sony DVD Handycam 97 Viewing scenes recorded on your computer 98 Viewing scenes on your computer Connecting your camcorder to your computer - Disc Dubbing . 100 Making a disc copy 100 Editing and...
Introduction 89 System requirements 89 Installing the USB driver 90 Installing software 91 Connecting your camcorder to the computer 92 Consulting the on-line help (operating instructions) of trouble and corrective action 116 Self-diagnosis display 123 Warning indicators 124 Warning messages 125 ...108 Selecting the option of each item 109 Troubleshooting Types of ImageMixer Ver.1.5 for Sony DVD Handycam 97 Viewing scenes recorded on your computer 98 Viewing scenes on your computer Connecting your camcorder to your computer - Disc Dubbing . 100 Making a disc copy 100 Editing and...
Operating Instructions
Page 12
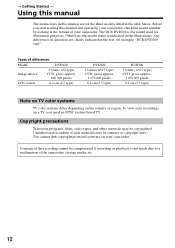
Using this manual The instructions in the text, for illustration purposes. The DCR-DVD200 is the model used for example, "DCR-DVD200 only". To view your camcorder, check the model number by looking at the bottom of the camcorder, storage media, etc. 12 - Unauthorized recording of such materials may be copyrighted. Types of the recording cannot be contrary...
Using this manual The instructions in the text, for illustration purposes. The DCR-DVD200 is the model used for example, "DCR-DVD200 only". To view your camcorder, check the model number by looking at the bottom of the camcorder, storage media, etc. 12 - Unauthorized recording of such materials may be copyrighted. Types of the recording cannot be contrary...
Operating Instructions
Page 45
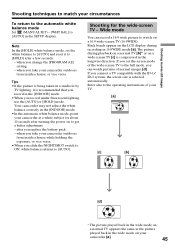
...setting. - The picture during recording in the [INDOOR] mode. •When you record in 16:9WIDE mode [a]. If you take your camcorder outdoors from inside a house, or vice versa. Shooting movies/still images Shooting techniques to match your circumstances To return to the automatic white ...balance mode Set (MANUAL SET) - [WHT BAL] to the operating instructions of normal images [d]. when you replace the battery pack. - Shooting for about 10 seconds after turning the power on a wide-screen TV...
...setting. - The picture during recording in the [INDOOR] mode. •When you record in 16:9WIDE mode [a]. If you take your camcorder outdoors from inside a house, or vice versa. Shooting movies/still images Shooting techniques to match your circumstances To return to the automatic white ...balance mode Set (MANUAL SET) - [WHT BAL] to the operating instructions of normal images [d]. when you replace the battery pack. - Shooting for about 10 seconds after turning the power on a wide-screen TV...
Operating Instructions
Page 62
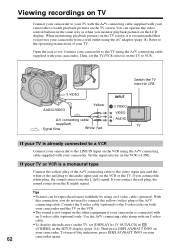
...signal. You can be reproduced more faithfully by using the A/V connecting cable supplied with your camcorder. S VIDEO AUDIO/VIDEO Yellow A/V connecting cable (supplied) : Signal flow White Red Switch the TV input to the operating instructions of your TV. Connect the S video cable (optional) to the S video jacks on... both your camcorder and the TV or the VCR. • The sound is not output on the other ...
...signal. You can be reproduced more faithfully by using the A/V connecting cable supplied with your camcorder. S VIDEO AUDIO/VIDEO Yellow A/V connecting cable (supplied) : Signal flow White Red Switch the TV input to the operating instructions of your TV. Connect the S video cable (optional) to the S video jacks on... both your camcorder and the TV or the VCR. • The sound is not output on the other ...
Operating Instructions
Page 63
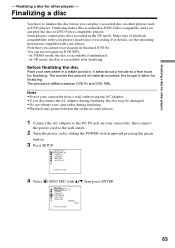
...you can play the disc on other players such as DVD players. In VR mode: the disc is recordable if unfinalized. - Finalizing a disc You have to a few hours for finalizing. For details, see the operating instructions supplied with your camcorder, then connect the power cord to the wall outlet.... 2 Turn the power on finalized DVD-Rs. It takes about a minute to finalize the disc before you disconnect the AC adaptor...
...you can play the disc on other players such as DVD players. In VR mode: the disc is recordable if unfinalized. - Finalizing a disc You have to a few hours for finalizing. For details, see the operating instructions supplied with your camcorder, then connect the power cord to the wall outlet.... 2 Turn the power on finalized DVD-Rs. It takes about a minute to finalize the disc before you disconnect the AC adaptor...
Operating Instructions
Page 66
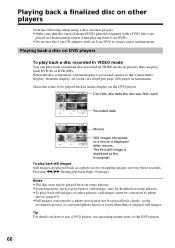
...images on other players. •Make sure that the vertical-shaped DVD player/computer with a DVD drive are placed in a horizontal position when playing back 8 cm DVDs. •Do not use a DVD player, see operating instructions of the DVD player. 66 Playing back a finalized disc on other players Note the...8226;Still images converted to a photo movie may cause malfunctions. Select the scene to the Visual Index display. Playing back a disc on DVD players To play back a disc recorded in VIDEO mode You can play back a finalized disc recorded in menu display on players that of ...
...images on other players. •Make sure that the vertical-shaped DVD player/computer with a DVD drive are placed in a horizontal position when playing back 8 cm DVDs. •Do not use a DVD player, see operating instructions of the DVD player. 66 Playing back a finalized disc on other players Note the...8226;Still images converted to a photo movie may cause malfunctions. Select the scene to the Visual Index display. Playing back a disc on DVD players To play back a disc recorded in VIDEO mode You can play back a finalized disc recorded in menu display on players that of ...
Operating Instructions
Page 67
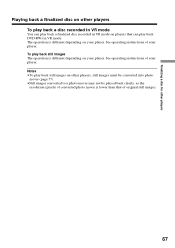
The operation is lower than that can play back DVD-RWs in VR mode. Notes •To play back a finalized disc recorded in VR mode on your player. See operating instructions of original still images. 67 Finalizing a disc for other players Playing back a finalized disc on other players, still images must be converted... is different depending on other players To play back a disc recorded in VR mode You can play back still images on your player. See operating instructions of your player.
The operation is lower than that can play back DVD-RWs in VR mode. Notes •To play back a finalized disc recorded in VR mode on your player. See operating instructions of original still images. 67 Finalizing a disc for other players Playing back a finalized disc on other players, still images must be converted... is different depending on other players To play back a disc recorded in VR mode You can play back still images on your player. See operating instructions of your player.

Operating Instructions
Page 68
...label of your computer. Or, double-click the [My Computer] icon on a computer without a DVD drive, by connecting your camcorder to the DVD drive of the disc. A DVD playback application starts and the movie is recorded on your computer. 2 Insert the finalized disc to... your computer. The date the disc was first used is played back. For details, see operating instructions of your computer. Notes •Use the DVD...
...label of your computer. Or, double-click the [My Computer] icon on a computer without a DVD drive, by connecting your camcorder to the DVD drive of the disc. A DVD playback application starts and the movie is recorded on your computer. 2 Insert the finalized disc to... your computer. The date the disc was first used is played back. For details, see operating instructions of your computer. Notes •Use the DVD...
Operating Instructions
Page 69
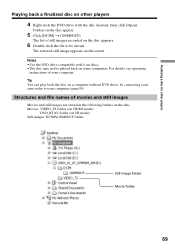
...list of still images recorded on some computers. Notes •Use the DVD drive compatible with the disc inserted, then click [Open]. The selected still image appears on the disc. For details, see operating instructions of movies and still images Movies and still images are stored in the ... DCIM\100MSDCF folder Still image folder Movie folder 69 Movies: VIDEO_TS folder (on VIDEO mode) DVD_RTAV folder (on a computer without DVD drive, by connecting your camcorder to be shown. Finalizing a disc for other players Playing back a finalized disc on other players 4 Right-click the...
...list of still images recorded on some computers. Notes •Use the DVD drive compatible with the disc inserted, then click [Open]. The selected still image appears on the disc. For details, see operating instructions of movies and still images Movies and still images are stored in the ... DCIM\100MSDCF folder Still image folder Movie folder 69 Movies: VIDEO_TS folder (on VIDEO mode) DVD_RTAV folder (on a computer without DVD drive, by connecting your camcorder to be shown. Finalizing a disc for other players Playing back a finalized disc on other players 4 Right-click the...
Operating Instructions
Page 92
...able to use the ImageMixer CD writing function, you connect your camcorder via a USB hub or to the USB port not equipped with your camcorder. 2 Set the mode dial to your camcorder. 5 Follow the instructions given in the on your computer - The installation of ImageMixer ...is selected and continue the procedure. Introduction 3 Follow the instructions given in the on- Note On a computer...
...able to use the ImageMixer CD writing function, you connect your camcorder via a USB hub or to the USB port not equipped with your camcorder. 2 Set the mode dial to your camcorder. 5 Follow the instructions given in the on your computer - The installation of ImageMixer ...is selected and continue the procedure. Introduction 3 Follow the instructions given in the on- Note On a computer...

Operating Instructions
Page 94
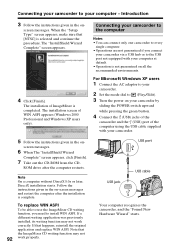
...USB cable Your computer recognizes the camcorder, and the "Found New Hardware" dialog box appears. 5 Follow the instructions given in the on your camcorder by sliding the POWER switch upward while pressing the green button. 4 Connect the (USB) jacks of the camcorder and the (USB) port ...of the computer using the USB cable supplied with your camcorder. Introduction For Microsoft Windows...
...USB cable Your computer recognizes the camcorder, and the "Found New Hardware" dialog box appears. 5 Follow the instructions given in the on your camcorder by sliding the POWER switch upward while pressing the green button. 4 Connect the (USB) jacks of the camcorder and the (USB) port ...of the computer using the USB cable supplied with your camcorder. Introduction For Microsoft Windows...

Operating Instructions
Page 95
... computer using the USB cable supplied with your camcorder. The connection between your camcorder and the computer is installed correctly. "Device Manager" screen appears. 5 Make sure that "SONY DDX-A1000 USB Device" appears in DVD/CD-ROM drives, "Generic volume" in Storage...]. screen messages and restart your computer. USB port USB jack USB cable Your computer recognizes the camcorder, and the "New Hardware Found" dialog box appears. 5 Follow the instructions given in Universal Serial Bus controllers respectively. Viewing/dubbing discs/ editing the recordings on your computer ...
... computer using the USB cable supplied with your camcorder. The connection between your camcorder and the computer is installed correctly. "Device Manager" screen appears. 5 Make sure that "SONY DDX-A1000 USB Device" appears in DVD/CD-ROM drives, "Generic volume" in Storage...]. screen messages and restart your computer. USB port USB jack USB cable Your computer recognizes the camcorder, and the "New Hardware Found" dialog box appears. 5 Follow the instructions given in Universal Serial Bus controllers respectively. Viewing/dubbing discs/ editing the recordings on your computer ...
Operating Instructions
Page 97
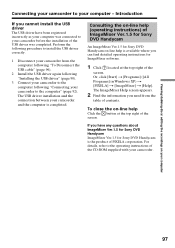
... ImageMixer Ver.1.5 for Sony DVD Handycam An ImageMixer Ver.1.5 for Sony DVD Handycam on-line help Click the button at the top right of the screen. Introduction If you can find detailed operating instructions for Sony DVD Handycam is available where you cannot install the USB driver The USB driver have any questions about ImageMixer Ver.1.5 for Sony DVD Handycam ImageMixer Ver.1.5 for...
... ImageMixer Ver.1.5 for Sony DVD Handycam An ImageMixer Ver.1.5 for Sony DVD Handycam on-line help Click the button at the top right of the screen. Introduction If you can find detailed operating instructions for Sony DVD Handycam is available where you cannot install the USB driver The USB driver have any questions about ImageMixer Ver.1.5 for Sony DVD Handycam ImageMixer Ver.1.5 for...
Operating Instructions
Page 100
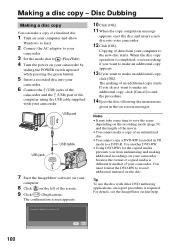
...can make an additional copy, click [Cancel] to end the procedure. 14 Eject the disc following the instructions given in VR mode to make a copy of an unfinalized disc. •You cannot copy a DVD-RW recorded in the on-screen messages. When the disc copy operation is completed, a screen asking if... appears. 10 Click [OK]. 11 When the copy completion message appears, eject the disc and insert a new disc into your camcorder. 6 Connect the (USB) jacks of the camcorder and the (USB) port of an additional copy starts. If you from unfinalizing and making of the computer using the USB cable...
...can make an additional copy, click [Cancel] to end the procedure. 14 Eject the disc following the instructions given in VR mode to make a copy of an unfinalized disc. •You cannot copy a DVD-RW recorded in the on-screen messages. When the disc copy operation is completed, a screen asking if... appears. 10 Click [OK]. 11 When the copy completion message appears, eject the disc and insert a new disc into your camcorder. 6 Connect the (USB) jacks of the camcorder and the (USB) port of an additional copy starts. If you from unfinalizing and making of the computer using the USB cable...

Operating Instructions
Page 104
...] to make an additional copy, click [OK]. The "Writing mode" screen appears. 3 When you want to end the procedure. 7 Eject the disc following the instructions given in the on the disc starts. When the operation is completed, a screen asking if you want to make an additional copy appears. 6 If you... have checked that all the contents are right, connect your camcorder to the menu. 5 Click [OK]. The "DVD Video Output" screen appears. 2 Click the button on the (Preview) box on the upper left of the screen. Recording on -...
...] to make an additional copy, click [OK]. The "Writing mode" screen appears. 3 When you want to end the procedure. 7 Eject the disc following the instructions given in the on the disc starts. When the operation is completed, a screen asking if you want to make an additional copy appears. 6 If you... have checked that all the contents are right, connect your camcorder to the menu. 5 Click [OK]. The "DVD Video Output" screen appears. 2 Click the button on the (Preview) box on the upper left of the screen. Recording on -...

Operating Instructions
Page 106
... on the edited tape: - Insert a blank tape (or a tape you have finished dubbing Stop recording on the VCR, then press x on your camcorder. 106 DATA CODE on the Remote Commander 1 Insert the recorded disc into the VCR. Dubbing a disc to a tape Dubbing to a tape Before operation...[DISPLAY] in (OTHERS) to LCD in the SETUP display. (The default setting is [LCD].) •Press the following buttons to the operating instructions of your camcorder. 2 Prepare the VCR for recording. Set the input selector to record over) into your VCR. DISPLAY on the Remote Commander - Refer the...
... on the edited tape: - Insert a blank tape (or a tape you have finished dubbing Stop recording on the VCR, then press x on your camcorder. 106 DATA CODE on the Remote Commander 1 Insert the recorded disc into the VCR. Dubbing a disc to a tape Dubbing to a tape Before operation...[DISPLAY] in (OTHERS) to LCD in the SETUP display. (The default setting is [LCD].) •Press the following buttons to the operating instructions of your camcorder. 2 Prepare the VCR for recording. Set the input selector to record over) into your VCR. DISPLAY on the Remote Commander - Refer the...

Operating Instructions
Page 107
...the VCR, insert a recorded tape into your camcorder at the scene where you are recording from the VCR or TV appears on the LCD display or in VR mode (page 7) following the instructions on the LCD display. 4 Press VISUAL INDEX on your camcorder. Format the disc in VIDEO mode or in... the viewfinder. 6 Press z on your camcorder. 3 Insert a blank disc (or a disc you insert a new DVD-RW. Select a TV program if you want to the...
...the VCR, insert a recorded tape into your camcorder at the scene where you are recording from the VCR or TV appears on the LCD display or in VR mode (page 7) following the instructions on the LCD display. 4 Press VISUAL INDEX on your camcorder. Format the disc in VIDEO mode or in... the viewfinder. 6 Press z on your camcorder. 3 Insert a blank disc (or a disc you insert a new DVD-RW. Select a TV program if you want to the...


