Operating Instructions
Page 5
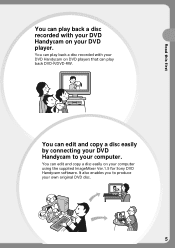
You can edit and copy a disc easily on your own original DVD disc. 5 It also enables you to your computer. You can edit and copy a disc easily by connecting your DVD Handycam to produce your computer using the supplied ImageMixer Ver.1.5 for Sony DVD Handycam software. You can play back DVD-R/DVD-RW. Read this first You can play back a disc recorded with your DVD Handycam on DVD players that can play back a disc recorded with your DVD Handycam on your DVD player.
You can edit and copy a disc easily on your own original DVD disc. 5 It also enables you to your computer. You can edit and copy a disc easily by connecting your DVD Handycam to produce your computer using the supplied ImageMixer Ver.1.5 for Sony DVD Handycam software. You can play back DVD-R/DVD-RW. Read this first You can play back a disc recorded with your DVD Handycam on DVD players that can play back a disc recorded with your DVD Handycam on your DVD player.
Operating Instructions
Page 9
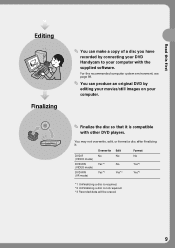
... mode) DVD-RW (VR mode) No Yes*1 Yes*2 No No Yes*2 No Yes*3 Yes*3 *1 Unfinalizing a disc is required. *2 Unfinalizing a disc is compatible with the supplied software. For the recommended computer system environment, see page 89. You can make a copy of a disc you have recorded by editing your movies/still images on... finalizing it is not required. *3 Recorded data will be erased. 9 Read this first Editing Finalizing You can produce an original DVD by connecting your DVD Handycam to your computer.
... mode) DVD-RW (VR mode) No Yes*1 Yes*2 No No Yes*2 No Yes*3 Yes*3 *1 Unfinalizing a disc is required. *2 Unfinalizing a disc is compatible with the supplied software. For the recommended computer system environment, see page 89. You can make a copy of a disc you have recorded by editing your movies/still images on... finalizing it is not required. *3 Recorded data will be erased. 9 Read this first Editing Finalizing You can produce an original DVD by connecting your DVD Handycam to your computer.

Operating Instructions
Page 11
...- Introduction 89 System requirements 89 Installing the USB driver 90 Installing software 91 Connecting your camcorder to the computer 92 Consulting the on-line help (operating instructions) of ImageMixer Ver.1.5 for Sony DVD Handycam 97 Viewing scenes recorded on your computer 98 Viewing scenes on ...a disc 104 Connecting your camcorder to a TV and a VCR Dubbing a disc to a tape 105 Connecting your camcorder to a VCR 105 Dubbing to a tape...
...- Introduction 89 System requirements 89 Installing the USB driver 90 Installing software 91 Connecting your camcorder to the computer 92 Consulting the on-line help (operating instructions) of ImageMixer Ver.1.5 for Sony DVD Handycam 97 Viewing scenes recorded on your computer 98 Viewing scenes on ...a disc 104 Connecting your camcorder to a TV and a VCR Dubbing a disc to a tape 105 Connecting your camcorder to a VCR 105 Dubbing to a tape...
Operating Instructions
Page 12
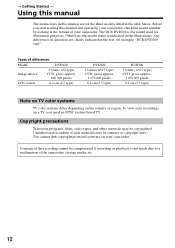
...copyrighted. - Using this manual The instructions in this manual and operating your camcorder, check the model number by looking at the bottom of such materials may be contrary to a malfunction of differences Model DVD100 Image device 4.5mm (1/4 type) CCD, gross approx. 680 000 pixels... cannot dub copyright protected software on a TV, you start reading this manual are clearly indicated in the illustrations. Getting Started - The DCR-DVD200 is indicated in the text, for example, "DCR-DVD200 only". To view your recordings on your camcorder. Unauthorized recording of your...
...copyrighted. - Using this manual The instructions in this manual and operating your camcorder, check the model number by looking at the bottom of such materials may be contrary to a malfunction of differences Model DVD100 Image device 4.5mm (1/4 type) CCD, gross approx. 680 000 pixels... cannot dub copyright protected software on a TV, you start reading this manual are clearly indicated in the illustrations. Getting Started - The DCR-DVD200 is indicated in the text, for example, "DCR-DVD200 only". To view your recordings on your camcorder. Unauthorized recording of your...
Operating Instructions
Page 89
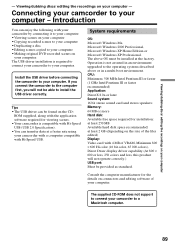
... on your computer - ROM supplied, along with the application software required for installation: at least 250 MB Available hard disk space recommended: at a faster rate using your camcorder with a computer compatible with your camcorder by connecting it to your computer: •Viewing scenes on... on your computer - If you connect the camcorder to install the USB driver correctly. The above or in an environment upgraded to a Macintosh computer. 89 Viewing/dubbing discs/ editing the recordings on connectors and editing software of VRAM, Minimum 800 × 600 Hi...
... on your computer - ROM supplied, along with the application software required for installation: at least 250 MB Available hard disk space recommended: at a faster rate using your camcorder with a computer compatible with your camcorder by connecting it to your computer: •Viewing scenes on... on your computer - If you connect the camcorder to install the USB driver correctly. The above or in an environment upgraded to a Macintosh computer. 89 Viewing/dubbing discs/ editing the recordings on connectors and editing software of VRAM, Minimum 800 × 600 Hi...

Operating Instructions
Page 90
... If you open a still image file. Communications with your computer Communications between your camcorder and your computer may increase when you are using your computer Software Depending on , close all the software. 2 Insert the supplied CD-ROM into the CD-ROM drive of your computer. ...USB driver Start the following operation before connecting the USB cable to your computer - Connecting your camcorder to your computer. When your computer is already turned on your application software, the file size may not recover properly even after a while. 90 The installation menu ...
... If you open a still image file. Communications with your computer Communications between your camcorder and your computer may increase when you are using your computer Software Depending on , close all the software. 2 Insert the supplied CD-ROM into the CD-ROM drive of your computer. ...USB driver Start the following operation before connecting the USB cable to your computer - Connecting your camcorder to your computer. When your computer is already turned on your application software, the file size may not recover properly even after a while. 90 The installation menu ...
Operating Instructions
Page 91
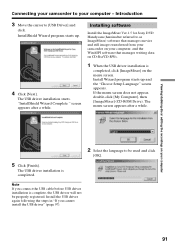
... transferred from your camcorder on your computer, and the WinASPI software that manages writing data on CD-Rs/CD-RWs. 1 When the USB driver installation is completed, click [ImageMixer] on your computer 2 Select the language to your camcorder to be properly ...the USB cable before USB driver installation is completed. "InstallShield Wizard Complete " screen appears after a while. Installing software Install the ImageMixer Ver.1.5 for Sony DVD Handycam (hereinafter referred to [USB Driver] and click. The menu screen appears after a while. InstallShield Wizard program ...
... transferred from your camcorder on your computer, and the WinASPI software that manages writing data on CD-Rs/CD-RWs. 1 When the USB driver installation is completed, click [ImageMixer] on your computer 2 Select the language to your camcorder to be properly ...the USB cable before USB driver installation is completed. "InstallShield Wizard Complete " screen appears after a while. Installing software Install the ImageMixer Ver.1.5 for Sony DVD Handycam (hereinafter referred to [USB Driver] and click. The menu screen appears after a while. InstallShield Wizard program ...
Operating Instructions
Page 93
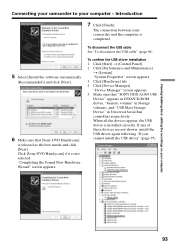
...Handycam] if it is selected as the best match and click [Next]. To confirm the USB driver installation 1 Click [Start] t [Control Panel]. 2 Click [Performance and Maintenance] t [System]. To disconnect the USB cable See "To disconnect the USB cable" (page 96). 5 Select [Install the software automatically (Recommended)] and click [Next]. 6 Make sure that "SONY... on your computer Connecting your camcorder to your camcorder and the computer is installed correctly. "Device Manager" screen appears. 5 Make sure that [Sony DVD Handycam] is not selected. Introduction 7 Click [Finish].
...Handycam] if it is selected as the best match and click [Next]. To confirm the USB driver installation 1 Click [Start] t [Control Panel]. 2 Click [Performance and Maintenance] t [System]. To disconnect the USB cable See "To disconnect the USB cable" (page 96). 5 Select [Install the software automatically (Recommended)] and click [Next]. 6 Make sure that "SONY... on your computer Connecting your camcorder to your camcorder and the computer is installed correctly. "Device Manager" screen appears. 5 Make sure that [Sony DVD Handycam] is not selected. Introduction 7 Click [Finish].
Operating Instructions
Page 97
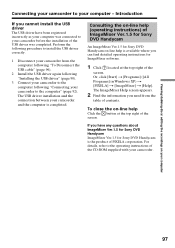
... computer following procedure to the operating instructions of the CD-ROM supplied with your camcorder before the installation of the screen. Consulting the on-line help (operating instructions) of ImageMixer Ver.1.5 for Sony DVD Handycam An ImageMixer Ver.1.5 for ImageMixer software. 1 Click located at the top right of the screen. Perform the following "Connecting...
... computer following procedure to the operating instructions of the CD-ROM supplied with your camcorder before the installation of the screen. Consulting the on-line help (operating instructions) of ImageMixer Ver.1.5 for Sony DVD Handycam An ImageMixer Ver.1.5 for ImageMixer software. 1 Click located at the top right of the screen. Perform the following "Connecting...
Operating Instructions
Page 98
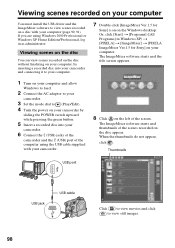
.... 7 Double-click [ImageMixer Ver.1.5 for Sony] on your computer (page 90, 91). If you are using the USB cable supplied with your computer. The ImageMixer software starts and the title screen appears. 1 Turn on your computer and allow Windows to load. 2 Connect the AC adaptor to your camcorder. 3 Set the mode dial to...
.... 7 Double-click [ImageMixer Ver.1.5 for Sony] on your computer (page 90, 91). If you are using the USB cable supplied with your computer. The ImageMixer software starts and the title screen appears. 1 Turn on your computer and allow Windows to load. 2 Connect the AC adaptor to your camcorder. 3 Set the mode dial to...
Operating Instructions
Page 99
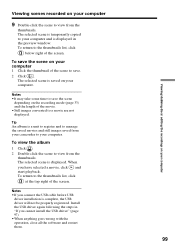
...the scene on your computer. When you cannot install the USB driver" (page 97). •When anything goes wrong with the operation, close all the software and restart them. 99 To save . 2 Click . Notes •If you connect the USB cable before USB driver installation is saved on your computer...saved movies and still images saved from the thumbnails. Install the USB driver again following the steps in the preview window. To return to your camcorder to the thumbnails list, click below right of the screen. To view the album 1 Click . 2 Double-click the scene to view from your...
...the scene on your computer. When you cannot install the USB driver" (page 97). •When anything goes wrong with the operation, close all the software and restart them. 99 To save . 2 Click . Notes •If you connect the USB cable before USB driver installation is saved on your computer...saved movies and still images saved from the thumbnails. Install the USB driver again following the steps in the preview window. To return to your camcorder to the thumbnails list, click below right of the screen. To view the album 1 Click . 2 Double-click the scene to view from your...
Operating Instructions
Page 100
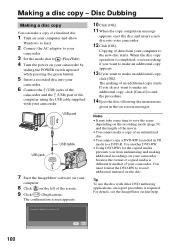
... the POWER switch upward while pressing the green button. 5 Insert a recorded disc into your camcorder. 12 Click [OK]. For details, see the ImageMixer on the disc. USB port USB jack USB cable 7 Start the ImageMixer software on the left of an additional copy starts. Use another DVD-RW. •Using DVD... a disc copy You can make a copy of a finalized disc. 1 Turn on your computer and allow Windows to load. 2 Connect the AC adaptor to your camcorder. 3 Set the mode dial to (Play/Edit). 4 Turn the power on the recording mode (page 33) and the length of your computer. 8 Click on ...
... the POWER switch upward while pressing the green button. 5 Insert a recorded disc into your camcorder. 12 Click [OK]. For details, see the ImageMixer on the disc. USB port USB jack USB cable 7 Start the ImageMixer software on the left of an additional copy starts. Use another DVD-RW. •Using DVD... a disc copy You can make a copy of a finalized disc. 1 Turn on your computer and allow Windows to load. 2 Connect the AC adaptor to your camcorder. 3 Set the mode dial to (Play/Edit). 4 Turn the power on the recording mode (page 33) and the length of your computer. 8 Click on ...

Operating Instructions
Page 101
.../ editing the recordings on your computer When the editing of saving data in the album. Storyboard When you want to edit them using the ImageMixer software. when some time for saving the file in the following procedure shows an example of the movie is also saved as the saving destination, then...
.../ editing the recordings on your computer When the editing of saving data in the album. Storyboard When you want to edit them using the ImageMixer software. when some time for saving the file in the following procedure shows an example of the movie is also saved as the saving destination, then...


