Operating Instructions
Page 3
...may cause undesired operation. Getting Started Declaration of Conformity Trade Name: SONY Model No.: DCR-DVD300 Responsible Party:Sony Electronics Inc. Declaration of Conformity Trade Name: SONY Model No.: DCR-DVD200 Responsible Party:Sony Electronics Inc. This equipment generates, uses, and can be determined ...antenna. - Address: 680 Kinderkamack Road, Oradell, NJ 07649 U.S.A. Operation is encouraged to try to correct the interference by turning the equipment off and on a circuit different from that may not cause harmful interference, and (2) this device must accept ...
...may cause undesired operation. Getting Started Declaration of Conformity Trade Name: SONY Model No.: DCR-DVD300 Responsible Party:Sony Electronics Inc. Declaration of Conformity Trade Name: SONY Model No.: DCR-DVD200 Responsible Party:Sony Electronics Inc. This equipment generates, uses, and can be determined ...antenna. - Address: 680 Kinderkamack Road, Oradell, NJ 07649 U.S.A. Operation is encouraged to try to correct the interference by turning the equipment off and on a circuit different from that may not cause harmful interference, and (2) this device must accept ...
Operating Instructions
Page 10
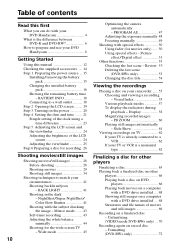
...recordings Playing a disc on TV 62 If your TV is already connected to a VCR 62 If your DVD Handycam 8 Getting Started Using this first What you can do with the subject checking the image - Slide Show ...Connecting to a wall outlet 18 Step 2 Opening the LCD screen ......... 19 Step 3 Turning on a finalized disc - NightShot/Super NightShot/ Color Slow Shutter 41 Shooting with your DVD Handycam 4 What is a monaural type 62 Finalizing a disc for other players Finalizing a ... difference between DVD-R and DVD-RW 6 How to match your camcorder ...... 55 Choosing and viewing a recording -
...recordings Playing a disc on TV 62 If your TV is already connected to a VCR 62 If your DVD Handycam 8 Getting Started Using this first What you can do with the subject checking the image - Slide Show ...Connecting to a wall outlet 18 Step 2 Opening the LCD screen ......... 19 Step 3 Turning on a finalized disc - NightShot/Super NightShot/ Color Slow Shutter 41 Shooting with your DVD Handycam 4 What is a monaural type 62 Finalizing a disc for other players Finalizing a ... difference between DVD-R and DVD-RW 6 How to match your camcorder ...... 55 Choosing and viewing a recording -
Operating Instructions
Page 16
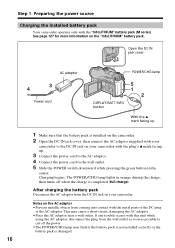
.... 4 Connect the power cord to the wall outlet. 5 Slide the POWER switch downward while pressing the green button in orange during the charge, then turns off the power. •The POWER/CHG lamp may cause a short-circuit, damaging the AC adaptor. •Place the AC adaptor near a wall ...outlet. Charging begins. Step 1 Preparing the power source Charging the installed battery pack Your camcorder operates only with this unit while using the AC adaptor, disconnect the plug from the wall outlet as soon as possible to cut off when...
.... 4 Connect the power cord to the wall outlet. 5 Slide the POWER switch downward while pressing the green button in orange during the charge, then turns off the power. •The POWER/CHG lamp may cause a short-circuit, damaging the AC adaptor. •Place the AC adaptor near a wall ...outlet. Charging begins. Step 1 Preparing the power source Charging the installed battery pack Your camcorder operates only with this unit while using the AC adaptor, disconnect the plug from the wall outlet as soon as possible to cut off when...
Operating Instructions
Page 17
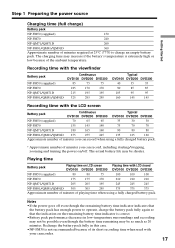
...Approximate number of minutes you can record, including starting/stopping, zooming and turning the power on/off even though the remaining battery time indicator indicates ... the indication on LCD screen Playing time with LCD closed DVD100 DVD200 DVD300 DVD100 DVD200 DVD300 NP-FM50 (supplied) 80 80 75 100 ... when used with the LCD screen Battery pack Continuous Typical DVD100 DVD200 DVD300 DVD100 DVD200 DVD300 NP-FM50 (supplied) 70 65 65 35...FM91/QM91/QM91D Continuous DVD100 DVD200 DVD300 85 75 75 185 170 170 215 195 195 325 295 295 Typical DVD100 DVD200 DVD300 40 ...
...Approximate number of minutes you can record, including starting/stopping, zooming and turning the power on/off even though the remaining battery time indicator indicates ... the indication on LCD screen Playing time with LCD closed DVD100 DVD200 DVD300 DVD100 DVD200 DVD300 NP-FM50 (supplied) 80 80 75 100 ... when used with the LCD screen Battery pack Continuous Typical DVD100 DVD200 DVD300 DVD100 DVD200 DVD300 NP-FM50 (supplied) 70 65 65 35...FM91/QM91/QM91D Continuous DVD100 DVD200 DVD300 85 75 75 185 170 170 215 195 195 325 295 295 Typical DVD100 DVD200 DVD300 40 ...
Operating Instructions
Page 18
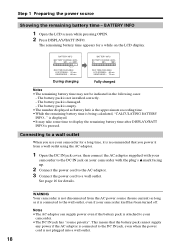
.../BATT INFO. This means that you power it is connected to display the remaining battery time after DISPLAY/BATT INFO is attached to your camcorder with your camcorder to the DC IN jack, even when the power cord is displayed. •It may not be indicated in the following cases: - BATTERY... 65 min VIEWFINDER : 75 min Fully charged Notes •The remaining battery time may take some time to the wall outlet, even if your camcorder itself has been turned off. The battery pack is empty. •The number displayed as it from the AC power source (house current) as long as Battery...
.../BATT INFO. This means that you power it is connected to display the remaining battery time after DISPLAY/BATT INFO is attached to your camcorder with your camcorder to the DC IN jack, even when the power cord is displayed. •It may not be indicated in the following cases: - BATTERY... 65 min VIEWFINDER : 75 min Fully charged Notes •The remaining battery time may take some time to the wall outlet, even if your camcorder itself has been turned off. The battery pack is empty. •The number displayed as it from the AC power source (house current) as long as Battery...

Operating Instructions
Page 19
... you adjust the angle of the LCD screen to the [BRT NORMAL]. 19 You can turn the LCD screen over and move it into the camcorder body. •When the LCD screen is moved back to the camcorder while recording or while in various angles, and reviewing recorded images. 2 180º OPEN button... is fixed to the desired position. Notes •When closing the LCD screen, set it vertically until it clicks, then swing it back to the camcorder body with the LCD screen facing out as changing settings, shooting images in standby to record, the screen backlight is opened up to the...
... you adjust the angle of the LCD screen to the [BRT NORMAL]. 19 You can turn the LCD screen over and move it into the camcorder body. •When the LCD screen is moved back to the camcorder while recording or while in various angles, and reviewing recorded images. 2 180º OPEN button... is fixed to the desired position. Notes •When closing the LCD screen, set it vertically until it clicks, then swing it back to the camcorder body with the LCD screen facing out as changing settings, shooting images in standby to record, the screen backlight is opened up to the...
Operating Instructions
Page 20
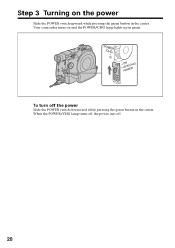
When the POWER/CHG lamp turns off, the power cuts off the power Slide the POWER switch downward while pressing the green button in the center. Step 3 Turning on and the POWER/CHG lamp lights up in green. Your camcorder turns on the power Slide the POWER switch upward while pressing the green button in the center. To turn off . 20
When the POWER/CHG lamp turns off, the power cuts off the power Slide the POWER switch downward while pressing the green button in the center. Step 3 Turning on and the POWER/CHG lamp lights up in green. Your camcorder turns on the power Slide the POWER switch upward while pressing the green button in the center. To turn off . 20
Operating Instructions
Page 21
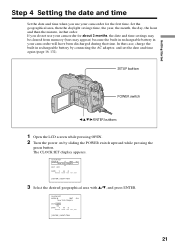
...date and time when you do not use your camcorder will have been discharged during that case, charge the built-in that order. In that time. SETUP button POWER switch b/v/V/B/ENTER buttons 1 Open the LCD screen while pressing OPEN. 2 Turn the power on by connecting the AC adaptor, ...and set the date and time again (page 16, 132). The CLOCK SET display appears. CLOCK SET AREA 26 GMT -5.0 N ew Yo r k , B o g o t a DST OFF ON DATE Y M D : [ ENTER ] : NEXT ITEM 21 If you use your camcorder for about 3 ...
...date and time when you do not use your camcorder will have been discharged during that case, charge the built-in that order. In that time. SETUP button POWER switch b/v/V/B/ENTER buttons 1 Open the LCD screen while pressing OPEN. 2 Turn the power on by connecting the AC adaptor, ...and set the date and time again (page 16, 132). The CLOCK SET display appears. CLOCK SET AREA 26 GMT -5.0 N ew Yo r k , B o g o t a DST OFF ON DATE Y M D : [ ENTER ] : NEXT ITEM 21 If you use your camcorder for about 3 ...
Operating Instructions
Page 24
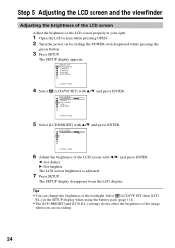
... display disappears from the LCD display. LCD COLOR VF B. L. Select (LCD/VF SET) then [LCD B.L.] in your sight. 1 Open the LCD screen while pressing OPEN. 2 Turn the power on by sliding the POWER switch upward while pressing the green button. 3 Press SETUP. The SETUP display appears. LCD / VF SET LCD BRIGHT...
... display disappears from the LCD display. LCD COLOR VF B. L. Select (LCD/VF SET) then [LCD B.L.] in your sight. 1 Open the LCD screen while pressing OPEN. 2 Turn the power on by sliding the POWER switch upward while pressing the green button. 3 Press SETUP. The SETUP display appears. LCD / VF SET LCD BRIGHT...
Operating Instructions
Page 26
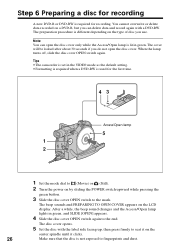
... spindle until it clicks. 26 Make sure that the disc is not exposed to the end. When the lamp turns off, slide the disc cover OPEN switch again. The disc cover opens. 5 Set the disc with a DVD... the first time. 43 Access/Open lamp 5 1 2 1 Set the mode dial to (Movie) or (Still). 2 Turn the power on a DVD-R, but you can open the disc cover. You cannot overwrite or delete data recorded on by sliding... 3 Slide the disc cover OPEN switch to the mark. Tips •The camcorder is set in green, and SLIDE [OPEN] appears. 4 Slide the disc cover OPEN switch again to fingerprints and...
... spindle until it clicks. 26 Make sure that the disc is not exposed to the end. When the lamp turns off, slide the disc cover OPEN switch again. The disc cover opens. 5 Set the disc with a DVD... the first time. 43 Access/Open lamp 5 1 2 1 Set the mode dial to (Movie) or (Still). 2 Turn the power on a DVD-R, but you can open the disc cover. You cannot overwrite or delete data recorded on by sliding... 3 Slide the disc cover OPEN switch to the mark. Tips •The camcorder is set in green, and SLIDE [OPEN] appears. 4 Slide the disc cover OPEN switch again to fingerprints and...
Operating Instructions
Page 29
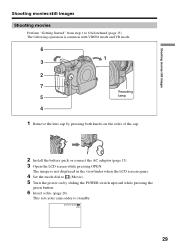
... lens cap by pressing both knobs on by sliding the POWER switch upward while pressing the green button. 6 Insert a disc (page 26). This sets your camcorder to 6 beforehand (page 15). The following operation is not displayed in the viewfinder when the LCD screen opens. 4 Set the mode dial to (Movie...). 5 Turn the power on the sides of the cap. 2 Install the battery pack or connect the AC adaptor (page 15). 3 Open the LCD screen while pressing ...
... lens cap by pressing both knobs on by sliding the POWER switch upward while pressing the green button. 6 Insert a disc (page 26). This sets your camcorder to 6 beforehand (page 15). The following operation is not displayed in the viewfinder when the LCD screen opens. 4 Set the mode dial to (Movie...). 5 Turn the power on the sides of the cap. 2 Install the battery pack or connect the AC adaptor (page 15). 3 Open the LCD screen while pressing ...
Operating Instructions
Page 30
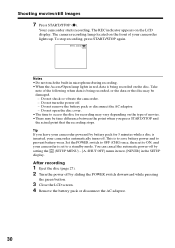
... recording. Take note of your camcorder automatically turns off by setting the (SETUP MENU) - [A. Do not shock or vibrate the camcorder. - Do not open the disc cover. •The time to access the disc for 5 minutes while a disc is set to a standby mode. Set the POWER... depending on the type of movies. •There may be time difference between the point when you leave your camcorder is inserted, your camcorder lights up. After recording 1 Eject the disc (page 27). 2 Turn the power off . This is being recorded on the LCD display. SHUT OFF] menu item to prevent battery ...
... recording. Take note of your camcorder automatically turns off by setting the (SETUP MENU) - [A. Do not shock or vibrate the camcorder. - Do not open the disc cover. •The time to access the disc for 5 minutes while a disc is set to a standby mode. Set the POWER... depending on the type of movies. •There may be time difference between the point when you leave your camcorder is inserted, your camcorder lights up. After recording 1 Eject the disc (page 27). 2 Turn the power off . This is being recorded on the LCD display. SHUT OFF] menu item to prevent battery ...
Operating Instructions
Page 31
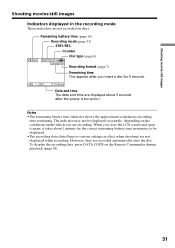
... Recording format (page 7) Remaining time This appears after you close the LCD screen and open it again, it takes about 5 seconds after the power is turned on. When you insert a disc for the correct remaining battery time in effect when shooting) are recorded automatically onto the disc. JAN 1 2003 11:23...
... Recording format (page 7) Remaining time This appears after you close the LCD screen and open it again, it takes about 5 seconds after the power is turned on. When you insert a disc for the correct remaining battery time in effect when shooting) are recorded automatically onto the disc. JAN 1 2003 11:23...
Operating Instructions
Page 34
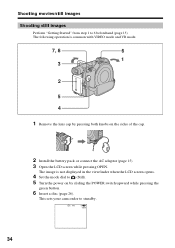
This sets your camcorder to 6 beforehand (page 15). FINE 0 -R VIDEO 34 Shooting movies/still images Shooting still images Perform "Getting Started" from step 1 to standby. The following operation is not displayed in the viewfinder when the LCD screen opens. 4 Set the mode dial to (Still). 5 Turn the power on the sides of the...
This sets your camcorder to 6 beforehand (page 15). FINE 0 -R VIDEO 34 Shooting movies/still images Shooting still images Perform "Getting Started" from step 1 to standby. The following operation is not displayed in the viewfinder when the LCD screen opens. 4 Set the mode dial to (Still). 5 Turn the power on the sides of the...
Operating Instructions
Page 35
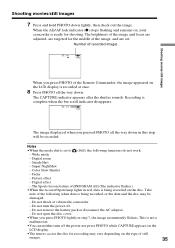
...- Super NightShot - Digital effect - Do not shock or vibrate the camcorder. - Do not turn off . - Do not open the disc cover. •When you ... for recording may be recorded. When the AE/AF lock indicator (z) stops flashing and remains on, your camcorder is being recorded on the type of still images. 35 SteadyShot - Fader - The brightness of [PROGRAM ...or disconnect the AC adaptor. - Digital zoom - Recording is not a malfunction. •You can neither turn the power off the power nor press PHOTO while CAPTURE appears on the LCD display is set . Color...
...- Super NightShot - Digital effect - Do not shock or vibrate the camcorder. - Do not turn off . - Do not open the disc cover. •When you ... for recording may be recorded. When the AE/AF lock indicator (z) stops flashing and remains on, your camcorder is being recorded on the type of still images. 35 SteadyShot - Fader - The brightness of [PROGRAM ...or disconnect the AC adaptor. - Digital zoom - Recording is not a malfunction. •You can neither turn the power off the power nor press PHOTO while CAPTURE appears on the LCD display is set . Color...
Operating Instructions
Page 36
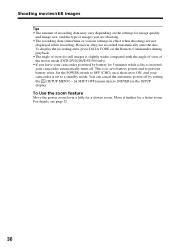
This is set to ON, and your camcorder powered by setting the (SETUP MENU) - [A.SHUT OFF] menu item to [NEVER] in effect when shooting) are not ...during playback. •The angle of view for still images is inserted, your camcorder automatically turns off by battery for image quality and image size, and the type of the movie mode (DCR-DVD200/DVD300 only). •If you are recorded automatically onto the disc. ...for 5 minutes while a disc is slightly wider compared with the angle of view of images you leave your camcorder is to save battery power and to a standby mode.
This is set to ON, and your camcorder powered by setting the (SETUP MENU) - [A.SHUT OFF] menu item to [NEVER] in effect when shooting) are not ...during playback. •The angle of view for still images is inserted, your camcorder automatically turns off by battery for image quality and image size, and the type of the movie mode (DCR-DVD200/DVD300 only). •If you are recorded automatically onto the disc. ...for 5 minutes while a disc is slightly wider compared with the angle of view of images you leave your camcorder is to save battery power and to a standby mode.

Operating Instructions
Page 43
... mode dial is a mirrorimage. S. The SETUP display disappears from the LCD display and the (self-timer) indicator appears. 7 Press START/STOP. Note The viewfinder automatically turns off when using the LCD display, except in the recording mode. CAMERA SET SELFTIMER D ZOOM 16 : 9WIDE STEADYSHOT N. Mirror mode The picture on the LCD...
... mode dial is a mirrorimage. S. The SETUP display disappears from the LCD display and the (self-timer) indicator appears. 7 Press START/STOP. Note The viewfinder automatically turns off when using the LCD display, except in the recording mode. CAMERA SET SELFTIMER D ZOOM 16 : 9WIDE STEADYSHOT N. Mirror mode The picture on the LCD...
Operating Instructions
Page 45
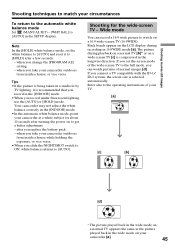
... back in the wide mode on a normal TV appears the same as the picture played back in the SETUP display. after turning the power on your camcorder outdoors from inside a house, or vice versa. Shooting for about 10 seconds after you change the [PROGRAM AE] setting. ... also to [AUTO]. when you slide the NIGHTSHOT switch to ON, white balance returns to the operating instructions of normal images [d]. Your camcorder may not adjust the white balance correctly in the longwise direction. The picture during recording in the [INDOOR] mode. •When you connect...
... back in the wide mode on a normal TV appears the same as the picture played back in the SETUP display. after turning the power on your camcorder outdoors from inside a house, or vice versa. Shooting for about 10 seconds after you change the [PROGRAM AE] setting. ... also to [AUTO]. when you slide the NIGHTSHOT switch to ON, white balance returns to the operating instructions of normal images [d]. Your camcorder may not adjust the white balance correctly in the longwise direction. The picture during recording in the [INDOOR] mode. •When you connect...

Operating Instructions
Page 48
... switch to ON, while adjusting the exposure manually. 2 3 1 Set the mode dial to (Still). 2 Press EXPOSURE. (Movie) or The exposure indicator appears. 0:00:00 -R VIDEO 3 Turn the dial to adjust the brightness. +: brighter -: darker To return to the automatic exposure setting: - if you adjust the exposure manually, the following cases: - BACK...
... switch to ON, while adjusting the exposure manually. 2 3 1 Set the mode dial to (Still). 2 Press EXPOSURE. (Movie) or The exposure indicator appears. 0:00:00 -R VIDEO 3 Turn the dial to adjust the brightness. +: brighter -: darker To return to the automatic exposure setting: - if you adjust the exposure manually, the following cases: - BACK...
Operating Instructions
Page 49
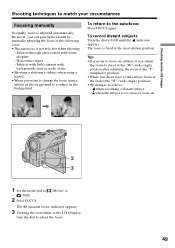
Subjects with little contrast with water droplets - Shooting movies/still images Shooting techniques to FAR until the indicator appears. To record distant subjects Turn the dial to match your circumstances Focusing manually Normally, focus is adjusted automatically. when the subject is fixed at the "T" (telephoto) position. •When you ... to focus on. 2 3 1 Set the mode dial to (Still). 2 Press FOCUS. (Movie) or The 9 (manual focus) indicator appears. 3 Viewing the viewfinder or the LCD display, turn the dial to the autofocus Press FOCUS again.
Subjects with little contrast with water droplets - Shooting movies/still images Shooting techniques to FAR until the indicator appears. To record distant subjects Turn the dial to match your circumstances Focusing manually Normally, focus is adjusted automatically. when the subject is fixed at the "T" (telephoto) position. •When you ... to focus on. 2 3 1 Set the mode dial to (Still). 2 Press FOCUS. (Movie) or The 9 (manual focus) indicator appears. 3 Viewing the viewfinder or the LCD display, turn the dial to the autofocus Press FOCUS again.


