
Operating Instructions
Page 11
... Table of ImageMixer Ver.1.5 for Sony DVD Handycam 97 Viewing scenes recorded on your computer 98 Viewing scenes on the disc 98 Making a disc copy - Introduction 89 System requirements 89 Installing the USB driver 90 Installing software 91 Connecting your camcorder to the computer 92 Consulting the... on-line help (operating instructions) of contents Using a disc in VR mode (DVD-RWs only) Selecting the playing order on your camcorder - Disc Dubbing . 100 Making a ...
... Table of ImageMixer Ver.1.5 for Sony DVD Handycam 97 Viewing scenes recorded on your computer 98 Viewing scenes on the disc 98 Making a disc copy - Introduction 89 System requirements 89 Installing the USB driver 90 Installing software 91 Connecting your camcorder to the computer 92 Consulting the... on-line help (operating instructions) of contents Using a disc in VR mode (DVD-RWs only) Selecting the playing order on your camcorder - Disc Dubbing . 100 Making a ...
Operating Instructions
Page 12
...camcorder. You cannot dub copyright protected software on a TV, you start reading this manual are clearly indicated in the text, for example, "DCR-DVD200 only". Using this manual The instructions in this manual and operating your camcorder, check the model number by looking at the bottom of your camcorder... media, etc. 12 The DCR-DVD200 is not made due to copyright laws. Otherwise, the model name is indicated in the table below. Unauthorized recording of differences Model DVD100 Image device 4.5mm (1/4 type) CCD, gross approx. 680 000 pixels LCD screen 6.2 cm (2.5 ...
...camcorder. You cannot dub copyright protected software on a TV, you start reading this manual are clearly indicated in the text, for example, "DCR-DVD200 only". Using this manual The instructions in this manual and operating your camcorder, check the model number by looking at the bottom of your camcorder... media, etc. 12 The DCR-DVD200 is not made due to copyright laws. Otherwise, the model name is indicated in the table below. Unauthorized recording of differences Model DVD100 Image device 4.5mm (1/4 type) CCD, gross approx. 680 000 pixels LCD screen 6.2 cm (2.5 ...
Operating Instructions
Page 89
... scenes copied to your computer •Making original DVD recorded scenes on your computer. Install the USB driver before connecting the camcorder to a Macintosh computer. 89 Operation is not assured in a multi-boot environment. Introduction You can be able to your computer... - Consult the computer manufacturer for the details on connectors and editing software of your computer - Connecting your camcorder to install the USB driver correctly. ROM supplied, along with the application software required for installation: at least 250 MB Available hard disk space recommended...
... scenes copied to your computer •Making original DVD recorded scenes on your computer. Install the USB driver before connecting the camcorder to a Macintosh computer. 89 Operation is not assured in a multi-boot environment. Introduction You can be able to your computer... - Consult the computer manufacturer for the details on connectors and editing software of your computer - Connecting your camcorder to install the USB driver correctly. ROM supplied, along with the application software required for installation: at least 250 MB Available hard disk space recommended...

Operating Instructions
Page 90
... computer. Communications with your computer Communications between your camcorder and your computer may not recover properly even after a while. 90 The menu screen appears after your application software, the file size may increase when you are using your computer Software Depending on , close all the software. 2 Insert the supplied CD-ROM into the ...Start the following operation before connecting the USB cable to load. Install the USB driver to your computer - The installation menu screen appears. Connecting your camcorder to control your camcorder from Sleep status.
... computer. Communications with your computer Communications between your camcorder and your computer may not recover properly even after a while. 90 The menu screen appears after your application software, the file size may increase when you are using your computer Software Depending on , close all the software. 2 Insert the supplied CD-ROM into the ...Start the following operation before connecting the USB cable to load. Install the USB driver to your computer - The installation menu screen appears. Connecting your camcorder to control your camcorder from Sleep status.
Operating Instructions
Page 91
The USB driver installation starts. Installing software Install the ImageMixer Ver.1.5 for Sony DVD Handycam (hereinafter referred to as ImageMixer) software that manages movies and still images transferred from your camcorder on your computer - Note If you cannot install the USB driver" (page 97). 91 Introduction 3... not be used and click [OK]. 5 Click [Finish]. The menu screen appears after a while. Connecting your camcorder to your computer, and the WinASPI software that manages writing data on CD-Rs/CD-RWs. 1 When the USB driver installation is completed, click [ImageMixer]...
The USB driver installation starts. Installing software Install the ImageMixer Ver.1.5 for Sony DVD Handycam (hereinafter referred to as ImageMixer) software that manages movies and still images transferred from your camcorder on your computer - Note If you cannot install the USB driver" (page 97). 91 Introduction 3... not be used and click [OK]. 5 Click [Finish]. The menu screen appears after a while. Connecting your camcorder to your computer, and the WinASPI software that manages writing data on CD-Rs/CD-RWs. 1 When the USB driver installation is completed, click [ImageMixer]...
Operating Instructions
Page 93
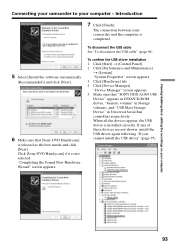
...Manager]. To disconnect the USB cable See "To disconnect the USB cable" (page 96). 5 Select [Install the software automatically (Recommended)] and click [Next]. 6 Make sure that "SONY DDX-A1000 USB Device" appears in DVD/CD-ROM drives, "Generic volume" in Storage volumes, and "USB Mass ...your computer Connecting your camcorder to your camcorder and the computer is selected as the best match and click [Next]. "Device Manager" screen appears. 5 Make sure that [Sony DVD Handycam] is completed. "Completing the Found New Hardware Wizard" screen appears. Click [Sony DVD Handycam] if it is ...
...Manager]. To disconnect the USB cable See "To disconnect the USB cable" (page 96). 5 Select [Install the software automatically (Recommended)] and click [Next]. 6 Make sure that "SONY DDX-A1000 USB Device" appears in DVD/CD-ROM drives, "Generic volume" in Storage volumes, and "USB Mass ...your computer Connecting your camcorder to your camcorder and the computer is selected as the best match and click [Next]. "Device Manager" screen appears. 5 Make sure that [Sony DVD Handycam] is completed. "Completing the Found New Hardware Wizard" screen appears. Click [Sony DVD Handycam] if it is ...
Operating Instructions
Page 97
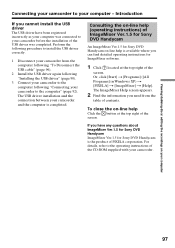
... the information you can find detailed operating instructions for Sony DVD Handycam on -line help (operating instructions) of ImageMixer Ver.1.5 for Sony DVD Handycam An ImageMixer Ver.1.5 for ImageMixer software. 1 Click located at the top right of PIXELA corporation. Viewing/dubbing discs/ editing the recordings on your camcorder and the computer is the product of the...
... the information you can find detailed operating instructions for Sony DVD Handycam on -line help (operating instructions) of ImageMixer Ver.1.5 for Sony DVD Handycam An ImageMixer Ver.1.5 for ImageMixer software. 1 Click located at the top right of PIXELA corporation. Viewing/dubbing discs/ editing the recordings on your camcorder and the computer is the product of the...
Operating Instructions
Page 98
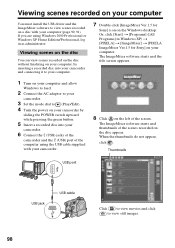
... upward while pressing the green button. 5 Insert a recorded disc into your camcorder and connecting it to your computer. 7 Double-click [ImageMixer Ver.1.5 for Sony] on your computer. The ImageMixer software starts and thumbnails of the computer using Windows 2000 Professional or Windows XP Home...PIXELA] t [ImageMixer] t [PIXELA ImageMixer Ver.1.5 for Sony] icon on the Windows desktop. Viewing scenes recorded on your computer You must install the USB driver and the ImageMixer software to view scenes recorded on a disc with your camcorder. 8 Click on the left of the screen. The ...
... upward while pressing the green button. 5 Insert a recorded disc into your camcorder and connecting it to your computer. 7 Double-click [ImageMixer Ver.1.5 for Sony] on your computer. The ImageMixer software starts and thumbnails of the computer using Windows 2000 Professional or Windows XP Home...PIXELA] t [ImageMixer] t [PIXELA ImageMixer Ver.1.5 for Sony] icon on the Windows desktop. Viewing scenes recorded on your computer You must install the USB driver and the ImageMixer software to view scenes recorded on a disc with your camcorder. 8 Click on the left of the screen. The ...
Operating Instructions
Page 99
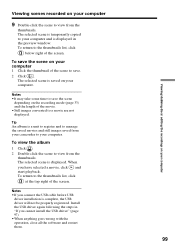
... and start playback. When you cannot install the USB driver" (page 97). •When anything goes wrong with the operation, close all the software and restart them. 99 To return to the thumbnails list, click below right of the screen. The selected scene is displayed. To view the album... 1 Click . 2 Double-click the scene to view from your camcorder to your computer. Install the USB driver again following the steps in the preview window. Viewing/dubbing discs/ editing the recordings on your computer Viewing...
... and start playback. When you cannot install the USB driver" (page 97). •When anything goes wrong with the operation, close all the software and restart them. 99 To return to the thumbnails list, click below right of the screen. The selected scene is displayed. To view the album... 1 Click . 2 Double-click the scene to view from your camcorder to your computer. Install the USB driver again following the steps in the preview window. Viewing/dubbing discs/ editing the recordings on your computer Viewing...
Operating Instructions
Page 100
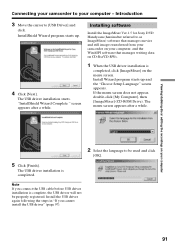
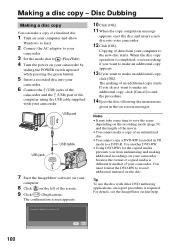
... copy, click [OK]. You must format the DVD-RW to (Play/Edit). 4 Turn the power on -screen messages. Copying of data from that of your camcorder. 3 Set the mode dial to record additional material on the left of a finalized disc. 1 Turn on your computer and allow Windows to load. 2 Connect...Click [OK]. Tip To use the disc with your computer. 8 Click on the disc. USB port USB jack USB cable 7 Start the ImageMixer software on your camcorder. Use another DVD-RW. •Using DVD-RWs for the copied media prevents you want to the new disc starts. For details, see the ...
... copy, click [OK]. You must format the DVD-RW to (Play/Edit). 4 Turn the power on -screen messages. Copying of data from that of your camcorder. 3 Set the mode dial to record additional material on the left of a finalized disc. 1 Turn on your computer and allow Windows to load. 2 Connect...Click [OK]. Tip To use the disc with your computer. 8 Click on the disc. USB port USB jack USB cable 7 Start the ImageMixer software on your camcorder. Use another DVD-RW. •Using DVD-RWs for the copied media prevents you want to the new disc starts. For details, see the ...


