Operating Instructions
Page 4
...Instructions.......... 3 Playable Discs 5 Getting Started Step 1: Positioning the System ...10 Step 2: Connecting the System ...13 Step 3: Performing the Quick Setup 21 Step 4: Enjoying Sound from all the Speakers 24 Sound Adjustment Enjoying Surround Sound by Using Decoding Mode 26 Selecting the Sound Mode 28 .../JPEG Image Files... 39 Adjusting the Delay Between the Picture and Sound 42 Restricting Playback of the Disc........... 43 Using the Setup Display 45 Tuner Presetting Radio Stations 53 Listening to the Radio 54 Control for HDMI/External Audio Device Using the Control for...
...Instructions.......... 3 Playable Discs 5 Getting Started Step 1: Positioning the System ...10 Step 2: Connecting the System ...13 Step 3: Performing the Quick Setup 21 Step 4: Enjoying Sound from all the Speakers 24 Sound Adjustment Enjoying Surround Sound by Using Decoding Mode 26 Selecting the Sound Mode 28 .../JPEG Image Files... 39 Adjusting the Delay Between the Picture and Sound 42 Restricting Playback of the Disc........... 43 Using the Setup Display 45 Tuner Presetting Radio Stations 53 Listening to the Radio 54 Control for HDMI/External Audio Device Using the Control for...
Operating Instructions
Page 21
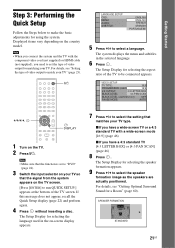
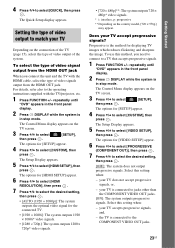
... in the on your TV" (page 23). Note • Make sure that the function is set the type of the TV screen. The Setup Display for matching your TV type. Displayed items vary depending on the TV. 2 Press [/1. For details, see "Getting Optimal Surround Sound for ...:9 4:3 OUTPUT: 4:3 LETTER BOX BLACK LEVEL: 4:3 PAN SCAN BLACK LEVEL (COMPONENT OUT): OFF PAUSE MODE: AUTO C/X/x/c, DISPLAY 1 Turn on the country model. The Setup Display for a Room" (page 60). x If you need to select the setting that the signal from the system appears on the TV screen. [Press [ENTER...
... in the on your TV" (page 23). Note • Make sure that the function is set the type of the TV screen. The Setup Display for matching your TV type. Displayed items vary depending on the TV. 2 Press [/1. For details, see "Getting Optimal Surround Sound for ...:9 4:3 OUTPUT: 4:3 LETTER BOX BLACK LEVEL: 4:3 PAN SCAN BLACK LEVEL (COMPONENT OUT): OFF PAUSE MODE: AUTO C/X/x/c, DISPLAY 1 Turn on the country model. The Setup Display for a Room" (page 60). x If you need to select the setting that the signal from the system appears on the TV screen. [Press [ENTER...
Operating Instructions
Page 22
...up the calibration mic at the ear level using a tripod, etc. (not supplied). You cannot turn the volume down. See "Getting Optimal Surround Sound for [SETUP] appear. 94( 99) 1( 1) T 0: 01: 08 DVD VIDEO CUSTOM CUSTOM QUICK 22US The options for a Room" (page 60) and "Calibrating the Appropriate...C/ c to change the position of the room in stop mode. Note • The environment of the speakers, reset the speaker settings. Quick Setup is output when [AUTO CALIBRATION] starts. repeatedly until "DVD" appears in the front panel display. 2 Press DISPLAY while the system is in ...
...up the calibration mic at the ear level using a tripod, etc. (not supplied). You cannot turn the volume down. See "Getting Optimal Surround Sound for [SETUP] appear. 94( 99) 1( 1) T 0: 01: 08 DVD VIDEO CUSTOM CUSTOM QUICK 22US The options for a Room" (page 60) and "Calibrating the Appropriate...C/ c to change the position of the room in stop mode. Note • The environment of the speakers, reset the speaker settings. Quick Setup is output when [AUTO CALIBRATION] starts. repeatedly until "DVD" appears in the front panel display. 2 Press DISPLAY while the system is in ...
Operating Instructions
Page 23
... outputs progressive signals. 4 Press X/x to the COMPONENT VIDEO OUT jacks. 23US Getting Started Progressive is connected to select [SETUP], then press . The Quick Setup display appears. Setting the type of the system. repeatedly until "DVD" appears in the front panel display. 2 Press ...country model, [720 × 576p] may appear. The options for displaying TV images which reduces flickering and sharpens the image. The options for [HDMI SETUP] appear. 6 Press X/x to select [HDMI RESOLUTION], then press . 7 Press X/x to select the desired setting, then press . • [...
... outputs progressive signals. 4 Press X/x to the COMPONENT VIDEO OUT jacks. 23US Getting Started Progressive is connected to select [SETUP], then press . The Quick Setup display appears. Setting the type of the system. repeatedly until "DVD" appears in the front panel display. 2 Press ...country model, [720 × 576p] may appear. The options for displaying TV images which reduces flickering and sharpens the image. The options for [HDMI SETUP] appear. 6 Press X/x to select [HDMI RESOLUTION], then press . 7 Press X/x to select the desired setting, then press . • [...

Operating Instructions
Page 28
Note • You cannot operate these setup items when you need to connect a TV or other component to produce the sound effect depending on the disc. • "MOVIE": The system provides the ...
Note • You cannot operate these setup items when you need to connect a TV or other component to produce the sound effect depending on the disc. • "MOVIE": The system provides the ...
Operating Instructions
Page 33
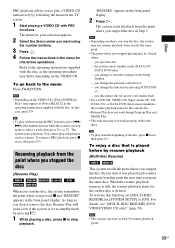
... at least 10 resume playback points. 33US Note • Depending on the VIDEO CD, [Press ENTER] in Step 3 may differ depending on the Setup Display. - Resuming playback from that is deleted. Tip • To play a VIDEO CD interactively by resume playback (Multi-disc Resume) This system... Disc PBC playback allows you want using the PBC function, press ./ > or the number buttons while the system is set [MULTI-DISC RESUME] in [SYSTEM SETUP] to select a track, then press H or . "RESUME" appears in the front panel display. 2 Press H. The menu for your selection appears. 2 ...
... at least 10 resume playback points. 33US Note • Depending on the VIDEO CD, [Press ENTER] in Step 3 may differ depending on the Setup Display. - Resuming playback from that is deleted. Tip • To play a VIDEO CD interactively by resume playback (Multi-disc Resume) This system... Disc PBC playback allows you want using the PBC function, press ./ > or the number buttons while the system is set [MULTI-DISC RESUME] in [SYSTEM SETUP] to select a track, then press H or . "RESUME" appears in the front panel display. 2 Press H. The menu for your selection appears. 2 ...

Operating Instructions
Page 34
... 99 tracks. 1 Press DISPLAY. TRACK - - 5. You can play from the beginning of the programmed tracks PROGRAM ALL CLEAR 1. • If [MULTI-DISC RESUME] in [SYSTEM SETUP] is set to [OFF] (page 50), the resume point is cleared when you change the function by arranging the order of the tracks on the...
... 99 tracks. 1 Press DISPLAY. TRACK - - 5. You can play from the beginning of the programmed tracks PROGRAM ALL CLEAR 1. • If [MULTI-DISC RESUME] in [SYSTEM SETUP] is set to [OFF] (page 50), the resume point is cleared when you change the function by arranging the order of the tracks on the...

Operating Instructions
Page 40
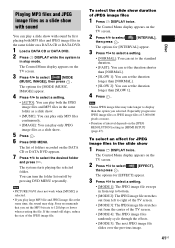
..." (page 39) or "Selecting a JPEG image file or folder" (page 40). • [PICTURE LIST]: Images of JPEG image files in the folder appear in [HDMI SETUP] to select the desired list, then press . • [FOLDER LIST]: The list of Venus (1987) 06 Romantic Warriors (1987) 07 Back for [BROWSING] appear. 3 Press...
..." (page 39) or "Selecting a JPEG image file or folder" (page 40). • [PICTURE LIST]: Images of JPEG image files in the folder appear in [HDMI SETUP] to select the desired list, then press . • [FOLDER LIST]: The list of Venus (1987) 06 Romantic Warriors (1987) 07 Back for [BROWSING] appear. 3 Press...
Operating Instructions
Page 41
...; [MODE 2]: The JPEG image file stretches out from left to select the desired folder and press H. You can play a slide show . 5 Press . 6 Press DVD MENU. Sony recommends that you set the MP3 bit rate to select [MODE (MUSIC, IMAGE)], then press . Note • PICTURE NAVI does not work when [MUSIC] is... the center of the JPEG image file. The options for [EFFECT] appear. 3 Press X/x to select a setting. • [MODE 1]: The JPEG image file sweeps in [HDMI SETUP] (page 47).
...; [MODE 2]: The JPEG image file stretches out from left to select the desired folder and press H. You can play a slide show . 5 Press . 6 Press DVD MENU. Sony recommends that you set the MP3 bit rate to select [MODE (MUSIC, IMAGE)], then press . Note • PICTURE NAVI does not work when [MUSIC] is... the center of the JPEG image file. The options for [EFFECT] appear. 3 Press X/x to select a setting. • [MODE 1]: The JPEG image file sweeps in [HDMI SETUP] (page 47).

Operating Instructions
Page 42
... Delay Between the Picture and Sound [A/V SYNC] When the sound does not match the pictures on the TV screen, you set [JPEG RESOLUTION] in [HDMI SETUP] to select [A/V SYNC], then press . • [OFF]: Off. 4 Press . The Control Menu display appears on the input stream, [A/V SYNC] may not be effective. 42US...
... Delay Between the Picture and Sound [A/V SYNC] When the sound does not match the pictures on the TV screen, you set [JPEG RESOLUTION] in [HDMI SETUP] to select [A/V SYNC], then press . • [OFF]: Off. 4 Press . The Control Menu display appears on the input stream, [A/V SYNC] may not be effective. 42US...

Operating Instructions
Page 43
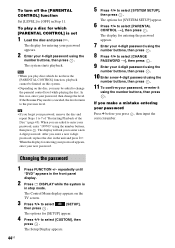
..., then press . [PARENTAL CONTROL] setting is complete. Enter a 4-digit password using the number buttons, then press . The selection items for [SETUP] appear. 4 Press X/x to select [CUSTOM], then press . The lower the value, the stricter the limitation. 43US The display for [LEVEL]...-enter your 4-digit password using the number buttons, then press . x When you have already registered a password The display for [SYSTEM SETUP] appear. 6 Press X/x to select [PARENTAL CONTROL t], then press . The display for registering a new password appears. When you need...
..., then press . [PARENTAL CONTROL] setting is complete. Enter a 4-digit password using the number buttons, then press . The selection items for [SETUP] appear. 4 Press X/x to select [CUSTOM], then press . The lower the value, the stricter the limitation. 43US The display for [LEVEL]...-enter your 4-digit password using the number buttons, then press . x When you have already registered a password The display for [SYSTEM SETUP] appear. 6 Press X/x to select [PARENTAL CONTROL t], then press . The display for registering a new password appears. When you need...
Operating Instructions
Page 44
... 11. Changing the password 1 Press FUNCTION +/- In this system. • Depending on the TV screen. 3 Press X/x to select then press . [SETUP], The options for entering the password appears. 7 Enter your password, re-enter it using the number buttons, then press . 8 Press X/x to change...press , then input the correct number. Tip • If you forget your password Press C before you play a disc for [SYSTEM SETUP] appear. 6 Press X/x to select [SYSTEM SETUP], then press . To turn off the [PARENTAL CONTROL] function Set [LEVEL] to 7 of "Restricting Playback of the Disc" (page...
... 11. Changing the password 1 Press FUNCTION +/- In this system. • Depending on the TV screen. 3 Press X/x to select then press . [SETUP], The options for entering the password appears. 7 Enter your password, re-enter it using the number buttons, then press . 8 Press X/x to change...press , then input the correct number. Tip • If you forget your password Press C before you play a disc for [SYSTEM SETUP] appear. 6 Press X/x to select [SYSTEM SETUP], then press . To turn off the [PARENTAL CONTROL] function Set [LEVEL] to 7 of "Restricting Playback of the Disc" (page...
Operating Instructions
Page 45
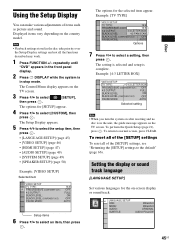
...country model. The Setup Display appears. 5 Press X/x to select the setup item, then press . • [LANGUAGE SETUP] (page 45) • [VIDEO SETUP] (page 46) • [HDMI SETUP] (page 47) • [AUDIO SETUP] (page 49) • [SYSTEM SETUP] (page 49) • [SPEAKER SETUP] (page 50) Example: [VIDEO SETUP] Selected item VIDEO SETUP TV TYPE: ... or sound track. The options for the on after resetting and no disc is in the disc take priority over the Setup Display settings and not all of items such as picture and sound. To return to select an item, then press . Example...
...country model. The Setup Display appears. 5 Press X/x to select the setup item, then press . • [LANGUAGE SETUP] (page 45) • [VIDEO SETUP] (page 46) • [HDMI SETUP] (page 47) • [AUDIO SETUP] (page 49) • [SYSTEM SETUP] (page 49) • [SPEAKER SETUP] (page 50) Example: [VIDEO SETUP] Selected item VIDEO SETUP TV TYPE: ... or sound track. The options for the on after resetting and no disc is in the disc take priority over the Setup Display settings and not all of items such as picture and sound. To return to select an item, then press . Example...

Operating Instructions
Page 46
...a 4:3 screen TV. Tip • If you select [ORIGINAL], the language given priority in [MENU], [AUDIO], or [SUBTITLE] that do not fit. VIDEO SETUP TV TYPE: PROGRESSIVE (COMPONENT OUT): 4:3 OUTPUT: BLACK LEVEL: BLACK LEVEL (COMPONENT OUT): PAUSE MODE: 16:9 OFF FULL ON OFF AUTO x [TV TYPE] You... be connected. When you select [AUDIO FOLLOW], the language for the subtitles changes according to on the TV screen. Settings for the display [VIDEO SETUP] Select settings according to the TV to select [START], then press . 46US x [PROGRESSIVE (COMPONENT OUT)] You can switch the language of ...
...a 4:3 screen TV. Tip • If you select [ORIGINAL], the language given priority in [MENU], [AUDIO], or [SUBTITLE] that do not fit. VIDEO SETUP TV TYPE: PROGRESSIVE (COMPONENT OUT): 4:3 OUTPUT: BLACK LEVEL: BLACK LEVEL (COMPONENT OUT): PAUSE MODE: 16:9 OFF FULL ON OFF AUTO x [TV TYPE] You... be connected. When you select [AUDIO FOLLOW], the language for the subtitles changes according to on the TV screen. Settings for the display [VIDEO SETUP] Select settings according to the TV to select [START], then press . 46US x [PROGRESSIVE (COMPONENT OUT)] You can switch the language of ...

Operating Instructions
Page 47
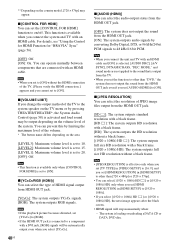
... this when you can adjust the aspect ratio to [16:9]. The system outputs the progressive signal. Check that the screen is output in [VIDEO SETUP] to watch 4:3 aspect ratio signals. Note • [PROGRESSIVE (COMPONENT OUT)] is not effective when the system outputs progressive signal. [OFF]: You... ratio on your TV. If you connect the unit and TV with no jitter. The system outputs the progressive signal for the HDMI [HDMI SETUP] HDMI SETUP HDMI RESOLUTION: CONTROL FOR HDMI: VOLUME LIMIT: YCBCR/RGB(HDMI): AUDIO(HDMI): JPEG RESOLUTION: AUTO(1920x1080p) OFF LEVEL2 YCBCR OFF SD x...
... this when you can adjust the aspect ratio to [16:9]. The system outputs the progressive signal. Check that the screen is output in [VIDEO SETUP] to watch 4:3 aspect ratio signals. Note • [PROGRESSIVE (COMPONENT OUT)] is not effective when the system outputs progressive signal. [OFF]: You... ratio on your TV. If you connect the unit and TV with no jitter. The system outputs the progressive signal for the HDMI [HDMI SETUP] HDMI SETUP HDMI RESOLUTION: CONTROL FOR HDMI: VOLUME LIMIT: YCBCR/RGB(HDMI): AUDIO(HDMI): JPEG RESOLUTION: AUTO(1920x1080p) OFF LEVEL2 YCBCR OFF SD x...
Operating Instructions
Page 48
... are not applied to a component with an HDMI cable and [ON] is effective only when you set [TV TYPE] in [VIDEO SETUP] to [16:9], and you set [HDMI RESOLUTION] in [HDMI SETUP] to [1920 × 1080i]. • If you change the output method of the system. Note • [JPEG RESOLUTION] is ...], DYNAMIC BASS, "DEC. x [JPEG RESOLUTION] You can select [(1920 × 1080i) HD ] or [(1920 × 1080i) HD] only when you set [HDMI RESOLUTION] in [HDMI SETUP] to other than "DVD," the system does not output the sound from the HDMI OUT jack even if you select [YCBCR]. 48US x [AUDIO (HDMI)] You...
... are not applied to a component with an HDMI cable and [ON] is effective only when you set [TV TYPE] in [VIDEO SETUP] to [16:9], and you set [HDMI RESOLUTION] in [HDMI SETUP] to [1920 × 1080i]. • If you change the output method of the system. Note • [JPEG RESOLUTION] is ...], DYNAMIC BASS, "DEC. x [JPEG RESOLUTION] You can select [(1920 × 1080i) HD ] or [(1920 × 1080i) HD] only when you set [HDMI RESOLUTION] in [HDMI SETUP] to other than "DVD," the system does not output the sound from the HDMI OUT jack even if you select [YCBCR]. 48US x [AUDIO (HDMI)] You...
Operating Instructions
Page 49
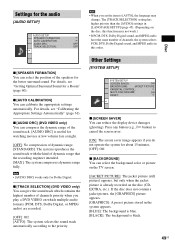
... reduce the display device damages (ghosting). The [TRACK SELECTION] setting has higher priority than the [AUDIO] settings in [LANGUAGE SETUP] (page 45). (Depending on the disc, this order. For details, see "Calibrating the Appropriate Settings Automatically" (page 61). Other Settings [SYSTEM... SETUP] SYSTEM SETUP SCREEN SAVER: ON BACKGROUND: JACKET PICTURE PARENTAL CONTROL: MULTI-DISC RESUME: ON RESET: x [SCREEN SAVER] You can give the ...
... reduce the display device damages (ghosting). The [TRACK SELECTION] setting has higher priority than the [AUDIO] settings in [LANGUAGE SETUP] (page 45). (Depending on the disc, this order. For details, see "Calibrating the Appropriate Settings Automatically" (page 61). Other Settings [SYSTEM... SETUP] SYSTEM SETUP SCREEN SAVER: ON BACKGROUND: JACKET PICTURE PARENTAL CONTROL: MULTI-DISC RESUME: ON RESET: x [SCREEN SAVER] You can give the ...

Operating Instructions
Page 50
...CONTROL] You can return the [SET UP] settings other settings of the speakers to the default" (page 66). Note • You cannot operate [SPEAKER SETUP] when you change them. [FRONT] [YES] [CENTER] [YES]: Normally select this. [NONE]: Select this if no center speaker is used. [...YES] Note • When you connect headphones to 10 discs. [OFF]: The system does not store the resume points in memory. SPEAKER SETUP CONNECTION: DISTANCE(FRONT): DISTANCE(SURROUND): LEVEL(FRONT): LEVEL(SURROUND): TESFRT OTNOTN:E YES CENTER: YES SURROUND: YES SUBWOOFER: YES subwoofer setting is ...
...CONTROL] You can return the [SET UP] settings other settings of the speakers to the default" (page 66). Note • You cannot operate [SPEAKER SETUP] when you change them. [FRONT] [YES] [CENTER] [YES]: Normally select this. [NONE]: Select this if no center speaker is used. [...YES] Note • When you connect headphones to 10 discs. [OFF]: The system does not store the resume points in memory. SPEAKER SETUP CONNECTION: DISTANCE(FRONT): DISTANCE(SURROUND): LEVEL(FRONT): LEVEL(SURROUND): TESFRT OTNOTN:E YES CENTER: YES SURROUND: YES SUBWOOFER: YES subwoofer setting is ...

Operating Instructions
Page 51
...+6.0 dB for [CENTER] and [SUBWOOFER]. You can set the parameters from -6.0 dB to +6.0 dB. You can adjust the sound level of the [SPEAKER SETUP] items, the test tone is emitted from each speaker in sequence while adjusting level. B [L/R] 3.0 m/10 ft2)3): Set the surround speaker distance (up to ...4.8 meters (16 ft) closer to the front speakers). 1)0.0 to 6.9 meters for North American models. 2)When you perform the Quick Setup (page 21), the default settings are changed . 4)This item appears when you select one of the surround speakers. x [TEST TONE] The speakers ...
...+6.0 dB for [CENTER] and [SUBWOOFER]. You can set the parameters from -6.0 dB to +6.0 dB. You can adjust the sound level of the [SPEAKER SETUP] items, the test tone is emitted from each speaker in sequence while adjusting level. B [L/R] 3.0 m/10 ft2)3): Set the surround speaker distance (up to ...4.8 meters (16 ft) closer to the front speakers). 1)0.0 to 6.9 meters for North American models. 2)When you perform the Quick Setup (page 21), the default settings are changed . 4)This item appears when you select one of the surround speakers. x [TEST TONE] The speakers ...
Operating Instructions
Page 57
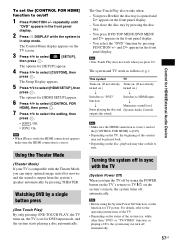
...r r Minimizes sound level. For details, refer to select the setting, then press . • [OFF]: Off. • [ON]: On. The options for [HDMI SETUP] appear. 6 Press X/x to select [CONTROL FOR HDMI], then press . 7 Press X/x to the operating instructions of the TV. • Depending on .) r r ...Switches to "DVD" Switches to select [SETUP], then press . Using the Theater Mode (Theater Mode) If your TV is compatible with the TV (System Power Off) When you turn off automatically. ...
...r r Minimizes sound level. For details, refer to select the setting, then press . • [OFF]: Off. • [ON]: On. The options for [HDMI SETUP] appear. 6 Press X/x to select [CONTROL FOR HDMI], then press . 7 Press X/x to the operating instructions of the TV. • Depending on .) r r ...Switches to "DVD" Switches to select [SETUP], then press . Using the Theater Mode (Theater Mode) If your TV is compatible with the TV (System Power Off) When you turn off automatically. ...

