Operating Instructions
Page 3
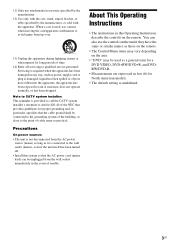
...Precautions On power sources • The unit is damaged, liquid has been spilled or objects have the same or similar names as those on the remote. • The Control Menu items may be used , use caution when moving the cart/apparatus combination to Article 820-40 of the NEC that ... is not disconnected from the wall socket immediately in this Operating Instructions describe the controls on the area. • "DVD" may vary depending on the remote. When a cart is used as a general term for a DVD VIDEO, DVD+RW/DVD+R, and DVDRW/DVD-R. • Measurements are expressed in feet (ft) for...
...Precautions On power sources • The unit is damaged, liquid has been spilled or objects have the same or similar names as those on the remote. • The Control Menu items may be used , use caution when moving the cart/apparatus combination to Article 820-40 of the NEC that ... is not disconnected from the wall socket immediately in this Operating Instructions describe the controls on the area. • "DVD" may vary depending on the remote. When a cart is used as a general term for a DVD VIDEO, DVD+RW/DVD+R, and DVDRW/DVD-R. • Measurements are expressed in feet (ft) for...
Operating Instructions
Page 4
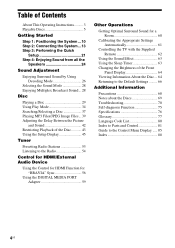
... MEDIA PORT Adapter 59 Other Operations Getting Optimal Surround Sound for a Room 60 Calibrating the Appropriate Settings Automatically 61 Controlling the TV with the Supplied Remote 62 Using the Sound Effect 63 Using the Sleep Timer 63 Changing the Brightness of the Front Panel Display 64 Viewing Information About the Disc...
... MEDIA PORT Adapter 59 Other Operations Getting Optimal Surround Sound for a Room 60 Calibrating the Appropriate Settings Automatically 61 Controlling the TV with the Supplied Remote 62 Using the Sound Effect 63 Using the Sleep Timer 63 Changing the Brightness of the Front Panel Display 64 Viewing Information About the Disc...
Operating Instructions
Page 8
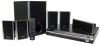
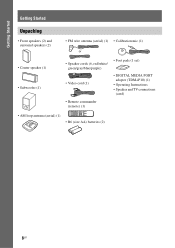
Getting Started Getting Started Unpacking • Front speakers (2) and surround speakers (2) • FM wire antenna (aerial) (1) • Calibration mic (1) or • Center speaker (1) • Subwoofer (1) • Speaker cords (6, red/white/ green/gray/blue/purple) • Foot pads (1 set) • Video cord (1) • DIGITAL MEDIA PORT adapter (TDM-iP10) (1) • Operating Instructions • Speaker and TV connections (card) • Remote commander (remote) (1) • AM loop antenna (aerial) (1) • R6 (size AA) batteries (2) 8US
Getting Started Getting Started Unpacking • Front speakers (2) and surround speakers (2) • FM wire antenna (aerial) (1) • Calibration mic (1) or • Center speaker (1) • Subwoofer (1) • Speaker cords (6, red/white/ green/gray/blue/purple) • Foot pads (1 set) • Video cord (1) • DIGITAL MEDIA PORT adapter (TDM-iP10) (1) • Operating Instructions • Speaker and TV connections (card) • Remote commander (remote) (1) • AM loop antenna (aerial) (1) • R6 (size AA) batteries (2) 8US

Operating Instructions
Page 9
...subwoofer Attach the foot pads (supplied) to the bottom of time, remove the batteries to stabilize the subwoofer and prevent it at the remote sensor on the batteries to the markings inside the compartment. Doing so may cause a malfunction. • If you do not intend to ...the 3 and # ends on the unit. Getting Started Inserting batteries into the remote casing, particularly when replacing the batteries. • Do not expose the remote sensor to direct sunlight or lighting apparatus. To use the remote for an extended period of the subwoofer to avoid possible damage from the mount...
...subwoofer Attach the foot pads (supplied) to the bottom of time, remove the batteries to stabilize the subwoofer and prevent it at the remote sensor on the batteries to the markings inside the compartment. Doing so may cause a malfunction. • If you do not intend to ...the 3 and # ends on the unit. Getting Started Inserting batteries into the remote casing, particularly when replacing the batteries. • Do not expose the remote sensor to direct sunlight or lighting apparatus. To use the remote for an extended period of the subwoofer to avoid possible damage from the mount...
Operating Instructions
Page 20
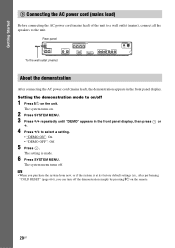
The system menu turns off 1 Press [/1 on the remote. 20US Tip • When you can turn off the demonstration simply by pressing [/1 on the unit. The setting is at its factory default settings (ex., ...
The system menu turns off 1 Press [/1 on the remote. 20US Tip • When you can turn off the demonstration simply by pressing [/1 on the unit. The setting is at its factory default settings (ex., ...
Operating Instructions
Page 29
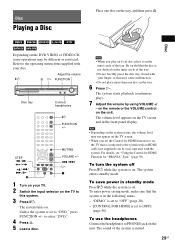
... the Control for "BRAVIA" Sync" (page 56). For details, see "Using the Control for HDMI Function for HDMI function to [OFF] (page 56). on the remote or the VOLUME control on the TV screen and in the following status. - The system starts playback (continuous play an 8 cm disc, place it on...
... the Control for "BRAVIA" Sync" (page 56). For details, see "Using the Control for HDMI Function for HDMI function to [OFF] (page 56). on the remote or the VOLUME control on the TV screen and in the following status. - The system starts playback (continuous play an 8 cm disc, place it on...
Operating Instructions
Page 52
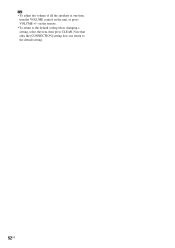
on the unit, or press VOLUME +/- Tip • To adjust the volume of all the speakers at one time, turn the VOLUME control on the remote. • To return to the default setting. 52US Note that only the [CONNECTION] setting does not return to the default setting when changing a setting, select the item, then press CLEAR.
on the unit, or press VOLUME +/- Tip • To adjust the volume of all the speakers at one time, turn the VOLUME control on the remote. • To return to the default setting. 52US Note that only the [CONNECTION] setting does not return to the default setting when changing a setting, select the item, then press CLEAR.
Operating Instructions
Page 56
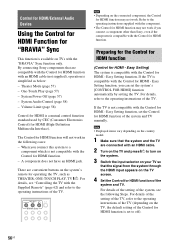
... you connect this system to the operating instructions of the Control for HDMI function is set to off). 56US There are connected with the Supplied Remote" (page 62) and refer to a component which is not compatible with the Control for HDMI function. - For details of the setting of the ... the TV, such as below: - Volume Limit (page 58) Control for HDMI is simplified as THEATER, ONE-TOUCH PLAY, TV [/1. By connecting Sony components that the system and the TV are convenient buttons on TVs with the Control for HDMI - Theater Mode (page 57) - Easy Setting function,...
... you connect this system to the operating instructions of the Control for HDMI function is set to off). 56US There are connected with the Supplied Remote" (page 62) and refer to a component which is not compatible with the Control for HDMI function. - For details of the setting of the ... the TV, such as below: - Volume Limit (page 58) Control for HDMI is simplified as THEATER, ONE-TOUCH PLAY, TV [/1. By connecting Sony components that the system and the TV are convenient buttons on TVs with the Control for HDMI - Theater Mode (page 57) - Easy Setting function,...
Operating Instructions
Page 57
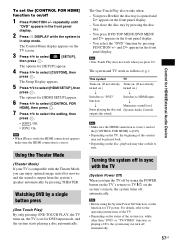
... on.) r r Switches to "DVD" Switches to select [HDMI SETUP], then press . function. Note • Before using the POWER button on the TV's remote or TV [/1 on the system's remote, the system turns off 1 Press FUNCTION +/- Using the Theater Mode (Theater Mode) If your TV is correct, and set the [CONTROL FOR HDMI...
... on.) r r Switches to "DVD" Switches to select [HDMI SETUP], then press . function. Note • Before using the POWER button on the TV's remote or TV [/1 on the system's remote, the system turns off 1 Press FUNCTION +/- Using the Theater Mode (Theater Mode) If your TV is correct, and set the [CONTROL FOR HDMI...
Operating Instructions
Page 58
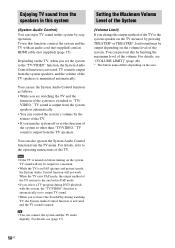
... operation. You can also operate the System Audio Control function from the speakers in this system (System Audio Control) You can use this by the remote of the volume. Tip • You can prevent this function, connect the system and the TV with the system, the "TV/VIDEO" function is muted...
... operation. You can also operate the System Audio Control function from the speakers in this system (System Audio Control) You can use this by the remote of the volume. Tip • You can prevent this function, connect the system and the TV with the system, the "TV/VIDEO" function is muted...

Operating Instructions
Page 59
... MEDIA PORT adapter. 59US In this case. ./> H x X Playing the connected component on the type of DIGITAL MEDIA PORT adapter, the images are played on the remote or the unit. Tip • When listening to operate a connected component using a portable audio source, you may be used in each area. The following illustration...
... MEDIA PORT adapter. 59US In this case. ./> H x X Playing the connected component on the type of DIGITAL MEDIA PORT adapter, the images are played on the remote or the unit. Tip • When listening to operate a connected component using a portable audio source, you may be used in each area. The following illustration...
Operating Instructions
Page 62
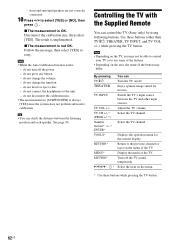
... menu of the TV. - do not turn off the TV sound temporarily. Tip • You can control the TV (Sony only) by using following buttons. Controlling the TV with the Supplied Remote You can check the distance between the TV and other than TV [/1, THEATER, TV INPUT, and TV VOL +/-) while pressing...
... menu of the TV. - do not turn off the TV sound temporarily. Tip • You can control the TV (Sony only) by using following buttons. Controlling the TV with the Supplied Remote You can check the distance between the TV and other than TV [/1, THEATER, TV INPUT, and TV VOL +/-) while pressing...

Operating Instructions
Page 71
... display. • The system is output from the HDMI OUT jack. Remedy • The speaker cord is not connected securely. • Press MUTING on the remote if "MUTING ON" is displayed in Slow-motion Play mode. Press H to return to normal play mode. • Check the speaker settings (page 50). •...
... display. • The system is output from the HDMI OUT jack. Remedy • The speaker cord is not connected securely. • Press MUTING on the remote if "MUTING ON" is displayed in Slow-motion Play mode. Press H to return to normal play mode. • Check the speaker settings (page 50). •...

Operating Instructions
Page 72
.... No sound or only a very lowlevel sound is more than 48 kHz. Operation Symptom Radio stations cannot be the entire 5.1 channel. The remote does not function. The surround effect is difficult to [STEREO] by scanning preset stations). It may be monaural or stereo even if the sound...14, 50). • Make sure the "DEC. Remedy • Check that the antenna (aerial) is heard from a transformer or motor, and at the remote sensor on AM radio. Wipe them with a cloth slightly moistened with automatic tuning). The sound loses stereo effect • Set [AUDIO] to • Make...
.... No sound or only a very lowlevel sound is more than 48 kHz. Operation Symptom Radio stations cannot be the entire 5.1 channel. The remote does not function. The surround effect is difficult to [STEREO] by scanning preset stations). It may be monaural or stereo even if the sound...14, 50). • Make sure the "DEC. Remedy • Check that the antenna (aerial) is heard from a transformer or motor, and at the remote sensor on AM radio. Wipe them with a cloth slightly moistened with automatic tuning). The sound loses stereo effect • Set [AUDIO] to • Make...

Operating Instructions
Page 73
... name • The system can only display numbers and letters of the operations above. characters are displayed as stop , press x on the unit or the remote and then start playing from the beginning. • Program Play, Shuffle Play, or Repeat Play has been selected. While playing such a disc, the system stops...
... name • The system can only display numbers and letters of the operations above. characters are displayed as stop , press x on the unit or the remote and then start playing from the beginning. • Program Play, Shuffle Play, or Repeat Play has been selected. While playing such a disc, the system stops...
Operating Instructions
Page 81
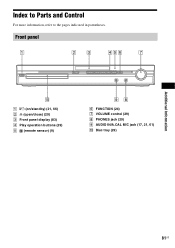
Front panel A "/1 (on/standby) (21, 66) B A (open/close) (29) C Front panel display (83) D Play operation buttons (29) E (remote sensor) (9) F FUNCTION (24) G VOLUME control (29) H PHONES jack (29) I AUDIO IN/A.CAL MIC jack (17, 21, 61) J Disc tray (29) Additional Information 81US Index to Parts and Control For more information, refer to the pages indicated in parentheses.
Front panel A "/1 (on/standby) (21, 66) B A (open/close) (29) C Front panel display (83) D Play operation buttons (29) E (remote sensor) (9) F FUNCTION (24) G VOLUME control (29) H PHONES jack (29) I AUDIO IN/A.CAL MIC jack (17, 21, 61) J Disc tray (29) Additional Information 81US Index to Parts and Control For more information, refer to the pages indicated in parentheses.
Operating Instructions
Page 84
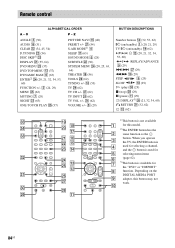
..., 32, 34, 53, 60) FUNCTION +/- 2 (24, 29) MENU wg (62) MUTING 7 (29) NIGHT wd (63) ONE-TOUCH PLAY eg (57) PICTURE NAVI qg (40) PRESET +/- O P - Remote control ALPHABETICAL ORDER A -
..., 32, 34, 53, 60) FUNCTION +/- 2 (24, 29) MENU wg (62) MUTING 7 (29) NIGHT wd (63) ONE-TOUCH PLAY eg (57) PICTURE NAVI qg (40) PRESET +/- O P - Remote control ALPHABETICAL ORDER A -


