Operating Instructions
Page 4
...Connecting the System ...13 Step 3: Performing the Quick Setup 21 Step 4: Enjoying Sound from all the Speakers 24 Sound Adjustment Enjoying Surround Sound by Using Decoding Mode 26 Selecting the Sound Mode 28 Enjoying Multiplex Broadcast Sound ... 28 Disc Playing a Disc 29 Using Play Mode 34 Searching/Selecting a ...Disc 37 Playing MP3 Files/JPEG Image Files... 39 Adjusting the Delay Between the Picture and Sound 42 Restricting Playback of the Disc........... 43 Using the Setup Display 45 Tuner Presetting Radio Stations 53 Listening to the Radio 54...
...Connecting the System ...13 Step 3: Performing the Quick Setup 21 Step 4: Enjoying Sound from all the Speakers 24 Sound Adjustment Enjoying Surround Sound by Using Decoding Mode 26 Selecting the Sound Mode 28 Enjoying Multiplex Broadcast Sound ... 28 Disc Playing a Disc 29 Using Play Mode 34 Searching/Selecting a ...Disc 37 Playing MP3 Files/JPEG Image Files... 39 Adjusting the Delay Between the Picture and Sound 42 Restricting Playback of the Disc........... 43 Using the Setup Display 45 Tuner Presetting Radio Stations 53 Listening to the Radio 54...

Operating Instructions
Page 10
Place the system as the speaker may result. • Do not use any type of the speakers, Sony recommends that are: - Subject to direct sunlight • Use caution when placing the speakers and/or speaker stands attached to... D Surround speaker (L (left)) E Surround speaker (R (right)) F Subwoofer G Unit CF G Top view E AA A A A CB B D A A C A C * Not supplied. For details, see "Getting Optimal Surround Sound for a Room" (page 60) and "Calibrating the Appropriate Settings Automatically" (page 61). 10US D E Note • Do not set the speakers in an inclined position. •...
Place the system as the speaker may result. • Do not use any type of the speakers, Sony recommends that are: - Subject to direct sunlight • Use caution when placing the speakers and/or speaker stands attached to... D Surround speaker (L (left)) E Surround speaker (R (right)) F Subwoofer G Unit CF G Top view E AA A A A CB B D A A C A C * Not supplied. For details, see "Getting Optimal Surround Sound for a Room" (page 60) and "Calibrating the Appropriate Settings Automatically" (page 61). 10US D E Note • Do not set the speakers in an inclined position. •...
Operating Instructions
Page 13
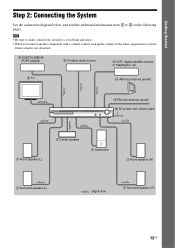
Getting Started Step 2: Connecting the System See the connection diagram below, and read the additional information from 1 to a level where sound is not distorted. 3 DIGITAL MEDIA PORT adapter 3 Portable audio source 3 VCR, digital satellite receiver, or PlayStation, etc. 2 TV 4 AM loop antenna (aerial) 4 FM wire antenna (...
Getting Started Step 2: Connecting the System See the connection diagram below, and read the additional information from 1 to a level where sound is not distorted. 3 DIGITAL MEDIA PORT adapter 3 Portable audio source 3 VCR, digital satellite receiver, or PlayStation, etc. 2 TV 4 AM loop antenna (aerial) 4 FM wire antenna (...
Operating Instructions
Page 15
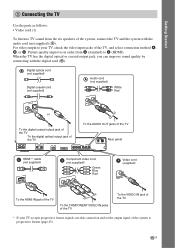
...input jacks of the TV, and select connection method A, B, or C. When the TV has the digital optical or coaxial output jack, you can improve sound quality by connecting with the audio cord (not supplied) (A). Getting Started 2 Connecting the TV Use the parts as follows: • Video cord (1)... To listen to TV sound from A (standard) to progressive format (page 23). 15US For video output to your TV accepts progressive format signals, use this connection and set the...
...input jacks of the TV, and select connection method A, B, or C. When the TV has the digital optical or coaxial output jack, you can improve sound quality by connecting with the audio cord (not supplied) (A). Getting Started 2 Connecting the TV Use the parts as follows: • Video cord (1)... To listen to TV sound from A (standard) to progressive format (page 23). 15US For video output to your TV accepts progressive format signals, use this connection and set the...
Operating Instructions
Page 18
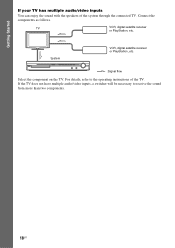
Connect the components as follows. For details, refer to receive the sound from more than two components. 18US System VCR, digital satellite receiver or PlayStation, etc. :Signal flow Select the component on the TV. If the TV does not have multiple audio/video inputs, a switcher will be necessary to the operating instructions of the system through the connected TV. TV VCR, digital satellite receiver or PlayStation, etc. Getting Started If your TV has multiple audio/video inputs You can enjoy the sound with the speakers of the TV.
Connect the components as follows. For details, refer to receive the sound from more than two components. 18US System VCR, digital satellite receiver or PlayStation, etc. :Signal flow Select the component on the TV. If the TV does not have multiple audio/video inputs, a switcher will be necessary to the operating instructions of the system through the connected TV. TV VCR, digital satellite receiver or PlayStation, etc. Getting Started If your TV has multiple audio/video inputs You can enjoy the sound with the speakers of the TV.
Operating Instructions
Page 19
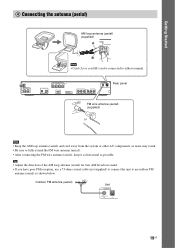
... wire antenna (aerial), keep it as horizontal as shown below. Tip • Adjust the direction of the AM loop antenna (aerial) for best AM broadcast sound. • If you have poor FM reception, use a 75-ohm coaxial cable (not supplied) to connect the unit to either terminal. Getting Started 4 Connecting the...
... wire antenna (aerial), keep it as horizontal as shown below. Tip • Adjust the direction of the AM loop antenna (aerial) for best AM broadcast sound. • If you have poor FM reception, use a 75-ohm coaxial cable (not supplied) to connect the unit to either terminal. Getting Started 4 Connecting the...
Operating Instructions
Page 21
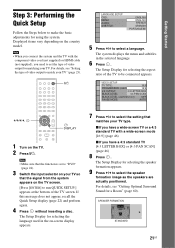
For details, see "Getting Optimal Surround Sound for a Room" (page 60). The Setup Display for selecting the aspect ratio of video output for selecting the speaker formation appears. 9 Press C/c to be connected ...
For details, see "Getting Optimal Surround Sound for a Room" (page 60). The Setup Display for selecting the aspect ratio of video output for selecting the speaker formation appears. 9 Press C/c to be connected ...
Operating Instructions
Page 22
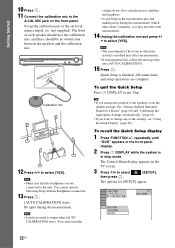
...system is output when [AUTO CALIBRATION] starts. The Control Menu display appears on the front panel. Note • Loud test sound is installed may interfere with the headphones connected. 13 Press . [AUTO CALIBRATION] starts. You cannot turn the volume down. See "Getting Optimal... Surround Sound for [SETUP] appear. 94( 99) 1( 1) T 0: 01: 08 DVD VIDEO CUSTOM CUSTOM QUICK 22US Quick Setup is in the measurement...
...system is output when [AUTO CALIBRATION] starts. The Control Menu display appears on the front panel. Note • Loud test sound is installed may interfere with the headphones connected. 13 Press . [AUTO CALIBRATION] starts. You cannot turn the volume down. See "Getting Optimal... Surround Sound for [SETUP] appear. 94( 99) 1( 1) T 0: 01: 08 DVD VIDEO CUSTOM CUSTOM QUICK 22US Quick Setup is in the measurement...
Operating Instructions
Page 24
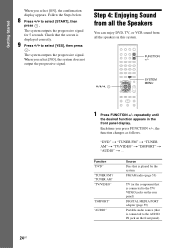
The system outputs the progressive signal for 5 seconds. Step 4: Enjoying Sound from all the Speakers You can enjoy DVD, TV, or VCR sound from all the speakers in the front panel display. Follow the Steps below. 8 Press C/c to the AUDIO IN jack on the front panel) When you ...
The system outputs the progressive signal for 5 seconds. Step 4: Enjoying Sound from all the Speakers You can enjoy DVD, TV, or VCR sound from all the speakers in the front panel display. Follow the Steps below. 8 Press C/c to the AUDIO IN jack on the front panel) When you ...
Operating Instructions
Page 25
MODE" appears in the front panel display, then press or c. 4 Press X/x repeatedly until the decoding mode you want to output the TV sound or stereo sound of a 2 channel source from connected components Distortion may occur when you can attenuate the input level. Press FUNCTION +/- to select "AUDIO." Select "A.F.D. STD." 1 ... the rear panel, or to the AUDIO IN jack on your TV, you may need to turn off your TV's speaker to enjoy surround sound of the sound from the six speakers, select the "PRO LOGIC," "PLII MOVIE," or "PLII MUSIC" decoding mode. Note • Depending on the front ...
MODE" appears in the front panel display, then press or c. 4 Press X/x repeatedly until the decoding mode you want to output the TV sound or stereo sound of a 2 channel source from connected components Distortion may occur when you can attenuate the input level. Press FUNCTION +/- to select "AUDIO." Select "A.F.D. STD." 1 ... the rear panel, or to the AUDIO IN jack on your TV, you may need to turn off your TV's speaker to enjoy surround sound of the sound from the six speakers, select the "PRO LOGIC," "PLII MOVIE," or "PLII MUSIC" decoding mode. Note • Depending on the front ...
Operating Instructions
Page 26
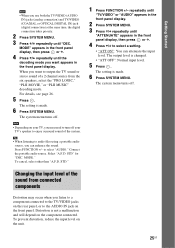
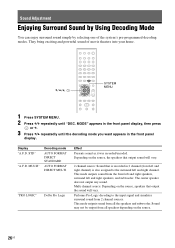
...26US Multi channel source: Depending on the source, speakers that is also assigned to the input signal and simulates surround sound from all the speakers and subwoofer. MULTI" Decoding mode AUTO FORMAT DIRECT STANDARD AUTO FORMAT DIRECT MULTI "PRO LOGIC" Dolby Pro... system's pre-programmed decoding modes. The center speaker does not output any sound. Sound may not be output from 2 channel sources. Sound Adjustment Enjoying Surround Sound by Using Decoding Mode You can enjoy surround sound simply by selecting one of movie theaters into your home. X/x/c, SYSTEM MENU...
...26US Multi channel source: Depending on the source, speakers that is also assigned to the input signal and simulates surround sound from all the speakers and subwoofer. MULTI" Decoding mode AUTO FORMAT DIRECT STANDARD AUTO FORMAT DIRECT MULTI "PRO LOGIC" Dolby Pro... system's pre-programmed decoding modes. The center speaker does not output any sound. Sound may not be output from 2 channel sources. Sound Adjustment Enjoying Surround Sound by Using Decoding Mode You can enjoy surround sound simply by selecting one of movie theaters into your home. X/x/c, SYSTEM MENU...

Operating Instructions
Page 27
...source. This mode is effective only when a multi channel source is ideal for normal stereo sources such as surround from 2 channel sources. Sound may not be effective. • When you select "A.F.D. This setting is played. Multi channel surround formats are not effective. • ...channel sources. STD," "PRO LOGIC," "PLII MOVIE," or "PLII MUSIC." 27US Multi channel surround formats are downmixed to 2 channels. Sound may not be effective. Effect Performs Pro Logic II movie mode decoding to the input signal and produces five full-bandwidth output channels ...
...source. This mode is effective only when a multi channel source is ideal for normal stereo sources such as surround from 2 channel sources. Sound may not be effective. • When you select "A.F.D. This setting is played. Multi channel surround formats are not effective. • ...channel sources. STD," "PRO LOGIC," "PLII MOVIE," or "PLII MUSIC." 27US Multi channel surround formats are downmixed to 2 channels. Sound may not be effective. Effect Performs Pro Logic II movie mode decoding to the input signal and produces five full-bandwidth output channels ...

Operating Instructions
Page 28
... 15) and set the digital output mode of both the main and sub languages will be output. • "MAIN+SUB": Mixed sound of the TV or other component to the unit. Press AUDIO repeatedly until the desired mode appears in the front panel display. • ..."MAIN": Sound of the main language will be output. • "SUB": Sound of the sub language will be output. 28US SOUND MODE Enjoying Multiplex Broadcast Sound (DUAL MONO) You can select a suitable sound mode for music. AUDIO Press SOUND MODE repeatedly during playback until the desired signal...
... 15) and set the digital output mode of both the main and sub languages will be output. • "MAIN+SUB": Mixed sound of the TV or other component to the unit. Press AUDIO repeatedly until the desired mode appears in the front panel display. • ..."MAIN": Sound of the main language will be output. • "SUB": Sound of the sub language will be output. 28US SOUND MODE Enjoying Multiplex Broadcast Sound (DUAL MONO) You can select a suitable sound mode for music. AUDIO Press SOUND MODE repeatedly during playback until the desired signal...
Operating Instructions
Page 29
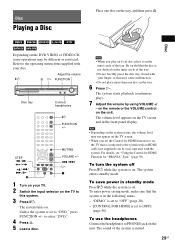
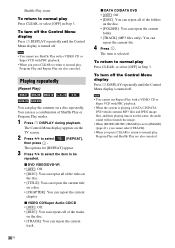
... it on . on the remote or the VOLUME control on the tray, and then press A. "DEMO" is set to select "DVD." 4 Press A. 5 Load a disc. The sound of the tray. Disc Depending on the DVD VIDEO or VIDEO CD, some operations may not appear on the TV screen. • When you play...
... it on . on the remote or the VOLUME control on the tray, and then press A. "DEMO" is set to select "DVD." 4 Press A. 5 Load a disc. The sound of the tray. Disc Depending on the DVD VIDEO or VIDEO CD, some operations may not appear on the TV screen. • When you play...
Operating Instructions
Page 30
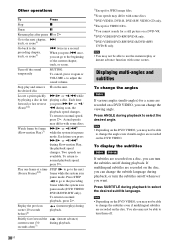
.... You also may not be able to the preceding chapter, track, or scene1) . twice in fast playing a disc. To return to adjust the sound volume. Briefly fast forward the (instant advance) current scene (30 seconds after pause X or H Go to the next chapter, > track, or scene1... the instant replay or instant advance function with some scenes. Other operations To Press Stop x Pause X Resume play and remove A on /off the sound temporarily MUTING. To return to normal playback, press H. Two speeds are recorded on a DVD-VR. 6)DVD VIDEO/DVD-RW/DVD-R only. 7)DVD...
.... You also may not be able to the preceding chapter, track, or scene1) . twice in fast playing a disc. To return to adjust the sound volume. Briefly fast forward the (instant advance) current scene (30 seconds after pause X or H Go to the next chapter, > track, or scene1... the instant replay or instant advance function with some scenes. Other operations To Press Stop x Pause X Resume play and remove A on /off the sound temporarily MUTING. To return to normal playback, press H. Two speeds are recorded on a DVD-VR. 6)DVD VIDEO/DVD-RW/DVD-R only. 7)DVD...
Operating Instructions
Page 31
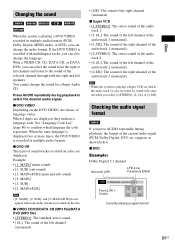
...VIDEO CD/CD/DATA CD (MP3 file)/DATA DVD (MP3 file) • [STEREO]: The standard stereo sound. • [1/L]: The sound of the left channel of the audio track 2 (monaural). • [2:2/R]: The sound of the right channel of the right channel (monaural). Checking the audio signal format If you press AUDIO ... audio stream is recorded on the DVD VIDEO, the choice of the selected channel through both the right and left speakers. Disc Changing the sound When the system is playing a DVD VIDEO recorded in multiple audio formats. x DVD VIDEO Depending on the disc. When the same language...
...VIDEO CD/CD/DATA CD (MP3 file)/DATA DVD (MP3 file) • [STEREO]: The standard stereo sound. • [1/L]: The sound of the left channel of the audio track 2 (monaural). • [2:2/R]: The sound of the right channel of the right channel (monaural). Checking the audio signal format If you press AUDIO ... audio stream is recorded on the DVD VIDEO, the choice of the selected channel through both the right and left speakers. Disc Changing the sound When the system is playing a DVD VIDEO recorded in multiple audio formats. x DVD VIDEO Depending on the disc. When the same language...
Operating Instructions
Page 36
... system is playing a DATA CD/DATA DVD which contains MP3 files and JPEG image files, and their playing time is not the same, the audio sound will not match the image. • When [MODE (MUSIC, IMAGE)] is turned off . You can play , Program Play and Shuffle Play are also canceled. x DVD...
... system is playing a DATA CD/DATA DVD which contains MP3 files and JPEG image files, and their playing time is not the same, the audio sound will not match the image. • When [MODE (MUSIC, IMAGE)] is turned off . You can play , Program Play and Shuffle Play are also canceled. x DVD...
Operating Instructions
Page 37
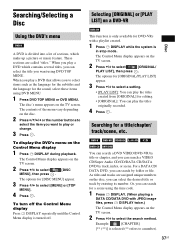
... search a DVD VIDEO/DVD-VR by track, index, or scene. Example: [CHAPTER] [** (**)] is selected (** refers to select [DISC MENU], then press . The options for the sound, select these items using DVD MENU. 1 Press DVD TOP MENU or DVD MENU. When you play the titles originally recorded. 4 Press . To turn off . The...
... search a DVD VIDEO/DVD-VR by track, index, or scene. Example: [CHAPTER] [** (**)] is selected (** refers to select [DISC MENU], then press . The options for the sound, select these items using DVD MENU. 1 Press DVD TOP MENU or DVD MENU. When you play the titles originally recorded. 4 Press . To turn off . The...
Operating Instructions
Page 41
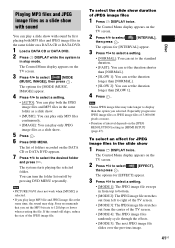
... . The Control Menu display appears on the DATA CD or DATA DVD appears. 7 Press X/x to select [MODE (MUSIC, IMAGE)], then press . If the sound still skips, reduce the size of the TV screen. • [MODE 4]: The JPEG image files randomly cycle through the effects. • [MODE 5]: The next...setting. • [AUTO]: You can turn the folder list on the TV screen. 3 Press X/x to select the desired folder and press H. Sony recommends that you set the duration longer than the option you play only JPEG image files as a slide show 1 Press DISPLAY twice. The list of...
... . The Control Menu display appears on the DATA CD or DATA DVD appears. 7 Press X/x to select [MODE (MUSIC, IMAGE)], then press . If the sound still skips, reduce the size of the TV screen. • [MODE 4]: The JPEG image files randomly cycle through the effects. • [MODE 5]: The next...setting. • [AUTO]: You can turn the folder list on the TV screen. 3 Press X/x to select the desired folder and press H. Sony recommends that you set the duration longer than the option you play only JPEG image files as a slide show 1 Press DISPLAY twice. The list of...

Operating Instructions
Page 42
.... The options for [A/V SYNC] appear. 3 Press X/x to select [A/V SYNC], then press . Adjusting the Delay Between the Picture and Sound [A/V SYNC] When the sound does not match the pictures on the input stream, [A/V SYNC] may not be effective. 42US Note • The [EFFECT] setting is ...not effective when you can adjust the difference between the picture and sound. 1 Press DISPLAY. Note • Depending on the TV screen, you set [JPEG RESOLUTION] in [HDMI SETUP] to [(1920 × 1080i) HD ] or...
.... The options for [A/V SYNC] appear. 3 Press X/x to select [A/V SYNC], then press . Adjusting the Delay Between the Picture and Sound [A/V SYNC] When the sound does not match the pictures on the input stream, [A/V SYNC] may not be effective. 42US Note • The [EFFECT] setting is ...not effective when you can adjust the difference between the picture and sound. 1 Press DISPLAY. Note • Depending on the TV screen, you set [JPEG RESOLUTION] in [HDMI SETUP] to [(1920 × 1080i) HD ] or...


