Operating Instructions
Page 8
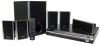
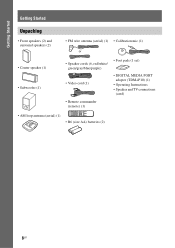
Getting Started Getting Started Unpacking • Front speakers (2) and surround speakers (2) • FM wire antenna (aerial) (1) • Calibration mic (1) or • Center speaker (1) • Subwoofer (1) • Speaker cords (6, red/white/ green/gray/blue/purple) • Foot pads (1 set) • Video cord (1) • DIGITAL MEDIA PORT adapter (TDM-iP10) (1) • Operating Instructions • Speaker and TV connections (card) • Remote commander (remote) (1) • AM loop antenna (aerial) (1) • R6 (size AA) batteries (2) 8US
Getting Started Getting Started Unpacking • Front speakers (2) and surround speakers (2) • FM wire antenna (aerial) (1) • Calibration mic (1) or • Center speaker (1) • Subwoofer (1) • Speaker cords (6, red/white/ green/gray/blue/purple) • Foot pads (1 set) • Video cord (1) • DIGITAL MEDIA PORT adapter (TDM-iP10) (1) • Operating Instructions • Speaker and TV connections (card) • Remote commander (remote) (1) • AM loop antenna (aerial) (1) • R6 (size AA) batteries (2) 8US
Operating Instructions
Page 22
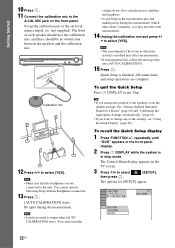
... QUICK 22US To recall the Quick Setup display 1 Press FUNCTION +/- You cannot operate following Steps with measurement. 14 Unplug the calibration mic and press C/ c to the A.CAL MIC jack on the TV screen. 3 Press X/x to the unit. Note • Loud test sound is in stop mode. ... Press . Be quiet during the measurement (which the system is finished. Getting Started 10 Press . 11 Connect the calibration mic to select [YES]. AUDIO IN / A.CAL MIC Calibration mic 12 Press C/c to change the position of the settings, see "Using the Setup Display" (page 45). Note •...
... QUICK 22US To recall the Quick Setup display 1 Press FUNCTION +/- You cannot operate following Steps with measurement. 14 Unplug the calibration mic and press C/ c to the A.CAL MIC jack on the TV screen. 3 Press X/x to the unit. Note • Loud test sound is in stop mode. ... Press . Be quiet during the measurement (which the system is finished. Getting Started 10 Press . 11 Connect the calibration mic to select [YES]. AUDIO IN / A.CAL MIC Calibration mic 12 Press C/c to change the position of the settings, see "Using the Setup Display" (page 45). Note •...
Operating Instructions
Page 61
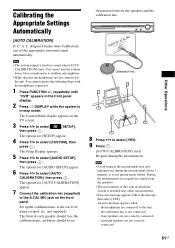
...speakers. • The environment of each speaker should face the calibration mic, and there should be no obstruction between the speakers and the calibration mic. The Control Menu display appears on the front panel Set up the calibration mic at the ear level using a tripod, etc. (not supplied.... - You cannot turn the volume down. A. The Setup Display appears. 5 Press X/x to select [SETUP], then press . the calibration mic is in the measurement area and making noise during the measurement. Note • The system outputs a loud test sound when [AUTO...
...speakers. • The environment of each speaker should face the calibration mic, and there should be no obstruction between the speakers and the calibration mic. The Control Menu display appears on the front panel Set up the calibration mic at the ear level using a tripod, etc. (not supplied.... - You cannot turn the volume down. A. The Setup Display appears. 5 Press X/x to select [SETUP], then press . the calibration mic is in the measurement area and making noise during the measurement. Note • The system outputs a loud test sound when [AUTO...
Operating Instructions
Page 62
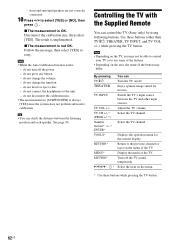
...sources. TV CH +/-* (PROG +/-*) Select the TV channel. x The measurement is not OK. x The measurement is OK. do not disconnect the calibration mic. • The measurement for [SUBWOOFER] is implemented. do not press any button. - THEATER Enjoy optimal image suited for the current display. MENU*...; Depending on the menu of the TV. Number buttons*, -* ENTER* Select the TV channel. - By pressing You can control the TV (Sony only) by using following buttons. do not change the volume. - Note • Depending on the TV, you may differ. Adjust the TV...
...sources. TV CH +/-* (PROG +/-*) Select the TV channel. x The measurement is not OK. x The measurement is OK. do not disconnect the calibration mic. • The measurement for [SUBWOOFER] is implemented. do not press any button. - THEATER Enjoy optimal image suited for the current display. MENU*...; Depending on the menu of the TV. Number buttons*, -* ENTER* Select the TV channel. - By pressing You can control the TV (Sony only) by using following buttons. do not change the volume. - Note • Depending on the TV, you may differ. Adjust the TV...


