Operating Instructions
Page 19
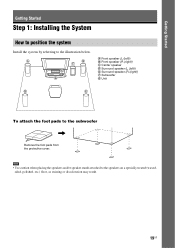
... the System How to position the system Install the system by referring to the speakers on a specially treated (waxed, oiled, polished, etc.) floor, as staining or discoloration may result. 19US A B F C G A Front speaker (L (left)) B Front speaker (R (right)) C Center speaker D Surround speaker (L (left)) E Surround speaker (R (right)) F Subwoofer G Unit D E To attach the foot pads to the subwoofer , Remove the foot...
... the System How to position the system Install the system by referring to the speakers on a specially treated (waxed, oiled, polished, etc.) floor, as staining or discoloration may result. 19US A B F C G A Front speaker (L (left)) B Front speaker (R (right)) C Center speaker D Surround speaker (L (left)) E Surround speaker (R (right)) F Subwoofer G Unit D E To attach the foot pads to the subwoofer , Remove the foot...
Operating Instructions
Page 20
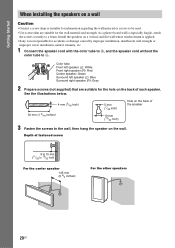
... 10 mm (11/32 to 13/32 inch) For the center speaker 145 mm (5 3/4 inches) For the other speakers 20US Color tube Front left speaker (L): White Front right speaker (R): Red Center speaker: Green Surround left speaker (L): Blue Surround right speaker (R): Gray 2 Prepare screws (not supplied) that are suitable...installation, natural calamity, etc. 1 Connect the speaker cord with the color tube to 3, and the speaker cord without the color tube to #. Install the speakers on a vertical and flat wall where reinforcement is applied. • Sony is especially fragile, attach the screws securely to...
... 10 mm (11/32 to 13/32 inch) For the center speaker 145 mm (5 3/4 inches) For the other speakers 20US Color tube Front left speaker (L): White Front right speaker (R): Red Center speaker: Green Surround left speaker (L): Blue Surround right speaker (R): Gray 2 Prepare screws (not supplied) that are suitable...installation, natural calamity, etc. 1 Connect the speaker cord with the color tube to 3, and the speaker cord without the color tube to #. Install the speakers on a vertical and flat wall where reinforcement is applied. • Sony is especially fragile, attach the screws securely to...
Operating Instructions
Page 21
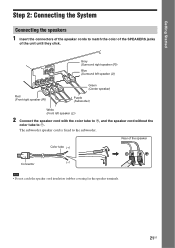
SPEAKERSUSR L SUR R FRONT R FRONSTPLEAKSEURBWSOOFER CENTER Red (Front right speaker (R)) Gray (Surround right speaker (R)) Blue (Surround left speaker (L)) Green (Center speaker) Purple (Subwoofer) White (Front left speaker (L)) 2 Connect the speaker cord with the color tube to 3, and the speaker cord without the color tube to the subwoofer. Rear of the unit until they click. Getting Started Step 2: Connecting the System Connecting...
SPEAKERSUSR L SUR R FRONT R FRONSTPLEAKSEURBWSOOFER CENTER Red (Front right speaker (R)) Gray (Surround right speaker (R)) Blue (Surround left speaker (L)) Green (Center speaker) Purple (Subwoofer) White (Front left speaker (L)) 2 Connect the speaker cord with the color tube to 3, and the speaker cord without the color tube to the subwoofer. Rear of the unit until they click. Getting Started Step 2: Connecting the System Connecting...
Operating Instructions
Page 27
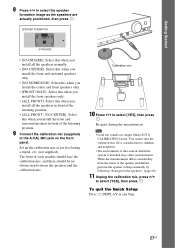
...]: Select this when you install the center and front speakers only. • [FRONT ONLY]: Select this when you install the front speakers only. • [ALL FRONT]: Select this when you install all the speakers in front of the speaker installation, perform the speaker settings manually by following "Settings for the speakers" (page 60). 11 Unplug the calibration...
...]: Select this when you install the center and front speakers only. • [FRONT ONLY]: Select this when you install the front speakers only. • [ALL FRONT]: Select this when you install all the speakers in front of the speaker installation, perform the speaker settings manually by following "Settings for the speakers" (page 60). 11 Unplug the calibration...
Operating Instructions
Page 44
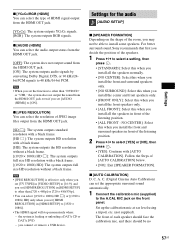
...below describes the options when you connect all the speakers to the unit and you want, then press . About speaker output The table below for surround setting descriptions. 4 Press SYSTEM MENU. Sound from the center speaker. The selected item appears in the front panel display.... 3 Press X/x to select the surround setting you set [SPEAKER FORMATION] to select "SUR.SETTING," then press or c. MULTI" (AUTO FORMAT...
...below describes the options when you connect all the speakers to the unit and you want, then press . About speaker output The table below for surround setting descriptions. 4 Press SYSTEM MENU. Sound from the center speaker. The selected item appears in the front panel display.... 3 Press X/x to select the surround setting you set [SPEAKER FORMATION] to select "SUR.SETTING," then press or c. MULTI" (AUTO FORMAT...
Operating Instructions
Page 57
... from the HDMI OUT jack. [YCBCR]: The system outputs YCBCR signals. [RGB]: The system outputs RGB signals. NO CENTER]: Select this when you install the front and surround speakers in front of the listening position. 2 Press C/c to select a setting, then press . • [STANDARD]: Select.... [(1920 × 1080i) HD]: The system outputs full size HD resolution without a black frame. C. For better surround sound, Sony recommends that first you install all the speakers in front of the listening position. • [ALL FRONT - x [AUTO CALIBRATION] D. Note • When you set the function...
... from the HDMI OUT jack. [YCBCR]: The system outputs YCBCR signals. [RGB]: The system outputs RGB signals. NO CENTER]: Select this when you install the front and surround speakers in front of the listening position. 2 Press C/c to select a setting, then press . • [STANDARD]: Select.... [(1920 × 1080i) HD]: The system outputs full size HD resolution without a black frame. C. For better surround sound, Sony recommends that first you install all the speakers in front of the listening position. • [ALL FRONT - x [AUTO CALIBRATION] D. Note • When you set the function...
Operating Instructions
Page 60
... setting may not be between 1.0 to 7.0 meters1) (3 to 23 ft) for the front speakers, and 0.0 to 7.0 meters2) (0 to [ON] for easy adjustment. [L/R] 0.0 dB: Set the front speaker level. [CENTER] 0.0 dB: Set the center speaker level. [SUBWOOFER] +2.0 dB: Set the subwoofer level. Be sure to set [TEST TONE]... to 23 ft) for the center speaker. x [LEVEL (SURROUND)] You can adjust the sound level of the front speakers, center speaker, and subwoofer. x [TEST TONE] You can adjust the sound level by using the [TEST TONE] function....
... setting may not be between 1.0 to 7.0 meters1) (3 to 23 ft) for the front speakers, and 0.0 to 7.0 meters2) (0 to [ON] for easy adjustment. [L/R] 0.0 dB: Set the front speaker level. [CENTER] 0.0 dB: Set the center speaker level. [SUBWOOFER] +2.0 dB: Set the subwoofer level. Be sure to set [TEST TONE]... to 23 ft) for the center speaker. x [LEVEL (SURROUND)] You can adjust the sound level of the front speakers, center speaker, and subwoofer. x [TEST TONE] You can adjust the sound level by using the [TEST TONE] function....
Operating Instructions
Page 65
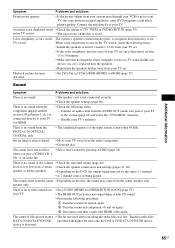
TV screen. Severe hum or noise is very low from the center speaker only. level is heard. • Move your TV. The sound comes from the center • Depending on again. 3 Disconnect and then connect the HDMI cable again. Connect the unit directly to your TV away from the audio... components. • Clean the disc. There is connected directly to your TV's speakers. Disable your TV via HDMI. &#...
TV screen. Severe hum or noise is very low from the center speaker only. level is heard. • Move your TV. The sound comes from the center • Depending on again. 3 Disconnect and then connect the HDMI cable again. Connect the unit directly to your TV away from the audio... components. • Clean the disc. There is connected directly to your TV's speakers. Disable your TV via HDMI. &#...
Operating Instructions
Page 71
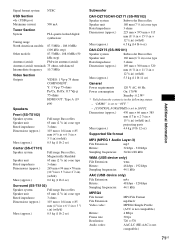
... mm × 164 mm × 85 mm (4 1/8 in × 6 1/2 in × 3 3/8 in) (w/h/d) 0.5 kg (1 lb 2 oz) Center (SS-CT101) Speaker system Speaker unit Rated impedance Dimensions (approx.) Mass (approx.) Full range Bass reflex, Magnetically Shielded 65 mm (2 5/8 in) cone type 3 ohms 265 mm × 94 ...× 315 mm (8 7/8 in × 15 5/8 in × 12 1/2 in) (w/h/d) Mass (approx.) 6.5 kg (14 lb 6 oz) DAV-DZ175 (SS-WS101) Speaker system Subwoofer Bass reflex Speaker unit 160 mm (6 3/8 in) cone type Rated impedance 3 ohms Dimensions (approx.) 169 mm × 300 mm × 320 mm (6 3/4 in...
... mm × 164 mm × 85 mm (4 1/8 in × 6 1/2 in × 3 3/8 in) (w/h/d) 0.5 kg (1 lb 2 oz) Center (SS-CT101) Speaker system Speaker unit Rated impedance Dimensions (approx.) Mass (approx.) Full range Bass reflex, Magnetically Shielded 65 mm (2 5/8 in) cone type 3 ohms 265 mm × 94 ...× 315 mm (8 7/8 in × 15 5/8 in × 12 1/2 in) (w/h/d) Mass (approx.) 6.5 kg (14 lb 6 oz) DAV-DZ175 (SS-WS101) Speaker system Subwoofer Bass reflex Speaker unit 160 mm (6 3/8 in) cone type Rated impedance 3 ohms Dimensions (approx.) 169 mm × 300 mm × 320 mm (6 3/4 in...


