Operating Instructions
Page 2
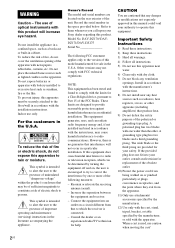
... Part 15 of important operating and maintenance (servicing) instructions in the space provided below. The use caution when moving the cart/ 2US These limits are located on the apparatus. Reorient or relocate the receiving antenna (aerial). - Consult the dealer or an experienced radio/TV technician for help. A polarized plug has two blades with FCC technical regulations. Owner's Record The model and serial numbers...
... Part 15 of important operating and maintenance (servicing) instructions in the space provided below. The use caution when moving the cart/ 2US These limits are located on the apparatus. Reorient or relocate the receiving antenna (aerial). - Consult the dealer or an experienced radio/TV technician for help. A polarized plug has two blades with FCC technical regulations. Owner's Record The model and serial numbers...

Operating Instructions
Page 5
... Operations 32 Selecting the Playback Mode 35 Displaying the Information of a Disc/ USB Device 39 Enjoying the Audio/Video of the Connected Component 40 Tuner Presetting Radio Stations 42 Listening to the Radio 42 Sound Effect Enjoying Surround Sound 44 Selecting the Sound Effect 46 Convenient Functions Using the Control for HDMI Function for "BRAVIA" Sync 47 Transferring Songs onto a USB Device 49 Using the sleep timer 51 Adjusting the Delay Between the Picture and Sound 51 Enjoying Multiplex Broadcast Sound 52 Changing the Input Level...
... Operations 32 Selecting the Playback Mode 35 Displaying the Information of a Disc/ USB Device 39 Enjoying the Audio/Video of the Connected Component 40 Tuner Presetting Radio Stations 42 Listening to the Radio 42 Sound Effect Enjoying Surround Sound 44 Selecting the Sound Effect 46 Convenient Functions Using the Control for HDMI Function for "BRAVIA" Sync 47 Transferring Songs onto a USB Device 49 Using the sleep timer 51 Adjusting the Delay Between the Picture and Sound 51 Enjoying Multiplex Broadcast Sound 52 Changing the Input Level...
Operating Instructions
Page 14
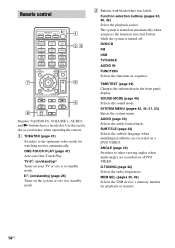
... optimum video mode for playback or transfer. 14US SOUND MODE (page 46) Selects the sound mode. Remote control 7 ONE-TOUCH THEATER PLAY TV BRAVIA Sync 1 2 3 DVD/CD FM USB 4 TV/ CABLE 7 TIME/ TEXT CLEAR AUDIO DVD TOP MENU 5 AUDIO IN 6 FUNCTION 8 SOUND MODE 9 SYSTEM MENU 0 TV INPUT SUBTITLE ANGLE D.TUNING MEM SEL DVD MENU MUTING VOLUME 1 2,3 4 6 RETURN PRESET TUNING SHIFT DISPLAY PRESET TUNING 5 Number 5/AUDIO IN, VOLUME +, AUDIO, and N buttons have a tactile dot. The system is turned off. A THEATER (page 47) Switches to standby mode. B Buttons with...
... optimum video mode for playback or transfer. 14US SOUND MODE (page 46) Selects the sound mode. Remote control 7 ONE-TOUCH THEATER PLAY TV BRAVIA Sync 1 2 3 DVD/CD FM USB 4 TV/ CABLE 7 TIME/ TEXT CLEAR AUDIO DVD TOP MENU 5 AUDIO IN 6 FUNCTION 8 SOUND MODE 9 SYSTEM MENU 0 TV INPUT SUBTITLE ANGLE D.TUNING MEM SEL DVD MENU MUTING VOLUME 1 2,3 4 6 RETURN PRESET TUNING SHIFT DISPLAY PRESET TUNING 5 Number 5/AUDIO IN, VOLUME +, AUDIO, and N buttons have a tactile dot. The system is turned off. A THEATER (page 47) Switches to standby mode. B Buttons with...
Operating Instructions
Page 26
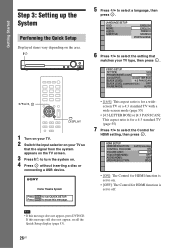
... 3: Setting up the System Performing the Quick Setup Displayed items vary depending on . 4 Press without inserting a disc or connecting a USB device. Note • If this message still does not appear, recall the Quick Setup display (page 53). 26US "/1 5 Press X/x to run QUICK SETUP. VIDEO SETUP TV TYPE: 16:9 PROGRESSIVE (COMPONENT OUT): 16:9 4:3 OUTPUT: 4:3 LETTER BOX BLACK LEVEL: 4:3 PAN SCAN BLACK LEVEL (COMPONENT OUT): OFF PAUSE MODE: AUTO C/X/x/c, DISPLAY 1 Turn on your TV. 2 Switch the input selector...
... 3: Setting up the System Performing the Quick Setup Displayed items vary depending on . 4 Press without inserting a disc or connecting a USB device. Note • If this message still does not appear, recall the Quick Setup display (page 53). 26US "/1 5 Press X/x to run QUICK SETUP. VIDEO SETUP TV TYPE: 16:9 PROGRESSIVE (COMPONENT OUT): 16:9 4:3 OUTPUT: 4:3 LETTER BOX BLACK LEVEL: 4:3 PAN SCAN BLACK LEVEL (COMPONENT OUT): OFF PAUSE MODE: AUTO C/X/x/c, DISPLAY 1 Turn on your TV. 2 Switch the input selector...
Operating Instructions
Page 27
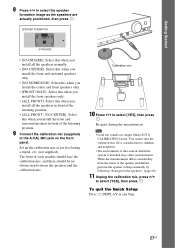
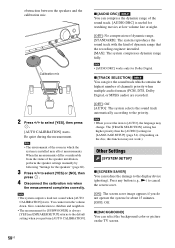
... is installed may affect measurements. Give consideration to children and neighbors. • The environment of the room in front of the listening position. 9 Connect the calibration mic (supplied) to select [YES], then press . Note • Loud test sounds are actually positioned, then press . You cannot turn the volume down. Calibration mic 10 Press C/c to select the speaker formation image as the speakers are output when [AUTO CALIBRATION] starts...
... is installed may affect measurements. Give consideration to children and neighbors. • The environment of the room in front of the listening position. 9 Connect the calibration mic (supplied) to select [YES], then press . Note • Loud test sounds are actually positioned, then press . You cannot turn the volume down. Calibration mic 10 Press C/c to select the speaker formation image as the speakers are output when [AUTO CALIBRATION] starts...
Operating Instructions
Page 28
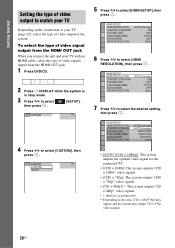
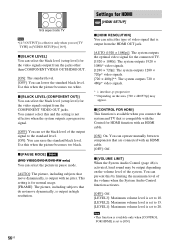
... the connection of your TV (page 22), select the type of video output of the system. HDMI SETUP HDMI RESOLUTION: CONTROL FOR HDMI: VOLUME LIMIT: YCBCR/RGB(HDMI): AUDIO(HDMI): JPEG RESOLUTION: AUTO(1920x1080p) ON OFF YCBCR OFF SD 7 Press X/x to match your TV with an HDMI cable, select the type of video signals output from the HDMI OUT jack. 1 Press DVD/CD. 2 Press DISPLAY while the system is in stop mode. 3 Press X/x to select [HDMI SETUP], then...
... the connection of your TV (page 22), select the type of video output of the system. HDMI SETUP HDMI RESOLUTION: CONTROL FOR HDMI: VOLUME LIMIT: YCBCR/RGB(HDMI): AUDIO(HDMI): JPEG RESOLUTION: AUTO(1920x1080p) ON OFF YCBCR OFF SD 7 Press X/x to match your TV with an HDMI cable, select the type of video signals output from the HDMI OUT jack. 1 Press DVD/CD. 2 Press DISPLAY while the system is in stop mode. 3 Press X/x to select [HDMI SETUP], then...
Operating Instructions
Page 41
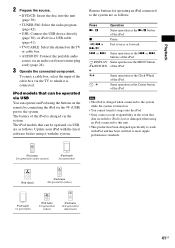
... iPod models that can operate an iPod using the buttons on the remote by connecting the iPod via an audio cord (stereo mini-plug cord) (page 24). 3 Operate the connected component. or > buttons of the iPod. Playback 2 Prepare the source. • DVD/CD: Insert the disc into the unit (page 30). • TUNER FM: Select the radio program (page 42). • USB: Connect the USB device directly (page 30), or iPod via a USB cable (page 41). • TV/CABLE: Select the channel on the TV or cable box...
... iPod models that can operate an iPod using the buttons on the remote by connecting the iPod via an audio cord (stereo mini-plug cord) (page 24). 3 Operate the connected component. or > buttons of the iPod. Playback 2 Prepare the source. • DVD/CD: Insert the disc into the unit (page 30). • TUNER FM: Select the radio program (page 42). • USB: Connect the USB device directly (page 30), or iPod via a USB cable (page 41). • TV/CABLE: Select the channel on the TV or cable box...
Operating Instructions
Page 47
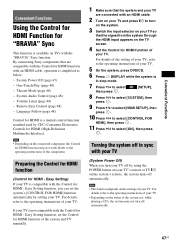
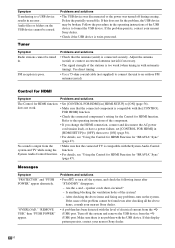
... X/x to select [HDMI SETUP], then press . 10 Press X/x to select [CONTROL FOR HDMI], then press . 11 Press X/x to the operating instructions of the component. If your TV. For details, refer to the operating instructions of the system and TV manually. 1 Make sure that are connected with the Control for HDMI is a mutual control function standard used by using the POWER button on your TV. 5 On the system, press DVD/CD. 6 Press DISPLAY while the...
... X/x to select [HDMI SETUP], then press . 10 Press X/x to select [CONTROL FOR HDMI], then press . 11 Press X/x to the operating instructions of the component. If your TV. For details, refer to the operating instructions of the system and TV manually. 1 Make sure that are connected with the Control for HDMI is a mutual control function standard used by using the POWER button on your TV. 5 On the system, press DVD/CD. 6 Press DISPLAY while the...
Operating Instructions
Page 48
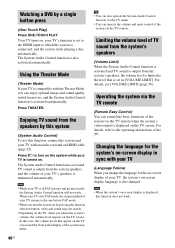
... system's on-screen display in PAP (picture and picture) mode, the System Audio Control function will not work . Watching a DVD by a single button press (One-Touch Play) Press ONE-TOUCH PLAY Your TV turns on, your TV's speakers is minimized automatically. The System Audio Control function is activated. TV sound is output from the system's speakers, the volume level is limited to which the system is in sync with an audio cord and an HDMI cable (page 22...
... system's on-screen display in PAP (picture and picture) mode, the System Audio Control function will not work . Watching a DVD by a single button press (One-Touch Play) Press ONE-TOUCH PLAY Your TV turns on, your TV's speakers is minimized automatically. The System Audio Control function is activated. TV sound is output from the system's speakers, the volume level is limited to which the system is in sync with an audio cord and an HDMI cable (page 22...
Operating Instructions
Page 54
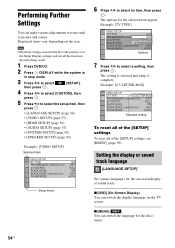
...; [HDMI SETUP] (page 56) • [AUDIO SETUP] (page 57) • [SYSTEM SETUP] (page 58) • [SPEAKER SETUP] (page 60) Example: [VIDEO SETUP] Selected item VIDEO SETUP TV TYPE: PROGRESSIVE (COMPONENT OUT): 4:3 OUTPUT: BLACK LEVEL: BLACK LEVEL (COMPONENT OUT): PAUSE MODE: 16:9 OFF FULL ON OFF AUTO Setup items 6 Press X/x to select a setting, then press . x [OSD] (On-Screen Display) You can make various adjustments to items such as picture and sound. The options for the selected item appear. Example: [4:3 LETTER BOX] VIDEO SETUP...
...; [HDMI SETUP] (page 56) • [AUDIO SETUP] (page 57) • [SYSTEM SETUP] (page 58) • [SPEAKER SETUP] (page 60) Example: [VIDEO SETUP] Selected item VIDEO SETUP TV TYPE: PROGRESSIVE (COMPONENT OUT): 4:3 OUTPUT: BLACK LEVEL: BLACK LEVEL (COMPONENT OUT): PAUSE MODE: 16:9 OFF FULL ON OFF AUTO Setup items 6 Press X/x to select a setting, then press . x [OSD] (On-Screen Display) You can make various adjustments to items such as picture and sound. The options for the selected item appear. Example: [4:3 LETTER BOX] VIDEO SETUP...
Operating Instructions
Page 56
... compatible with the Control for HDMI function with no jitter. x [BLACK LEVEL] You can select the black level (setup level) for the video signals output from the jacks other than COMPONENT VIDEO OUT/HDMI OUT. [ON]: The standard level. [OFF]: You can select the black level (setup level) for the video signals output from the HDMI OUT jack. [AUTO (1920 × 1080p)]: The system outputs the optimal video signal for the connected TV. [1920 × 1080i]: The system outputs 1920 × 1080i* video signals...
... compatible with the Control for HDMI function with no jitter. x [BLACK LEVEL] You can select the black level (setup level) for the video signals output from the jacks other than COMPONENT VIDEO OUT/HDMI OUT. [ON]: The standard level. [OFF]: You can select the black level (setup level) for the video signals output from the HDMI OUT jack. [AUTO (1920 × 1080p)]: The system outputs the optimal video signal for the connected TV. [1920 × 1080i]: The system outputs 1920 × 1080i* video signals...
Operating Instructions
Page 57
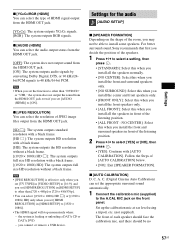
... you install the front and surround speakers in [HDMI SETUP] to [1920 × 1080i]. • The HDMI signal will stop momentarily when: - Set up the calibration mic at ear level using a tripod, etc. (not supplied). Settings x [YCBCR/RGB (HDMI)] You can select the audio output status from the HDMI OUT jack. [OFF]: The system does not output sound from the HDMI OUT jack. [ON]: The system outputs audio signals by converting Dolby Digital, DTS, or 96 kHz/24bit PCM signals...
... you install the front and surround speakers in [HDMI SETUP] to [1920 × 1080i]. • The HDMI signal will stop momentarily when: - Set up the calibration mic at ear level using a tripod, etc. (not supplied). Settings x [YCBCR/RGB (HDMI)] You can select the audio output status from the HDMI OUT jack. [OFF]: The system does not output sound from the HDMI OUT jack. [ON]: The system outputs audio signals by converting Dolby Digital, DTS, or 96 kHz/24bit PCM signals...
Operating Instructions
Page 58
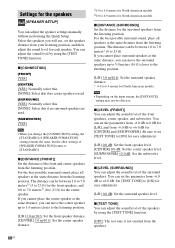
... cannot turn the volume down. Note • The environment of the speaker installation, perform the speaker settings manually by following "Settings for about 15 minutes. [OFF]: Off. Calibration mic 2 Press C/c to the default setting when you perform [AUTO CALIBRATION]. Be quiet during the measurement. Give consideration to children and neighbors. • The measurement for Dolby Digital. Note • [AUDIO DRC] works only for [SUBWOOFER] is installed may not work.) Other Settings [SYSTEM SETUP] x [SCREEN...
... cannot turn the volume down. Note • The environment of the speaker installation, perform the speaker settings manually by following "Settings for about 15 minutes. [OFF]: Off. Calibration mic 2 Press C/c to the default setting when you perform [AUTO CALIBRATION]. Be quiet during the measurement. Give consideration to children and neighbors. • The measurement for Dolby Digital. Note • [AUDIO DRC] works only for [SUBWOOFER] is installed may not work.) Other Settings [SYSTEM SETUP] x [SCREEN...

Operating Instructions
Page 59
... [PARENTAL CONTROL] function Set [LEVEL] to the default settings. Tip • If you enter a new 4-digit password, replace the disc in Step 5. Playback restarts at the resume point only for entering your password appears, enter your password appears. You can return the [SETUP] settings other than [PARENTAL CONTROL] to [OFF] in the unit and press N. To play a disc for entering your new password. Enter your password, enter "199703" using the number buttons...
... [PARENTAL CONTROL] function Set [LEVEL] to the default settings. Tip • If you enter a new 4-digit password, replace the disc in Step 5. Playback restarts at the resume point only for entering your password appears, enter your password appears. You can return the [SETUP] settings other than [PARENTAL CONTROL] to [OFF] in the unit and press N. To play a disc for entering your new password. Enter your password, enter "199703" using the number buttons...
Operating Instructions
Page 60
...3.0 m/10 ft: Set the surround speaker distance. * 0.0 to 23 ft) for the center speaker. You can set [TEST TONE] to [ON] for easy adjustment. [L/R] 0.0 dB: Set the front speaker level. [CENTER] 0.0 dB: Set the center speaker level. [SUBWOOFER] +2.0 dB: Set the subwoofer level. x [CONNECTION] [FRONT] [YES] [CENTER] [YES]: Normally select this. [NONE]: Select this if no surround speakers are used. [SUBWOOFER] [YES] Note • When you can adjust the sound level by using the [TEST TONE] function. x [DISTANCE (SURROUND)] Set the distance for the surround speakers from -6.0 dB to...
...3.0 m/10 ft: Set the surround speaker distance. * 0.0 to 23 ft) for the center speaker. You can set [TEST TONE] to [ON] for easy adjustment. [L/R] 0.0 dB: Set the front speaker level. [CENTER] 0.0 dB: Set the center speaker level. [SUBWOOFER] +2.0 dB: Set the subwoofer level. x [CONNECTION] [FRONT] [YES] [CENTER] [YES]: Normally select this. [NONE]: Select this if no surround speakers are used. [SUBWOOFER] [YES] Note • When you can adjust the sound level by using the [TEST TONE] function. x [DISTANCE (SURROUND)] Set the distance for the surround speakers from -6.0 dB to...
Operating Instructions
Page 64
... used for video output, change the type of video signal output from the unit and then set [PROGRESSIVE (COMPONENT OUT)] in progressive format. Problems and solutions • The video input on the front panel does not light up). • If the HDMI OUT jack is no picture. If the picture still does not appear, repeat the Steps and try other than HDMI OUT, and switch your nearest Sony dealer. Troubleshooting If you make an HDMI cable connection. Picture...
... used for video output, change the type of video signal output from the unit and then set [PROGRESSIVE (COMPONENT OUT)] in progressive format. Problems and solutions • The video input on the front panel does not light up). • If the HDMI OUT jack is no picture. If the picture still does not appear, repeat the Steps and try other than HDMI OUT, and switch your nearest Sony dealer. Troubleshooting If you make an HDMI cable connection. Picture...
Operating Instructions
Page 65
... the audio components. • Clean the disc. When color irregularity occurs on the TV screen, check the following procedure. 1 Turn the system off and on again. 2 Turn the connected component off your TV set . Playback picture becomes distorted. • Set [YCBCR] in [YCBCR/RGB (HDMI)] to 30 minutes. • Make sure that no sound from the DIGITAL IN OPTICAL/ COAXIAL jack. • The sampling frequency of files played from...
... the audio components. • Clean the disc. When color irregularity occurs on the TV screen, check the following procedure. 1 Turn the system off and on again. 2 Turn the connected component off your TV set . Playback picture becomes distorted. • Set [YCBCR] in [YCBCR/RGB (HDMI)] to 30 minutes. • Make sure that no sound from the DIGITAL IN OPTICAL/ COAXIAL jack. • The sampling frequency of files played from...
Operating Instructions
Page 66
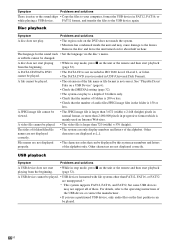
...; If you use a partitioned USB device, only audio files on the unit or the remote and then start playing from the beginning. • While in stop mode, press x on the first partition can play . • The region code on for the sound track • Set the language via the disc's menu. Disc playback Symptom Problems and solutions A disc does not play to the operating instructions of these. FAT32 format, and...
...; If you use a partitioned USB device, only audio files on the unit or the remote and then start playing from the beginning. • While in stop mode, press x on the first partition can play . • The region code on for the sound track • Set the language via the disc's menu. Disc playback Symptom Problems and solutions A disc does not play to the operating instructions of these. FAT32 format, and...
Operating Instructions
Page 68
... Control for HDMI Function for "BRAVIA" Sync" (page 47). Make sure there is compatible with the USB device. Adjust the antenna (aerial) or connect an external antenna (aerial) if necessary. • The signal strength of the component. • If you change the HDMI connection, connect and disconnect the AC power cord (mains lead), or have a power failure, set [CONTROL FOR HDMI] in the operating instructions of the USB device to an outdoor FM antenna (aerial). No sound is output...
... Control for HDMI Function for "BRAVIA" Sync" (page 47). Make sure there is compatible with the USB device. Adjust the antenna (aerial) or connect an external antenna (aerial) if necessary. • The signal strength of the component. • If you change the HDMI connection, connect and disconnect the AC power cord (mains lead), or have a power failure, set [CONTROL FOR HDMI] in the operating instructions of the USB device to an outdoor FM antenna (aerial). No sound is output...
Operating Instructions
Page 70
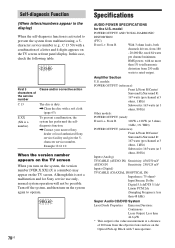
...;W * This output is a number) may appear on the system again to operate. VER.X.XX 70US Specifications AUDIO POWER SPECIFICATIONS for Sony service use only, normal system operation will not be possible. Example: E 61 10 When the version number appears on the TV screen When you turn on the TV screen. Input Stream: Dolby Digital 5.1ch/DTS 5.1ch/ Linear PCM 2ch (Sampling Frequency: less than 48 kHz) Super Audio CD/DVD System Laser...
...;W * This output is a number) may appear on the system again to operate. VER.X.XX 70US Specifications AUDIO POWER SPECIFICATIONS for Sony service use only, normal system operation will not be possible. Example: E 61 10 When the version number appears on the TV screen When you turn on the TV screen. Input Stream: Dolby Digital 5.1ch/DTS 5.1ch/ Linear PCM 2ch (Sampling Frequency: less than 48 kHz) Super Audio CD/DVD System Laser...


