
Operating Instructions
Page 1
2-661-597-13(1) DVD Home Theatre System Operating Instructions DAV-DX355/DX375 ©2006 Sony Corporation
2-661-597-13(1) DVD Home Theatre System Operating Instructions DAV-DX355/DX375 ©2006 Sony Corporation

Operating Instructions
Page 3
It is brought directly from a cold to a warm location, moisture may condense inside the DVD Home Theatre System and cause damage to the lenses. Welcome! • Do not install the unit in a horizontal position only. • Keep the unit and discs away from ... the unit is designed to be operated in an inclined position. Thank you move it for purchasing Sony DVD Home Theatre System. When you first install the unit, or when you for future reference. 3US Before operating this system, please read this manual thoroughly and retain it from a cold to a warm location, wait for about...
It is brought directly from a cold to a warm location, moisture may condense inside the DVD Home Theatre System and cause damage to the lenses. Welcome! • Do not install the unit in a horizontal position only. • Keep the unit and discs away from ... the unit is designed to be operated in an inclined position. Thank you move it for purchasing Sony DVD Home Theatre System. When you first install the unit, or when you for future reference. 3US Before operating this system, please read this manual thoroughly and retain it from a cold to a warm location, wait for about...
Operating Instructions
Page 4
... Sound 49 (A/V SYNC) Selecting a Playback Area for a Super Audio CD 49 About MP3 Audio Tracks and JPEG Image Files 50 Playing DATA CDs or DATA DVDs with MP3 Audio Tracks and JPEG Image Files 52 Playing Audio Tracks and Images as a Slide Show with Sound 54 Playing VIDEO CDs with PBC... the THEATRE SYNC Function 61 Using the Sound Effect 62 Using the Sleep Timer 63 Changing the Brightness of Contents Welcome 3 About This Manual 6 This System Can Play the Following Discs 7 Getting Started - BASIC - Table of the Front Panel Display 63 4US
... Sound 49 (A/V SYNC) Selecting a Playback Area for a Super Audio CD 49 About MP3 Audio Tracks and JPEG Image Files 50 Playing DATA CDs or DATA DVDs with MP3 Audio Tracks and JPEG Image Files 52 Playing Audio Tracks and Images as a Slide Show with Sound 54 Playing VIDEO CDs with PBC... the THEATRE SYNC Function 61 Using the Sound Effect 62 Using the Sleep Timer 63 Changing the Brightness of Contents Welcome 3 About This Manual 6 This System Can Play the Following Discs 7 Getting Started - BASIC - Table of the Front Panel Display 63 4US
Operating Instructions
Page 5
... appear in the display) Specifications 85 Glossary 87 Language Code List 91 Index to Parts and Controls 92 Guide to the Control Menu Display...... 94 DVD Setup Display List 97 AMP Menu List 98 Index 99 5US
... appear in the display) Specifications 85 Glossary 87 Language Code List 91 Index to Parts and Controls 92 Guide to the Control Menu Display...... 94 DVD Setup Display List 97 AMP Menu List 98 Index 99 5US
Operating Instructions
Page 6
...defined by ISO/MPEG which compresses audio data. 6US You can also use the controls on the system if they have the same or similar names as a general term for DVD VIDEOs, DVD+RWs/DVD+Rs, and DVD-RWs/DVD-Rs. • Measurements are expressed in feet (ft) for North American models. •... files * MP3 (MPEG1 Audio Layer 3) is clearly indicated in the text, for example, "DAV-DX355 only." • The Control Menu items may be used as those on the area. • "DVD" may be different depending on the remote. • The instructions in this manual are used for DAVDX355 and DAV-DX375.
...defined by ISO/MPEG which compresses audio data. 6US You can also use the controls on the system if they have the same or similar names as a general term for DVD VIDEOs, DVD+RWs/DVD+Rs, and DVD-RWs/DVD-Rs. • Measurements are expressed in feet (ft) for North American models. •... files * MP3 (MPEG1 Audio Layer 3) is clearly indicated in the text, for example, "DAV-DX355 only." • The Control Menu items may be used as those on the area. • "DVD" may be different depending on the remote. • The instructions in this manual are used for DAVDX355 and DAV-DX375.
Operating Instructions
Page 7
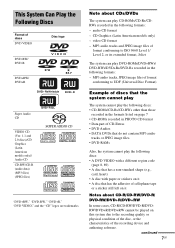
... with paper or stickers on it Notes about CDs/DVDs The system can play CD-ROMs/CD-Rs/CDRWs recorded in the following formats: - Note about CD-R/CD-RW/DVD-R/ DVD-RW/DVD+R/DVD+RW In some cases, CD-R/CD-RW/DVD-R/DVDRW/DVD+R/DVD+RW cannot be played on it • A disc... that has the adhesive of cellophane tape or a sticker still left on this system due to ISO 9660 Level 1/ Level 2, or its extended format, Joliet The system can play DVD-ROMs/DVD+RWs/ DVD-RWs/DVD+Rs/DVD...
... with paper or stickers on it Notes about CDs/DVDs The system can play CD-ROMs/CD-Rs/CDRWs recorded in the following formats: - Note about CD-R/CD-RW/DVD-R/ DVD-RW/DVD+R/DVD+RW In some cases, CD-R/CD-RW/DVD-R/DVDRW/DVD+R/DVD+RW cannot be played on it • A disc... that has the adhesive of cellophane tape or a sticker still left on this system due to ISO 9660 Level 1/ Level 2, or its extended format, Joliet The system can play DVD-ROMs/DVD+RWs/ DVD-RWs/DVD+Rs/DVD...
Operating Instructions
Page 8
...protection technology that do not conform to the Compact Disc (CD) standard. This system incorporates with the DVDs or VIDEO CDs. The disc will not play on this system. Use of Digital Theater Systems, Inc. Note that conform to the CD standard and may be given even ...DTS** Digital Surround System. * Manufactured under license from Dolby Laboratories. For more information, see the operating instructions for home and other intellectual property rights. Any subsequent MP3 audio tracks recorded in the first session. Please be played back. • This system can also be ...
...protection technology that do not conform to the Compact Disc (CD) standard. This system incorporates with the DVDs or VIDEO CDs. The disc will not play on this system. Use of Digital Theater Systems, Inc. Note that conform to the CD standard and may be given even ...DTS** Digital Surround System. * Manufactured under license from Dolby Laboratories. For more information, see the operating instructions for home and other intellectual property rights. Any subsequent MP3 audio tracks recorded in the first session. Please be played back. • This system can also be ...
Operating Instructions
Page 13
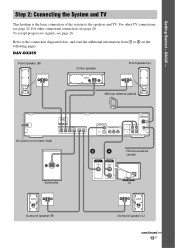
... TV This hookup is the basic connection of the system to 4 on the following pages. To accept progressive signals, see page 28. Getting Started - Refer to the connection diagram below, and read the additional information ...from 1 to the speakers and TV. For other TV connections, see page 24. For other component connection, see page 26. DAV-DX355 Front speaker (R) Center speaker Front speaker (L) AM loop antenna (aerial) AC power cord (mains lead) (DVD ONLY) OUT SPEAKER FRONT R FRONT L CENTER WOOFER SUR R SUR L MONITOR OUT VIDEO S VIDEO...
... TV This hookup is the basic connection of the system to 4 on the following pages. To accept progressive signals, see page 28. Getting Started - Refer to the connection diagram below, and read the additional information ...from 1 to the speakers and TV. For other TV connections, see page 24. For other component connection, see page 26. DAV-DX355 Front speaker (R) Center speaker Front speaker (L) AM loop antenna (aerial) AC power cord (mains lead) (DVD ONLY) OUT SPEAKER FRONT R FRONT L CENTER WOOFER SUR R SUR L MONITOR OUT VIDEO S VIDEO...
Operating Instructions
Page 14
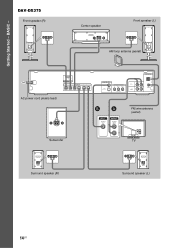
DAV-DX375 Front speaker (R) Center speaker Front speaker (L) AM loop antenna (aerial) AC power cord (mains lead) (DVD ONLY) OUT SPEAKER FRONT R FRONT L CENTER WOOFER SUR R SUR L MONITOR OUT VIDEO S VIDEO (DVD ONLY) COMPONENT VIDEO OUT Y PB/CB PR/CR (DVD ONLY) ANTENNA R AUDIO IN L TV VCR R AUDIO IN L AM COAXIAL FM75 BA FM wire antenna (aerial) Subwoofer VIDEO IN AUDIO OUT L R TV Surround speaker (R) Surround speaker (L) 14US BASIC - Getting Started -
DAV-DX375 Front speaker (R) Center speaker Front speaker (L) AM loop antenna (aerial) AC power cord (mains lead) (DVD ONLY) OUT SPEAKER FRONT R FRONT L CENTER WOOFER SUR R SUR L MONITOR OUT VIDEO S VIDEO (DVD ONLY) COMPONENT VIDEO OUT Y PB/CB PR/CR (DVD ONLY) ANTENNA R AUDIO IN L TV VCR R AUDIO IN L AM COAXIAL FM75 BA FM wire antenna (aerial) Subwoofer VIDEO IN AUDIO OUT L R TV Surround speaker (R) Surround speaker (L) 14US BASIC - Getting Started -

Operating Instructions
Page 19
...BLACK LEVEL (COMPONENT OUT): OFF 4:3 OUTPUT: FULL 7 Press X/x to select the setting that the signal from the system appears on the TV screen. [Press [ENTER] to "DVD." 3 Switch the input selector on your TV so that matches your TV type. SPEAKER FORMATION STANDARD continued 19US The.... You cannot operate steps after 8 with a wide-screen mode [16:9] (page 73) 8 Press . The Setup Display for a Room" (page 67). The system displays the menu and subtitles in the on the TV. 2 Press [/1. "/1 C/X/x/c, DISPLAY 1 Turn on -screen display appears. LANGUAGE SETUP OSD: MENU: AUDIO: ...
...BLACK LEVEL (COMPONENT OUT): OFF 4:3 OUTPUT: FULL 7 Press X/x to select the setting that the signal from the system appears on the TV screen. [Press [ENTER] to "DVD." 3 Switch the input selector on your TV so that matches your TV type. SPEAKER FORMATION STANDARD continued 19US The.... You cannot operate steps after 8 with a wide-screen mode [16:9] (page 73) 8 Press . The Setup Display for a Room" (page 67). The system displays the menu and subtitles in the on the TV. 2 Press [/1. "/1 C/X/x/c, DISPLAY 1 Turn on -screen display appears. LANGUAGE SETUP OSD: MENU: AUDIO: ...
Operating Instructions
Page 21
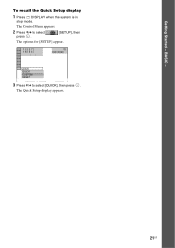
To recall the Quick Setup display 1 Press DISPLAY when the system is in stop mode. The Control Menu appears. 2 Press X/x to select press . [SETUP], then The options for [SETUP] appear. 1 2 ( 2 7 ) 1 8 ( 3 4 ) : : DVD VIDEO QUICK QUICK CUSTOM RESET BNR 3 Press X/x to select [QUICK], then press . Getting Started - BASIC - The Quick Setup display appears. 21US
To recall the Quick Setup display 1 Press DISPLAY when the system is in stop mode. The Control Menu appears. 2 Press X/x to select press . [SETUP], then The options for [SETUP] appear. 1 2 ( 2 7 ) 1 8 ( 3 4 ) : : DVD VIDEO QUICK QUICK CUSTOM RESET BNR 3 Press X/x to select [QUICK], then press . Getting Started - BASIC - The Quick Setup display appears. 21US

Operating Instructions
Page 24
... D TV with HDMI* jack IN To HDMI* IN To HDMI* OUT To COMPONENT VIDEO OUT (DVD ONLY) OUT SPEAKER FRONT R FRONT L CENTER WOOFER SUR R SUR L MONITOR OUT VIDEO S VIDEO (DVD ONLY) COMPONENT VIDEO OUT Y PB/CB PR/CR (DVD ONLY) ANTENNA R AUDIO IN L TV VCR R AUDIO IN L AM COAXIAL FM75 To VIDEO To... S VIDEO A VIDEO IN B S VIDEO IN C Y PB/CB PR/CR TV with VIDEO IN jack TV with S VIDEO IN jack * HDMI (high-definition multimedia interface) TV with COMPONENT VIDEO IN jacks The system is based on...
... D TV with HDMI* jack IN To HDMI* IN To HDMI* OUT To COMPONENT VIDEO OUT (DVD ONLY) OUT SPEAKER FRONT R FRONT L CENTER WOOFER SUR R SUR L MONITOR OUT VIDEO S VIDEO (DVD ONLY) COMPONENT VIDEO OUT Y PB/CB PR/CR (DVD ONLY) ANTENNA R AUDIO IN L TV VCR R AUDIO IN L AM COAXIAL FM75 To VIDEO To... S VIDEO A VIDEO IN B S VIDEO IN C Y PB/CB PR/CR TV with VIDEO IN jack TV with S VIDEO IN jack * HDMI (high-definition multimedia interface) TV with COMPONENT VIDEO IN jacks The system is based on...

Operating Instructions
Page 26
... signals, and, - Progressive is connected to the COMPONENT VIDEO OUT jacks. "PROGRE" lights up in the front panel display when the system outputs progressive signals. 1 Press FUNCTION +/- the TV is the method for video-based software. This automatically detects the software type, and selects ... signals. Note that the picture will not be clear or no picture will appear if you want to fix the conversion method to select "DVD." 2 Press PROGRESSIVE. Normally select this setting when: - your TV accept progressive signals? your TV accepts progressive signals, and, - you ...
... signals, and, - Progressive is connected to the COMPONENT VIDEO OUT jacks. "PROGRE" lights up in the front panel display when the system outputs progressive signals. 1 Press FUNCTION +/- the TV is the method for video-based software. This automatically detects the software type, and selects ... signals. Note that the picture will not be clear or no picture will appear if you want to fix the conversion method to select "DVD." 2 Press PROGRESSIVE. Normally select this setting when: - your TV accept progressive signals? your TV accepts progressive signals, and, - you ...

Operating Instructions
Page 27
... signals need to "PROGRESSIVE AUTO" or "PROGRESSIVE VIDEO," images from film and displays images at 30 frames/60 fields per second. Some DVD software contains both video and film. Even though you set to be divided into 2 types: film-based software and video-based software. In...INTERLACE Select this setting when: - You cannot select NORMAL (INTERLACE) while "HDMI" lights up in progressive signal format, sections of some types of DVD software that you play video-based software in the front panel display. your TV is derived from the MONITOR OUT (VIDEO or S VIDEO) jack are...
... signals need to "PROGRESSIVE AUTO" or "PROGRESSIVE VIDEO," images from film and displays images at 30 frames/60 fields per second. Some DVD software contains both video and film. Even though you set to be divided into 2 types: film-based software and video-based software. In...INTERLACE Select this setting when: - You cannot select NORMAL (INTERLACE) while "HDMI" lights up in progressive signal format, sections of some types of DVD software that you play video-based software in the front panel display. your TV is derived from the MONITOR OUT (VIDEO or S VIDEO) jack are...

Operating Instructions
Page 28
...) OUT SPEAKER FRONT R FRONT L CENTER WOOFER SUR R SUR L To TV (AUDIO IN) MONITOR OUT VIDEO S VIDEO (DVD ONLY) COMPONENT VIDEO OUT Y PB/CB PR/CR (DVD ONLY) ANTENNA R AUDIO IN L TV VCR R AUDIO IN L AM COAXIAL FM75 To VCR (AUDIO IN) AUDIO OUT L R VCR, digital satellite receiver or...enjoy sound using the audio cord (not supplied). White (L/audio) Red (R/audio) 28US Connecting the system and the other component Outputs the other component through the speakers of this system by connecting the AUDIO OUT jacks of another component. To connect the AUDIO OUT jacks of other component...
...) OUT SPEAKER FRONT R FRONT L CENTER WOOFER SUR R SUR L To TV (AUDIO IN) MONITOR OUT VIDEO S VIDEO (DVD ONLY) COMPONENT VIDEO OUT Y PB/CB PR/CR (DVD ONLY) ANTENNA R AUDIO IN L TV VCR R AUDIO IN L AM COAXIAL FM75 To VCR (AUDIO IN) AUDIO OUT L R VCR, digital satellite receiver or...enjoy sound using the audio cord (not supplied). White (L/audio) Red (R/audio) 28US Connecting the system and the other component Outputs the other component through the speakers of this system by connecting the AUDIO OUT jacks of another component. To connect the AUDIO OUT jacks of other component...
Operating Instructions
Page 30
...is set to this may cause malfunction. • Do not place more than one disc on the DVD VIDEO or VIDEO CD, some operations may not appear on the system. The system starts playback (continuous play ) of the system. To load other discs, press DISC SKIP on the inner circle of the tray. The...as follows: - Depending on the tray, and then press A. Place one disc on the TV to "DVD," press FUNCTION +/- The system turns on the TV screen and in the disc stocker but not selected. to select "DVD." 30US When you want. The volume level appears on . green: the disc is selected, or the...
...is set to this may cause malfunction. • Do not place more than one disc on the DVD VIDEO or VIDEO CD, some operations may not appear on the system. The system starts playback (continuous play ) of the system. To load other discs, press DISC SKIP on the inner circle of the tray. The...as follows: - Depending on the tray, and then press A. Place one disc on the TV to "DVD," press FUNCTION +/- The system turns on the TV screen and in the disc stocker but not selected. to select "DVD." 30US When you want. The volume level appears on . green: the disc is selected, or the...

Operating Instructions
Page 31
...system. However, this is inserted. To cancel standby mode, press "/1 once. Stop play after pause X or H Go to the next chapter, track, or scene > (except for JPEG) chapter, track, or scene Mute the sound MUTING. Replay the previous scene* (instant replay) during playback. * DVD VIDEOs/DVD-RWs/DVD-Rs only. ** DVD VIDEOs/DVD-RWs/DVD-Rs/DVD+RWs/ DVD...+Rs only. Note • Noise may not appear smoothly. The indicator turns off . About DVD 5-DISC changer Sub Tray...
...system. However, this is inserted. To cancel standby mode, press "/1 once. Stop play after pause X or H Go to the next chapter, track, or scene > (except for JPEG) chapter, track, or scene Mute the sound MUTING. Replay the previous scene* (instant replay) during playback. * DVD VIDEOs/DVD-RWs/DVD-Rs only. ** DVD VIDEOs/DVD-RWs/DVD-Rs/DVD+RWs/ DVD...+Rs only. Note • Noise may not appear smoothly. The indicator turns off . About DVD 5-DISC changer Sub Tray...
Operating Instructions
Page 32
... when listening to a component connected to the TV or VCR jacks on the rear of the system changes in the front panel display, then press or c. 4 Press X/x to the TV or VCR jacks on the operation. DVD t TUNER FM t TUNER AM t TV t VCR t AUDIO t ... This is not a malfunction and will depend on...
... when listening to a component connected to the TV or VCR jacks on the rear of the system changes in the front panel display, then press or c. 4 Press X/x to the TV or VCR jacks on the operation. DVD t TUNER FM t TUNER AM t TV t VCR t AUDIO t ... This is not a malfunction and will depend on...
Operating Instructions
Page 36
...Disc (Scan, Slow-motion Play, Freeze Frame) You can quickly locate a particular point on a disc by frame (Slow-motion Play) (DVD VIDEO, DVD-R, DVD-RW, VIDEO CD only) Press /m or M/ when the system is in pause mode. With each press, playback speed becomes faster. 36US Playback direction × 2B t 1M t 2M t 3M ... frame by monitoring the picture or playing back slowly. Note • You cannot search for Super Audio CD, CD, MP3, and JPEG) When the system is in the pause mode, press (step) to go to normal playback, press H. Press (step) to go to do some discs. Actual speeds...
...Disc (Scan, Slow-motion Play, Freeze Frame) You can quickly locate a particular point on a disc by frame (Slow-motion Play) (DVD VIDEO, DVD-R, DVD-RW, VIDEO CD only) Press /m or M/ when the system is in pause mode. With each press, playback speed becomes faster. 36US Playback direction × 2B t 1M t 2M t 3M ... frame by monitoring the picture or playing back slowly. Note • You cannot search for Super Audio CD, CD, MP3, and JPEG) When the system is in the pause mode, press (step) to go to normal playback, press H. Press (step) to go to do some discs. Actual speeds...

Operating Instructions
Page 37
...: when you can search for . The system starts playback from the selected number. The display will show different items depending on the disc, you select [CHAPTER] [** (**)] is selected (** refers to search for a scene using the time code. 1 Press DISPLAY. (When playing a DATA CD/DATA DVD with JPEG image files, press DISPLAY twice...
...: when you can search for . The system starts playback from the selected number. The display will show different items depending on the disc, you select [CHAPTER] [** (**)] is selected (** refers to search for a scene using the time code. 1 Press DISPLAY. (When playing a DATA CD/DATA DVD with JPEG image files, press DISPLAY twice...


