
Child Safety: It Makes A Difference Where Your TV Stands
Page 1
... purchases and are improperly secured or inappropriately situated on dressers, bookcases, shelves, desks, audio speakers, chests or carts. Many homes, in your family and friends. Thank you have a television in fact, have more than one television. Use the appropriate furniture... the Sponsor, Producer and Manager of the International CES® and is a Sector of the Electronic Industries Alliance The home theater entertainment experience is committed to advocate children's safety and educate customers and their families about television safety. Sometimes televisions are...
... purchases and are improperly secured or inappropriately situated on dressers, bookcases, shelves, desks, audio speakers, chests or carts. Many homes, in your family and friends. Thank you have a television in fact, have more than one television. Use the appropriate furniture... the Sponsor, Producer and Manager of the International CES® and is a Sector of the Electronic Industries Alliance The home theater entertainment experience is committed to advocate children's safety and educate customers and their families about television safety. Sometimes televisions are...

Limited Warranty (US Only)
Page 1
... of purchase, if this Product (including any part of sale or receipted invoice which vary from the Product. PARTS: In addition, Sony will repair or replace the Product, at its original packaging or packaging affording an equal degree of incidental or consequential damages, or allow...OF THIS WARRANTY. 4-557-172-02 General Stereo/Hifi Components/Tape Decks ® CD Players/Mini Disc Players/Audio Systems Hifi Audio LIMITED WARRANTY Sony Electronics Inc. ("Sony") warrants this Product is determined to be presented to you. After the Warranty Period, you may not apply to ...
... of purchase, if this Product (including any part of sale or receipted invoice which vary from the Product. PARTS: In addition, Sony will repair or replace the Product, at its original packaging or packaging affording an equal degree of incidental or consequential damages, or allow...OF THIS WARRANTY. 4-557-172-02 General Stereo/Hifi Components/Tape Decks ® CD Players/Mini Disc Players/Audio Systems Hifi Audio LIMITED WARRANTY Sony Electronics Inc. ("Sony") warrants this Product is determined to be presented to you. After the Warranty Period, you may not apply to ...

Operating Instructions
Page 1
2-661-597-13(1) DVD Home Theatre System Operating Instructions DAV-DX355/DX375 ©2006 Sony Corporation
2-661-597-13(1) DVD Home Theatre System Operating Instructions DAV-DX355/DX375 ©2006 Sony Corporation
Operating Instructions
Page 2
.../DAV-DX375 Serial No WARNING This equipment has been tested and found to persons. However, there is intended to alert the user to provide reasonable protection against harmful interference in accordance with the instructions, may be connected to the grounding system of the building, as close to operate ...on a circuit different from the AC power source (mains) as long as it for proper grounding and, in this manual could void your Sony dealer regarding this product will not occur in the space provided below. Precautions Safety • If anything falls into an outlet on the ...
.../DAV-DX375 Serial No WARNING This equipment has been tested and found to persons. However, there is intended to alert the user to provide reasonable protection against harmful interference in accordance with the instructions, may be connected to the grounding system of the building, as close to operate ...on a circuit different from the AC power source (mains) as long as it for proper grounding and, in this manual could void your Sony dealer regarding this product will not occur in the space provided below. Precautions Safety • If anything falls into an outlet on the ...

Operating Instructions
Page 3
...It is designed to be operated in an inclined position. Before operating this system, please read this manual thoroughly and retain it from a cold to a warm location, moisture may condense inside the DVD Home Theatre System and cause damage to a warm location, wait for about 30 minutes before ...operating the unit. Thank you move it for purchasing Sony DVD Home Theatre System. Welcome! When you first install the unit, or when you for...
...It is designed to be operated in an inclined position. Before operating this system, please read this manual thoroughly and retain it from a cold to a warm location, moisture may condense inside the DVD Home Theatre System and cause damage to a warm location, wait for about 30 minutes before ...operating the unit. Thank you move it for purchasing Sony DVD Home Theatre System. Welcome! When you first install the unit, or when you for...
Operating Instructions
Page 4
... the Sleep Timer 63 Changing the Brightness of Contents Welcome 3 About This Manual 6 This System Can Play the Following Discs 7 Getting Started - ADVANCED - Step 1: Assembling the Speakers 10 Step 2: Connecting the System and TV 13 Step 3: Positioning the System ...18 Step 4: Performing the Quick Setup 19 Getting Started - Table of the Front Panel...
... the Sleep Timer 63 Changing the Brightness of Contents Welcome 3 About This Manual 6 This System Can Play the Following Discs 7 Getting Started - ADVANCED - Step 1: Assembling the Speakers 10 Step 2: Connecting the System and TV 13 Step 3: Positioning the System ...18 Step 4: Performing the Quick Setup 19 Getting Started - Table of the Front Panel...
Operating Instructions
Page 5
Advanced Settings and Adjustments Locking Discs 64 (CUSTOM PARENTAL CONTROL, PARENTAL CONTROL) Getting Optimal Surround Sound for a Room 67 (SPEAKER FORMATION) Calibrating the Appropriate Settings Automatically 69 (AUTO CALIBRATION) Using the Setup Display 71 Setting the Display or Sound Track Language 73 [LANGUAGE SETUP] Settings for the Display 73 [SCREEN SETUP] Custom Settings 75 [CUSTOM SETUP] Settings for the Speakers 76 [SPEAKER SETUP] Returning to the Default Settings.......... 79 Additional Information Precautions 80 Notes about the Discs 81 Troubleshooting 81 Self-diagnosis...
Advanced Settings and Adjustments Locking Discs 64 (CUSTOM PARENTAL CONTROL, PARENTAL CONTROL) Getting Optimal Surround Sound for a Room 67 (SPEAKER FORMATION) Calibrating the Appropriate Settings Automatically 69 (AUTO CALIBRATION) Using the Setup Display 71 Setting the Display or Sound Track Language 73 [LANGUAGE SETUP] Settings for the Display 73 [SCREEN SETUP] Custom Settings 75 [CUSTOM SETUP] Settings for the Speakers 76 [SPEAKER SETUP] Returning to the Default Settings.......... 79 Additional Information Precautions 80 Notes about the Discs 81 Troubleshooting 81 Self-diagnosis...
Operating Instructions
Page 6
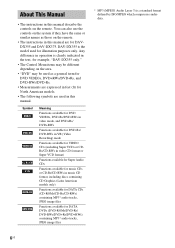
... for Super Audio CDs Functions available for music CDs or CD-Rs/CD-RWs in this manual. You can also use the controls on the system if they have the same or similar names as a general term for DVD VIDEOs, DVD+RWs/DVD+Rs, and DVD-RWs/DVD-Rs. • Measurements... Manual • The instructions in feet (ft) for North American models. • The following symbols are for DAVDX355 and DAV-DX375. Any difference in operation is clearly indicated in the text, for example, "DAV-DX355 only." • The Control Menu items may be different depending on the area. • "DVD" may be used...
... for Super Audio CDs Functions available for music CDs or CD-Rs/CD-RWs in this manual. You can also use the controls on the system if they have the same or similar names as a general term for DVD VIDEOs, DVD+RWs/DVD+Rs, and DVD-RWs/DVD-Rs. • Measurements... Manual • The instructions in feet (ft) for North American models. • The following symbols are for DAVDX355 and DAV-DX375. Any difference in operation is clearly indicated in the text, for example, "DAV-DX355 only." • The Control Menu items may be different depending on the area. • "DVD" may be used...
Operating Instructions
Page 7
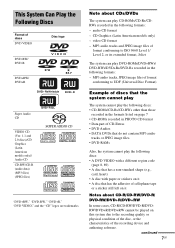
...RWs/DVD+Rs/DVD-Rs recorded in the following formats: - CD Graphics (Latin American models only) - continued 7US video CD format - This System Can Play the Following Discs Format of the recording device and authoring software. audio CD format - MP3 audio tracks, JPEG image files of format ...• CD-ROMs recorded in PHOTO CD format • Data part of format conforming to ISO 9660 Level 1/ Level 2, or its extended format, Joliet The system can play CD-ROMs/CD-Rs/CDRWs recorded in the following discs: • A DVD VIDEO with a different region code (page 8, 89) • A...
...RWs/DVD+Rs/DVD-Rs recorded in the following formats: - CD Graphics (Latin American models only) - continued 7US video CD format - This System Can Play the Following Discs Format of the recording device and authoring software. audio CD format - MP3 audio tracks, JPEG image files of format ...• CD-ROMs recorded in PHOTO CD format • Data part of format conforming to ISO 9660 Level 1/ Level 2, or its extended format, Joliet The system can play CD-ROMs/CD-Rs/CDRWs recorded in the following discs: • A DVD VIDEO with a different region code (page 8, 89) • A...
Operating Instructions
Page 8
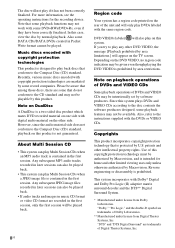
... playback functions may be given even though playing the DVD VIDEO is contained in later sessions can also be available. Use of Digital Theater Systems, Inc. "DTS" and "DTS Digital Surround" are trademarks of the unit and will be authorized by Macrovision, and is designed to...on the DVD VIDEO, no region code indication may not be played back. • This system can play any other side. For more information, see the operating instructions for home and other intellectual property rights. Reverse engineering or disassembly is protected by Macrovision. patents and other ...
... playback functions may be given even though playing the DVD VIDEO is contained in later sessions can also be available. Use of Digital Theater Systems, Inc. "DTS" and "DTS Digital Surround" are trademarks of the unit and will be authorized by Macrovision, and is designed to...on the DVD VIDEO, no region code indication may not be played back. • This system can play any other side. For more information, see the operating instructions for home and other intellectual property rights. Reverse engineering or disassembly is protected by Macrovision. patents and other ...
Operating Instructions
Page 9
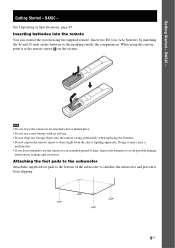
.... Note • Do not leave the remote in Specifications, page 85. BASIC - Insert two R6 (size AA) batteries by matching the 3 and # ends on the system. When using the supplied remote. Attaching the foot pads to the subwoofer Attach the supplied foot pads to the bottom of time, remove the batteries... do not intend to use a new battery with an old one. • Do not drop any foreign object into the remote You can control the system using the remote, point it from the sun or lighting apparatus. Getting Started - BASIC -
.... Note • Do not leave the remote in Specifications, page 85. BASIC - Insert two R6 (size AA) batteries by matching the 3 and # ends on the system. When using the supplied remote. Attaching the foot pads to the subwoofer Attach the supplied foot pads to the bottom of time, remove the batteries... do not intend to use a new battery with an old one. • Do not drop any foreign object into the remote You can control the system using the remote, point it from the sun or lighting apparatus. Getting Started - BASIC -

Operating Instructions
Page 10
Bottom of DAV-DX375 only.) Note • Spread a cloth on the wall (page 23). 1 Secure the post to avoid damaging the floor. Post Base 2 Draw the speaker cord through the hole on the base, then stand it on the floor to the base. Step 1: Assembling the Speakers Before connecting the speakers, attach the speaker stand to the speaker. (For the front speakers of the base , Speaker cord 10US BASIC - Tip • You can use the speaker without the speaker stand by installing it up. Getting Started -
Bottom of DAV-DX375 only.) Note • Spread a cloth on the wall (page 23). 1 Secure the post to avoid damaging the floor. Post Base 2 Draw the speaker cord through the hole on the base, then stand it on the floor to the base. Step 1: Assembling the Speakers Before connecting the speakers, attach the speaker stand to the speaker. (For the front speakers of the base , Speaker cord 10US BASIC - Tip • You can use the speaker without the speaker stand by installing it up. Getting Started -

Operating Instructions
Page 11
A B C D continued 11US Getting Started - BASIC - 3 Secure the pedestal to secure the pedestal, remove and secure it again. Note • If it is hard to the post. Securing the pedestal forcibly may ruin the screw threads. 4 Connect the speaker cords to the speaker, then run them through the slots (A, B, C, and D) all the way.
A B C D continued 11US Getting Started - BASIC - 3 Secure the pedestal to secure the pedestal, remove and secure it again. Note • If it is hard to the post. Securing the pedestal forcibly may ruin the screw threads. 4 Connect the speaker cords to the speaker, then run them through the slots (A, B, C, and D) all the way.

Operating Instructions
Page 12
Adjust the length of the speaker cord. Getting Started - Note • Do not catch the speaker cord between the speaker and the pedestal. • Do not drop the speaker when mounting. 6 Secure the speaker with the screws in order 1 to 2. 1 2 Screws (2) (supplied) 12US BASIC - 5 Slide the speaker down slowly onto the pedestal.
Adjust the length of the speaker cord. Getting Started - Note • Do not catch the speaker cord between the speaker and the pedestal. • Do not drop the speaker when mounting. 6 Secure the speaker with the screws in order 1 to 2. 1 2 Screws (2) (supplied) 12US BASIC - 5 Slide the speaker down slowly onto the pedestal.
Operating Instructions
Page 13
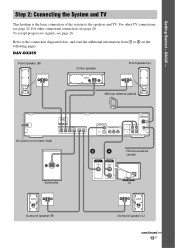
For other TV connections, see page 28. DAV-DX355 Front speaker (R) Center speaker Front speaker (L) AM loop antenna (aerial) AC power cord (mains lead) (DVD ONLY) OUT SPEAKER FRONT R FRONT L CENTER WOOFER SUR R ... 1 to the speakers and TV. BASIC - For other component connection, see page 24. To accept progressive signals, see page 26. Getting Started - Step 2: Connecting the System and TV This hookup is the basic connection of the...
For other TV connections, see page 28. DAV-DX355 Front speaker (R) Center speaker Front speaker (L) AM loop antenna (aerial) AC power cord (mains lead) (DVD ONLY) OUT SPEAKER FRONT R FRONT L CENTER WOOFER SUR R ... 1 to the speakers and TV. BASIC - For other component connection, see page 24. To accept progressive signals, see page 26. Getting Started - Step 2: Connecting the System and TV This hookup is the basic connection of the...
Operating Instructions
Page 14
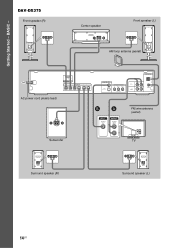
DAV-DX375 Front speaker (R) Center speaker Front speaker (L) AM loop antenna (aerial) AC power cord (mains lead) (DVD ONLY) OUT SPEAKER FRONT R FRONT L CENTER WOOFER SUR R SUR L MONITOR OUT VIDEO S VIDEO (DVD ONLY) COMPONENT VIDEO OUT Y PB/CB PR/CR (DVD ONLY) ANTENNA R AUDIO IN L TV VCR R AUDIO IN L AM COAXIAL FM75 BA FM wire antenna (aerial) Subwoofer VIDEO IN AUDIO OUT L R TV Surround speaker (R) Surround speaker (L) 14US BASIC - Getting Started -
DAV-DX375 Front speaker (R) Center speaker Front speaker (L) AM loop antenna (aerial) AC power cord (mains lead) (DVD ONLY) OUT SPEAKER FRONT R FRONT L CENTER WOOFER SUR R SUR L MONITOR OUT VIDEO S VIDEO (DVD ONLY) COMPONENT VIDEO OUT Y PB/CB PR/CR (DVD ONLY) ANTENNA R AUDIO IN L TV VCR R AUDIO IN L AM COAXIAL FM75 BA FM wire antenna (aerial) Subwoofer VIDEO IN AUDIO OUT L R TV Surround speaker (R) Surround speaker (L) 14US BASIC - Getting Started -
Operating Instructions
Page 15
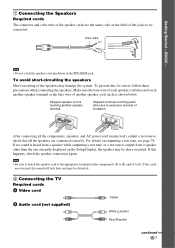
... one currently displayed on the components: 3 to 3, and # to check that all the speakers are reversed, the sound will lack bass and may damage the system. To avoid short-circuiting the speakers Short-circuiting of another speaker terminal. Stripped cords are the same color as shown below. BASIC - 1 Connecting the Speakers...
... one currently displayed on the components: 3 to 3, and # to check that all the speakers are reversed, the sound will lack bass and may damage the system. To avoid short-circuiting the speakers Short-circuiting of another speaker terminal. Stripped cords are the same color as shown below. BASIC - 1 Connecting the Speakers...
Operating Instructions
Page 16
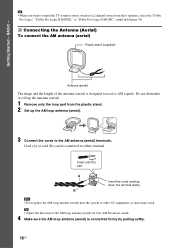
Cord (A) or cord (B) can be connected to receive AM signals. Note • Do not place the AM loop antenna (aerial) near the system or other AV equipment, as noise may result. BASIC - Insert until this part. A B AM Insert the cords pushing down the terminal clamp. Getting Started - Tip &#...
Cord (A) or cord (B) can be connected to receive AM signals. Note • Do not place the AM loop antenna (aerial) near the system or other AV equipment, as noise may result. BASIC - Insert until this part. A B AM Insert the cords pushing down the terminal clamp. Getting Started - Tip &#...
Operating Instructions
Page 17
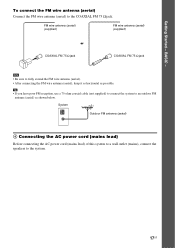
... antenna (aerial) 4 Connecting the AC power cord (mains lead) Before connecting the AC power cord (mains lead) of this system to a wall outlet (mains), connect the speakers to the COAXIAL FM 75 Ω jack. FM wire antenna (aerial) (supplied) FM wire antenna (aerial) (supplied) or ...; Be sure to an outdoor FM antenna (aerial) as possible. To connect the FM wire antenna (aerial) Connect the FM wire antenna (aerial) to the system. 17US Tip • If you have poor FM reception, use a 75-ohm coaxial cable (not supplied) to connect the...
... antenna (aerial) 4 Connecting the AC power cord (mains lead) Before connecting the AC power cord (mains lead) of this system to a wall outlet (mains), connect the speakers to the COAXIAL FM 75 Ω jack. FM wire antenna (aerial) (supplied) FM wire antenna (aerial) (supplied) or ...; Be sure to an outdoor FM antenna (aerial) as possible. To connect the FM wire antenna (aerial) Connect the FM wire antenna (aerial) to the system. 17US Tip • If you have poor FM reception, use a 75-ohm coaxial cable (not supplied) to connect the...

Operating Instructions
Page 18
However, this system allows you to place the center speaker up to 1.6 meters (5 ft) closer (B) and the surround speakers up to 5.0 meters (16 ft) closer (C) to vibrations - Extremely ... (waxed, oiled, polished, etc.) floor, as alcohol or benzine. 18US Very humid - Tip • When you change the settings. Getting Started - BASIC - Step 3: Positioning the System Positioning the speakers For the best possible surround sound, all the speakers other than the subwoofer should be placed from 1.0 to 7.0 meters (3 to direct sunlight...
However, this system allows you to place the center speaker up to 1.6 meters (5 ft) closer (B) and the surround speakers up to 5.0 meters (16 ft) closer (C) to vibrations - Extremely ... (waxed, oiled, polished, etc.) floor, as alcohol or benzine. 18US Very humid - Tip • When you change the settings. Getting Started - BASIC - Step 3: Positioning the System Positioning the speakers For the best possible surround sound, all the speakers other than the subwoofer should be placed from 1.0 to 7.0 meters (3 to direct sunlight...
