Operating Instructions
Page 1
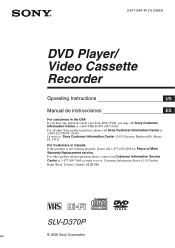
... If you have any questions about your Sony DVD-VCR, you may call 1-877-602-2008 for Peace of Mind Warranty Replacement service. For other Sony product questions, please call Sony Customer Information Center at : Customer Information Service 115 Gordon Baker Road, Toronto, Ontario, M2H 3R6 SLV-D370P © 2006 Sony Corporation For all other product related questions...
... If you have any questions about your Sony DVD-VCR, you may call 1-877-602-2008 for Peace of Mind Warranty Replacement service. For other Sony product questions, please call Sony Customer Information Center at : Customer Information Service 115 Gordon Baker Road, Toronto, Ontario, M2H 3R6 SLV-D370P © 2006 Sony Corporation For all other product related questions...
Operating Instructions
Page 2
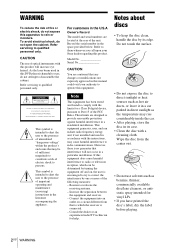
.... Increase the separation between the equipment and receiver. - Wipe the disc from that any changes or modifications not expressly approved in this manual could void your Sony dealer regarding this DVD player is connected. - This symbol is intended to alert the user to constitute a risk of the following measures: - Note This equipment has...
.... Increase the separation between the equipment and receiver. - Wipe the disc from that any changes or modifications not expressly approved in this manual could void your Sony dealer regarding this DVD player is connected. - This symbol is intended to alert the user to constitute a risk of the following measures: - Note This equipment has...

Operating Instructions
Page 5
Table of contents 2 WARNING 2 Notes about discs 3 Precautions 7 About this manual 7 This player can play the following discs Getting Started 10 Step 1 : Unpacking 11 Step 2 : Setting up the remote commander 14 Step 3 : Basic hookups 20 Step 4 : ...-screen display 41 Playing a tape 45 Recording TV programs 48 Recording TV programs using the timer 51 Checking/changing/canceling timer settings 53 Locking the DVD-VCR (Child Lock) continued Table of contents 5US
Table of contents 2 WARNING 2 Notes about discs 3 Precautions 7 About this manual 7 This player can play the following discs Getting Started 10 Step 1 : Unpacking 11 Step 2 : Setting up the remote commander 14 Step 3 : Basic hookups 20 Step 4 : ...-screen display 41 Playing a tape 45 Recording TV programs 48 Recording TV programs using the timer 51 Checking/changing/canceling timer settings 53 Locking the DVD-VCR (Child Lock) continued Table of contents 5US

Operating Instructions
Page 7
... ISO (International Organization for DVD VIDEOs, DVD-RWs/DVD-Rs, and DVD+RWs/ DVD+Rs. • The meaning of format conforming to UDF (Universal Disk Format). - 8 cm DVD+RW, DVD-RW, and DVD-R recorded with a DVD Video camera continued About this manual 7US KODAK Picture CD format * A logical format of files and folders on the DVD-VCR having the same or similar...
... ISO (International Organization for DVD VIDEOs, DVD-RWs/DVD-Rs, and DVD+RWs/ DVD+Rs. • The meaning of format conforming to UDF (Universal Disk Format). - 8 cm DVD+RW, DVD-RW, and DVD-R recorded with a DVD Video camera continued About this manual 7US KODAK Picture CD format * A logical format of files and folders on the DVD-VCR having the same or similar...

Operating Instructions
Page 18
... power cord for 5 seconds or more with the DVD-VCR power turned off. 18US Basic hookups The DVD-VCR automatically presets the DVD-VCR's clock and TV channels when the DVD-VCR is set . If the clock is completed, the current time appears in the display window, see "Presetting/disabling channels manually" on page 24. To add or disable...
... power cord for 5 seconds or more with the DVD-VCR power turned off. 18US Basic hookups The DVD-VCR automatically presets the DVD-VCR's clock and TV channels when the DVD-VCR is set . If the clock is completed, the current time appears in the display window, see "Presetting/disabling channels manually" on page 24. To add or disable...
Operating Instructions
Page 22
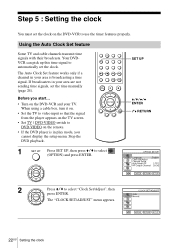
.... Your DVDVCR can pick up this time signal to automatically set the clock on the DVD-VCR and your area are not sending time signals, set the time manually (page 24). The "CLOCK SET/ADJUST" menu appears. 22US Setting the clock Before you cannot display the setup menu. When using a cable box...video input so that the signal from the player appears on the remote. • If the DVD player is broadcasting a time signal. If broadcasters in play mode, you start... • Turn on the DVD-VCR to use the timer features properly. Using the Auto Clock Set feature Some TV and cable ...
.... Your DVDVCR can pick up this time signal to automatically set the clock on the DVD-VCR and your area are not sending time signals, set the time manually (page 24). The "CLOCK SET/ADJUST" menu appears. 22US Setting the clock Before you cannot display the setup menu. When using a cable box...video input so that the signal from the player appears on the remote. • If the DVD player is broadcasting a time signal. If broadcasters in play mode, you start... • Turn on the DVD-VCR to use the timer features properly. Using the Auto Clock Set feature Some TV and cable ...
Operating Instructions
Page 24
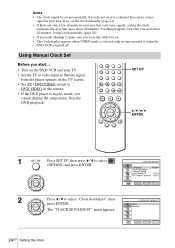
... Set Before you start... • Turn on the DVD-VCR and your TV. • Set the TV to video input so that carry time signals, setting the clock automatically may take up to about 20 minutes, set the clock manually (page 24). • If you made Hookup 2, make sure you leave the cable...;VIDEO on . • The clock display appears when VIDEO mode is selected with no tape inserted or when the DVD-VCR is in play mode, you cannot display the setup menu. SET UP V/v/B/b ENTER 1 Press SET UP, then press V/v to select (OPTION) and press ENTER. 2 Press V/v ...
... Set Before you start... • Turn on the DVD-VCR and your TV. • Set the TV to video input so that carry time signals, setting the clock automatically may take up to about 20 minutes, set the clock manually (page 24). • If you made Hookup 2, make sure you leave the cable...;VIDEO on . • The clock display appears when VIDEO mode is selected with no tape inserted or when the DVD-VCR is in play mode, you cannot display the setup menu. SET UP V/v/B/b ENTER 1 Press SET UP, then press V/v to select (OPTION) and press ENTER. 2 Press V/v ...

Operating Instructions
Page 25
Note • The clock display appears when VIDEO mode is selected with no tape inserted or when the DVD-VCR is set , and press V/v to exit the menu. Setting the clock 25US Getting Started 3 Press V/v to select "Manual", then press ENTER. 4 Set the hour, minutes, month, day and year in sequence by pressing B/b to select the item to be set automatically. 5 Press ENTER to confirm the setting. 6 Press SET UP to select the digits. The day of the week is turned off.
Note • The clock display appears when VIDEO mode is selected with no tape inserted or when the DVD-VCR is set , and press V/v to exit the menu. Setting the clock 25US Getting Started 3 Press V/v to select "Manual", then press ENTER. 4 Set the hour, minutes, month, day and year in sequence by pressing B/b to select the item to be set automatically. 5 Press ENTER to confirm the setting. 6 Press SET UP to select the digits. The day of the week is turned off.

Operating Instructions
Page 26
.... Then, if there are any unwanted channels, disable them directly using manual presetting methods (page 28). If you have already decided which channels you wish to DVD·VIDEO on the remote. • If the DVD player is capable of receiving VHF channels 2 to 13, UHF channels ... channels in play mode, you start... • Turn on the DVD-VCR and your area using a cable box, turn it on the TV screen. • Set TV / DVD·VIDEO switch to preset, set them manually. Step 6 : Presetting channels This DVD-VCR is in your TV. When using automatic presetting methods.
.... Then, if there are any unwanted channels, disable them directly using manual presetting methods (page 28). If you have already decided which channels you wish to DVD·VIDEO on the remote. • If the DVD player is capable of receiving VHF channels 2 to 13, UHF channels ... channels in play mode, you start... • Turn on the DVD-VCR and your area using a cable box, turn it on the TV screen. • Set TV / DVD·VIDEO switch to preset, set them manually. Step 6 : Presetting channels This DVD-VCR is in your TV. When using automatic presetting methods.
Operating Instructions
Page 28
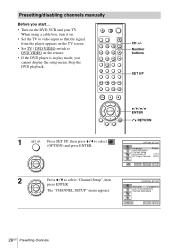
.... 28US Presetting channels Number buttons SET UP V/v/B/b ENTER O RETURN 1 Press SET UP, then press V/v to select (OPTION) and press ENTER. 2 Press V/v to DVD·VIDEO on the remote. • If the DVD player is in play mode, you start... • Turn on the TV screen. • Set TV... / DVD·VIDEO switch to select "Channel Setup", then press ENTER. When using a cable box, turn it on. • Set the TV to video input so that the signal from the player appears on the DVD-VCR and your TV. CH +/- Presetting/disabling channels manually Before you cannot display ...
.... 28US Presetting channels Number buttons SET UP V/v/B/b ENTER O RETURN 1 Press SET UP, then press V/v to select (OPTION) and press ENTER. 2 Press V/v to DVD·VIDEO on the remote. • If the DVD player is in play mode, you start... • Turn on the TV screen. • Set TV... / DVD·VIDEO switch to select "Channel Setup", then press ENTER. When using a cable box, turn it on. • Set the TV to video input so that the signal from the player appears on the DVD-VCR and your TV. CH +/- Presetting/disabling channels manually Before you cannot display ...

Operating Instructions
Page 29
or number buttons to enter Channel to be disabled 5 Press O RETURN to confirm the setting. 6 Press SET UP to select "ADD" (in memory) or "DELETE" (deleted). 3 Press ENTER. Note • If you have not preset channels automatically, you cannot preset/disable channels manually. Channel to be preset the channel number. 2 Press B/b to exit the menu. Presetting channels 29US Getting Started 3 Press V/v to select "Channel Add/Delete," then press ENTER. 4 To preset/disable a channel: 1 Press CH +/-
or number buttons to enter Channel to be disabled 5 Press O RETURN to confirm the setting. 6 Press SET UP to select "ADD" (in memory) or "DELETE" (deleted). 3 Press ENTER. Note • If you have not preset channels automatically, you cannot preset/disable channels manually. Channel to be preset the channel number. 2 Press B/b to exit the menu. Presetting channels 29US Getting Started 3 Press V/v to select "Channel Add/Delete," then press ENTER. 4 To preset/disable a channel: 1 Press CH +/-

Operating Instructions
Page 44
to work with tapes recorded in poor condition. In this case, manually adjust the tracking. Press TRACKING +/- The distortion should disappear as you press one of the two tracking buttons. Tracking meter Note • The auto tracking adjustment cannot be guaranteed to display the tracking meter. To resume automatic tracking adjustment, eject the tape and reinsert it. Adjusting the picture (tracking) Although the VCR automatically adjusts the tracking when playing a tape, distortion may occur if the recording is in the LP mode on other VCRs. 44US Playing a tape
to work with tapes recorded in poor condition. In this case, manually adjust the tracking. Press TRACKING +/- The distortion should disappear as you press one of the two tracking buttons. Tracking meter Note • The auto tracking adjustment cannot be guaranteed to display the tracking meter. To resume automatic tracking adjustment, eject the tape and reinsert it. Adjusting the picture (tracking) Although the VCR automatically adjusts the tracking when playing a tape, distortion may occur if the recording is in the LP mode on other VCRs. 44US Playing a tape
Operating Instructions
Page 103
...; The player cannot play has taken effect (page 37). The title of the image is set correctly. • Select correctly VIDEO or DVD with SELECT DVD/ VIDEO button. The player starts playing the disc automatically. • The disc features an auto playback function. You cannot perform some operations.... it has the extension ".MP3." • The data is not characters are not recorded on the DVD being played. • The DVD prohibits the changing of the language for the sound track. See the operating manual that is not correctly finalized (page 8). • Make sure the TV...
...; The player cannot play has taken effect (page 37). The title of the image is set correctly. • Select correctly VIDEO or DVD with SELECT DVD/ VIDEO button. The player starts playing the disc automatically. • The disc features an auto playback function. You cannot perform some operations.... it has the extension ".MP3." • The data is not characters are not recorded on the DVD being played. • The DVD prohibits the changing of the language for the sound track. See the operating manual that is not correctly finalized (page 8). • Make sure the TV...


