
Limited Warranty (US Only)
Page 1
4-557-172-02 General Stereo/Hifi Components/Tape Decks ® CD Players/Mini Disc Players/Audio Systems Hifi Audio LIMITED WARRANTY Sony Electronics Inc. ("Sony") warrants this Product is determined to be presented to obtain warranty service. After the Warranty Period, you must take the Product,...one (1) year. ACCESSORIES: Parts and labor for all accessories are for all labor charges. 2. To obtain warranty service, you must be defective, Sony will supply, at no charge, new or rebuilt replacements in either its option, at no charge, or pay the labor charges to state. This...
4-557-172-02 General Stereo/Hifi Components/Tape Decks ® CD Players/Mini Disc Players/Audio Systems Hifi Audio LIMITED WARRANTY Sony Electronics Inc. ("Sony") warrants this Product is determined to be presented to obtain warranty service. After the Warranty Period, you must take the Product,...one (1) year. ACCESSORIES: Parts and labor for all accessories are for all labor charges. 2. To obtain warranty service, you must be defective, Sony will supply, at no charge, new or rebuilt replacements in either its option, at no charge, or pay the labor charges to state. This...
Operating Instructions (primary manual)
Page 3
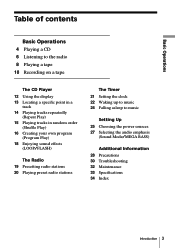
Basic Operations Table of contents Basic Operations 4 Playing a CD 6 Listening to the radio 8 Playing a tape 10 Recording on a tape The CD Player 12 Using the display 13 Locating a specific point in a track 14 Playing tracks repeatedly (Repeat Play) 15 Playing tracks in random order (Shuffle Play) 16 ...
Basic Operations Table of contents Basic Operations 4 Playing a CD 6 Listening to the radio 8 Playing a tape 10 Recording on a tape The CD Player 12 Using the display 13 Locating a specific point in a track 14 Playing tracks repeatedly (Repeat Play) 15 Playing tracks in random order (Shuffle Play) 16 ...
Operating Instructions (primary manual)
Page 4
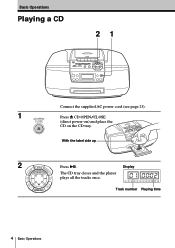
TUNE + V Press ^. With the label side up 2 ET - BAND PRE PRES OL + SET + VOL TUNE - - Basic Operations Playing a CD 21 1 CD OPEN/ CLOSE Connect the supplied AC power cord (see page 25). Press 6 CD OPEN/CLOSE (direct power-on) and place the CD on the CD tray. The CD tray closes and the player plays all the tracks once. Display Track number Playing time 4 Basic Operations
TUNE + V Press ^. With the label side up 2 ET - BAND PRE PRES OL + SET + VOL TUNE - - Basic Operations Playing a CD 21 1 CD OPEN/ CLOSE Connect the supplied AC power cord (see page 25). Press 6 CD OPEN/CLOSE (direct power-on) and place the CD on the CD tray. The CD tray closes and the player plays all the tracks once. Display Track number Playing time 4 Basic Operations
Operating Instructions (primary manual)
Page 5
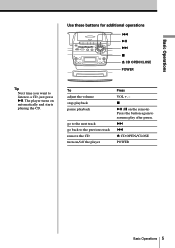
To adjust the volume stop playback pause playback go to the next track go back to the previous track remove the CD turn on the remote) Press the button again to a CD, just press ^. p ^ (P on /off the player Press VOL +, - Basic Operations Use these buttons for additional operations = ^ + p 6 CD OPEN/CLOSE POWER Tip Next time you want to listen to resume play after pause. + = 6 CD OPEN/CLOSE POWER Basic Operations 5 The player turns on automatically and starts playing the CD.
To adjust the volume stop playback pause playback go to the next track go back to the previous track remove the CD turn on the remote) Press the button again to a CD, just press ^. p ^ (P on /off the player Press VOL +, - Basic Operations Use these buttons for additional operations = ^ + p 6 CD OPEN/CLOSE POWER Tip Next time you want to listen to resume play after pause. + = 6 CD OPEN/CLOSE POWER Basic Operations 5 The player turns on automatically and starts playing the CD.
Operating Instructions (primary manual)
Page 10
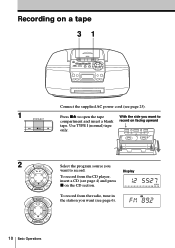
BAND PRE PRES OL + SET + VOL TUNE - - Display To record from the CD player, insert a CD (see page 4) and press p on the CD section. With the side you want (see page 25). Use TYPE I (normal) tape only. TUNE + V Select the program source you want to record on a tape ... 6). 10 Basic Operations Recording on facing upward 2 ET - Press p6 to record. TUNE + V ET - BAND PRE PRES OL + SET + VOL TUNE - - To record from the radio, tune in the station you want to open the tape compartment and insert a blank tape.
BAND PRE PRES OL + SET + VOL TUNE - - Display To record from the CD player, insert a CD (see page 4) and press p on the CD section. With the side you want (see page 25). Use TYPE I (normal) tape only. TUNE + V Select the program source you want to record on a tape ... 6). 10 Basic Operations Recording on facing upward 2 ET - Press p6 to record. TUNE + V ET - BAND PRE PRES OL + SET + VOL TUNE - - To record from the radio, tune in the station you want to open the tape compartment and insert a blank tape.
Operating Instructions (primary manual)
Page 12
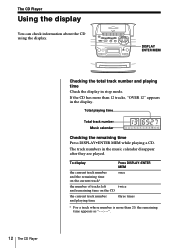
..." appears in the display. Total playing time Total track number Music calendar Checking the remaining time Press DISPLAY•ENTER MEM while playing a CD. To display the current track number and the remaining time on the current track* the number of tracks left and remaining time on the... once twice three times * For a track whose number is more than 20, the remaining time appears as "- -:- -". DISPLAY ENTER MEM 12 The CD Player Checking the total track number and playing time Check the display in the music calendar disappear after they are played. The track numbers in stop...
..." appears in the display. Total playing time Total track number Music calendar Checking the remaining time Press DISPLAY•ENTER MEM while playing a CD. To display the current track number and the remaining time on the current track* the number of tracks left and remaining time on the... once twice three times * For a track whose number is more than 20, the remaining time appears as "- -:- -". DISPLAY ENTER MEM 12 The CD Player Checking the total track number and playing time Check the display in the music calendar disappear after they are played. The track numbers in stop...
Operating Instructions (primary manual)
Page 13
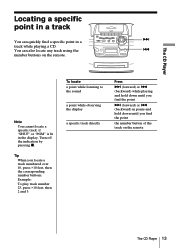
... while observing the display a specific track directly Press + (forward) or = (backward) while playing and hold down until you find a specific point in a track while playing a CD. The CD Player Locating a specific point in a track + You can also locate any track using the = number buttons on the remote The...
... while observing the display a specific track directly Press + (forward) or = (backward) while playing and hold down until you find a specific point in a track while playing a CD. The CD Player Locating a specific point in a track + You can also locate any track using the = number buttons on the remote The...
Operating Instructions (primary manual)
Page 14
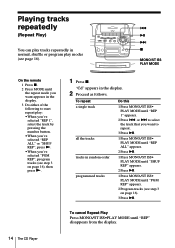
... Press p. 2 Press MODE until the repeat mode you 've selected "PGM REP", program tracks (see step 3 on page 16), then press (. 14 The CD Player 1 Press p. Playing tracks repeatedly (Repeat Play) You can play tracks repeatedly in normal, shuffle or program play : •When you've selected "REP 1", ..." appears. 2 Press ^. 1 Press MONO/ST ISS• PLAY MODE until "PGM REP" appears. 2 Program tracks (see step 3 on page 16). 3 Press ^. "Cd" appears in the display. 2 Proceed as follows. To cancel Repeat Play Press MONO/ST ISS•PLAY MODE until "REP" disappears from the display.
... Press p. 2 Press MODE until the repeat mode you 've selected "PGM REP", program tracks (see step 3 on page 16), then press (. 14 The CD Player 1 Press p. Playing tracks repeatedly (Repeat Play) You can play tracks repeatedly in normal, shuffle or program play : •When you've selected "REP 1", ..." appears. 2 Press ^. 1 Press MONO/ST ISS• PLAY MODE until "PGM REP" appears. 2 Program tracks (see step 3 on page 16). 3 Press ^. "Cd" appears in the display. 2 Proceed as follows. To cancel Repeat Play Press MONO/ST ISS•PLAY MODE until "REP" disappears from the display.

Operating Instructions (primary manual)
Page 15
To cancel Shuffle Play Press MONO/ST ISS•PLAY MODE until "SHUF" appears in the display. 3 Press (. 1 Press p. The CD Player Playing tracks in random order (Shuffle Play) You can play . "Cd" appears in the display. 2 Press MONO/ST ISS•PLAY MODE until "SHUF" appears in the display. 3 Press ^ to start shuffle play tracks in random order. ^ p MONO/ST ISS PLAY MODE On the remote 1 Press p. 2 Press MODE repeatedly until "SHUF" disappears from the display. The CD Player 15
To cancel Shuffle Play Press MONO/ST ISS•PLAY MODE until "SHUF" appears in the display. 3 Press (. 1 Press p. The CD Player Playing tracks in random order (Shuffle Play) You can play . "Cd" appears in the display. 2 Press MONO/ST ISS•PLAY MODE until "SHUF" appears in the display. 3 Press ^ to start shuffle play tracks in random order. ^ p MONO/ST ISS PLAY MODE On the remote 1 Press p. 2 Press MODE repeatedly until "SHUF" disappears from the display. The CD Player 15

Operating Instructions (primary manual)
Page 16
... "PGM" appears in the display. 3 Press the = or + then press DISPLAY• ENTER MEM for the tracks you want to start program play. 16 The CD Player "Cd" appears in the display. 2 Press MONO/ST ISS•PLAY MODE until "PGM" appears in the display. 3 Press the number buttons for the tracks you...
... "PGM" appears in the display. 3 Press the = or + then press DISPLAY• ENTER MEM for the tracks you want to start program play. 16 The CD Player "Cd" appears in the display. 2 Press MONO/ST ISS•PLAY MODE until "PGM" appears in the display. 3 Press the number buttons for the tracks you...
Operating Instructions (primary manual)
Page 17
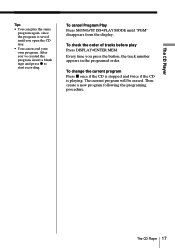
...create a new program following the programing procedure. To change the current program Press p once if the CD is stopped and twice if the CD is saved until "PGM" disappears from the display. The CD Player Tips • You can record your own program. The current program will be erased. Every time you... 've created the program, insert a blank tape and press r to start recording. To cancel Program Play Press MONO/ST ISS•PLAY MODE until you open the CD tray. &#...
...create a new program following the programing procedure. To change the current program Press p once if the CD is stopped and twice if the CD is saved until "PGM" disappears from the display. The CD Player Tips • You can record your own program. The current program will be erased. Every time you... 've created the program, insert a blank tape and press r to start recording. To cancel Program Play Press MONO/ST ISS•PLAY MODE until you open the CD tray. &#...
Operating Instructions (primary manual)
Page 18
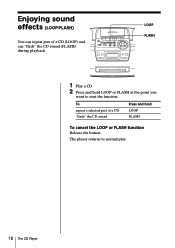
LOOP FLASH 1 Play a CD. 2 Press and hold LOOP FLASH To cancel the LOOP or FLASH function Release the button. Enjoying sound effects (LOOP/FLASH) You can repeat part of a CD "flash" the CD sound Press and hold LOOP or FLASH at the point you want to normal play. 18 The CD Player The player returns to start the function. To repeat a selected part of a CD (LOOP) and can "flash" the CD sound (FLASH) during playback.
LOOP FLASH 1 Play a CD. 2 Press and hold LOOP FLASH To cancel the LOOP or FLASH function Release the button. Enjoying sound effects (LOOP/FLASH) You can repeat part of a CD "flash" the CD sound Press and hold LOOP or FLASH at the point you want to normal play. 18 The CD Player The player returns to start the function. To repeat a selected part of a CD (LOOP) and can "flash" the CD sound (FLASH) during playback.
Operating Instructions (primary manual)
Page 26
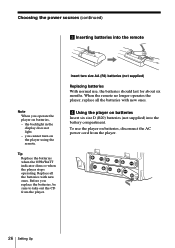
...(R6) batteries (not supplied) Replacing batteries With normal use the player on batteries, disconnect the AC power cord from the player. When the remote no longer operates the player, replace all the batteries with new ones. 4 Using the player on batteries Insert six size D (R20) batteries (not supplied..., - To use , the batteries should last for about six months. you replace the batteries, be sure to take out the CD from the player. 26 Setting Up the backlight in the display does not light. - Choosing the power sources (continued) 3 Inserting batteries into the battery ...
...(R6) batteries (not supplied) Replacing batteries With normal use the player on batteries, disconnect the AC power cord from the player. When the remote no longer operates the player, replace all the batteries with new ones. 4 Using the player on batteries Insert six size D (R20) batteries (not supplied..., - To use , the batteries should last for about six months. you replace the batteries, be sure to take out the CD from the player. 26 Setting Up the backlight in the display does not light. - Choosing the power sources (continued) 3 Inserting batteries into the battery ...
Operating Instructions (primary manual)
Page 28
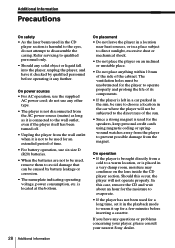
... any solid object or liquid fall into the player, unplug the player, and have any questions or problems concerning your player, please consult your nearest Sony dealer. 28 Additional Information On power sources ...by qualified personnel before inserting a cassette. In this occur, the player will not be sure to choose a location in the car where the player will not operate properly. The ...8226; Do not place the player on the lens inside the CD player section. Additional Information Precautions On safety • As the laser beam used in the CD player section is harmful to the ...
... any solid object or liquid fall into the player, unplug the player, and have any questions or problems concerning your player, please consult your nearest Sony dealer. 28 Additional Information On power sources ...by qualified personnel before inserting a cassette. In this occur, the player will not be sure to choose a location in the car where the player will not operate properly. The ...8226; Do not place the player on the lens inside the CD player section. Additional Information Precautions On safety • As the laser beam used in the CD player section is harmful to the ...
Operating Instructions (primary manual)
Page 30
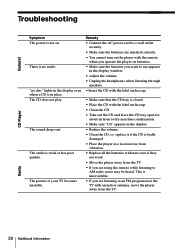
... in a location free from vibration. • Replace all the batteries with new ones if they are weak. • Move the player away from the TV. Radio 30 Additional Information Troubleshooting General CD Player Symptom The power is unavoidable. • If you are using the remote while listening to an FM program near the TV...
... in a location free from vibration. • Replace all the batteries with new ones if they are weak. • Move the player away from the TV. Radio 30 Additional Information Troubleshooting General CD Player Symptom The power is unavoidable. • If you are using the remote while listening to an FM program near the TV...
Operating Instructions (primary manual)
Page 33
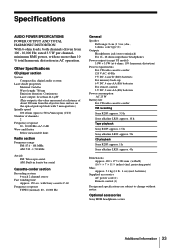
... Wow and flutter Below measurable limit Radio section Frequency range FM: 87.6 - 108 MHz AM: 530 - 1,710 kHz Aerials FM: Telescopic aerial AM: Built-in AC operation. Other Specifications CD player section System Compact disc digital audio ...DC, 2 size AA (R6) batteries Power consumption AC 25 W Battery life For CD radio cassette-corder: FM recording Sony R20P: approx. 3.5 h Sony alkaline LR20: approx. 10 h Tape playback Sony R20P: approx. 1.5 h Sony alkaline LR20: approx. 5 h CD playback Sony R20P: approx. 1 h Sony alkaline LR20: approx. 4 h Dimensions Approx. 420 × 177 × 281 ...
... Wow and flutter Below measurable limit Radio section Frequency range FM: 87.6 - 108 MHz AM: 530 - 1,710 kHz Aerials FM: Telescopic aerial AM: Built-in AC operation. Other Specifications CD player section System Compact disc digital audio ...DC, 2 size AA (R6) batteries Power consumption AC 25 W Battery life For CD radio cassette-corder: FM recording Sony R20P: approx. 3.5 h Sony alkaline LR20: approx. 10 h Tape playback Sony R20P: approx. 1.5 h Sony alkaline LR20: approx. 5 h CD playback Sony R20P: approx. 1 h Sony alkaline LR20: approx. 4 h Dimensions Approx. 420 × 177 × 281 ...
Operating Instructions (primary manual)
Page 34
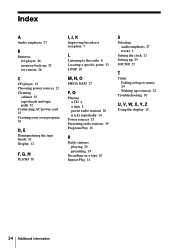
...C CD player 12 Choosing power sources 25 Cleaning cabinet 32 tape heads and tape path 32 Connecting AC power cord 25 Creating your own program 16 D, E Demagnetizing the tape heads 32 Display 12 F, G, H FLASH 18 I, J, K Improving broadcast reception 7 L Listening to the radio ...6 Locating a specific point 13 LOOP 18 M, N, O MEGA BASS 27 P, Q Playing a CD 4 a tape 8 preset radio stations 20 tracks repeatedly 14 Power sources 25 Presetting radio stations 19 Program Play 16 R Radio stations playing 20 presetting 19 Recording on a tape 10...
...C CD player 12 Choosing power sources 25 Cleaning cabinet 32 tape heads and tape path 32 Connecting AC power cord 25 Creating your own program 16 D, E Demagnetizing the tape heads 32 Display 12 F, G, H FLASH 18 I, J, K Improving broadcast reception 7 L Listening to the radio ...6 Locating a specific point 13 LOOP 18 M, N, O MEGA BASS 27 P, Q Playing a CD 4 a tape 8 preset radio stations 20 tracks repeatedly 14 Power sources 25 Presetting radio stations 19 Program Play 16 R Radio stations playing 20 presetting 19 Recording on a tape 10...


