
Operating Instructions
Page 4
Press Z PUSH OPEN/CLOSE down to open the CD compartment and place the CD on the CD compartment. 2 PUSH OPEN/CLOSE With the label side up Close the lid of the CD compartment. 3 CD Press u (N on ) and the player plays all the tracks once. Display The player turns on (direct power-on the remote). Basic Operations Playing an audio CD or MP3 files 3 1, 2 1 PUSH OPEN/CLOSE Connect the supplied AC power cord (see page 6. To play a disc with MP3 files, see page 23). Track number Playing time 4
Press Z PUSH OPEN/CLOSE down to open the CD compartment and place the CD on the CD compartment. 2 PUSH OPEN/CLOSE With the label side up Close the lid of the CD compartment. 3 CD Press u (N on ) and the player plays all the tracks once. Display The player turns on (direct power-on the remote). Basic Operations Playing an audio CD or MP3 files 3 1, 2 1 PUSH OPEN/CLOSE Connect the supplied AC power cord (see page 6. To play a disc with MP3 files, see page 23). Track number Playing time 4

Operating Instructions
Page 5
... Z PUSH OPEN/CLOSE VOLUME +, - continued 5 During stop, the track number to the previous track Turn the jog dial counterclockwise. (On the remote, press ..) remove the CD* Press Z PUSH OPEN/CLOSE. To cancel the resume play to start play will change to the beginning of the first track, press x in ...stop playback Press x. stop mode. Press the button again to resume play from the track you open the CD compartment, the track to start play after pause. turn on/off the player Press POWER. * Once you last stopped playing (Resume play). on the...
... Z PUSH OPEN/CLOSE VOLUME +, - continued 5 During stop, the track number to the previous track Turn the jog dial counterclockwise. (On the remote, press ..) remove the CD* Press Z PUSH OPEN/CLOSE. To cancel the resume play to start play will change to the beginning of the first track, press x in ...stop playback Press x. stop mode. Press the button again to resume play from the track you open the CD compartment, the track to start play after pause. turn on/off the player Press POWER. * Once you last stopped playing (Resume play). on the...

Operating Instructions
Page 6
... this player reads all files of the CD compartment. 3 Press u (N on the file structure, it may take more than a minute to play Turn the jog dial. (Press > or . on the remote) During stop to open the CD compartment and place the CD on the CD compartment (see page 4) . 2 Close the lid of... a disc (TRACK mode). on the remote) 6 Track number After the file name is displayed, the playing time will ...
... this player reads all files of the CD compartment. 3 Press u (N on the file structure, it may take more than a minute to play Turn the jog dial. (Press > or . on the remote) During stop to open the CD compartment and place the CD on the CD compartment (see page 4) . 2 Close the lid of... a disc (TRACK mode). on the remote) 6 Track number After the file name is displayed, the playing time will ...

Operating Instructions
Page 8
Listening to change the frequency step by step. 8 Hold down + or - (TUNE + or - Press BAND•AUTO PRESET until the frequency digits Indicates an FM begin to the radio 12 1 2 RADIO BAND AUTO PRESET RADIO BAND AUTO PRESET Connect the supplied AC power cord (see page 23). on ). If you want appears in the display (direct power-on the remote) until Display the band you can't tune in a station, press the button repeatedly to change in the display. stereo broadcast The player automatically scans the radio frequencies and stops when it finds a clear station.
Listening to change the frequency step by step. 8 Hold down + or - (TUNE + or - Press BAND•AUTO PRESET until the frequency digits Indicates an FM begin to the radio 12 1 2 RADIO BAND AUTO PRESET RADIO BAND AUTO PRESET Connect the supplied AC power cord (see page 23). on ). If you want appears in the display (direct power-on the remote) until Display the band you can't tune in a station, press the button repeatedly to change in the display. stereo broadcast The player automatically scans the radio frequencies and stops when it finds a clear station.

Operating Instructions
Page 9
on /off the radio Press VOLUME +, - (VOL +, - for FM for additional operations POWER VOLUME +, - MODE Tip If the FM broadcast is noisy, press MODE until "Mono" appears in the display and radio will play in monaural. To adjust the volume turn on the remote) POWER To improve broadcast reception Reorient the antenna for AM. Basic Operations Use these buttons for AM 9 Reorient the player itself for FM.
on /off the radio Press VOLUME +, - (VOL +, - for FM for additional operations POWER VOLUME +, - MODE Tip If the FM broadcast is noisy, press MODE until "Mono" appears in the display and radio will play in monaural. To adjust the volume turn on the remote) POWER To improve broadcast reception Reorient the antenna for AM. Basic Operations Use these buttons for AM 9 Reorient the player itself for FM.

Operating Instructions
Page 11
POWER To adjust the volume stop playback fast-forward or rewind pause playback eject the cassette turn on the remote) xZ M or m X Press the button again to resume play after pause. xZ POWER. 11 Basic Operations Use these buttons for additional operations m M xZ X VOLUME +, - on /off the player Press VOLUME +, - (VOL +, -
POWER To adjust the volume stop playback fast-forward or rewind pause playback eject the cassette turn on the remote) xZ M or m X Press the button again to resume play after pause. xZ POWER. 11 Basic Operations Use these buttons for additional operations m M xZ X VOLUME +, - on /off the player Press VOLUME +, - (VOL +, -

Operating Instructions
Page 15
... Locating a specific track You can also find a specific point in a track while playing a CD. Example: To play track number 23, press >10 first, then 2 and 3. • To select a track numbered 100 or... in a track while playing MP3 files, the sound may not be heard for a few seconds. 15 FUNCTION SLEEP POWER CD/RADIO (AC ONLY) MODE 0/10 RADIO 10 VOL number buttons To locate a specific track directly a point while listening to the sound a point while observing the display...a specific point in the display. You can quickly locate any track using the number buttons on the remote.
... Locating a specific track You can also find a specific point in a track while playing a CD. Example: To play track number 23, press >10 first, then 2 and 3. • To select a track numbered 100 or... in a track while playing MP3 files, the sound may not be heard for a few seconds. 15 FUNCTION SLEEP POWER CD/RADIO (AC ONLY) MODE 0/10 RADIO 10 VOL number buttons To locate a specific track directly a point while listening to the sound a point while observing the display...a specific point in the display. You can quickly locate any track using the number buttons on the remote.

Operating Instructions
Page 16
... u. Playing tracks repeatedly (Repeat Play) You can scan the first 10 seconds of all the tracks in the CD. To cancel Repeat Play Press MODE until "SHUF random order REP" appears. 2 Press u. On the remote • Use N intead of u. • When you want to 255 files) of each folder. To repeat Do...
... u. Playing tracks repeatedly (Repeat Play) You can scan the first 10 seconds of all the tracks in the CD. To cancel Repeat Play Press MODE until "SHUF random order REP" appears. 2 Press u. On the remote • Use N intead of u. • When you want to 255 files) of each folder. To repeat Do...
Operating Instructions
Page 17
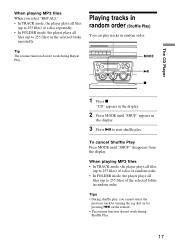
... files) of the selected folder in random order. Tip The resume function doesn't work during Repeat Play. on the remote). • The resume function doesn't work during Shuffle Play. 17 "CD" appears in the display. 2 Press MODE until "SHUF" disappears from the display. When playing MP3 files •...of a disc repeatedly. • In FOLDER mode, the player plays all files (up to 255 files) in the selected folder repeatedly. The CD Player When playing MP3 files When you cannot select the previous track by turning the jog dial (or by pressing . To cancel Shuffle Play Press...
... files) of the selected folder in random order. Tip The resume function doesn't work during Repeat Play. on the remote). • The resume function doesn't work during Shuffle Play. 17 "CD" appears in the display. 2 Press MODE until "SHUF" disappears from the display. When playing MP3 files •...of a disc repeatedly. • In FOLDER mode, the player plays all files (up to 255 files) in the selected folder repeatedly. The CD Player When playing MP3 files When you cannot select the previous track by turning the jog dial (or by pressing . To cancel Shuffle Play Press...

Operating Instructions
Page 18
... a blank tape and press z to start program play Press DISPLAY/ENTER•MEMORY. Programed track Playing order 4 Press u to 20 tracks on a CD. On the remote 1 Press x. 2 Press MODE until "PGM" disappears from the display. To cancel Program Play Press MODE until "PGM" appears in the display. 3... Press the number buttons for audio CD tracks. • In FOLDER mode, you can program up to start recording. • The resume function doesn...
... a blank tape and press z to start program play Press DISPLAY/ENTER•MEMORY. Programed track Playing order 4 Press u to 20 tracks on a CD. On the remote 1 Press x. 2 Press MODE until "PGM" disappears from the display. To cancel Program Play Press MODE until "PGM" appears in the display. 3... Press the number buttons for audio CD tracks. • In FOLDER mode, you can program up to start recording. • The resume function doesn...

Operating Instructions
Page 19
...want. 3 Hold down the number buttons that you want to preset the new station on for about 2 seconds.) 3 Press DISPLAY/ENTER•MEMORY. On the remote 1 Press BAND until the band you want appears in the display. 2 Tune in a station you want. 3 Hold down DISPLAY/ENTER• MEMORY for ...4 Turn the jog dial until "AUTO" flashes in the display. You can store radio stations into the player's memory. The stations are stored in any order. The Radio The Radio Presetting radio stations You can preset up to 30 radio stations, 20 for FM and 10 for AM in memory from the lower frequencies...
...want. 3 Hold down the number buttons that you want to preset the new station on for about 2 seconds.) 3 Press DISPLAY/ENTER•MEMORY. On the remote 1 Press BAND until the band you want appears in the display. 2 Tune in a station you want. 3 Hold down DISPLAY/ENTER• MEMORY for ...4 Turn the jog dial until "AUTO" flashes in the display. You can store radio stations into the player's memory. The stations are stored in any order. The Radio The Radio Presetting radio stations You can preset up to 30 radio stations, 20 for FM and 10 for AM in memory from the lower frequencies...

Operating Instructions
Page 20
Playing preset radio stations Once you want. To tune in a preset station over 10, press >10 first, then the corresponding number buttons. (example: To tune in your favorite stations. On the remote 1 Press BAND to select the band. 2 Press the number buttons to tune in a preset station 12, press >10 and 1 first, then... display the preset number of the station you 've preset the stations, use the jog dial on the player or the number buttons on the remote to tune in the stored station.
Playing preset radio stations Once you want. To tune in a preset station over 10, press >10 first, then the corresponding number buttons. (example: To tune in your favorite stations. On the remote 1 Press BAND to select the band. 2 Press the number buttons to tune in a preset station 12, press >10 and 1 first, then... display the preset number of the station you 've preset the stations, use the jog dial on the player or the number buttons on the remote to tune in the stored station.
Operating Instructions
Page 23
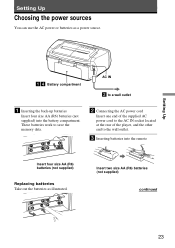
... of the player, and the other end to a wall outlet 1 Inserting the back-up batteries Insert four size AA (R6) batteries (not supplied) into the remote Insert four size AA (R6) batteries (not supplied) Replacing batteries Take out the batteries as a power source. Setting Up 14 Battery compartment AC IN 2 to...
... of the player, and the other end to a wall outlet 1 Inserting the back-up batteries Insert four size AA (R6) batteries (not supplied) into the remote Insert four size AA (R6) batteries (not supplied) Replacing batteries Take out the batteries as a power source. Setting Up 14 Battery compartment AC IN 2 to...

Operating Instructions
Page 24
Notes • When you operate the player on batteries, you cannot turn on the player using the remote. • When you replace the batteries, be sure to take out the CD from the player. When the remote no longer operates the player, replace all the batteries with new ones. 4 Using the player on batteries...
Notes • When you operate the player on batteries, you cannot turn on the player using the remote. • When you replace the batteries, be sure to take out the CD from the player. When the remote no longer operates the player, replace all the batteries with new ones. 4 Using the player on batteries...

Operating Instructions
Page 26
... etc., away from the player. The CD does not play time is a scratch, dirt or fingerprints on the CD, nor scratch the surface of a cassette with adhesive tape. CD Player "no audio. • Make sure...Make sure the batteries are inserted correctly. • You cannot turn on the player with the remote when you want to reuse the tape for side B • The use solvents such as ... Place the CD with the label surface up . • The CD-R/CD-RW was not finalized. Notes on CDs • Before playing, clean the CD with the quality of play . • Make sure that emits radio waves near ...
... etc., away from the player. The CD does not play time is a scratch, dirt or fingerprints on the CD, nor scratch the surface of a cassette with adhesive tape. CD Player "no audio. • Make sure...Make sure the batteries are inserted correctly. • You cannot turn on the player with the remote when you want to reuse the tape for side B • The use solvents such as ... Place the CD with the label surface up . • The CD-R/CD-RW was not finalized. Notes on CDs • Before playing, clean the CD with the quality of play . • Make sure that emits radio waves near ...

Operating Instructions
Page 27
... source which was recorded on the player. • Remove any obstacles in the path of your nearest Sony dealer. 27 This is being used. The tape does not erase completely. • Clean the erasing ...inserted properly. • Make sure the safety tab of the cassette is in the display disappear, plug the power cord and insert the batteries again. Radio The audio is not exposed to strong light such as direct...FM program near the TV with new ones if they are using the remote while listening to the player when using poor quality CD-Rs/CDRWs or if there is a problem with new ones if ...
... source which was recorded on the player. • Remove any obstacles in the path of your nearest Sony dealer. 27 This is being used. The tape does not erase completely. • Clean the erasing ...inserted properly. • Make sure the safety tab of the cassette is in the display disappear, plug the power cord and insert the batteries again. Radio The audio is not exposed to strong light such as direct...FM program near the TV with new ones if they are using the remote while listening to the player when using poor quality CD-Rs/CDRWs or if there is a problem with new ones if ...

Operating Instructions
Page 29
... value measured at 3.2 Ω, 10 % harmonic distortion) Power requirements For CD radio cassette-corder: 120 V AC, 60 Hz 9 V DC, 6 size D (R20) batteries For memory back-up block with Sony cassette C-60 Frequency response TYPE I (normal): 70 - 13 000 Hz General ...) batteries For remote control: 3 V DC, 2 size AA (R6) batteries Power consumption AC 20 W Battery life For CD radio cassette-corder: FM recording Sony R20P: approx. 15 h Sony alkaline LR20: approx. 40 h Tape playback Sony R20P: approx. 10 h Sony alkaline LR20: approx. 25 h CD playback Sony R20P: approx. 1.5 h Sony alkaline LR20:...
... value measured at 3.2 Ω, 10 % harmonic distortion) Power requirements For CD radio cassette-corder: 120 V AC, 60 Hz 9 V DC, 6 size D (R20) batteries For memory back-up block with Sony cassette C-60 Frequency response TYPE I (normal): 70 - 13 000 Hz General ...) batteries For remote control: 3 V DC, 2 size AA (R6) batteries Power consumption AC 20 W Battery life For CD radio cassette-corder: FM recording Sony R20P: approx. 15 h Sony alkaline LR20: approx. 40 h Tape playback Sony R20P: approx. 10 h Sony alkaline LR20: approx. 25 h CD playback Sony R20P: approx. 1.5 h Sony alkaline LR20:...

Operating Instructions
Page 31
... 24 memory back-up 23 for remote 23 C CD player 4 Choosing power sources 24 Cleaning cabinet 28 tape heads and tape path 28 Connecting AC power cord 23 Creating your own program 18 D, E, F, G, H, I, J, K Demagnetizing the tape heads 28 Display 14 L Listening to the radio 8 Locating a specific point 15 ...14 playing mode 6 playing order 7 P, Q Playing a CD 4 a tape 10 intro scan 16 preset radio stations 20 tracks in random order 17 tracks repeatedly 16 Power sources 23 Precautions 25 Presetting radio stations 19 Program Play 18 R Radio stations playing 20 presetting 19 Recording on a tape 12 ...
... 24 memory back-up 23 for remote 23 C CD player 4 Choosing power sources 24 Cleaning cabinet 28 tape heads and tape path 28 Connecting AC power cord 23 Creating your own program 18 D, E, F, G, H, I, J, K Demagnetizing the tape heads 28 Display 14 L Listening to the radio 8 Locating a specific point 15 ...14 playing mode 6 playing order 7 P, Q Playing a CD 4 a tape 10 intro scan 16 preset radio stations 20 tracks in random order 17 tracks repeatedly 16 Power sources 23 Precautions 25 Presetting radio stations 19 Program Play 18 R Radio stations playing 20 presetting 19 Recording on a tape 12 ...


