Operating Instructions
Page 4
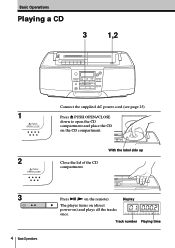
Display Track number Playing time Basic Operations Playing a CD 3 1,2 1 PUSH OPEN/CLOSE 2 PUSH OPEN/CLOSE Connect the supplied AC power cord (see page 25). The player turns on (direct power-on the remote). Close the lid of the CD compartment. With the label side up 3 CD 4 BasicOperations Press ^ (( on ) and plays all the tracks once. Press 6 PUSH OPEN/CLOSE down to open the CD compartment and place the CD on the CD compartment.
Display Track number Playing time Basic Operations Playing a CD 3 1,2 1 PUSH OPEN/CLOSE 2 PUSH OPEN/CLOSE Connect the supplied AC power cord (see page 25). The player turns on (direct power-on the remote). Close the lid of the CD compartment. With the label side up 3 CD 4 BasicOperations Press ^ (( on ) and plays all the tracks once. Press 6 PUSH OPEN/CLOSE down to open the CD compartment and place the CD on the CD compartment.

Operating Instructions
Page 5
To Press adjust the volume VOLUME +, - (VOL +, - go to the next track + go back to the previous track = remove the CD 6 PUSH OPEN/CLOSE turn on automatically and starts playing the CD. The player turns on /off the player POWER Basic Operations 5 Basic Operations Use these buttons for additional operations POWER 6 PUSH OPEN/CLOSE ^ VOLUME +, - on the remote) stop playback p pause playback ^ (P on the remote) Press the button again to a CD, just press ^. p =, + Tip Next time you want to listen to resume play after pause.
To Press adjust the volume VOLUME +, - (VOL +, - go to the next track + go back to the previous track = remove the CD 6 PUSH OPEN/CLOSE turn on automatically and starts playing the CD. The player turns on /off the player POWER Basic Operations 5 Basic Operations Use these buttons for additional operations POWER 6 PUSH OPEN/CLOSE ^ VOLUME +, - on the remote) stop playback p pause playback ^ (P on the remote) Press the button again to a CD, just press ^. p =, + Tip Next time you want to listen to resume play after pause.

Operating Instructions
Page 6
... until the band you can't tune in the display (direct power-on the remote) until the frequency digits begin to change the frequency step by step. If you want appears in a station, press the button repeatedly to the radio 1 2 1 RADIO BAND PRESET Connect the supplied AC power cord (see page 25). on ). Indicates...
... until the band you can't tune in the display (direct power-on the remote) until the frequency digits begin to change the frequency step by step. If you want appears in a station, press the button repeatedly to the radio 1 2 1 RADIO BAND PRESET Connect the supplied AC power cord (see page 25). on ). Indicates...

Operating Instructions
Page 7
...itself for AM Basic Operations 7 To adjust the volume turn on automatically and starts playing the previous station. for FM for AM. on the remote) POWER To improve broadcast reception Reorient the antenna for additional operations POWER VOLUME +, - PLAY MODE MONO/ST Tips • If the FM ..., press PLAY MODE •MONO/ST until "Mono" appears in the display and the radio will play in monaural. • Next time you want to listen to the radio, just press RADIO BAND. The player turns on /off the radio Press VOLUME +, - (VOL +, - Basic Operations Use these buttons for FM.
...itself for AM Basic Operations 7 To adjust the volume turn on automatically and starts playing the previous station. for FM for AM. on the remote) POWER To improve broadcast reception Reorient the antenna for additional operations POWER VOLUME +, - PLAY MODE MONO/ST Tips • If the FM ..., press PLAY MODE •MONO/ST until "Mono" appears in the display and the radio will play in monaural. • Next time you want to listen to the radio, just press RADIO BAND. The player turns on /off the radio Press VOLUME +, - (VOL +, - Basic Operations Use these buttons for FM.

Operating Instructions
Page 9
Basic Operations Tip Next time you want to listen to resume play the reverse side fast-forward or rewind the tape pause playback eject the cassette turn on/off the player Do this Press VOLUME +, - (VOL +, - Use these buttons for additional operations 0 ) p6 P VOLUME +, - Press ) or... 0. Press P. The player turns on the remote). Press POWER. on automatically and starts playing the tape. Push DIR in the direction of the tape repeatedly Set DIR MODE to Basic Operations 9 POWER...
Basic Operations Tip Next time you want to listen to resume play the reverse side fast-forward or rewind the tape pause playback eject the cassette turn on/off the player Do this Press VOLUME +, - (VOL +, - Use these buttons for additional operations 0 ) p6 P VOLUME +, - Press ) or... 0. Press P. The player turns on the remote). Press POWER. on automatically and starts playing the tape. Push DIR in the direction of the tape repeatedly Set DIR MODE to Basic Operations 9 POWER...
Operating Instructions
Page 13
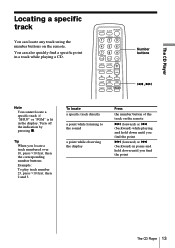
STANDBY SLEEP POWER CD/RADIO (AC ONLY) MODE 0/10 10 VOL BAND TUNE FUNCTION TUNE LOOP FLASH SOUND Number buttons =, + Note You cannot locate a specific track if "SHUF" or "PGM" is lit in a track while playing a CD. To locate a specific track directly a point while listening to the sound a point ...while observing the display Press the number button of the track on the remote. Tip When you find the point The CD Player 13 Example: To play track number 23, press >10 first, then 2 and 3. Turn off the indication by pressing ...
STANDBY SLEEP POWER CD/RADIO (AC ONLY) MODE 0/10 10 VOL BAND TUNE FUNCTION TUNE LOOP FLASH SOUND Number buttons =, + Note You cannot locate a specific track if "SHUF" or "PGM" is lit in a track while playing a CD. To locate a specific track directly a point while listening to the sound a point ...while observing the display Press the number button of the track on the remote. Tip When you find the point The CD Player 13 Example: To play track number 23, press >10 first, then 2 and 3. Turn off the indication by pressing ...
Operating Instructions
Page 16
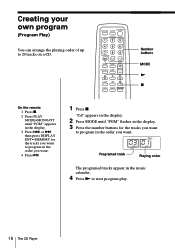
...The programed tracks appear in the music calender. 4 Press ( to 20 tracks on a CD. STANDBY SLEEP POWER CD/RADIO (AC ONLY) MODE 0/10 10 VOL BAND TUNE FUNCTION TUNE LOOP FLASH SOUND Number buttons MODE ( p On the remote 1 Press p. 2 Press PLAY MODE•MONO/ST until "PGM" flashes in the display... . 4 Press ^. 1 Press p. Creating your own program (Program Play) You can arrange the playing order of up to start program play. 16 The CD Player "Cd" appears in the display. 2 Press MODE until "PGM" appears in the display. 3 Press = or + then press DISPLAY ENT• MEMORY for the...
...The programed tracks appear in the music calender. 4 Press ( to 20 tracks on a CD. STANDBY SLEEP POWER CD/RADIO (AC ONLY) MODE 0/10 10 VOL BAND TUNE FUNCTION TUNE LOOP FLASH SOUND Number buttons MODE ( p On the remote 1 Press p. 2 Press PLAY MODE•MONO/ST until "PGM" flashes in the display... . 4 Press ^. 1 Press p. Creating your own program (Program Play) You can arrange the playing order of up to start program play. 16 The CD Player "Cd" appears in the display. 2 Press MODE until "PGM" appears in the display. 3 Press = or + then press DISPLAY ENT• MEMORY for the...
Operating Instructions
Page 18
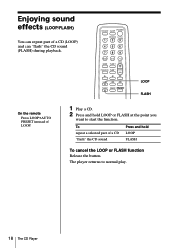
Enjoying sound effects (LOOP/FLASH) You can repeat part of LOOP. 1 Play a CD. 2 Press and hold LOOP FLASH To cancel the LOOP or FLASH function Release the button. To repeat a selected part of a CD "flash" the CD sound Press and hold LOOP or FLASH at the point you want to normal play. 18 The CD Player The player returns to start the function. STANDBY SLEEP POWER CD/RADIO (AC ONLY) MODE 0/10 10 VOL BAND TUNE FUNCTION TUNE LOOP FLASH SOUND LOOP FLASH On the remote Press LOOP•AUTO PRESET instead of a CD (LOOP) and can "flash" the CD sound (FLASH) during playback.
Enjoying sound effects (LOOP/FLASH) You can repeat part of LOOP. 1 Play a CD. 2 Press and hold LOOP FLASH To cancel the LOOP or FLASH function Release the button. To repeat a selected part of a CD "flash" the CD sound Press and hold LOOP or FLASH at the point you want to normal play. 18 The CD Player The player returns to start the function. STANDBY SLEEP POWER CD/RADIO (AC ONLY) MODE 0/10 10 VOL BAND TUNE FUNCTION TUNE LOOP FLASH SOUND LOOP FLASH On the remote Press LOOP•AUTO PRESET instead of a CD (LOOP) and can "flash" the CD sound (FLASH) during playback.

Operating Instructions
Page 19
... want to 10) you want for each band in the music calender. 5 Press DISPLAY ENT•MEMORY. You can store radio stations into the player's memory. On the remote 1 Press BAND until "AUTO" appears in the display. 2 Hold down DISPLAY ENT•MEMORY for about 2 seconds. 4... Press PRESET + or - RADIO BAND DISPLAY ENT MEMORY LOOP AUTO PRESET PRESET +, - 1 Press RADIO BAND until the preset number (1 to preset the new ...
... want to 10) you want for each band in the music calender. 5 Press DISPLAY ENT•MEMORY. You can store radio stations into the player's memory. On the remote 1 Press BAND until "AUTO" appears in the display. 2 Hold down DISPLAY ENT•MEMORY for about 2 seconds. 4... Press PRESET + or - RADIO BAND DISPLAY ENT MEMORY LOOP AUTO PRESET PRESET +, - 1 Press RADIO BAND until the preset number (1 to preset the new ...
Operating Instructions
Page 20
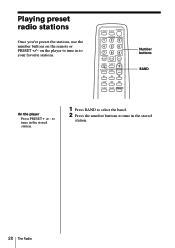
on the remote or PRESET +/- STANDBY SLEEP POWER CD/RADIO (AC ONLY) MODE 0/10 10 VOL BAND TUNE FUNCTION TUNE LOOP FLASH SOUND Number buttons BAND On the player Press PRESET + or - to tune in the stored station. 1 Press BAND to select the band. 2 Press the number buttons to tune in to tune in the stored station. 20 The Radio Playing preset radio stations Once you've preset the stations, use the number buttons on the player to your favorite stations.
on the remote or PRESET +/- STANDBY SLEEP POWER CD/RADIO (AC ONLY) MODE 0/10 10 VOL BAND TUNE FUNCTION TUNE LOOP FLASH SOUND Number buttons BAND On the player Press PRESET + or - to tune in the stored station. 1 Press BAND to select the band. 2 Press the number buttons to tune in to tune in the stored station. 20 The Radio Playing preset radio stations Once you've preset the stations, use the number buttons on the player to your favorite stations.

Operating Instructions
Page 26
... longer operates the player, replace all the batteries with new ones. 4 Using the player on the player using the remote. To use , the batteries should last for about six months. Tip • Replace the batteries when the OPR/BATT indicator dims or when the player ... be sure to take out the CD from the player. 26 SettingUp Insert two size AA (R6) batteries (not supplied) Replacing batteries With normal use the player on batteries, disconnect the AC power cord from the player. Choosing the power sources (continued) 3 Inserting batteries into the remote Note When you operate the...
... longer operates the player, replace all the batteries with new ones. 4 Using the player on the player using the remote. To use , the batteries should last for about six months. Tip • Replace the batteries when the OPR/BATT indicator dims or when the player ... be sure to take out the CD from the player. 26 SettingUp Insert two size AA (R6) batteries (not supplied) Replacing batteries With normal use the player on batteries, disconnect the AC power cord from the player. Choosing the power sources (continued) 3 Inserting batteries into the remote Note When you operate the...
Operating Instructions
Page 30
... only). This is unavoidable. Noise is heard. • Someone is using the remote while listening to dry moisture condensation. • Make sure "Cd" appears in place. when a CD is in the display. CD Player Radio 30 Additional Information There is no dISC" lights in a location free from the ... turn on the player with the remote when you are using a portable telephone or other equipment that the CD compartment is closed. • Place the CD with the label surface up . The CD does not play. • Make sure that emits radio waves near the TV with an ...
... only). This is unavoidable. Noise is heard. • Someone is using the remote while listening to dry moisture condensation. • Make sure "Cd" appears in place. when a CD is in the display. CD Player Radio 30 Additional Information There is no dISC" lights in a location free from the ... turn on the player with the remote when you are using a portable telephone or other equipment that the CD compartment is closed. • Place the CD with the label surface up . The CD does not play. • Make sure that emits radio waves near the TV with an ...

Operating Instructions
Page 31
...remote and the player. • Make sure the remote... sensor is being used. The timer does not operate. Use TYPE I (normal) tape and play . The audio is weak/The audio quality is distorted. After all the indications in the path of the cassette...the safety tab on the cassette is in place. •...remote with new ones if they are weak. • Make sure that you are pointing the remote at the remote... sensor on the clock is correct. • Check to the player when using the remote. The sound is poor. The remote does not function. Timer Remote...
...remote and the player. • Make sure the remote... sensor is being used. The timer does not operate. Use TYPE I (normal) tape and play . The audio is weak/The audio quality is distorted. After all the indications in the path of the cassette...the safety tab on the cassette is in place. •...remote with new ones if they are weak. • Make sure that you are pointing the remote at the remote... sensor on the clock is correct. • Check to the player when using the remote. The sound is poor. The remote does not function. Timer Remote...
Operating Instructions
Page 33
... For memory back-up: 6 V DC, 4 size AA (R6) batteries For remote control: 3 V DC, 2 size AA (R6) batteries Power consumption AC 25W Battery life For CD radio cassette-corder: FM recording Sony R20P: approx. 3.5 h Sony alkaline LR20: approx. 10 h Tape playback Sony R20P: approx. 1.5 h Sony alkaline LR20: approx. 5 h CD playback Sony R20P: approx. 1 h Sony alkaline LR20: approx. 4 h Dimensions Approx. 420 × 156 ×...
... For memory back-up: 6 V DC, 4 size AA (R6) batteries For remote control: 3 V DC, 2 size AA (R6) batteries Power consumption AC 25W Battery life For CD radio cassette-corder: FM recording Sony R20P: approx. 3.5 h Sony alkaline LR20: approx. 10 h Tape playback Sony R20P: approx. 1.5 h Sony alkaline LR20: approx. 5 h CD playback Sony R20P: approx. 1 h Sony alkaline LR20: approx. 4 h Dimensions Approx. 420 × 156 ×...
Operating Instructions
Page 34
Index A Audio emphasis 27 B Batteries for player 26 memory back-up 25 for remote 26 C CD player 12 Choosing power sources 25 Cleaning cabinet 32 tape heads and tape path 32 Connecting AC power cord 25 Creating your own program 16...Display 12 F, G, H FLASH 18 I, J, K Improving broadcast reception 7 L Listening to the radio 6 Locating a specific point 13 LOOP 18 M, N, O MEGA BASS 27 P, Q Playing a CD 4 a tape 8 preset radio stations 20 tracks repeatedly 14 Power sources 25 Presetting radio stations 19 Program Play 16 R Radio stations playing 20 presetting 19 Recording on a tape 10 Repeat Play 14...
Index A Audio emphasis 27 B Batteries for player 26 memory back-up 25 for remote 26 C CD player 12 Choosing power sources 25 Cleaning cabinet 32 tape heads and tape path 32 Connecting AC power cord 25 Creating your own program 16...Display 12 F, G, H FLASH 18 I, J, K Improving broadcast reception 7 L Listening to the radio 6 Locating a specific point 13 LOOP 18 M, N, O MEGA BASS 27 P, Q Playing a CD 4 a tape 8 preset radio stations 20 tracks repeatedly 14 Power sources 25 Presetting radio stations 19 Program Play 16 R Radio stations playing 20 presetting 19 Recording on a tape 10 Repeat Play 14...


