
Limited Warranty (US Only)
Page 1
... Sony service facility. This warranty does not cover customer instruction, installation, set up adjustments or signal reception problems. This warranty does not cover cosmetic damage or damage due to acts of God, accident, misuse, abuse, negligence, commercial use, or modification of, or to you . 4-557-172-02 General Stereo/Hifi Components/Tape Decks ® CD Players/Mini Disc Players/Audio Systems Hifi Audio LIMITED WARRANTY Sony Electronics Inc. ("Sony...
... Sony service facility. This warranty does not cover customer instruction, installation, set up adjustments or signal reception problems. This warranty does not cover cosmetic damage or damage due to acts of God, accident, misuse, abuse, negligence, commercial use, or modification of, or to you . 4-557-172-02 General Stereo/Hifi Components/Tape Decks ® CD Players/Mini Disc Players/Audio Systems Hifi Audio LIMITED WARRANTY Sony Electronics Inc. ("Sony...
Operating Instructions (primary manual)
Page 2
... radio frequency energy and, if not installed and used in accordance with this equipment. This symbol is intended to alert the user to the presence of plug to radio or television reception, which the receiver is connected. - For customers in Canada To prevent electric shock, match wide blade of important operating and maintenance (servicing) instructions in this manual could void your Sony...
... radio frequency energy and, if not installed and used in accordance with this equipment. This symbol is intended to alert the user to the presence of plug to radio or television reception, which the receiver is connected. - For customers in Canada To prevent electric shock, match wide blade of important operating and maintenance (servicing) instructions in this manual could void your Sony...

Operating Instructions (primary manual)
Page 3
... Table of contents Basic Operations Playing a CD 4 Listening to the radio 6 Playing a tape 8 Recording on a tape 10 The CD Player Using the display 12 Locating a specific track 12 Playing tracks repeatedly (Repeat Play 13 Playing tracks in random order (Shuffle Play 14 Creating your own program (Program Play 14 The Radio Presetting radio stations 16 Playing preset radio stations 17 The Audio Emphasis Selecting the audio emphasis (SOUND/POWER DRIVE WOOFER/ GAME Xpand 18 The Timer Falling asleep to music 19 Setting Up Choosing the power sources 20 Connecting a game machine...
... Table of contents Basic Operations Playing a CD 4 Listening to the radio 6 Playing a tape 8 Recording on a tape 10 The CD Player Using the display 12 Locating a specific track 12 Playing tracks repeatedly (Repeat Play 13 Playing tracks in random order (Shuffle Play 14 Creating your own program (Program Play 14 The Radio Presetting radio stations 16 Playing preset radio stations 17 The Audio Emphasis Selecting the audio emphasis (SOUND/POWER DRIVE WOOFER/ GAME Xpand 18 The Timer Falling asleep to music 19 Setting Up Choosing the power sources 20 Connecting a game machine...
Operating Instructions (primary manual)
Page 4
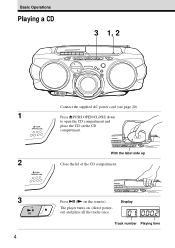
The player turns on the remote). Display Track number Playing time Press u (N on (direct poweron) and plays all the tracks once. Basic Operations Playing a CD 3 1, 2 1 2 3 4 Connect the supplied AC power cord (see page 20). Press ZPUSH OPEN/CLOSE down to open the CD compartment and place the CD on the CD compartment. With the label side up Close the lid of the CD compartment.
The player turns on the remote). Display Track number Playing time Press u (N on (direct poweron) and plays all the tracks once. Basic Operations Playing a CD 3 1, 2 1 2 3 4 Connect the supplied AC power cord (see page 20). Press ZPUSH OPEN/CLOSE down to open the CD compartment and place the CD on the CD compartment. With the label side up Close the lid of the CD compartment.
Operating Instructions (primary manual)
Page 5
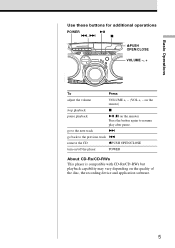
.../CD-RWs This player is compatible with CD-Rs/CD-RWs but playback capability may vary depending on the remote) Press the button again to the previous track . go to the next track > go back to resume play after pause. Basic Operations Use these buttons for additional operations POWER u ., > x ZPUSH OPEN/CLOSE VOLUME -, + To Press adjust the volume VOLUME +, - (VOL +, - on the remote) stop playback x pause playback u (X on the quality of the disc, the recording...
.../CD-RWs This player is compatible with CD-Rs/CD-RWs but playback capability may vary depending on the remote) Press the button again to the previous track . go to the next track > go back to resume play after pause. Basic Operations Use these buttons for additional operations POWER u ., > x ZPUSH OPEN/CLOSE VOLUME -, + To Press adjust the volume VOLUME +, - (VOL +, - on the remote) stop playback x pause playback u (X on the quality of the disc, the recording...
Operating Instructions (primary manual)
Page 6
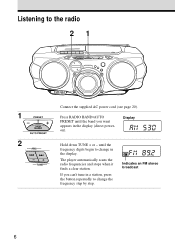
on). 2 Hold down TUNE + or - The player automatically scans the radio frequencies and stops when it finds a clear station. until the band you can't tune in the display. Indicates an FM stereo broadcast If you want appears in the display (direct power- Listening to the radio 21 Connect the supplied AC power cord (see page 20). 1 Press RADIO BAND•AUTO Display PRESET until the frequency digits begin to change in a station, press the button repeatedly to change the frequency step by step. 6
on). 2 Hold down TUNE + or - The player automatically scans the radio frequencies and stops when it finds a clear station. until the band you can't tune in the display. Indicates an FM stereo broadcast If you want appears in the display (direct power- Listening to the radio 21 Connect the supplied AC power cord (see page 20). 1 Press RADIO BAND•AUTO Display PRESET until the frequency digits begin to change in a station, press the button repeatedly to change the frequency step by step. 6
Operating Instructions (primary manual)
Page 7
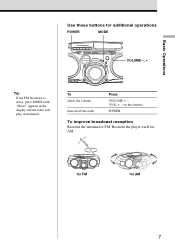
for FM for AM. on /off the radio Press VOLUME +, - (VOL +, - To adjust the volume turn on the remote) POWER To improve broadcast reception Reorient the antenna for additional operations POWER MODE VOLUME -, + Tip If the FM broadcast is noisy, press MODE until "Mono" appears in the display and the radio will play in monaural. Reorient the player itself for AM 7 Basic Operations Use these buttons for FM.
for FM for AM. on /off the radio Press VOLUME +, - (VOL +, - To adjust the volume turn on the remote) POWER To improve broadcast reception Reorient the antenna for additional operations POWER MODE VOLUME -, + Tip If the FM broadcast is noisy, press MODE until "Mono" appears in the display and the radio will play in monaural. Reorient the player itself for AM 7 Basic Operations Use these buttons for FM.
Operating Instructions (primary manual)
Page 8
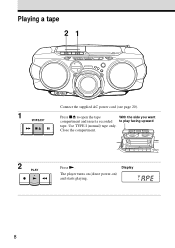
Display The player turns on (direct power-on) and starts playing. 8 Use TYPE I (normal) tape only. Close the compartment. 2 Press N. Playing a tape 21 Connect the supplied AC power cord (see page 20). 1 Press xZ to open the tape With the side you want compartment and insert a recorded to play facing upward tape.
Display The player turns on (direct power-on) and starts playing. 8 Use TYPE I (normal) tape only. Close the compartment. 2 Press N. Playing a tape 21 Connect the supplied AC power cord (see page 20). 1 Press xZ to open the tape With the side you want compartment and insert a recorded to play facing upward tape.
Operating Instructions (primary manual)
Page 10
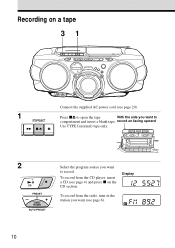
Recording on facing upward Use TYPE I (normal) tape only. record on a tape 31 1 2 10 Connect the supplied AC power cord (see page 20). Display To record from the CD player, insert a CD (see page 6). Press xZ to open the tape With the side you want to compartment and insert a blank tape. To record from the radio, tune in the station you want to record. Select the program source you want (see page 4) and press x on the CD section.
Recording on facing upward Use TYPE I (normal) tape only. record on a tape 31 1 2 10 Connect the supplied AC power cord (see page 20). Display To record from the CD player, insert a CD (see page 6). Press xZ to open the tape With the side you want to compartment and insert a blank tape. To record from the radio, tune in the station you want to record. Select the program source you want (see page 4) and press x on the CD section.

Operating Instructions (primary manual)
Page 13
... number buttons. tracks in 1 Press MODE until "REP" disappears from the display. Playing tracks repeatedly (Repeat Play) You can play tracks repeatedly in normal, shuffle or program play modes (see step 3 on page 14). 3 Press u. 13 On the remote • Use N instead of u. • When you want to repeat. 3 Press u. The CD Player MODE 1 Press x. To repeat Do this a single track 1 Press MODE until "REP ALL" appears. 2 Press u. all the tracks 1 Press MODE until "REP 1" appears. 2 Press . programed tracks...
... number buttons. tracks in 1 Press MODE until "REP" disappears from the display. Playing tracks repeatedly (Repeat Play) You can play tracks repeatedly in normal, shuffle or program play modes (see step 3 on page 14). 3 Press u. 13 On the remote • Use N instead of u. • When you want to repeat. 3 Press u. The CD Player MODE 1 Press x. To repeat Do this a single track 1 Press MODE until "REP ALL" appears. 2 Press u. all the tracks 1 Press MODE until "REP 1" appears. 2 Press . programed tracks...

Operating Instructions (primary manual)
Page 16
... hold down the number button that you want the new station on for 2 seconds. The Radio Presetting radio stations You can preset up to 30 radio stations, 20 for FM and 10 for AM in any order. You can store radio stations into the player's memory. The stations are stored in the display. 3 Press DISPLAY ENT•MEMORY. You need to preset a station with a weak signal manually. 1 Press RADIO BAND•AUTO PRESET to the...
... hold down the number button that you want the new station on for 2 seconds. The Radio Presetting radio stations You can preset up to 30 radio stations, 20 for FM and 10 for AM in any order. You can store radio stations into the player's memory. The stations are stored in the display. 3 Press DISPLAY ENT•MEMORY. You need to preset a station with a weak signal manually. 1 Press RADIO BAND•AUTO PRESET to the...

Operating Instructions (primary manual)
Page 17
on the player or the number buttons on the remote to tune in a stored station. m 17 The Radio Playing preset radio stations Once you want appears in the display. 2 Press the number button to tune in to your favorite stations. PRESET -, + On the remote 1 Press BAND until the band you 've preset the stations, use PRESET + or - to tune in a preset station 12, press >10 and 1 first , and then press 2.) RADIO BAND AUTO PRESET 1 Press RADIO BAND•AUTO PRESET to select...
on the player or the number buttons on the remote to tune in a stored station. m 17 The Radio Playing preset radio stations Once you want appears in the display. 2 Press the number button to tune in to your favorite stations. PRESET -, + On the remote 1 Press BAND until the band you 've preset the stations, use PRESET + or - to tune in a preset station 12, press >10 and 1 first , and then press 2.) RADIO BAND AUTO PRESET 1 Press RADIO BAND•AUTO PRESET to select...
Operating Instructions (primary manual)
Page 20
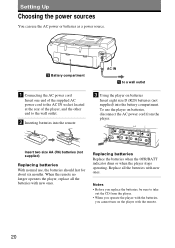
... power cord Insert one end of the supplied AC power cord to the AC IN socket located at the rear of the player, and the other end to take out the CD from the player. • When you operate the player with the batteries, you cannot turn on batteries, disconnect the AC power cord from the player. Replace all the batteries with the remote. 20 To use the player on the player...
... power cord Insert one end of the supplied AC power cord to the AC IN socket located at the rear of the player, and the other end to take out the CD from the player. • When you operate the player with the batteries, you cannot turn on batteries, disconnect the AC power cord from the player. Replace all the batteries with the remote. 20 To use the player on the player...

Operating Instructions (primary manual)
Page 23
... player has not been used for a long time, set it in the playback mode to warm it checked by battery leakage or corrosion. • The nameplate indicating operating voltage, power consumption, etc. If you have it up for the player to qualified personnel only. • Should any solid object or liquid fall into the player, unplug the player, and have any further. • Discs...
... player has not been used for a long time, set it in the playback mode to warm it checked by battery leakage or corrosion. • The nameplate indicating operating voltage, power consumption, etc. If you have it up for the player to qualified personnel only. • Should any solid object or liquid fall into the player, unplug the player, and have any further. • Discs...
Operating Instructions (primary manual)
Page 24
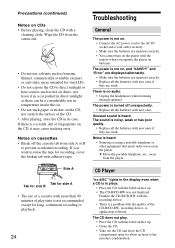
.... Troubleshooting General The power is not on the CD, nor scratch the surface of the CD. • After playing, store the CD in direct sunlight as benzine, thinner, commercially available cleaners or anti-static spray intended for long, continuous recording or playback. 24 CD Player "no audio. • Unplug the headphones when listening through speakers. Unusual sound is turned off the cassette tab from the player. c Move the portable...
.... Troubleshooting General The power is not on the CD, nor scratch the surface of the CD. • After playing, store the CD in direct sunlight as benzine, thinner, commercially available cleaners or anti-static spray intended for long, continuous recording or playback. 24 CD Player "no audio. • Unplug the headphones when listening through speakers. Unusual sound is turned off the cassette tab from the player. c Move the portable...

Operating Instructions (primary manual)
Page 25
... display disappear, plug the power cord and insert the batteries again. Use TYPE I (normal) tape and play . • Make sure the safety tab on the player. • Remove any obstacles in place. If the problem persists, please consult your TV becomes unstable. • If you are using the remote while listening to AM radio, noise may be heard. The sound drops out. The REC z button does not function...
... display disappear, plug the power cord and insert the batteries again. Use TYPE I (normal) tape and play . • Make sure the safety tab on the player. • Remove any obstacles in place. If the problem persists, please consult your TV becomes unstable. • If you are using the remote while listening to AM radio, noise may be heard. The sound drops out. The REC z button does not function...
Operating Instructions (primary manual)
Page 27
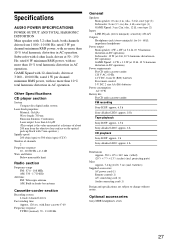
... bar antenna Cassette-corder section Recording system 4-track 2 channel stereo Fast winding time Approx. 120 sec. with no more than 10 % total harmonic distortion in DC operation) Power requirements For CD radio cassette-corder: 120 V AC, 60 Hz 12 V DC, 8 size D (R20) batteries For remote control: 3 V DC, 2 size AA (R6) batteries Power consumption AC 35 W Battery life For CD radio cassette-corder: FM recording Sony R20P: approx. 6.5 h Sony alkaline LR20: approx. 18 h Tape playback Sony R20P: approx. 1.5 h Sony alkaline LR20: approx. 6 h CD playback Sony...
... bar antenna Cassette-corder section Recording system 4-track 2 channel stereo Fast winding time Approx. 120 sec. with no more than 10 % total harmonic distortion in DC operation) Power requirements For CD radio cassette-corder: 120 V AC, 60 Hz 12 V DC, 8 size D (R20) batteries For remote control: 3 V DC, 2 size AA (R6) batteries Power consumption AC 35 W Battery life For CD radio cassette-corder: FM recording Sony R20P: approx. 6.5 h Sony alkaline LR20: approx. 18 h Tape playback Sony R20P: approx. 1.5 h Sony alkaline LR20: approx. 6 h CD playback Sony...

Operating Instructions (primary manual)
Page 28
... the tape heads 26 Display 12 G, H GAME Xpand 18 I, J, K Improving broadcast reception 7 L, M, N, O Listening to the radio 6 Locating a specific track 12 P, Q Playing a CD 4 a tape 8 preset radio stations 17 tracks repeatedly 13 POWER DRIVE WOOFER 18 Power sources 20 Presetting radio stations 16 Program Play 14 R Radio stations playing 17 presetting 16 Recording on a tape 10 Repeat Play 13 S Selecting audio emphasis 18 tracks 5 Setting up 20 Shuffle Play 14 SOUND 18 T Timer Falling asleep to music 19 Troubleshooting 24 U, V, W, X, Y, Z Using the display 12 28 Sony Corporation Printed...
... the tape heads 26 Display 12 G, H GAME Xpand 18 I, J, K Improving broadcast reception 7 L, M, N, O Listening to the radio 6 Locating a specific track 12 P, Q Playing a CD 4 a tape 8 preset radio stations 17 tracks repeatedly 13 POWER DRIVE WOOFER 18 Power sources 20 Presetting radio stations 16 Program Play 14 R Radio stations playing 17 presetting 16 Recording on a tape 10 Repeat Play 13 S Selecting audio emphasis 18 tracks 5 Setting up 20 Shuffle Play 14 SOUND 18 T Timer Falling asleep to music 19 Troubleshooting 24 U, V, W, X, Y, Z Using the display 12 28 Sony Corporation Printed...

Marketing Specifications
Page 1
CFD-G70 CD/Radio/Cassette Recorder • CD-R/RW PLAYBACK COMPATIBILITY • REMOTE CONTROL • POWER DRIVE WOOFER (PDW) PROVIDES DYNAMIC AND POWERFUL SOUND • GAME X-PAND™ AND 5 SPEAKER SYSTEM • HIGH POWER OUTPUT 20W RMS (FTC: 12W TOTAL POWER OUTPUT) • BACKLIT LCD DISPLAY • DIGITAL AM/FM STEREO TUNER • TWIN AMPLIFER SYSTEMS FOR GREAT SOUND REPRODUCTION • 30 STATION MEMORY PRESETS (10AM/20FM) • 4 PATTERN ELECTRONIC SOUND MODE • MEGA BASS® SOUND SYSTEM • CD PLAYER WITH 1 BIT D/A CONVERTER •...
CFD-G70 CD/Radio/Cassette Recorder • CD-R/RW PLAYBACK COMPATIBILITY • REMOTE CONTROL • POWER DRIVE WOOFER (PDW) PROVIDES DYNAMIC AND POWERFUL SOUND • GAME X-PAND™ AND 5 SPEAKER SYSTEM • HIGH POWER OUTPUT 20W RMS (FTC: 12W TOTAL POWER OUTPUT) • BACKLIT LCD DISPLAY • DIGITAL AM/FM STEREO TUNER • TWIN AMPLIFER SYSTEMS FOR GREAT SOUND REPRODUCTION • 30 STATION MEMORY PRESETS (10AM/20FM) • 4 PATTERN ELECTRONIC SOUND MODE • MEGA BASS® SOUND SYSTEM • CD PLAYER WITH 1 BIT D/A CONVERTER •...

Marketing Specifications
Page 2
...you program for repeat-play of a single track, all tracks, RMS (Random Music Search) or Shuffle Play • SYNCHRONIZED CD/CASSETTE DUBBING starts compact disc play when cassette recording begins specifications DIGITAL FILTER: 8X Oversampling DIGITAL TO ANALOG CONVERSION: 1 Bit CD FREQUENCY RESPONSE: 20-20000Hz, +1,-2dB TUNER FREQUENCY RANGE: AM: 530-1710kHz FM: 87.6-108MHz ANTENNA SYSTEM: AM: Built-in Ferrite Bar Antenna FM: Telescopic Antenna TAPE SYSTEM: 4 track, 2 channel stereo cassette SPEAKERS: 4" (10cm) x 2 OUTPUTS: Headphone (stereo mini jack) POWER REQUIREMENTS: "D" x 6 Batteries...
...you program for repeat-play of a single track, all tracks, RMS (Random Music Search) or Shuffle Play • SYNCHRONIZED CD/CASSETTE DUBBING starts compact disc play when cassette recording begins specifications DIGITAL FILTER: 8X Oversampling DIGITAL TO ANALOG CONVERSION: 1 Bit CD FREQUENCY RESPONSE: 20-20000Hz, +1,-2dB TUNER FREQUENCY RANGE: AM: 530-1710kHz FM: 87.6-108MHz ANTENNA SYSTEM: AM: Built-in Ferrite Bar Antenna FM: Telescopic Antenna TAPE SYSTEM: 4 track, 2 channel stereo cassette SPEAKERS: 4" (10cm) x 2 OUTPUTS: Headphone (stereo mini jack) POWER REQUIREMENTS: "D" x 6 Batteries...


