Warranty Card
Page 1
... in exchange for defective parts for all labor charges. 2. REPAIR OR REPLACEMENT AS PROVIDED UNDER THIS WARRANTY IS THE EXCLUSIVE REMEDY OF THE CONSUMER. 4-557-147-22 Tape Cassette Player/Recorder/CD Player/Mini Disc ® DAT/Radio/Head Phone/Speaker/MIC/Personals Portable Audio LIMITED WARRANTY Sony Electronics Inc. ("Sony") warrants this Product is determined to be presented to service the Product. This warranty gives you specific legal rights, and...
... in exchange for defective parts for all labor charges. 2. REPAIR OR REPLACEMENT AS PROVIDED UNDER THIS WARRANTY IS THE EXCLUSIVE REMEDY OF THE CONSUMER. 4-557-147-22 Tape Cassette Player/Recorder/CD Player/Mini Disc ® DAT/Radio/Head Phone/Speaker/MIC/Personals Portable Audio LIMITED WARRANTY Sony Electronics Inc. ("Sony") warrants this Product is determined to be presented to service the Product. This warranty gives you specific legal rights, and...

Operating Instructions (primary manual)
Page 2
...plug to Part 15 of the FCC Rules. Model No. Information For customers in this manual could void your Sony dealer regarding this equipment. However, there is intended to alert the user to the presence of uninsulated "dangerous voltage" within the product's enclosure that to which can radiate radio frequency energy and, if not installed and used in the battery... CFD-E90 Serial No. 2 CAUTION The use of important operating and maintenance (servicing) instructions in a particular installation. Consult the dealer or an experienced radio/TV technician for a Class B digital ...
...plug to Part 15 of the FCC Rules. Model No. Information For customers in this manual could void your Sony dealer regarding this equipment. However, there is intended to alert the user to the presence of uninsulated "dangerous voltage" within the product's enclosure that to which can radiate radio frequency energy and, if not installed and used in the battery... CFD-E90 Serial No. 2 CAUTION The use of important operating and maintenance (servicing) instructions in a particular installation. Consult the dealer or an experienced radio/TV technician for a Class B digital ...

Operating Instructions (primary manual)
Page 3
... the radio 6 Playing a tape 8 Recording on a tape 10 The CD Player Using the display 12 Locating a specific point in a track 12 Playing tracks repeatedly (Repeat Play 13 Playing tracks in random order (Shuffle Play 14 Creating your own program (Program Play 14 The Radio Presetting radio stations 16 Playing preset radio stations 17 The Audio Emphasis Selecting the audio emphasis (MEGA BASS 18 The Timer Setting the clock 19 Waking up to music 20 Falling asleep to music 21 Setting Up Choosing the power sources 23 Additional Information Precautions 25 Troubleshooting 26...
... the radio 6 Playing a tape 8 Recording on a tape 10 The CD Player Using the display 12 Locating a specific point in a track 12 Playing tracks repeatedly (Repeat Play 13 Playing tracks in random order (Shuffle Play 14 Creating your own program (Program Play 14 The Radio Presetting radio stations 16 Playing preset radio stations 17 The Audio Emphasis Selecting the audio emphasis (MEGA BASS 18 The Timer Setting the clock 19 Waking up to music 20 Falling asleep to music 21 Setting Up Choosing the power sources 23 Additional Information Precautions 25 Troubleshooting 26...

Operating Instructions (primary manual)
Page 4
Display The player turns on (direct power-on the CD compartment. With the label side up Close the lid of the CD compartment. Basic Operations Playing a CD 3 1, 2 1 2 3 4 Connect the supplied AC power cord (see page 23). Press u. Track number Playing time Press ZPUSH OPEN/CLOSE down to open the CD compartment and place the CD on ) and plays all the tracks once.
Display The player turns on (direct power-on the CD compartment. With the label side up Close the lid of the CD compartment. Basic Operations Playing a CD 3 1, 2 1 2 3 4 Connect the supplied AC power cord (see page 23). Press u. Track number Playing time Press ZPUSH OPEN/CLOSE down to open the CD compartment and place the CD on ) and plays all the tracks once.
Operating Instructions (primary manual)
Page 6
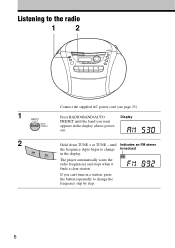
on). 2 Hold down TUNE + or TUNE - The player automatically scans the radio frequencies and stops when it finds a clear station. Listening to the radio 1 2 Connect the supplied AC power cord (see page 23). 1 Press RADIO•BAND•AUTO Display PRESET until Indicates an FM stereo the frequency digits begin to change broadcast in the display (direct power- until the band you can't tune in a station, press the button repeatedly to change the frequency step by step. 6 If you want appears in the display.
on). 2 Hold down TUNE + or TUNE - The player automatically scans the radio frequencies and stops when it finds a clear station. Listening to the radio 1 2 Connect the supplied AC power cord (see page 23). 1 Press RADIO•BAND•AUTO Display PRESET until Indicates an FM stereo the frequency digits begin to change broadcast in the display (direct power- until the band you can't tune in a station, press the button repeatedly to change the frequency step by step. 6 If you want appears in the display.

Operating Instructions (primary manual)
Page 8
Playing a tape 12 Connect the supplied AC power cord (see page 23). 1 Press xZ to open the tape With the side you want compartment and insert a recorded to play facing you tape. Close the compartment. 2 Press n. Use TYPE I (normal) tape only. Display The player turns on (direct power-on) and starts playing. 8
Playing a tape 12 Connect the supplied AC power cord (see page 23). 1 Press xZ to open the tape With the side you want compartment and insert a recorded to play facing you tape. Close the compartment. 2 Press n. Use TYPE I (normal) tape only. Display The player turns on (direct power-on) and starts playing. 8
Operating Instructions (primary manual)
Page 10
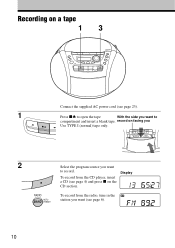
To record from the radio, tune in the station you want to compartment and insert a blank tape. Recording on a tape 13 1 2 10 Connect the supplied AC power cord (see page 4) and press x on facing you Use TYPE I (normal) tape only. Display To record from the CD player, insert a CD (see page 23). Select the program source you want to record. Press xZ to open the tape With the side you want (see page 6). record on the CD section.
To record from the radio, tune in the station you want to compartment and insert a blank tape. Recording on a tape 13 1 2 10 Connect the supplied AC power cord (see page 4) and press x on facing you Use TYPE I (normal) tape only. Display To record from the CD player, insert a CD (see page 23). Select the program source you want to record. Press xZ to open the tape With the side you want (see page 6). record on the CD section.
Operating Instructions (primary manual)
Page 13
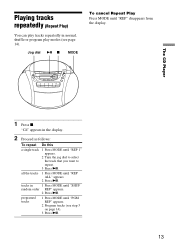
... repeat Do this a single track 1 Press MODE until "REP 1" appears. 2 Turn the jog dial to select the track that you want to repeat. 3 Press u. "Cd" appears in 1 Press MODE until "PGM REP" appears. 2 Program tracks (see page 14). all the tracks 1 Press MODE until "REP" disappears from the display. programed tracks 1 Press MODE until "SHUF random order REP" appears. 2 Press u. Playing tracks repeatedly (Repeat Play) You can play tracks repeatedly in normal, shuffle or program play modes...
... repeat Do this a single track 1 Press MODE until "REP 1" appears. 2 Turn the jog dial to select the track that you want to repeat. 3 Press u. "Cd" appears in 1 Press MODE until "PGM REP" appears. 2 Program tracks (see page 14). all the tracks 1 Press MODE until "REP" disappears from the display. programed tracks 1 Press MODE until "SHUF random order REP" appears. 2 Press u. Playing tracks repeatedly (Repeat Play) You can play tracks repeatedly in normal, shuffle or program play modes...

Operating Instructions (primary manual)
Page 20
... the set the volume, then press ENTER. To play . Each time you begin, make sure the (clock) indication is lit, press STANDBY. 1 Prepare the music source you want the music to go off . Then the power will enter into the standby mode. The indication lights up to music or a radio program at the preset time, and the player will go on page 19). a CD Insert a CD. 2 Press CLOCK/SLEEP/TIMER until "TIMER...
... the set the volume, then press ENTER. To play . Each time you begin, make sure the (clock) indication is lit, press STANDBY. 1 Prepare the music source you want the music to go off . Then the power will enter into the standby mode. The indication lights up to music or a radio program at the preset time, and the player will go on page 19). a CD Insert a CD. 2 Press CLOCK/SLEEP/TIMER until "TIMER...

Operating Instructions (primary manual)
Page 21
... until you reset them. 1 Play the music source you will start at the set time, the player will be turned off the power. Tips • To exit the standby mode, press STANDBY to make sure that n or z button of the radio, however, if you listen to before you turn off the player before the preset time, timer playback will hear that station at the preset time. In case of the tape player is...
... until you reset them. 1 Play the music source you will start at the set time, the player will be turned off the power. Tips • To exit the standby mode, press STANDBY to make sure that n or z button of the radio, however, if you listen to before you turn off the player before the preset time, timer playback will hear that station at the preset time. In case of the tape player is...

Operating Instructions (primary manual)
Page 22
... than the set the sleeping timer. Set the waking up at higher volume. 22 For instance, you cannot store different radio stations. • You can sleep at lower volume and wake up timer first (see page 20), turn off until the tape reaches the end. However, you can set different volume for the waking up to turn on the power, and then set time, the player will...
... than the set the sleeping timer. Set the waking up at higher volume. 22 For instance, you cannot store different radio stations. • You can sleep at lower volume and wake up timer first (see page 20), turn off until the tape reaches the end. However, you can set different volume for the waking up to turn on the power, and then set time, the player will...
Operating Instructions (primary manual)
Page 24
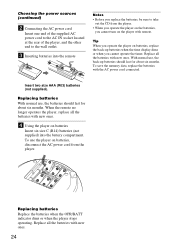
... supplied AC power cord to the AC IN socket located at the rear of the player, and the other end to take out the CD from the player. With normal use, the back-up batteries when the time display dims or when you cannot turn on the player with remote. To use , the batteries should last for about six months. When the remote no longer operates the player, replace...
... supplied AC power cord to the AC IN socket located at the rear of the player, and the other end to take out the CD from the player. With normal use, the back-up batteries when the time display dims or when you cannot turn on the player with remote. To use , the batteries should last for about six months. When the remote no longer operates the player, replace...

Operating Instructions (primary manual)
Page 25
... supplied AC power cord; On operation • If the player is brought directly from a cold to a warm location, or is located at the bottom. Should this occur, the player will not be played on an inclined or unstable place. • Do not place anything within 10 mm of the side of time. • For battery operation, use any further. • Discs with adhesive tape...
... supplied AC power cord; On operation • If the player is brought directly from a cold to a warm location, or is located at the bottom. Should this occur, the player will not be played on an inclined or unstable place. • Do not place anything within 10 mm of the side of time. • For battery operation, use any further. • Discs with adhesive tape...

Operating Instructions (primary manual)
Page 26
... such as there can play back discs that conform to the CD standard and may cause tracking error. Notes on and then press DISPLAY for about 2 seconds to cancel the demonstration mode. There is a recording standard used for the Audio CDs. c Set the clock, or turn on the player with new ones. Unusual sound is not on. • Connect the AC power cord to direct sunlight or heat sources...
... such as there can play back discs that conform to the CD standard and may cause tracking error. Notes on and then press DISPLAY for about 2 seconds to cancel the demonstration mode. There is a recording standard used for the Audio CDs. c Set the clock, or turn on the player with new ones. Unusual sound is not on. • Connect the AC power cord to direct sunlight or heat sources...
Operating Instructions (primary manual)
Page 27
...; The CD-R/CD-RW was recorded on the cassette is in place. The audio is unavoidable. The sound drops out. Timer The timer does not operate. • Make sure the time on TYPE I (normal) tape only. You cannot open/close the lid. The sound is distorted. • The TYPE II (high position) or TYPE IV (metal) tape is displayed. CD Player The CD does not play or "no diSC" lights in the display even when a CD is...
...; The CD-R/CD-RW was recorded on the cassette is in place. The audio is unavoidable. The sound drops out. Timer The timer does not operate. • Make sure the time on TYPE I (normal) tape only. You cannot open/close the lid. The sound is distorted. • The TYPE II (high position) or TYPE IV (metal) tape is displayed. CD Player The CD does not play or "no diSC" lights in the display even when a CD is...

Operating Instructions (primary manual)
Page 28
... player when using the remote. After all the batteries in the remote with new ones if they are weak. • Make sure that you still have problems, unplug the AC power cord and remove all the batteries. After trying the above remedies, if you are pointing the remote at the remote sensor on the player. • Remove any obstacles in the display disappear, plug the power cord...
... player when using the remote. After all the batteries in the remote with new ones if they are weak. • Make sure that you still have problems, unplug the AC power cord and remove all the batteries. After trying the above remedies, if you are pointing the remote at the remote sensor on the player. • Remove any obstacles in the display disappear, plug the power cord...

Operating Instructions (primary manual)
Page 30
... kHz Antennas FM: Telescopic antenna AM: Built-in AC operation. Specifications AUDIO POWER SPECIFICATIONS POWER OUTPUT AND TOTAL HARMONIC DISTORTION With 4-ohm loads, both channels driven from the objective lens surface on the optical pick-up : 4.5 V DC, 3 size AA (R6) batteries For remote control: 3 V DC, 2 size AAA (R03) batteries Power consumption AC 14 W Battery life For CD radio cassette-corder: FM recording Sony R14P: approx. 13.5 h Sony alkaline LR14: approx. 20 h Tape playback Sony R14P: approx. 7.5 h Sony...
... kHz Antennas FM: Telescopic antenna AM: Built-in AC operation. Specifications AUDIO POWER SPECIFICATIONS POWER OUTPUT AND TOTAL HARMONIC DISTORTION With 4-ohm loads, both channels driven from the objective lens surface on the optical pick-up : 4.5 V DC, 3 size AA (R6) batteries For remote control: 3 V DC, 2 size AAA (R03) batteries Power consumption AC 14 W Battery life For CD radio cassette-corder: FM recording Sony R14P: approx. 13.5 h Sony alkaline LR14: approx. 20 h Tape playback Sony R14P: approx. 7.5 h Sony...
Operating Instructions (primary manual)
Page 31
...D, E, F, G, H Demagnetizing the tape heads 29 Display 12 I, J, K Improving broadcast reception 7 L Listening to the radio 6 Locating a specific track 12 M, N, O MEGA BASS 18 P, Q Playing a CD 4 a tape 8 preset radio stations 17 tracks repeatedly 13 Power sources 23 Presetting radio stations 16 Program Play 14 R Radio stations playing 17 presetting 16 Recording on a tape 10 Repeat Play 13 S Selecting audio emphasis 18 tracks 5 Setting the clock 19 Setting up 23 Shuffle Play 14 T Timer Falling asleep to music 21 Waking up to music 20 Troubleshooting 26 U, V, W, X, Y, Z Using the display 12 31
...D, E, F, G, H Demagnetizing the tape heads 29 Display 12 I, J, K Improving broadcast reception 7 L Listening to the radio 6 Locating a specific track 12 M, N, O MEGA BASS 18 P, Q Playing a CD 4 a tape 8 preset radio stations 17 tracks repeatedly 13 Power sources 23 Presetting radio stations 16 Program Play 14 R Radio stations playing 17 presetting 16 Recording on a tape 10 Repeat Play 13 S Selecting audio emphasis 18 tracks 5 Setting the clock 19 Setting up 23 Shuffle Play 14 T Timer Falling asleep to music 21 Waking up to music 20 Troubleshooting 26 U, V, W, X, Y, Z Using the display 12 31
Marketing Specifications
Page 1
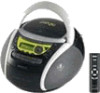
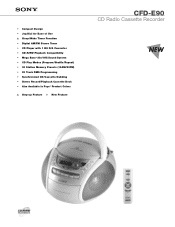
® • Compact Design • Jog Dial for Ease of Use v Sleep/Wake Timer Function • Digital AM/FM Stereo Tuner • CD Player with 1 Bit D/A Converter • CD-R/RW Playback Compatibility • Mega Bass® (On/Off) Sound System • CD Play Modes (Program/Shuffle/Repeat) • 30 Station Memory Presets (10AM/20FM) • 20 Track RMS Programming • Synchronized CD/Cassette Dubbing • Stereo Record/Playback Cassette Deck • Also Available In Psyc® Product Colors v Step-up Feature ◗ New Feature CFD-E90 CD Radio Cassette Recorder
® • Compact Design • Jog Dial for Ease of Use v Sleep/Wake Timer Function • Digital AM/FM Stereo Tuner • CD Player with 1 Bit D/A Converter • CD-R/RW Playback Compatibility • Mega Bass® (On/Off) Sound System • CD Play Modes (Program/Shuffle/Repeat) • 30 Station Memory Presets (10AM/20FM) • 20 Track RMS Programming • Synchronized CD/Cassette Dubbing • Stereo Record/Playback Cassette Deck • Also Available In Psyc® Product Colors v Step-up Feature ◗ New Feature CFD-E90 CD Radio Cassette Recorder
Marketing Specifications
Page 2
... Playback Compatibility plays all compact discs including CD-R recordable and CD-RW rewritable • Mega Bass® Sound System produces rich, deep, bass tones for more powerful overall sound • CD Play Modes (Program/Shuffle/Repeat) lets you hear tracks in sequence as recorded,in program RMS order or a single track over and over, or all tracks in random (Shuffle) order • 30 Station Memory Presets (10AM/20FM) uses electronic settings for easy one-button tuning of your choice of Sony. CFD-E90 CD Radio Cassette Recorder features...
... Playback Compatibility plays all compact discs including CD-R recordable and CD-RW rewritable • Mega Bass® Sound System produces rich, deep, bass tones for more powerful overall sound • CD Play Modes (Program/Shuffle/Repeat) lets you hear tracks in sequence as recorded,in program RMS order or a single track over and over, or all tracks in random (Shuffle) order • 30 Station Memory Presets (10AM/20FM) uses electronic settings for easy one-button tuning of your choice of Sony. CFD-E90 CD Radio Cassette Recorder features...


