
Operating Instructions
Page 5
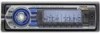
... Playing tracks 14 Display items 14 Setting the play 11 Radio Storing and receiving stations 11 Storing automatically - SET 16 Using optional equipment 17 Auxiliary audio equipment 17 CD/MD changer 18 Marine remote commander RM-X55M/X11M 18 Additional Information Precautions 19 Notes on discs ...19 Playback order of controls and basic operations Main unit 8 Card remote commander RM-X151 10 CD Display items 11 Repeat and ...
... Playing tracks 14 Display items 14 Setting the play 11 Radio Storing and receiving stations 11 Storing automatically - SET 16 Using optional equipment 17 Auxiliary audio equipment 17 CD/MD changer 18 Marine remote commander RM-X55M/X11M 18 Additional Information Precautions 19 Notes on discs ...19 Playback order of controls and basic operations Main unit 8 Card remote commander RM-X151 10 CD Display items 11 Repeat and ...
Operating Instructions
Page 9
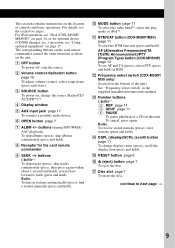
... commander I SEEK -/+ buttons CD/PD*1: To skip tracks (press); M Number buttons CD/PD*1: (3): REP page 11 (4): SHUF page 11 (6): PAUSE To pause playback of iPod*1. buttons (during MP3/WMA/ AAC playback) To skip albums (press); Radio: To tune in RDS. Radio: To receive stored stations (press); H ...Receptor for optional device (CD/MD changer, etc.,) operation, see the respective pages. Q Disc slot page 7 To insert the disc. K BTM/CAT button (CDX-M50IP/M30) page 11 To ...
... commander I SEEK -/+ buttons CD/PD*1: To skip tracks (press); M Number buttons CD/PD*1: (3): REP page 11 (4): SHUF page 11 (6): PAUSE To pause playback of iPod*1. buttons (during MP3/WMA/ AAC playback) To skip albums (press); Radio: To tune in RDS. Radio: To receive stored stations (press); H ...Receptor for optional device (CD/MD changer, etc.,) operation, see the respective pages. Q Disc slot page 7 To insert the disc. K BTM/CAT button (CDX-M50IP/M30) page 11 To ...
Operating Instructions
Page 10
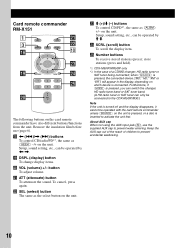
... cancel, press again. on the card remote commander have also different buttons/functions from the unit. Keep the AUX cap out of the reach of a CD/MD changer, HD radio tuner or SAT tuner being connected; wd wf 1 2 3 4 5 6 wg w; + VOL - ql DSPL (display) button To change display items. w;... etc., can only be connected to prevent accidental swallowing. 10 wg Number buttons To receive stored stations (press); About AUX cap When not using the AUX input jack (5), use (page 6). qk buttons To control CD/radio/PD*1, the same as the select button on the unit is pressed, or...
... cancel, press again. on the card remote commander have also different buttons/functions from the unit. Keep the AUX cap out of the reach of a CD/MD changer, HD radio tuner or SAT tuner being connected; wd wf 1 2 3 4 5 6 wg w; + VOL - ql DSPL (display) button To change display items. w;... etc., can only be connected to prevent accidental swallowing. 10 wg Number buttons To receive stored stations (press); About AUX cap When not using the AUX input jack (5), use (page 6). qk buttons To control CD/radio/PD*1, the same as the select button on the unit is pressed, or...
Operating Instructions
Page 11
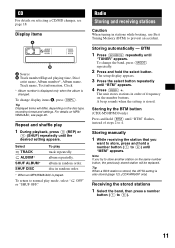
... on selecting a CD/MD changer, see page 20. For details on the number buttons. album in stations ...in random order. * When an MP3/WMA/AAC is also stored (page 12). (CDX-MR50IP only) Receiving the stored stations 1 Select the band, then press a number button ((1) to (6)) until "BTM" appears. 4 Press (SEEK) +. Storing... disc in order of steps 2 to store another station on the disc type, recording format and settings. Radio Storing and receiving stations Caution When tuning in random order. The setup display appears. 3 Press the select button repeatedly until "MEM" appears. ...
... on selecting a CD/MD changer, see page 20. For details on the number buttons. album in stations ...in random order. * When an MP3/WMA/AAC is also stored (page 12). (CDX-MR50IP only) Receiving the stored stations 1 Select the band, then press a number button ((1) to (6)) until "BTM" appears. 4 Press (SEEK) +. Storing... disc in order of steps 2 to store another station on the disc type, recording format and settings. Radio Storing and receiving stations Caution When tuning in random order. The setup display appears. 3 Press the select button repeatedly until "MEM" appears. ...
Operating Instructions
Page 24
... A disc/track name is not correct. Automatic tuning is not possible. • Setting of speakers/amplifiers is complete. t Be sure to receive the channel that you want to the dock connector, disconnect the iPod from the dock connector, then reconnect. t Connect iPod to check the ...connection. Error displays/Messages BLANK Tracks have not been recorded on during automatic tuning. FAILURE (Illuminates for the current station. t Insert a music CD in the CD/MD changer. t Install the unit at a station: Set "MONO-ON" (page 17). • The broadcast signal is connected, storing ...
... A disc/track name is not correct. Automatic tuning is not possible. • Setting of speakers/amplifiers is complete. t Be sure to receive the channel that you want to the dock connector, disconnect the iPod from the dock connector, then reconnect. t Connect iPod to check the ...connection. Error displays/Messages BLANK Tracks have not been recorded on during automatic tuning. FAILURE (Illuminates for the current station. t Insert a music CD in the CD/MD changer. t Install the unit at a station: Set "MONO-ON" (page 17). • The broadcast signal is connected, storing ...

