
Operating Instructions
Page 2
... harmful interference in the United States. BBE MP works by generating even-order harmonics from that this Sony Compact Disc Player. Increase the separation between the equipment and receiver. - Consult the dealer or an experienced radio/TV...images for details on a disc is possible. • CD-R/CD-RW which the receiver is connected. - R The BBE MP process improves digitally compressed sound, such as the disc name, artist name, and track names. Reorient or relocate the receiving antenna. - For disposal or recycling information, please contact your nearest authorized Sony...
... harmful interference in the United States. BBE MP works by generating even-order harmonics from that this Sony Compact Disc Player. Increase the separation between the equipment and receiver. - Consult the dealer or an experienced radio/TV...images for details on a disc is possible. • CD-R/CD-RW which the receiver is connected. - R The BBE MP process improves digitally compressed sound, such as the disc name, artist name, and track names. Reorient or relocate the receiving antenna. - For disposal or recycling information, please contact your nearest authorized Sony...

Operating Instructions
Page 3
Clock 13 CD Player CD/MD Unit (optional) Playing a disc 14 Display items 15 Playing tracks repeatedly - Disc List 18 * Functions available with optional CD/MD unit Radio Storing stations automatically - Auto Clear 27 Storing the images - EQ7 30 Adjusting the bass and treble -...volume - Custom 35 Initializing the unit - Shuffle 17 Labeling a CD - Effect 24 Selecting a wallpaper - Skin 22 Setting the character color - Wallpaper 25 Setting a panorama image - Snapshot 28 Selecting the start-up image - ATT 29 Setting the Dynamic Soundstage Organizer - Disc Memo 17...
Clock 13 CD Player CD/MD Unit (optional) Playing a disc 14 Display items 15 Playing tracks repeatedly - Disc List 18 * Functions available with optional CD/MD unit Radio Storing stations automatically - Auto Clear 27 Storing the images - EQ7 30 Adjusting the bass and treble -...volume - Custom 35 Initializing the unit - Shuffle 17 Labeling a CD - Effect 24 Selecting a wallpaper - Skin 22 Setting the character color - Wallpaper 25 Setting a panorama image - Snapshot 28 Selecting the start-up image - ATT 29 Setting the Dynamic Soundstage Organizer - Disc Memo 17...

Operating Instructions
Page 4
When selecting the item in the menus (DISC) (M) : to select upwards (SEEK) ( BACK SOURCE DISC - Location of controls Card remote commander RM-X145A OPEN/CLOSE CAT REP SHUF 1 2 3 BBE MP PAUSE 4 5 6 SCREEN CAPTURE IMAGE MENU DISC + MODE SEEK- SEEK+ ENTER OFF + ATT VOL -
When selecting the item in the menus (DISC) (M) : to select upwards (SEEK) ( BACK SOURCE DISC - Location of controls Card remote commander RM-X145A OPEN/CLOSE CAT REP SHUF 1 2 3 BBE MP PAUSE 4 5 6 SCREEN CAPTURE IMAGE MENU DISC + MODE SEEK- SEEK+ ENTER OFF + ATT VOL -

Operating Instructions
Page 6
...made with the Traffic Laws in your country. • For your safety, the images from the VIDEO IN automatically disappear after you have any other soft drinks onto the unit or discs. Should this manual, please consult your nearest Sony dealer. Moisture condensation On a rainy day or in a very damp area, ...may cause injury or damage the display. • Bright points of the unit. To maintain high sound quality Be careful not to cool off , but CD/MP3 sound can be heard. Notes on the LCD display. This is operating. • Do not use the Disc Memo feature while driving, or ...
...made with the Traffic Laws in your country. • For your safety, the images from the VIDEO IN automatically disappear after you have any other soft drinks onto the unit or discs. Should this manual, please consult your nearest Sony dealer. Moisture condensation On a rainy day or in a very damp area, ...may cause injury or damage the display. • Bright points of the unit. To maintain high sound quality Be careful not to cool off , but CD/MP3 sound can be heard. Notes on the LCD display. This is operating. • Do not use the Disc Memo feature while driving, or ...

Operating Instructions
Page 10
...ENTER R dial CUSTOM MENU 1 During playback or radio reception, press (MENU). Displaying the lists. Settings for the system of the unit. Settings for display images. As you press < or ,, the item changes as follows: List y Display y Edit y Setup y Sound y Custom y PlayMode 3 Press < or... PlayMode - Operation by the card remote commander: OPEN/CLOSE CAT MENU BACK REP SHUF 1 2 3 BBE MP PAUSE 4 5 6 SCREEN CAPTURE IMAGE MENU DISC + MODE SEEK- During the menu operation: To return to the normal display. During the menu operation: To return to the normal display....
...ENTER R dial CUSTOM MENU 1 During playback or radio reception, press (MENU). Displaying the lists. Settings for the system of the unit. Settings for display images. As you press < or ,, the item changes as follows: List y Display y Edit y Setup y Sound y Custom y PlayMode 3 Press < or... PlayMode - Operation by the card remote commander: OPEN/CLOSE CAT MENU BACK REP SHUF 1 2 3 BBE MP PAUSE 4 5 6 SCREEN CAPTURE IMAGE MENU DISC + MODE SEEK- During the menu operation: To return to the normal display. During the menu operation: To return to the normal display....

Operating Instructions
Page 11
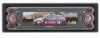
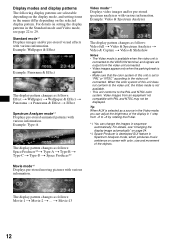
...shift menu changes as follows: Standard mode t Spectrum Analyzer mode t Movie mode t Video mode t Standard mode 2 Press (IMAGE) repeatedly to select the desired display pattern. SEEK+ ENTER IMAGE 1 During playback or radio reception, press (SCREEN) repeatedly to next page t CUSTOM During playback or radio reception, press (... *2 Available only when no shift menu is displayed. *3 Available only when an MP3 file is played. *4 Available only when an optional CD/MD unit is connected. *5 To stop searching, rotate the R dial in various ways depending on the shift menu selected. For details on...
...shift menu changes as follows: Standard mode t Spectrum Analyzer mode t Movie mode t Video mode t Standard mode 2 Press (IMAGE) repeatedly to select the desired display pattern. SEEK+ ENTER IMAGE 1 During playback or radio reception, press (SCREEN) repeatedly to next page t CUSTOM During playback or radio reception, press (... *2 Available only when no shift menu is displayed. *3 Available only when an MP3 file is played. *4 Available only when an optional CD/MD unit is connected. *5 To stop searching, rotate the R dial in various ways depending on the shift menu selected. For details on...
Operating Instructions
Page 12
... is selected as follows: Space Producer*2t Type-A t Type-B t Type-C t Type-D t Space Producer*2 Video mode*1 Displays video images and/or pre-stored spectrum analyzers with various information. Movie mode*1 Displays pre-stored moving pictures with various information. The display pattern changes ...Displays pre-stored animated patterns with various information. When the color system of the objects. For details, see "Changing the display image automatically" on page 24. *2 Space Producer is developed GUI feature in Spectrum Analyzer mode, which produces music ambience on setting ...
... is selected as follows: Space Producer*2t Type-A t Type-B t Type-C t Type-D t Space Producer*2 Video mode*1 Displays video images and/or pre-stored spectrum analyzers with various information. Movie mode*1 Displays pre-stored moving pictures with various information. The display pattern changes ...Displays pre-stored animated patterns with various information. When the color system of the objects. For details, see "Changing the display image automatically" on page 24. *2 Space Producer is developed GUI feature in Spectrum Analyzer mode, which produces music ambience on setting ...

Operating Instructions
Page 13
...and the calendar - "Complete" appears, and the display returns to select "YES," then press (ENTER). After pressing the reset button, the start-up image" on the unit first, then set the day, the year, hour and minute. The confirmation display appears after replacing the car battery or changing the... in 11 steps (from 2004 to 10) by rotating the R dial. • You can set . • You can change the start -up image appears and the demonstration starts automatically. Tips • During the demonstration display, you must reset the unit. For details, see "Selecting the start -up...
...and the calendar - "Complete" appears, and the display returns to select "YES," then press (ENTER). After pressing the reset button, the start-up image" on the unit first, then set the day, the year, hour and minute. The confirmation display appears after replacing the car battery or changing the... in 11 steps (from 2004 to 10) by rotating the R dial. • You can set . • You can change the start -up image appears and the demonstration starts automatically. Tips • During the demonstration display, you must reset the unit. For details, see "Selecting the start -up...

Operating Instructions
Page 22
Image Settings The setting items available in a station through a list - The display returns to the normal display. The display returns to the normal display. Tuning in ...
Image Settings The setting items available in a station through a list - The display returns to the normal display. The display returns to the normal display. Tuning in ...

Operating Instructions
Page 23
... < or , repeatedly to select "Display," then press (ENTER). 3 Press < or , repeatedly to select "Char Color," then press (ENTER). 4 Press < or , repeatedly to contrast against background images. To return to the normal display. 23 The display returns to the former color levels, select "NO," then press (ENTER). 7 Press (MENU). Each time you...
... < or , repeatedly to select "Display," then press (ENTER). 3 Press < or , repeatedly to select "Char Color," then press (ENTER). 4 Press < or , repeatedly to contrast against background images. To return to the normal display. 23 The display returns to the former color levels, select "NO," then press (ENTER). 7 Press (MENU). Each time you...

Operating Instructions
Page 24
..., then press (ENTER). 5 Press (MENU). The display returns to select the desired speed, "FAST," "MIDDLE," or "SLOW," then press (ENTER). 5 Press (MENU). To cancel the image change the display image automatically at a specified speed. 1 Press (MENU). 2 Press < or , repeatedly to select "Display," then press (ENTER). 3 Press < or , repeatedly to select "Auto...
..., then press (ENTER). 5 Press (MENU). The display returns to select the desired speed, "FAST," "MIDDLE," or "SLOW," then press (ENTER). 5 Press (MENU). To cancel the image change the display image automatically at a specified speed. 1 Press (MENU). 2 Press < or , repeatedly to select "Display," then press (ENTER). 3 Press < or , repeatedly to select "Auto...

Operating Instructions
Page 25
... to select "Wallpaper," then press (ENTER). 4 Press < or , repeatedly to select "Auto," then press (ENTER). 5 Press < or , repeatedly to display user stored images in sequence. 1 Press (MENU). 2 Press < or , repeatedly to select "Display," then press (ENTER). 3 Press < or , repeatedly to select "Wallpaper," then press... press (ENTER). 4 Press < or , repeatedly to select "Select," then press (ENTER). 5 Press < or , repeatedly to select the desired image, then press (ENTER). 5 Press (MENU). The display returns to select "USER" or "ALL," then press (ENTER). 6 Press (MENU). to display ...
... to select "Wallpaper," then press (ENTER). 4 Press < or , repeatedly to select "Auto," then press (ENTER). 5 Press < or , repeatedly to display user stored images in sequence. 1 Press (MENU). 2 Press < or , repeatedly to select "Display," then press (ENTER). 3 Press < or , repeatedly to select "Wallpaper," then press... press (ENTER). 4 Press < or , repeatedly to select "Select," then press (ENTER). 5 Press < or , repeatedly to select the desired image, then press (ENTER). 5 Press (MENU). The display returns to select "USER" or "ALL," then press (ENTER). 6 Press (MENU). to display ...

Operating Instructions
Page 26
... on the selected display patterns in the Video mode. Standard3 y Wide3 y Cinema3 To adjust the image position Cinema and Wide type images can deform or clip out images to fit the screen size with only the left and right sides of 16 to 3. Cinema1: ... Cinema2 y Cinema1 When "Video & Capture" or "Video & Slideshow" is selected. Aspect You can be displayed correctly. Display patterns and image types The following image types are available depending on the selected image mode (aspect ratio), display characters may not be scrolled up or down by pressing M or m. 5 Press (MENU).
... on the selected display patterns in the Video mode. Standard3 y Wide3 y Cinema3 To adjust the image position Cinema and Wide type images can deform or clip out images to fit the screen size with only the left and right sides of 16 to 3. Cinema1: ... Cinema2 y Cinema1 When "Video & Capture" or "Video & Slideshow" is selected. Aspect You can be displayed correctly. Display patterns and image types The following image types are available depending on the selected image mode (aspect ratio), display characters may not be scrolled up or down by pressing M or m. 5 Press (MENU).

Operating Instructions
Page 27
... appears only when the source, disc, album, or track currently selected is selected. Cinema2: An image with an aspect ratio of 2.35 to 1, with only the left and right sides of the image being enlarged to fill the area for the Capture and Slide show mode. When "Video & Capture... Press < or , repeatedly to select "Auto Clear," then press (ENTER). 4 Press (ENTER) repeatedly to enjoy images. Wide3: An image with an aspect ratio of 16 to 9, with only the left and right sides of the image being enlarged to the normal display. To restore display characters, select "OFF" in step 4. The display...
... appears only when the source, disc, album, or track currently selected is selected. Cinema2: An image with an aspect ratio of 2.35 to 1, with only the left and right sides of the image being enlarged to fill the area for the Capture and Slide show mode. When "Video & Capture... Press < or , repeatedly to select "Auto Clear," then press (ENTER). 4 Press (ENTER) repeatedly to enjoy images. Wide3: An image with an aspect ratio of 16 to 9, with only the left and right sides of the image being enlarged to the normal display. To restore display characters, select "OFF" in step 4. The display...

Operating Instructions
Page 28
...," then press (ENTER). 4 Press < or , repeatedly to select "Select," then press (ENTER). 5 Press < or , repeatedly to select the desired image to the previous display. Use for public and profit purposes require permission of the unit, set "Video" in step 4. "Complete" appears, then the display returns... to "PAL" or "NTSC." • Do not turn off the unit while storing the image, otherwise the image may not be deleted completely. • It takes a while to delete. Deleting the stored image - For details on changing the aspect ratio, see "Selecting the aspect ratio" on page 26...
...," then press (ENTER). 4 Press < or , repeatedly to select "Select," then press (ENTER). 5 Press < or , repeatedly to select the desired image to the previous display. Use for public and profit purposes require permission of the unit, set "Video" in step 4. "Complete" appears, then the display returns... to "PAL" or "NTSC." • Do not turn off the unit while storing the image, otherwise the image may not be deleted completely. • It takes a while to delete. Deleting the stored image - For details on changing the aspect ratio, see "Selecting the aspect ratio" on page 26...

Operating Instructions
Page 29
... set "BBE MP" in "PlayMode" to "ON" or "OFF." BBE MP The BBE MP process effectively adds warmth and provides clear CD quality sound even from heavily compressed MP3 material. Note The BBE MP function is available only when playing back on this unit, press (MENU...), then set as a start-up image. • A previously selected start-up screen. 1 Press (MENU). 2 Press < or , repeatedly to select "Edit," then press (ENTER). 3 Press < or , repeatedly to select "...
... set "BBE MP" in "PlayMode" to "ON" or "OFF." BBE MP The BBE MP process effectively adds warmth and provides clear CD quality sound even from heavily compressed MP3 material. Note The BBE MP function is available only when playing back on this unit, press (MENU...), then set as a start-up image. • A previously selected start-up screen. 1 Press (MENU). 2 Press < or , repeatedly to select "Edit," then press (ENTER). 3 Press < or , repeatedly to select "...

Operating Instructions
Page 30
...activated, equalizer settings are automatically adjusted for 7 music types (Xplod, Vocal, Club, Jazz, NewAge, Rock, and Custom). DSO mode and image of the DSO mode increases as if there were speakers above the dashboard (virtual speakers). To cancel the DSO mode, select "OFF." ... Tip The sound effect of virtual speakers *3 *3 *2 *2 *1 *1 *4 *4 *1 DSO 1 *2 DSO 2 *3 DSO 3 *4 DSO OFF 1 Press (SOURCE) to select a source (radio, CD, MD, or AUX). 2 Press (MENU). 3 Press < or , repeatedly to select "Sound," then press (ENTER). 4 Press < or , repeatedly to select "DSO," then press (ENTER). 5...
...activated, equalizer settings are automatically adjusted for 7 music types (Xplod, Vocal, Club, Jazz, NewAge, Rock, and Custom). DSO mode and image of the DSO mode increases as if there were speakers above the dashboard (virtual speakers). To cancel the DSO mode, select "OFF." ... Tip The sound effect of virtual speakers *3 *3 *2 *2 *1 *1 *4 *4 *1 DSO 1 *2 DSO 2 *3 DSO 3 *4 DSO OFF 1 Press (SOURCE) to select a source (radio, CD, MD, or AUX). 2 Press (MENU). 3 Press < or , repeatedly to select "Sound," then press (ENTER). 4 Press < or , repeatedly to select "DSO," then press (ENTER). 5...

Operating Instructions
Page 35
...then press (ENTER). To cancel initializing, press (MENU). Initialize If you have initialized. • You cannot delete the pre-stored images in this unit. 35 Capture - Setup (Contrast, Dimmer, Video, Commander), Edit (Name Edit, Name Delete, Picture Delete, Opening), Display (...," then press (ENTER). 3 Press < or , repeatedly to select the desired function to select "Initialize," then press (ENTER). ATT - stores the image at the moment the shutter clicked (page 28). Initializing the unit - The confirmation display appears. 4 Press < or , repeatedly to the normal display....
...then press (ENTER). To cancel initializing, press (MENU). Initialize If you have initialized. • You cannot delete the pre-stored images in this unit. 35 Capture - Setup (Contrast, Dimmer, Video, Commander), Edit (Name Edit, Name Delete, Picture Delete, Opening), Display (...," then press (ENTER). 3 Press < or , repeatedly to select the desired function to select "Initialize," then press (ENTER). ATT - stores the image at the moment the shutter clicked (page 28). Initializing the unit - The confirmation display appears. 4 Press < or , repeatedly to the normal display....

Operating Instructions
Page 36
... Wallpaper - turns off the display characters on the source and display pattern in the display mode selected. Display Skin Char Color Auto Image Effect Wallpaper Select Auto Arrange Panorama Aspect Auto Clear Auto Scroll * The default setting 1* 2 3 Custom Blue White* Green Pink ... display characters (page 23). • Auto Image - scrolls long text information (page 16). selects the panorama images as the wallpaper (page 25). • Aspect - changes the image ratio (page 26). • Auto Clear - changes the duration for displaying images (page 24). • Effect - List...
... Wallpaper - turns off the display characters on the source and display pattern in the display mode selected. Display Skin Char Color Auto Image Effect Wallpaper Select Auto Arrange Panorama Aspect Auto Clear Auto Scroll * The default setting 1* 2 3 Custom Blue White* Green Pink ... display characters (page 23). • Auto Image - scrolls long text information (page 16). selects the panorama images as the wallpaper (page 25). • Aspect - changes the image ratio (page 26). • Auto Clear - changes the duration for displaying images (page 24). • Effect - List...
Operating Instructions
Page 37
deletes the stored image (page 28). • BTM - changes the operative directions of the display. • Initialize - adjusts the right and left speaker volume (page 32). • Fader - selects ... - adjusts the equalizer curve settings (page 30). • Bass - adjusts the treble level (page 31). • Balance - selects the cut -off . • Video - selects the image as the factory-set position. - continue to dim the display. - Select "ON" to next page t 37 sets the DSO mode (page 30). • EQ7 - sets...
deletes the stored image (page 28). • BTM - changes the operative directions of the display. • Initialize - adjusts the right and left speaker volume (page 32). • Fader - selects ... - adjusts the equalizer curve settings (page 30). • Bass - adjusts the treble level (page 31). • Balance - selects the cut -off . • Video - selects the image as the factory-set position. - continue to dim the display. - Select "ON" to next page t 37 sets the DSO mode (page 30). • EQ7 - sets...

