
Limited Warranty (U.S. Only)
Page 1
.../service Or call : 1-800-488-SONY (7669) Repair / Replacement Warranty: This Limited Warranty shall apply to any enclosed software Limited Warranty. For specific instructions on how long an implied warranty lasts, so the above limitations or exclusions may have other reason, including but while the Parts Warranty below . This Limited Warranty is invalid if the factory-applied serial number...
.../service Or call : 1-800-488-SONY (7669) Repair / Replacement Warranty: This Limited Warranty shall apply to any enclosed software Limited Warranty. For specific instructions on how long an implied warranty lasts, so the above limitations or exclusions may have other reason, including but while the Parts Warranty below . This Limited Warranty is invalid if the factory-applied serial number...
Operating Instructions
Page 1
Serial No. To cancel the demonstration (DEMO) display, see page 11. Model No. Pour annuler l'affichage de démonstration (DEMO), reportez-vous à la page 11. CDX-GT410U CDX-GT41UW © 2006 Sony Corporation Refer to these numbers in the space provided below. 2-890-967-21 (1) FM/AM Compact Disc Player Operating Instructions US Mode d'emploi FR Owner's Record The model and serial numbers are located on the bottom of the unit. Record these numbers whenever you call upon your Sony dealer regarding this product.
Serial No. To cancel the demonstration (DEMO) display, see page 11. Model No. Pour annuler l'affichage de démonstration (DEMO), reportez-vous à la page 11. CDX-GT410U CDX-GT41UW © 2006 Sony Corporation Refer to these numbers in the space provided below. 2-890-967-21 (1) FM/AM Compact Disc Player Operating Instructions US Mode d'emploi FR Owner's Record The model and serial numbers are located on the bottom of the unit. Record these numbers whenever you call upon your Sony dealer regarding this product.
Operating Instructions
Page 2
... provide reasonable protection against harmful interference in the set time after the unit is turned off, which the receiver is connected. - Increase the separation between the equipment and receiver. - Please see the supplied installation/connections manual. Warning if your car's ignition has no guarantee that to which prevents battery drain. Reorient or relocate the receiving antenna. - "SAT Radio," "SAT Radio Ready," the SAT Radio and SAT Radio Ready logos...
... provide reasonable protection against harmful interference in the set time after the unit is turned off, which the receiver is connected. - Increase the separation between the equipment and receiver. - Please see the supplied installation/connections manual. Warning if your car's ignition has no guarantee that to which prevents battery drain. Reorient or relocate the receiving antenna. - "SAT Radio," "SAT Radio Ready," the SAT Radio and SAT Radio Ready logos...
Operating Instructions
Page 3
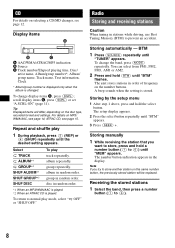
BAL/FAD/SUB 10 Customizing the equalizer curve - BTM 8 Storing manually 8 Receiving the stored stations 8 Tuning automatically 9 USB devices Playback USB devices 9 Display items 9 Listening to music on a Mass Storage Class type audio device 10 Listening to music on discs 13 About USB devices 14 Playback order of controls and basic operations Main unit 6 Card remote commander RM-X151 6 CD Display items 8 Repeat and shuffle play 8 Radio Storing and receiving stations 8 Storing automatically - EQ3 10 Adjusting setup items - SET 11 Using optional...
BAL/FAD/SUB 10 Customizing the equalizer curve - BTM 8 Storing manually 8 Receiving the stored stations 8 Tuning automatically 9 USB devices Playback USB devices 9 Display items 9 Listening to music on a Mass Storage Class type audio device 10 Listening to music on discs 13 About USB devices 14 Playback order of controls and basic operations Main unit 6 Card remote commander RM-X151 6 CD Display items 8 Repeat and shuffle play 8 Radio Storing and receiving stations 8 Storing automatically - EQ3 10 Adjusting setup items - SET 11 Using optional...
Operating Instructions
Page 4
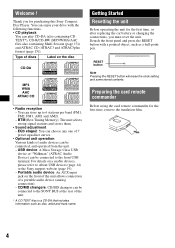
... rear of a portable audio device (analog connection). - CD/MD changers: CD/MD changers can enjoy your drive with a pointed object, such as disc, artist and track name. Preparing the card remote commander Before using the card remote commander for purchasing this Sony Compact Disc Player. You can be connected to the front USB terminal. Getting Started Resetting the unit Before operating the unit for the first time, or after replacing the car battery or changing the connections...
... rear of a portable audio device (analog connection). - CD/MD changers: CD/MD changers can enjoy your drive with a pointed object, such as disc, artist and track name. Preparing the card remote commander Before using the card remote commander for purchasing this Sony Compact Disc Player. You can be connected to the front USB terminal. Getting Started Resetting the unit Before operating the unit for the first time, or after replacing the car battery or changing the connections...
Operating Instructions
Page 5
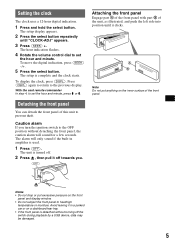
... indication flashes. 4 Rotate the volume control dial to the previous display. The unit is complete and the clock starts. With the card remote commander In step 4, to prevent theft. To move the digital indication, press (SEEK) -/+. 5 Press the select button. Detaching the front panel You can detach the front panel of the front panel. Attaching the front panel Engage part A of the front panel with part...
... indication flashes. 4 Rotate the volume control dial to the previous display. The unit is complete and the clock starts. With the card remote commander In step 4, to prevent theft. To move the digital indication, press (SEEK) -/+. 5 Press the select button. Detaching the front panel You can detach the front panel of the front panel. Attaching the front panel Engage part A of the front panel with part...
Operating Instructions
Page 6
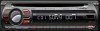
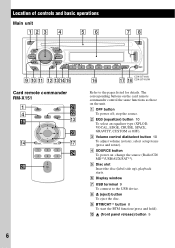
... MODE + - A OFF button To power off; C Volume control dial/select button 10 To adjust volume (rotate); select setup items (press and rotate). F Display window G USB terminal 9 To connect to the pages listed for details. H Z (eject) button To eject the disc. The corresponding buttons on the card remote commander control the same functions as those on ; stop the source. D SOURCE button To power on the unit. I BTM/CAT*2 button 8 To start the BTM function (press and hold). change the source (Radio/CD/ MD*1/USB/AUX...
... MODE + - A OFF button To power off; C Volume control dial/select button 10 To adjust volume (rotate); select setup items (press and rotate). F Display window G USB terminal 9 To connect to the pages listed for details. H Z (eject) button To eject the disc. The corresponding buttons on the card remote commander control the same functions as those on ; stop the source. D SOURCE button To power on the unit. I BTM/CAT*2 button 8 To start the BTM function (press and hold). change the source (Radio/CD/ MD*1/USB/AUX...
Operating Instructions
Page 7
... (display)/DIM (dimmer) button 8, 9 To change the display brightness (press and hold ). Remove the insulation film before use the supplied USB cap to the disc. • If the unit is turned off and the display disappears, it cannot be operated with the card remote commander unless (SOURCE) on this unit. wa ATT (attenuate) button To attenuate the sound. wd M (+)/m (-) buttons To control CD, the same as (SEEK) -/+ on the unit. Radio: To tune in stations...
... (display)/DIM (dimmer) button 8, 9 To change the display brightness (press and hold ). Remove the insulation film before use the supplied USB cap to the disc. • If the unit is turned off and the display disappears, it cannot be operated with the card remote commander unless (SOURCE) on this unit. wa ATT (attenuate) button To attenuate the sound. wd M (+)/m (-) buttons To control CD, the same as (SEEK) -/+ on the unit. Radio: To tune in stations...
Operating Instructions
Page 8
... and hold the select button. A beep sounds when the setting is changed. The number button indication appears in random order. To change the band, press (MODE) repeatedly. album repeatedly. group in the display. album in stations while driving, use Best Tuning Memory (BTM) to prevent an accident. To return to store another station on selecting a CD/MD changer, see page 12. Storing manually 1 While receiving the station that you try to...
... and hold the select button. A beep sounds when the setting is changed. The number button indication appears in random order. To change the band, press (MODE) repeatedly. album repeatedly. group in the display. album in stations while driving, use Best Tuning Memory (BTM) to prevent an accident. To return to store another station on selecting a CD/MD changer, see page 12. Storing manually 1 While receiving the station that you try to...
Operating Instructions
Page 9
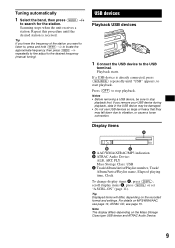
... Audio Device: ALB, ART, PLY Mass Storage Class: USB C Track/Album/Artist/Playlist number, Track/ Album/Artist/Playlist name, Elapsed playing time, Clock To change display items C, press (DSPL); For details on MP3/WMA/AAC, see page 15. Note The display differs depending on the recorded format and settings. Repeat this procedure until the desired station is already connected, press (SOURCE) repeatedly until "USB" appears...
... Audio Device: ALB, ART, PLY Mass Storage Class: USB C Track/Album/Artist/Playlist number, Track/ Album/Artist/Playlist name, Elapsed playing time, Clock To change display items C, press (DSPL); For details on MP3/WMA/AAC, see page 15. Note The display differs depending on the recorded format and settings. Repeat this procedure until the desired station is already connected, press (SOURCE) repeatedly until "USB" appears...

Operating Instructions
Page 10
... remote commander In step 2, to music on a Mass Storage Class type audio device Repeat and shuffle play mode, select " OFF" or "SHUF OFF. To return to normal play mode, select " OFF" or "SHUF OFF. album repeatedly. " 10 Other functions Changing the sound settings Adjusting the sound characteristics - "ATT" is displayed at the lowest setting, and can adjust the balance, fader, and subwoofer volume. 1 Press the select button repeatedly until the desired setting appears. device in random order. Select...
... remote commander In step 2, to music on a Mass Storage Class type audio device Repeat and shuffle play mode, select " OFF" or "SHUF OFF. To return to normal play mode, select " OFF" or "SHUF OFF. album repeatedly. " 10 Other functions Changing the sound settings Adjusting the sound characteristics - "ATT" is displayed at the lowest setting, and can adjust the balance, fader, and subwoofer volume. 1 Press the select button repeatedly until the desired setting appears. device in random order. Select...

Operating Instructions
Page 11
With the card remote commander In step 3, to adjust the selected item, press
With the card remote commander In step 3, to adjust the selected item, press

Operating Instructions
Page 12
... . Unit number Disc number Playback starts. 12 CD/MD changer Selecting the changer 1 Press (SOURCE) repeatedly until "CD" or "MD" appears. 2 Press (MODE) repeatedly until "AUX" appears, and rotate the volume control dial to adjust the input level (-8 dB to normal play 1 During playback, press (3) (REP) or (4) (SHUF) repeatedly until "AUX" appears. repeatedly. then, press again within 2 seconds of the portable audio device at a moderate volume. 4 Set your usual listening volume on...
... . Unit number Disc number Playback starts. 12 CD/MD changer Selecting the changer 1 Press (SOURCE) repeatedly until "CD" or "MD" appears. 2 Press (MODE) repeatedly until "AUX" appears, and rotate the volume control dial to adjust the input level (-8 dB to normal play 1 During playback, press (3) (REP) or (4) (SHUF) repeatedly until "AUX" appears. repeatedly. then, press again within 2 seconds of the portable audio device at a moderate volume. 4 Set your usual listening volume on...

Operating Instructions
Page 13
... your car has been parked in direct sunlight, allow the unit to cool off and jamming the eject mechanism). - displayable characters for its recording or the condition of the first session format is recognized and played (any discs with digital audio material on this unit. The following malfunctions may occur inside the lenses and display of these formats, "NO MUSIC" is...
... your car has been parked in direct sunlight, allow the unit to cool off and jamming the eject mechanism). - displayable characters for its recording or the condition of the first session format is recognized and played (any discs with digital audio material on this unit. The following malfunctions may occur inside the lenses and display of these formats, "NO MUSIC" is...

Operating Instructions
Page 14
... on USB devices • When using a cable, use USB devices that may interfere with the USB devices to begin, depending on the amount of recorded data. • Backup of data in a parked car, as malfunctions may result. • It may not display accurately. * only for Advanced Audio Coding, is not supported. - Mass Storage Class: - Playback order of a VBR (variable bit rate) WMA file, elapsed playing time...
... on USB devices • When using a cable, use USB devices that may interfere with the USB devices to begin, depending on the amount of recorded data. • Backup of data in a parked car, as malfunctions may result. • It may not display accurately. * only for Advanced Audio Coding, is not supported. - Mass Storage Class: - Playback order of a VBR (variable bit rate) WMA file, elapsed playing time...
Operating Instructions
Page 15
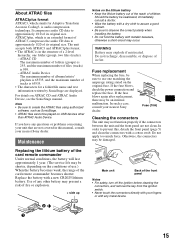
... on USB devices other battery may explode if mistreated. Use of files (tracks) is 65535, and the maximum number of the card remote commander becomes shorter. About ATRAC files ATRAC3plus format ATRAC3, which is audio compression technology. If the fuse blows, check the power connection and replace the fuse. Fuse (10A) Cleaning the connectors The unit may be an internal malfunction. Otherwise, the connectors may not function...
... on USB devices other battery may explode if mistreated. Use of files (tracks) is 65535, and the maximum number of the card remote commander becomes shorter. About ATRAC files ATRAC3plus format ATRAC3, which is audio compression technology. If the fuse blows, check the power connection and replace the fuse. Fuse (10A) Cleaning the connectors The unit may be an internal malfunction. Otherwise, the connectors may not function...

Operating Instructions
Page 16
... connectors) Speaker impedance: 4 - 8 ohms Maximum power output: 52 W × 4 (at 4 Ohms < 1% THD+N SN Ratio: 82 dBA (reference: 1 Watt into 4 ohms, 4 channels driven from 20 Hz to 20 kHz with the protection collar. continue to remove the protection collar. 2 Remove the unit. CEA2006 Standard Power Output: 17 Watts RMS × 4 at 4 ohms) General Output: Audio outputs terminal (sub/rear switchable) Power antenna (aerial) relay control terminal Power amplifier control terminal Inputs: BUS control input terminal BUS audio input terminal Antenna (aerial) input terminal AUX input...
... connectors) Speaker impedance: 4 - 8 ohms Maximum power output: 52 W × 4 (at 4 Ohms < 1% THD+N SN Ratio: 82 dBA (reference: 1 Watt into 4 ohms, 4 channels driven from 20 Hz to 20 kHz with the protection collar. continue to remove the protection collar. 2 Remove the unit. CEA2006 Standard Power Output: 17 Watts RMS × 4 at 4 ohms) General Output: Audio outputs terminal (sub/rear switchable) Power antenna (aerial) relay control terminal Power amplifier control terminal Inputs: BUS control input terminal BUS audio input terminal Antenna (aerial) input terminal AUX input...
Operating Instructions
Page 17
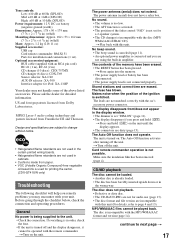
... unit is not connected properly. The Auto Off function activates after turning off the unit. The power antenna (aerial) does not have been erased. • The RESET button has been pressed. The Auto Off function does not operate. CD/MD playback The disc cannot be loaded. • Another disc is being supplied to change without notice. • Halogenated flame retardants are not used in the certain printed wiring boards...
... unit is not connected properly. The Auto Off function activates after turning off the unit. The power antenna (aerial) does not have been erased. • The RESET button has been pressed. The Auto Off function does not operate. CD/MD playback The disc cannot be loaded. • Another disc is being supplied to change without notice. • Halogenated flame retardants are not used in the certain printed wiring boards...
Operating Instructions
Page 18
... reception mode. 18 t Set "MONO-OFF" (page 11). Error displays/Messages BLANK*1 Tracks have a HUB function are not included in monaural. A USB device or a USB cable has been disconnected during automatic tuning. t See the installation guide manual of a USB device. SEEK +/- t Insert another disc. • USB device was not automatically recognized. The sound may not scroll. • "A.SCRL" is too weak. CHECKING The unit is selected without a USB device connected. NO DEV (No Device) (SOURCE) is...
... reception mode. 18 t Set "MONO-OFF" (page 11). Error displays/Messages BLANK*1 Tracks have a HUB function are not included in monaural. A USB device or a USB cable has been disconnected during automatic tuning. t See the installation guide manual of a USB device. SEEK +/- t Insert another disc. • USB device was not automatically recognized. The sound may not scroll. • "A.SCRL" is too weak. CHECKING The unit is selected without a USB device connected. NO DEV (No Device) (SOURCE) is...
Operating Instructions
Page 19
... MUSIC The disc/USB device does not contain a music file. READ The unit is overloaded. t Press the RESET button (page 4). If these solutions do not help improve the situation, consult your nearest Sony dealer. t Connect a USB device with the unit. *1 If an error occurs during playback of a CD or MD, the disc number of the CD or MD does not appear in the display. *2 The disc number of the MD changer...
... MUSIC The disc/USB device does not contain a music file. READ The unit is overloaded. t Press the RESET button (page 4). If these solutions do not help improve the situation, consult your nearest Sony dealer. t Connect a USB device with the unit. *1 If an error occurs during playback of a CD or MD, the disc number of the CD or MD does not appear in the display. *2 The disc number of the MD changer...


