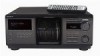
Primary User Manual
Page 3
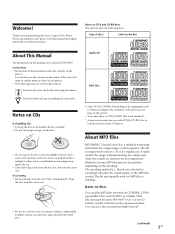
... CDs • To keep the disc clean, handle the disc carefully. • Do not stick paper or tape on discs • Do not use solvents such as there can use the controls on the remote if they have the same or similar names as those on CD-R and CD-RW discs This unit can play on this Sony... Compact Disc Player. z Indicates hints and tips for vinyl...
... CDs • To keep the disc clean, handle the disc carefully. • Do not stick paper or tape on discs • Do not use solvents such as there can use the controls on the remote if they have the same or similar names as those on CD-R and CD-RW discs This unit can play on this Sony... Compact Disc Player. z Indicates hints and tips for vinyl...
Primary User Manual
Page 4
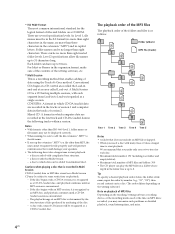
...properly and will be no more than eight characters. Cautions when playing a disc that is recorded in to Lead-out regarded as a CD-DA (audio) disc. A Multi Session CD is a CD having multiple sessions, with each disc. • Maximum folder number: 150 (including root folder and empty folders)...etc. *2 Multi Session This is a recording method that could damage your speakers. • The following tracks within a session. a disc to which CD-DA (audio) data are several specification levels. There can play the MP3 files in a folder whose depth in the expansion format, make...
...properly and will be no more than eight characters. Cautions when playing a disc that is recorded in to Lead-out regarded as a CD-DA (audio) disc. A Multi Session CD is a CD having multiple sessions, with each disc. • Maximum folder number: 150 (including root folder and empty folders)...etc. *2 Multi Session This is a recording method that could damage your speakers. • The following tracks within a session. a disc to which CD-DA (audio) data are several specification levels. There can play the MP3 files in a folder whose depth in the expansion format, make...
Primary User Manual
Page 5
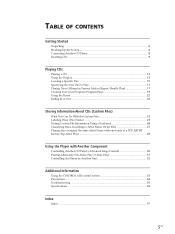
TABLE OF CONTENTS Getting Started Unpacking ...6 Hooking Up the System ...6 Connecting Another CD Player 8 Inserting CDs ...9 Playing CDs Playing a CD ...12 Using the Display ...13 Locating a Specific Disc ...15 Specifying the Next Disc to Play 17 Playing Discs (Album) in Various Modes (Repeat/Shuffle Play 17 Creating Your Own Program (Program Play 19 Using the Timer ...22 Fading...
TABLE OF CONTENTS Getting Started Unpacking ...6 Hooking Up the System ...6 Connecting Another CD Player 8 Inserting CDs ...9 Playing CDs Playing a CD ...12 Using the Display ...13 Locating a Specific Disc ...15 Specifying the Next Disc to Play 17 Playing Discs (Album) in Various Modes (Repeat/Shuffle Play 17 Creating Your Own Program (Program Play 19 Using the Timer ...22 Fading...
Primary User Manual
Page 6
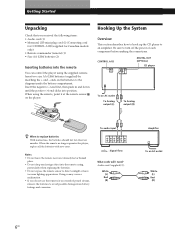
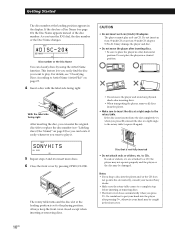
... player using the remote, point it at the remote sensor on the batteries to the diagram inside the battery compartment. CONTROL A1II DIGITAL OUT (OPTICAL) CD player To an AC outlet To Analog output (L) To Analog output (R) z When to replace batteries With normal use the remote for an extended period ..., replace all the batteries with new ones. ends on the player. Hooking Up the System Overview This section describes how to hook up the CD player to avoid possible damage from battery leakage and corrosion. Insert two size AA (LR6) batteries (supplied) by matching the + and -
... player using the remote, point it at the remote sensor on the batteries to the diagram inside the battery compartment. CONTROL A1II DIGITAL OUT (OPTICAL) CD player To an AC outlet To Analog output (L) To Analog output (R) z When to replace batteries With normal use the remote for an extended period ..., replace all the batteries with new ones. ends on the player. Hooking Up the System Overview This section describes how to hook up the CD player to avoid possible damage from battery leakage and corrosion. Insert two size AA (LR6) batteries (supplied) by matching the + and -
Primary User Manual
Page 7
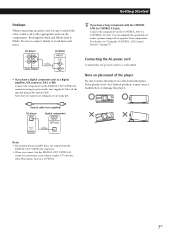
...the optical cable. For details, see "Using the CONTROL A1II Control System" on a flat, horizontal place. CD player L L R R IN 2ND CD OUT ANALOG Amplifier INPUT CD L R • If you have a Sony component with the CONTROL A1II (or CONTROL A1) jack Connect the component via the CONTROL A1II (or CONTROL A1... to the appropriate jacks on the components: Red (right) to Red and White (left on a slanted position, it may occur when you play CD software other than music, such as a digital amplifier, D/A converter, DAT, or MD Connect the component via the DIGITAL OUT (OPTICAL) connector using...
...the optical cable. For details, see "Using the CONTROL A1II Control System" on a flat, horizontal place. CD player L L R R IN 2ND CD OUT ANALOG Amplifier INPUT CD L R • If you have a Sony component with the CONTROL A1II (or CONTROL A1) jack Connect the component via the CONTROL A1II (or CONTROL A1... to the appropriate jacks on the components: Red (right) to Red and White (left on a slanted position, it may occur when you play CD software other than music, such as a digital amplifier, D/A converter, DAT, or MD Connect the component via the DIGITAL OUT (OPTICAL) connector using...
Primary User Manual
Page 8
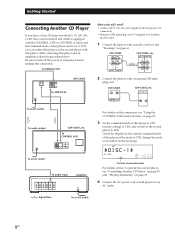
... A1II Control System" on page 33. 3 Set the command mode of this player to CD1 (factory setting) or CD2, and set to CD3, you have a Sony CD player in which 5, 50, 200, 300, or 400 discs can be inserted and which is CD3, change the mode as described on the next page. 2nd NEXT... models only) 1 Connect the players with an audio cord (see also "Hookups" on page 6). HIT TRACK GROUP ART. MIN STEP SEC *DISC-1****** ALL 1 DISCS SHUFFLE REPEAT 1 GROUP PROGRAM 1 2 3 X-FADE DELETE MULTI CD TEXT NO DELAY CD1 CD2 CD3 Current command mode For details on how to turn off the power of each player...
... A1II Control System" on page 33. 3 Set the command mode of this player to CD1 (factory setting) or CD2, and set to CD3, you have a Sony CD player in which 5, 50, 200, 300, or 400 discs can be inserted and which is CD3, change the mode as described on the next page. 2nd NEXT... models only) 1 Connect the players with an audio cord (see also "Hookups" on page 6). HIT TRACK GROUP ART. MIN STEP SEC *DISC-1****** ALL 1 DISCS SHUFFLE REPEAT 1 GROUP PROGRAM 1 2 3 X-FADE DELETE MULTI CD TEXT NO DELAY CD1 CD2 CD3 Current command mode For details on how to turn off the power of each player...
Primary User Manual
Page 9
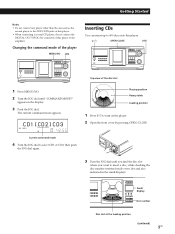
... "COMMAND MODE?" The current command mode appears. 2nd NEXT DISC ART. Small display I / 1 Disc number Disc slot at the loading position (continued) 9US MIN STEP SEC *CD1[CD2]CD3* ALL 1 DISCS SHUFFLE REPEAT 1 GROUP PROGRAM 1 2 3 X-FADE DELETE MULTI CD TEXT NO DELAY CD1 CD2 CD3 Current command mode 4 Turn... to the 2ND CD IN jacks of this player. • When connecting a second CD player, do not connect the DIGITAL OUT (OPTICAL) connector of this player. ?/1 OPEN/CLOSE JOG Top view of the player MENU/NO JOG Inserting CDs You can insert up to 400 discs into this player ...
... "COMMAND MODE?" The current command mode appears. 2nd NEXT DISC ART. Small display I / 1 Disc number Disc slot at the loading position (continued) 9US MIN STEP SEC *CD1[CD2]CD3* ALL 1 DISCS SHUFFLE REPEAT 1 GROUP PROGRAM 1 2 3 X-FADE DELETE MULTI CD TEXT NO DELAY CD1 CD2 CD3 Current command mode 4 Turn... to the 2ND CD IN jacks of this player. • When connecting a second CD player, do not connect the DIGITAL OUT (OPTICAL) connector of this player. ?/1 OPEN/CLOSE JOG Top view of the player MENU/NO JOG Inserting CDs You can insert up to 400 discs into this player ...
Primary User Manual
Page 10
..., see page 23), the Disc Name appears instead of the disc number. when you want to play. MIN STEP SEC SONYHITS***** ALL 1 DISCS SHUFFLE REPEAT 1 GROUP PROGRAM 1 2 3 X-FADE DELETE MULTI CD TEXT NO DELAY CD1 CD2 CD3 5 Repeat steps 3 and 4 to put your nearest Sony dealer. • Make sure... the rotary table comes to CDs. The rotary table turns and the disc slot at the loading position ...
..., see page 23), the Disc Name appears instead of the disc number. when you want to play. MIN STEP SEC SONYHITS***** ALL 1 DISCS SHUFFLE REPEAT 1 GROUP PROGRAM 1 2 3 X-FADE DELETE MULTI CD TEXT NO DELAY CD1 CD2 CD3 5 Repeat steps 3 and 4 to put your nearest Sony dealer. • Make sure... the rotary table comes to CDs. The rotary table turns and the disc slot at the loading position ...

Primary User Manual
Page 11
Then close the front cover. The disc in the selected slot moves up and you press A again, the disc returns to the loaded position. If the disc does not return to 3 of "Inserting CDs" on page 9, remove the discs. Getting Started 11US When you can remove the disc easily. Removing CDs After following steps 1 to 3 of "Inserting CDs" on page 9, press A (DISC EJECT). z To remove discs easily After following steps 1 to the loaded position, reinsert the disc.
Then close the front cover. The disc in the selected slot moves up and you press A again, the disc returns to the loaded position. If the disc does not return to 3 of "Inserting CDs" on page 9, remove the discs. Getting Started 11US When you can remove the disc easily. Removing CDs After following steps 1 to 3 of "Inserting CDs" on page 9, press A (DISC EJECT). z To remove discs easily After following steps 1 to the loaded position, reinsert the disc.
Primary User Manual
Page 12
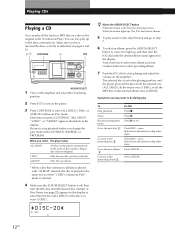
... clockwise to select next album and turn counterclockwise to select preceding album. 7 Push the JOG dial to 400 discs consecutively. Press DISC + once. Each time you change the play mode with "ALBUM" selected, the disc is played in the same way as indicated on pages 9 and 10. ?/1 CONTINUE H JOG ALBUM ... button While the button is set to select the first disc (ALL DISCS) or the disc you have selected. Press ALBUM +. Playing CDs Playing a CD You can also play up , and then turn the JOG dial until the desired disc number or Disc Name (see page 23) appears in the display to ...
... clockwise to select next album and turn counterclockwise to select preceding album. 7 Push the JOG dial to 400 discs consecutively. Press DISC + once. Each time you change the play mode with "ALBUM" selected, the disc is played in the same way as indicated on pages 9 and 10. ?/1 CONTINUE H JOG ALBUM ... button While the button is set to select the first disc (ALL DISCS) or the disc you have selected. Press ALBUM +. Playing CDs Playing a CD You can also play up , and then turn the JOG dial until the desired disc number or Disc Name (see page 23) appears in the display to ...
Primary User Manual
Page 13
...down until you find the point. Stop playing and remove the disc Press OPEN/CLOSE. * When "ALL DISCS" or "1 DISC" is selected, you were pressing M. Unlike a normal CD, a CD TEXT disc includes information such as the Disc Names (see page 23) or Artist Names (see page 27...tracks Total playing time NEXT DISC 2nd PLAYER DISC Current disc number (continued) 13US When you find the point during the operation. When the player detects a CD TEXT disc, "CD TEXT" appears in the display. DISPLAY TIME Display information of the normal discs Display information in a track...
...down until you find the point. Stop playing and remove the disc Press OPEN/CLOSE. * When "ALL DISCS" or "1 DISC" is selected, you were pressing M. Unlike a normal CD, a CD TEXT disc includes information such as the Disc Names (see page 23) or Artist Names (see page 27...tracks Total playing time NEXT DISC 2nd PLAYER DISC Current disc number (continued) 13US When you find the point during the operation. When the player detects a CD TEXT disc, "CD TEXT" appears in the display. DISPLAY TIME Display information of the normal discs Display information in a track...
Primary User Manual
Page 14
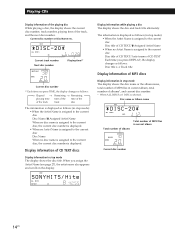
... follows (in stop mode): • When the Artist Name is assigned to the current disc Disc title of CD TEXT/ Assigned Artist Name • When no disc name is assigned to the current disc Disc title of CD TEXT/Artist name of CD TEXT Each time you assign the Artist Name (see page 27), the artist name also...
... follows (in stop mode): • When the Artist Name is assigned to the current disc Disc title of CD TEXT/ Assigned Artist Name • When no disc name is assigned to the current disc Disc title of CD TEXT/Artist name of CD TEXT Each time you assign the Artist Name (see page 27), the artist name also...
Primary User Manual
Page 15
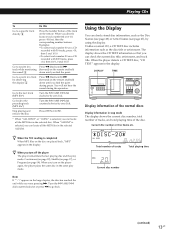
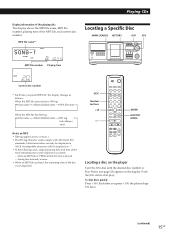
MIN STEP SEC **** ALBUM GROUP MP3 MULTI CD TEXT NO DELAY CD2 CD3 MP3 file number Playing time NEXT DISC 2nd PLAYER DISC Locating a Specific Disc NAME SEARCH HISTORY +100 JOG Current disc number *1 Each time you press +100, the player skips 100 discs. (continued) 15US during fast-forward/reverse. • .... Push the JOG dial to version 1. • The ID3 tag character codes comply with ASCII and ISO standards. Playing CDs Display information of the playing disc The display shows the MP3 file name, MP3 file number, playing time of the track remaining may not be displayed in ...
MIN STEP SEC **** ALBUM GROUP MP3 MULTI CD TEXT NO DELAY CD2 CD3 MP3 file number Playing time NEXT DISC 2nd PLAYER DISC Locating a Specific Disc NAME SEARCH HISTORY +100 JOG Current disc number *1 Each time you press +100, the player skips 100 discs. (continued) 15US during fast-forward/reverse. • .... Push the JOG dial to version 1. • The ID3 tag character codes comply with ASCII and ISO standards. Playing CDs Display information of the playing disc The display shows the MP3 file name, MP3 file number, playing time of the track remaining may not be displayed in ...
Primary User Manual
Page 16
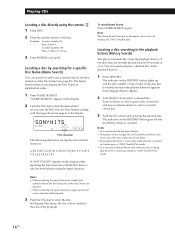
...8226; You can search and play a desired disc in the playback history (History Search) The player automatically stores the playback history of the program. Locating a disc searching in the playback history. 1 Press HISTORY. Playing CDs Locating a disc directly using the input character. To enter number... 100 Press 1, then 10/0 twice. 3 Press ENTER to select a desired disc. Notes • When searching for ...
...8226; You can search and play a desired disc in the playback history (History Search) The player automatically stores the playback history of the program. Locating a disc searching in the playback history. 1 Press HISTORY. Playing CDs Locating a disc directly using the input character. To enter number... 100 Press 1, then 10/0 twice. 3 Press ENTER to select a desired disc. Notes • When searching for ...

Primary User Manual
Page 17
.... SHUFFLE REPEAT H JOG DISC Number buttons REPEAT H SHUFFLE ENTER ALBUM -/+ DISC +/- (continued) 17US MIN STEP SEC *DISC-38***** ALL 1 DISCS SHUFFLE REPEAT 1 GROUP PROGRAM 1 2 3 X-FADE DELETE MULTI CD TEXT NO DELAY CD1 CD2 CD3 Next disc number or the Disc Name NEXT DISC 2nd PLAYER DISC Current disc number After the current disc is played, the next disc you want to skip...
.... SHUFFLE REPEAT H JOG DISC Number buttons REPEAT H SHUFFLE ENTER ALBUM -/+ DISC +/- (continued) 17US MIN STEP SEC *DISC-38***** ALL 1 DISCS SHUFFLE REPEAT 1 GROUP PROGRAM 1 2 3 X-FADE DELETE MULTI CD TEXT NO DELAY CD1 CD2 CD3 Next disc number or the Disc Name NEXT DISC 2nd PLAYER DISC Current disc number After the current disc is played, the next disc you want to skip...

Primary User Manual
Page 18
...in the display while the player is shuffling the tracks. " " appears in the display. ALL DISCS Shuffle Play starts. "REPEAT" appears in the display while the player is shuffling the discs or the tracks. Notes on all Repeat Play modes other than "REPEAT1," playback is being played,... press REPEAT one or more times. 18US To cancel Shuffle Play Press CONTINUE. Playing CDs Playing repeatedly (Repeat Play) Press REPEAT while playing a disc. " " appears in the display. To repeat the current track (MP3 file) While the track (MP3 file) ...
...in the display while the player is shuffling the tracks. " " appears in the display. ALL DISCS Shuffle Play starts. "REPEAT" appears in the display while the player is shuffling the discs or the tracks. Notes on all Repeat Play modes other than "REPEAT1," playback is being played,... press REPEAT one or more times. 18US To cancel Shuffle Play Press CONTINUE. Playing CDs Playing repeatedly (Repeat Play) Press REPEAT while playing a disc. " " appears in the display. To repeat the current track (MP3 file) While the track (MP3 file) ...
Primary User Manual
Page 19
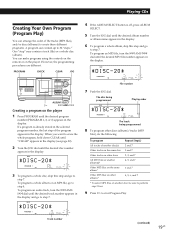
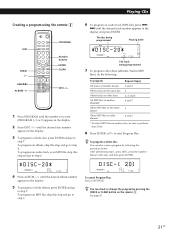
...AMS L Creating a program on the player. When you want to step 7. 2nd NEXT DISC ART. MIN STEP SEC *DISC-20***** ALL 1 DISCS SHUFFLE REPEAT 1 GROUP PROGRAM 1 MULTI CD TEXT NO DELAY CD1 CD2 CD3 3 To program a whole disc, skip this step and go to erase the whole program, hold down CLEAR until "...appears in the display (see page 20). 2 Turn the JOG dial until the desired disc number appears in the display. 2nd NEXT DISC ART. MIN STEP SEC *DISC-20***** ALL 1 DISCS SHUFFLE REPEAT 1 GROUP PROGRAM 1 MULTI CD TEXT NO DELAY CD1 CD2 CD3 Track number 4 If the ALBUM SELECT button is already...
...AMS L Creating a program on the player. When you want to step 7. 2nd NEXT DISC ART. MIN STEP SEC *DISC-20***** ALL 1 DISCS SHUFFLE REPEAT 1 GROUP PROGRAM 1 MULTI CD TEXT NO DELAY CD1 CD2 CD3 3 To program a whole disc, skip this step and go to erase the whole program, hold down CLEAR until "...appears in the display (see page 20). 2 Turn the JOG dial until the desired disc number appears in the display. 2nd NEXT DISC ART. MIN STEP SEC *DISC-20***** ALL 1 DISCS SHUFFLE REPEAT 1 GROUP PROGRAM 1 MULTI CD TEXT NO DELAY CD1 CD2 CD3 Track number 4 If the ALBUM SELECT button is already...
Primary User Manual
Page 20
...if you press this button, the display shows the disc and track number (album name and MP3 file number) of the program is programmed as one at a time, starting with the last step in the programmed order. Playing CDs To cancel Program Play Press CONTINUE. Add tracks ...(MP3 file) or discs (albums) to the original display. Changing the programmed order You can check your program before or after...
...if you press this button, the display shows the disc and track number (album name and MP3 file number) of the program is programmed as one at a time, starting with the last step in the programmed order. Playing CDs To cancel Program Play Press CONTINUE. Add tracks ...(MP3 file) or discs (albums) to the original display. Changing the programmed order You can check your program before or after...
Primary User Manual
Page 21
... an audio track (MP3 file), press ./ > until the number you want (PROGRAM 1, 2, or 3) appears in the display. 2 Press DISC +/- Playing CDs Creating a program using the remote Z DISC CHECK H ./> ALBUM -/+ PROGRAM Number buttons ENTER CLEAR DISC +/- 1 Press PROGRAM until the desired track number appears in the display and press ENTER. To program an audio track...
... an audio track (MP3 file), press ./ > until the number you want (PROGRAM 1, 2, or 3) appears in the display. 2 Press DISC +/- Playing CDs Creating a program using the remote Z DISC CHECK H ./> ALBUM -/+ PROGRAM Number buttons ENTER CLEAR DISC +/- 1 Press PROGRAM until the desired track number appears in the display and press ENTER. To program an audio track...
Primary User Manual
Page 22
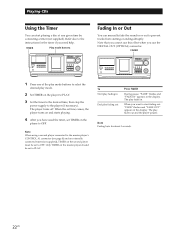
... desired play fades in. The player turns off. When the set to OFF. Note Fading lasts for the timer if you want to start playing a disc at any given time by connecting a timer (not supplied). The play mode. 2 Set TIMER on and starts playing. 4 After you use the DIGITAL OUT (OPTICAL... play fades out and the player pauses. The play fading out Press FADER During pause. Refer also to the instructions for about 5 seconds. 22US Playing CDs Using the Timer You can manually fade the sound in or out to prevent tracks from starting or ending abruptly. Only TIMER on the master...
... desired play fades in. The player turns off. When the set to OFF. Note Fading lasts for the timer if you want to start playing a disc at any given time by connecting a timer (not supplied). The play mode. 2 Set TIMER on and starts playing. 4 After you use the DIGITAL OUT (OPTICAL... play fades out and the player pauses. The play fading out Press FADER During pause. Refer also to the instructions for about 5 seconds. 22US Playing CDs Using the Timer You can manually fade the sound in or out to prevent tracks from starting or ending abruptly. Only TIMER on the master...


