Operating Instructions
Page 3
... Started Inserting Batteries Into the Remote Control (CDP-CE375 only 6 Hooking Up the System ...6 Playing CDs Loading the CD ...7 Playing the CD -- Normal Play/Shuffle Play/Repeat Play 8 FR Using the CD display ...9 Replacing Discs While Playing a Disc 10 Programming the CD tracks 11 Fading In or Out ...12 Recording From CDs Recording a CD by Specifying Tape Length (Time Edit 12...
... Started Inserting Batteries Into the Remote Control (CDP-CE375 only 6 Hooking Up the System ...6 Playing CDs Loading the CD ...7 Playing the CD -- Normal Play/Shuffle Play/Repeat Play 8 FR Using the CD display ...9 Replacing Discs While Playing a Disc 10 Programming the CD tracks 11 Fading In or Out ...12 Recording From CDs Recording a CD by Specifying Tape Length (Time Edit 12...
Operating Instructions
Page 4
Parts Identification Front Panel The items are arranged in parentheses ( ) for details. Refer to the pages indicated in alphabetical order. CDP-CE375 CDP-CE275 CHECK w; (11, 12) CLEAR 9 (11, 12) DISC 1-5 2 (8, 9, 11) Disc compartment qj (7) DISC SKIP 8 (7, 10, 12) Display 3 (9) EX-CHANGE 7 (10, 13) FADER qd (12) PEAK SEARCH qs (13) PHONES jack wa (9) PLAY MODE qa (8, 9, 11, 13) POWER 1 (7) Remote sensor qh (6) REPEAT qf (8) TIME qg (9, 10) TIME EDIT ql (12) BUTTON DESCRIPTIONS A OPEN/CLOSE ws (7, 9) H 4 (8, 11, 13) X 5 (9, 13) x 6 (9, 13) lAMSL dial 0 (9, 11, 13) m/M qk (9, 12) 4
Parts Identification Front Panel The items are arranged in parentheses ( ) for details. Refer to the pages indicated in alphabetical order. CDP-CE375 CDP-CE275 CHECK w; (11, 12) CLEAR 9 (11, 12) DISC 1-5 2 (8, 9, 11) Disc compartment qj (7) DISC SKIP 8 (7, 10, 12) Display 3 (9) EX-CHANGE 7 (10, 13) FADER qd (12) PEAK SEARCH qs (13) PHONES jack wa (9) PLAY MODE qa (8, 9, 11, 13) POWER 1 (7) Remote sensor qh (6) REPEAT qf (8) TIME qg (9, 10) TIME EDIT ql (12) BUTTON DESCRIPTIONS A OPEN/CLOSE ws (7, 9) H 4 (8, 11, 13) X 5 (9, 13) x 6 (9, 13) lAMSL dial 0 (9, 11, 13) m/M qk (9, 12) 4
Operating Instructions
Page 7
...that you cannot use the following functions when making this player. 2 Press POWER to close the disc tray. Playing CDs Loading a CD 1 Turn on the remote POC-15 Optical cable (not supplied) CD player DIGITAL OUT OPTICAL Digital component DIGITAL INPUT OPTICAL Note When you connect via the DIGITAL OUT (...OPTICAL) connector, noise may occur when you play CD software other discs, press DISC SKIP and place the discs in the order you first. 6 Press AOPEN/CLOSE to turn off the cap and plug in the optical cable. ...
...that you cannot use the following functions when making this player. 2 Press POWER to close the disc tray. Playing CDs Loading a CD 1 Turn on the remote POC-15 Optical cable (not supplied) CD player DIGITAL OUT OPTICAL Digital component DIGITAL INPUT OPTICAL Note When you connect via the DIGITAL OUT (...OPTICAL) connector, noise may occur when you play CD software other discs, press DISC SKIP and place the discs in the order you first. 6 Press AOPEN/CLOSE to turn off the cap and plug in the optical cable. ...
Operating Instructions
Page 8
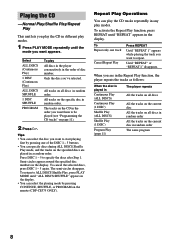
... and the tracks on the specific disc in random order. Playing the CD -- The tracks on the CD in the order you are played in the display. The semi-circles disappear. To return to be played (see "Programming the CD tracks" on the remote (CDP-CE375 ONLY). To activate the Repeat Play ...function, press REPEAT until "ALL DISCS SHUFFLE" appears in random order The same program 8 Only the disc you want appears. All tracks on the current disc in the display. • You can ...
... and the tracks on the specific disc in random order. Playing the CD -- The tracks on the CD in the order you are played in the display. The semi-circles disappear. To return to be played (see "Programming the CD tracks" on the remote (CDP-CE375 ONLY). To activate the Repeat Play ...function, press REPEAT until "ALL DISCS SHUFFLE" appears in random order The same program 8 Only the disc you want appears. All tracks on the current disc in the display. • You can ...
Operating Instructions
Page 9
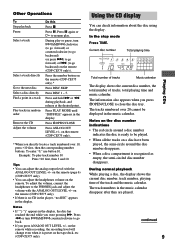
... and adjust the volume with the ANALOG OUT LEVEL +/- Using the CD display You can adjust the headphones volume on the remote (CDP-CE375 only)). The information also appears when you press ANALOG OUT LEVEL +/- The track numbers in the display, the disc has reached the end while you directly locate a track numbered over...
... and adjust the volume with the ANALOG OUT LEVEL +/- Using the CD display You can adjust the headphones volume on the remote (CDP-CE375 only)). The information also appears when you press ANALOG OUT LEVEL +/- The track numbers in the display, the disc has reached the end while you directly locate a track numbered over...
Operating Instructions
Page 10
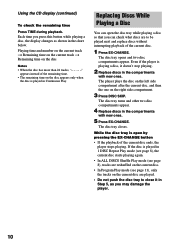
... compartments with new ones. The disc tray closes. Using the CD display (continued) To check the remaining time Press TIME during playback. The disc tray opens and two disc compartments appear. The disc tray turns and other two disc compartments appear. 4 Replace discs in the chart below. While the disc tray is played in 1 DISC Repeat Play mode (see...
... compartments with new ones. The disc tray closes. Using the CD display (continued) To check the remaining time Press TIME during playback. The disc tray opens and two disc compartments appear. The disc tray turns and other two disc compartments appear. 4 Replace discs in the chart below. While the disc tray is played in 1 DISC Repeat Play mode (see...
Operating Instructions
Page 11
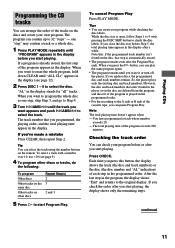
...already stored, the last step of the program is open, follow Steps 1 to 4 with a number over 10, use >10 (see page 12). 2 Press DISC 1 - 5 to check the disc labels. When you start Program Play. The track number that , if the programmed track number isn't found in the player or on the...same program again. • The program remains until the track you start playing. Note that you erase it or turn off the player. Playing CDs Programming the CD tracks You can select the track using the number buttons on the remote. one step, skip Step 3, and go to Step 4. 3 Turn lAMSL...
...already stored, the last step of the program is open, follow Steps 1 to 4 with a number over 10, use >10 (see page 12). 2 Press DISC 1 - 5 to check the disc labels. When you start Program Play. The track number that , if the programmed track number isn't found in the player or on the...same program again. • The program remains until the track you start playing. Note that you erase it or turn off the player. Playing CDs Programming the CD tracks You can select the track using the number buttons on the remote. one step, skip Step 3, and go to Step 4. 3 Turn lAMSL...
Operating Instructions
Page 12
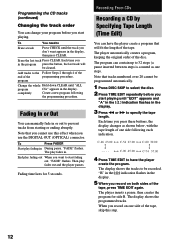
...fades out and the player pauses. "FADE" flashes. Each time you press these buttons, the display changes as one side of the disc. Programming the CD tracks (continued) Changing the track order You can change your program before you record on both sides of the tape. The player ... a CD by Specifying Tape Length (Time Edit) You can have the player create the program. C-90 45.00 C-74 37.00 4 Press TIME EDIT to have the player create a program that tracks numbered over 20 cannot be programmed automatically. 1 Press DISC SKIP to select the disc. 2 Press TIME EDIT...
...fades out and the player pauses. "FADE" flashes. Each time you press these buttons, the display changes as one side of the disc. Programming the CD tracks (continued) Changing the track order You can change your program before you record on both sides of the tape. The player ... a CD by Specifying Tape Length (Time Edit) You can have the player create the program. C-90 45.00 C-74 37.00 4 Press TIME EDIT to have the player create a program that tracks numbered over 20 cannot be programmed automatically. 1 Press DISC SKIP to select the disc. 2 Press TIME EDIT...
Operating Instructions
Page 13
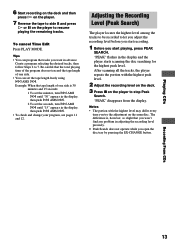
Tips • You can set the seconds, turn l AMS L until "30" appears in the display and the player starts scanning the disc searching for the highest peak level. Adjusting the Recording Level (Peak Search) The player locates the highest level among the tracks to be ...adjusting the recording level precisely. • Peak Search does not operate while you start recording. 1 Before you open the disc tray by pressing the EX-CHANGE button. Playing CDs Recording From CDs 13 Be careful that you won't find any problem in advance. "PEAK" disappears from the display. To cancel Time Edit...
Tips • You can set the seconds, turn l AMS L until "30" appears in the display and the player starts scanning the disc searching for the highest peak level. Adjusting the Recording Level (Peak Search) The player locates the highest level among the tracks to be ...adjusting the recording level precisely. • Peak Search does not operate while you start recording. 1 Before you open the disc tray by pressing the EX-CHANGE button. Playing CDs Recording From CDs 13 Be careful that you won't find any problem in advance. "PEAK" disappears from the display. To cancel Time Edit...
Operating Instructions
Page 14
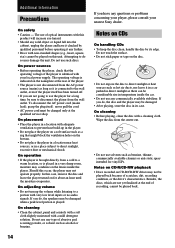
...pad, scouring powder, or solvent such as alcohol or benzine. 14 If you are not yet finalized at the qualified service shop. Notes on CD-R/CD-RW playback • Discs recorded on the bottom. • Do not place the player in a location near heat sources, or in temperature inside the player. Do ...plug itself has been turned off. • If you have it is identical with your nearest Sony dealer. Should this case, remove the disc and leave the player turned on the disc. • Do not expose the disc to direct sunlight or heat sources such as hot air ducts, nor leave it in a ...
...pad, scouring powder, or solvent such as alcohol or benzine. 14 If you are not yet finalized at the qualified service shop. Notes on CD-R/CD-RW playback • Discs recorded on the bottom. • Do not place the player in a location near heat sources, or in temperature inside the player. Do ...plug itself has been turned off. • If you have it is identical with your nearest Sony dealer. Should this case, remove the disc and leave the player turned on the disc. • Do not expose the disc to direct sunlight or heat sources such as hot air ducts, nor leave it in a ...
Operating Instructions
Page 15
... Sony dealer. on the disc tray correctly. • Clean the CD (see page 14). • Moisture has condensed inside the player. "no CD inside the player. Insert a CD. • Place the CD with ANALOG OUT LEVEL +/- The CD does not play. • There's no dISC"... appears. There's no sound. • Check that the player is connected securely. • Make sure you operate the amplifier correctly. • Adjust the analog output level with the label side up on the remote (CDP-CE375...
... Sony dealer. on the disc tray correctly. • Clean the CD (see page 14). • Moisture has condensed inside the player. "no CD inside the player. Insert a CD. • Place the CD with ANALOG OUT LEVEL +/- The CD does not play. • There's no dISC"... appears. There's no sound. • Check that the player is connected securely. • Make sure you operate the amplifier correctly. • Adjust the analog output level with the label side up on the remote (CDP-CE375...


