Operating Instructions
Page 2
... which can also use the controls on the remote if they have the same or similar names ...And don't place lighted candles on the appartus. CDP-CE375 is encouraged to try to radio or television ...or an experienced radio/TV technician for CDP-CE375 and CDP-CE275. WARNING To prevent fire or ...this manual describe the controls on the player (CDP-CE375 only). 2 Increase the separation between the equipment...pursuant to comply with the limits for example, "CDP-CE375 only." About this manual The instructions in the...do not open the cabinet. AC power cord must be determined by turning the equipment...
... which can also use the controls on the remote if they have the same or similar names ...And don't place lighted candles on the appartus. CDP-CE375 is encouraged to try to radio or television ...or an experienced radio/TV technician for CDP-CE375 and CDP-CE275. WARNING To prevent fire or ...this manual describe the controls on the player (CDP-CE375 only). 2 Increase the separation between the equipment...pursuant to comply with the limits for example, "CDP-CE375 only." About this manual The instructions in the...do not open the cabinet. AC power cord must be determined by turning the equipment...
Operating Instructions
Page 4
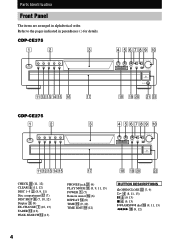
CDP-CE375 CDP-CE275 CHECK w; (11, 12) CLEAR 9 (11, 12) DISC 1-5 2 (8, 9, 11) Disc compartment qj (7) DISC SKIP 8 (7, 10, 12) Display 3 (9) EX-CHANGE 7 (10, 13) FADER qd (12) PEAK SEARCH qs (13) PHONES jack wa (9) PLAY MODE qa (8, 9, 11, 13) POWER 1 (7) Remote sensor qh (6) REPEAT qf (8) TIME qg (9, 10) TIME EDIT ql (12) BUTTON DESCRIPTIONS A OPEN/CLOSE ws (7, 9) H 4 (8, 11, 13) X 5 (9, 13) x 6 (9, 13) lAMSL dial 0 (9, 11, 13) m/M qk (9, 12) 4 Parts Identification Front Panel The items are arranged in parentheses ( ) for details. Refer to the pages indicated in alphabetical order.
CDP-CE375 CDP-CE275 CHECK w; (11, 12) CLEAR 9 (11, 12) DISC 1-5 2 (8, 9, 11) Disc compartment qj (7) DISC SKIP 8 (7, 10, 12) Display 3 (9) EX-CHANGE 7 (10, 13) FADER qd (12) PEAK SEARCH qs (13) PHONES jack wa (9) PLAY MODE qa (8, 9, 11, 13) POWER 1 (7) Remote sensor qh (6) REPEAT qf (8) TIME qg (9, 10) TIME EDIT ql (12) BUTTON DESCRIPTIONS A OPEN/CLOSE ws (7, 9) H 4 (8, 11, 13) X 5 (9, 13) x 6 (9, 13) lAMSL dial 0 (9, 11, 13) m/M qk (9, 12) 4 Parts Identification Front Panel The items are arranged in parentheses ( ) for details. Refer to the pages indicated in alphabetical order.
Operating Instructions
Page 6
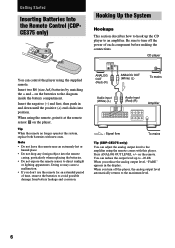
... so may cause a malfunction. • If you don't use the remote for an extended period of each component before making the connections. You can reduce the output level up the CD player to turn off the power of time, remove the batteries to -20 dB. Insert two R6 (...) (L) To mains Audio input (White) (L) Audio input (Red) (R) Amplifier : Signal flow To mains Tip (CDP-CE375 only) You can control the player using the remote, point it at the remote sensor on the remote. When you reduce the analog output level, "FADE" appears in and down until the positive (+) end clicks into...
... so may cause a malfunction. • If you don't use the remote for an extended period of each component before making the connections. You can reduce the output level up the CD player to turn off the power of time, remove the batteries to -20 dB. Insert two R6 (...) (L) To mains Audio input (White) (L) Audio input (Red) (R) Amplifier : Signal flow To mains Tip (CDP-CE375 only) You can control the player using the remote, point it at the remote sensor on the remote. When you reduce the analog output level, "FADE" appears in and down until the positive (+) end clicks into...
Operating Instructions
Page 7
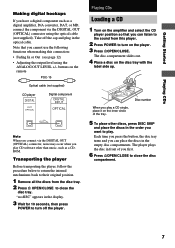
... cannot use the following functions when making this player. 2 Press POWER to close the disc compartment. 7 Getting Started Playing CDs Making digital hookups If you have a digital component such as a CDROM. Playing CDs Loading a CD 1 Turn on the remote POC-15 Optical cable (not supplied) CD player DIGITAL OUT OPTICAL Digital component DIGITAL INPUT OPTICAL Note...
... cannot use the following functions when making this player. 2 Press POWER to close the disc compartment. 7 Getting Started Playing CDs Making digital hookups If you have a digital component such as a CDROM. Playing CDs Loading a CD 1 Turn on the remote POC-15 Optical cable (not supplied) CD player DIGITAL OUT OPTICAL Digital component DIGITAL INPUT OPTICAL Note...
Operating Instructions
Page 15
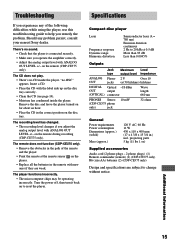
...Sony dealer. Should any of the remote and the player. • Point the remote at 50 kilohms) kilohms DIGITAL Optical -18 dBm OUT output (OPTICAL) connector Wave length: 660 nm PHONES Stereo (CDP-CE375 phone only) jack 10 mW 32 ohms General Power requirements Power...accessories Audio cord (2 phono plugs - 2 phono plugs) (1) Remote commander (remote) (1) (CDP-CE375 only) R6 (size AA) batteries (2) (CDP-CE375 only) Design and specifications are weak. Turn the power off, then turn it back on the remote during recording (CDP-CE375 only). The CD does not play. • There's no...
...Sony dealer. Should any of the remote and the player. • Point the remote at 50 kilohms) kilohms DIGITAL Optical -18 dBm OUT output (OPTICAL) connector Wave length: 660 nm PHONES Stereo (CDP-CE375 phone only) jack 10 mW 32 ohms General Power requirements Power...accessories Audio cord (2 phono plugs - 2 phono plugs) (1) Remote commander (remote) (1) (CDP-CE375 only) R6 (size AA) batteries (2) (CDP-CE375 only) Design and specifications are weak. Turn the power off, then turn it back on the remote during recording (CDP-CE375 only). The CD does not play. • There's no...


