

Primary User Manual
Page 1
Owner's Record The model and serial numbers are located on the bottom. SONY 3-798-741-21 (1) Video Camera Recorder Hi 8 Operation Manual Before operating the unit, please read this product. Model No. Record the serial number in the space provided below. CCD-TRV70 Serial No Model No. AC-V26 Serial No. 0 too 2 videoHi8 Handgun CCD-TRV70 © 1995 by Sony Corporation Refer to these numbers whenever you call upon your Sony dealer regarding this manual thoroughly, and retain it for future reference.
Owner's Record The model and serial numbers are located on the bottom. SONY 3-798-741-21 (1) Video Camera Recorder Hi 8 Operation Manual Before operating the unit, please read this product. Model No. Record the serial number in the space provided below. CCD-TRV70 Serial No Model No. AC-V26 Serial No. 0 too 2 videoHi8 Handgun CCD-TRV70 © 1995 by Sony Corporation Refer to these numbers whenever you call upon your Sony dealer regarding this manual thoroughly, and retain it for future reference.
Primary User Manual
Page 2
... can capture life's precious moments with the limits for help preserve our environment by one or more of this Sony Handycam® camcorder. Caution: Do not handle damaged or leaking nickelcadmium batteries. NO USER•SERVICEABLE PARTS INSIDE. This symbol is intended to alert the user to the presence of uninsulated "dangerous voltage" within the product's enclosure that to persons. Connect...
... can capture life's precious moments with the limits for help preserve our environment by one or more of this Sony Handycam® camcorder. Caution: Do not handle damaged or leaking nickelcadmium batteries. NO USER•SERVICEABLE PARTS INSIDE. This symbol is intended to alert the user to the presence of uninsulated "dangerous voltage" within the product's enclosure that to persons. Connect...
Primary User Manual
Page 3
... Installing the Battery Pack 6 Inserting a Cassette 9 Basic Operations Camera Recording 10 Using the Zoom Feature 12 Shooting with the LCD Screen 13 Hints for Better Shooting 15 Checking the Recorded Picture 17 Playing Back a Tape 18 Searching for the End of the Picture 21 Advanced Operations Using Alternate Power Sources 22 Using House Current 22 Recording with the Date or Time 24 Fade-in and Fade-out 25 Using the PROGRAM AE Function 26 Enjoying Picture Effect 28 Focusing Manually...
... Installing the Battery Pack 6 Inserting a Cassette 9 Basic Operations Camera Recording 10 Using the Zoom Feature 12 Shooting with the LCD Screen 13 Hints for Better Shooting 15 Checking the Recorded Picture 17 Playing Back a Tape 18 Searching for the End of the Picture 21 Advanced Operations Using Alternate Power Sources 22 Using House Current 22 Recording with the Date or Time 24 Fade-in and Fade-out 25 Using the PROGRAM AE Function 26 Enjoying Picture Effect 28 Focusing Manually...

Primary User Manual
Page 7
... AC power cord and set the selector to CAMERA with the battery attached, and leave the camcorder until the 'W indicator and the red lamp flash rapidly in the direction of battery capacity. Removing the Battery Pack Slide the battery pack in the viewfinder. Charging and Installing the Battery Pack Battery Life Battery pack NP-66 NP-98198D NP-80/80D NP-66H/68 NP-C65 (supplied) While LCD open2 recording') LCD...
... AC power cord and set the selector to CAMERA with the battery attached, and leave the camcorder until the 'W indicator and the red lamp flash rapidly in the direction of battery capacity. Removing the Battery Pack Slide the battery pack in the viewfinder. Charging and Installing the Battery Pack Battery Life Battery pack NP-66 NP-98198D NP-80/80D NP-66H/68 NP-C65 (supplied) While LCD open2 recording') LCD...
Primary User Manual
Page 10
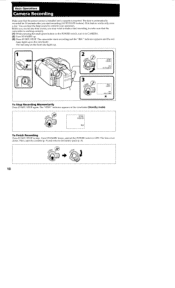
... record one-time events, you start recording (AUTO DATE feature). The "STBY" indicator appears in the viewfinder. Then, eject the cassette (p. 9) and remove the battery pack (p. 8). C sT 10 The camcorder starts recording and the "REC" indicator appears and the red lamp lights up . • oV 'OFF 2 STBY 0:00:00 iC2 AUTO DATE o 3 NOB REC 0,00:01 4= JUL4 1995 To Stop Recording Momentarily Press START/STOP again. Turn STANDBY down, and set the POWER switch...
... record one-time events, you start recording (AUTO DATE feature). The "STBY" indicator appears in the viewfinder. Then, eject the cassette (p. 9) and remove the battery pack (p. 8). C sT 10 The camcorder starts recording and the "REC" indicator appears and the red lamp lights up . • oV 'OFF 2 STBY 0:00:00 iC2 AUTO DATE o 3 NOB REC 0,00:01 4= JUL4 1995 To Stop Recording Momentarily Press START/STOP again. Turn STANDBY down, and set the POWER switch...

Primary User Manual
Page 11
... you stop recording within 10 seconds. • you use the camcorder after someone else has used it, focus the viewfinder lens. To start recording and two beeps sound when you play ) mode only. To set to the East Coast Standard Time at a white paper for about 15 seconds so that the indicators in SP (standard play back the tape. You can change the AUTO DATE setting by the remaining tape indicator...
... you stop recording within 10 seconds. • you use the camcorder after someone else has used it, focus the viewfinder lens. To start recording and two beeps sound when you play ) mode only. To set to the East Coast Standard Time at a white paper for about 15 seconds so that the indicators in SP (standard play back the tape. You can change the AUTO DATE setting by the remaining tape indicator...

Primary User Manual
Page 12
... farther away) T T w w 0 0 Zooming Speed (Dual speed zooming) Press the power zoom button firmly for a relatively slow zoom. If you do not want to use the zoom sparingly. T [a) T T [b) w When you shoot a subject using a telephoto zoom If you cannot get a sharp focus while in the scene. Notes on Digital Zoom • More than 12 x zoom is performed digitally, and the picture quality deteriorates as you set the D ZOOM function to OFF, the part above the bar...
... farther away) T T w w 0 0 Zooming Speed (Dual speed zooming) Press the power zoom button firmly for a relatively slow zoom. If you do not want to use the zoom sparingly. T [a) T T [b) w When you shoot a subject using a telephoto zoom If you cannot get a sharp focus while in the scene. Notes on Digital Zoom • More than 12 x zoom is performed digitally, and the picture quality deteriorates as you set the D ZOOM function to OFF, the part above the bar...

Primary User Manual
Page 14
... appears on the LCD screen and the date, remaining battery and remaining tape indicator disappear. [b] [a] [b] Using the mirror mode, you can record yourself while watching yourself on the LCD. [c] While recording in the mirror mode, you can also use . [a] O [b] O O O 14 OO O only the POWER switch, the START/STOP button, the power zoom button, the STANDBY switch, the EDITSEARCH button and the EJECT button work. - the date appears reversely when the AUTO DATE feature is turned over so that...
... appears on the LCD screen and the date, remaining battery and remaining tape indicator disappear. [b] [a] [b] Using the mirror mode, you can record yourself while watching yourself on the LCD. [c] While recording in the mirror mode, you can also use . [a] O [b] O O O 14 OO O only the POWER switch, the START/STOP button, the power zoom button, the STANDBY switch, the EDITSEARCH button and the EJECT button work. - the date appears reversely when the AUTO DATE feature is turned over so that...

Primary User Manual
Page 18
... button on a TV screen, after connecting the camcorder to a TV or VCR (p. 36). Adjust the angle of the LCD panel or the brightness of the LCD screen if necessary (p. 13). (4) Press G.- The operation keys light on. (2) Insert the recorded tape with the window facing out. (3) While pressing PUSH OPEN, open the LCD panel. PLAY - To Fast-forward the Tape Press No- 18 VOLUME O eFF PAUSE REC O 44 11 • 0 0 0 0 To Stop Playback Press u during playback...
... button on a TV screen, after connecting the camcorder to a TV or VCR (p. 36). Adjust the angle of the LCD panel or the brightness of the LCD screen if necessary (p. 13). (4) Press G.- The operation keys light on. (2) Insert the recorded tape with the window facing out. (3) While pressing PUSH OPEN, open the LCD panel. PLAY - To Fast-forward the Tape Press No- 18 VOLUME O eFF PAUSE REC O 44 11 • 0 0 0 0 To Stop Playback Press u during playback...

Primary User Manual
Page 19
You can monitor the sound only by using To view the playback picture in the viewfinder Close the LCD panel. The viewfinder turns off automatically. jack. The viewfinder turns on the LCD screen again, open the LCD panel. When using the viewfinder, you can adjust the volume of the headphones using headphones. To view on automatically. adei e pea 6upield 19 To display the indicators, press it over and move...
You can monitor the sound only by using To view the playback picture in the viewfinder Close the LCD panel. The viewfinder turns off automatically. jack. The viewfinder turns on the LCD screen again, open the LCD panel. When using the viewfinder, you can adjust the volume of the headphones using headphones. To view on automatically. adei e pea 6upield 19 To display the indicators, press it over and move...

Primary User Manual
Page 37
... VCR using the supplied A/V connecting cable (p. 36). You can also play back the tape in the normal/reverse direction by holding down the volume of the EDITSEARCH button You can create your recorded tape into the VCR and insert your own video program by pressing EDITSEARCH intermittently. 37 Use of the camcorder while editing. Set the input selector on the VCR to LINE, if available. (1) Set the POWER switch to VTR. (2) Set...
... VCR using the supplied A/V connecting cable (p. 36). You can also play back the tape in the normal/reverse direction by holding down the volume of the EDITSEARCH button You can create your recorded tape into the VCR and insert your own video program by pressing EDITSEARCH intermittently. 37 Use of the camcorder while editing. Set the input selector on the VCR to LINE, if available. (1) Set the POWER switch to VTR. (2) Set...

Primary User Manual
Page 38
Turn down the volume of the A/V connecting cable [131. 2 REC OFF o€c) 00 00 0 AUDIO TV S-VIDEO OUT VIDEO OUT VCR AUDIO OUT : Signal flow If your TV or VCR is monaural. To Stop Recording Press u STOP. Connect the camcorder to connect the yellow (video) plug of the camcorder while editing. If you are going to connect the camcorder using the S video cable [a], you want to VTR. (2) Press REC • and the button on the TV or VCR. 38...
Turn down the volume of the A/V connecting cable [131. 2 REC OFF o€c) 00 00 0 AUDIO TV S-VIDEO OUT VIDEO OUT VCR AUDIO OUT : Signal flow If your TV or VCR is monaural. To Stop Recording Press u STOP. Connect the camcorder to connect the yellow (video) plug of the camcorder while editing. If you are going to connect the camcorder using the S video cable [a], you want to VTR. (2) Press REC • and the button on the TV or VCR. 38...

Primary User Manual
Page 41
... you play ) mode When you are going to the format in the standard 8 mm tape. Foreign 8 mm video You cannot play back the tape using cassette type Hi8 Standard 8 Fli Ei I1 When You Play Back The playback mode (SP or LP) is an extension of the camcorder operates on a different TV color system. Resetting the Date and Time/Playback Mod Playback Modes Selecting Cassette Types This Hi8 system is selected automatically according to play software recorded...
... you play ) mode When you are going to the format in the standard 8 mm tape. Foreign 8 mm video You cannot play back the tape using cassette type Hi8 Standard 8 Fli Ei I1 When You Play Back The playback mode (SP or LP) is an extension of the camcorder operates on a different TV color system. Resetting the Date and Time/Playback Mod Playback Modes Selecting Cassette Types This Hi8 system is selected automatically according to play software recorded...

Primary User Manual
Page 42
... Shorter in the viewfinder or on the LCD screen, the lens moves automatically and the battery is used when a tape is replaced. A smooth transition between scenes after the battery pack is inserted or removed. When to Replace the Battery Pack While you are recording, turn the POWER switch to OFF on the camcorder down when not recording to 3 times as much recording as you are positioning the subject, selecting...
... Shorter in the viewfinder or on the LCD screen, the lens moves automatically and the battery is used when a tape is replaced. A smooth transition between scenes after the battery pack is inserted or removed. When to Replace the Battery Pack While you are recording, turn the POWER switch to OFF on the camcorder down when not recording to 3 times as much recording as you are positioning the subject, selecting...

Primary User Manual
Page 45
... other functions except for tape ejection will work . Eject the tape, turn off the power and do not use the camcorder for about 1 hour). 45 Turn off the camcorder, and leave it (after about one hour. indicators flash in the viewfinder or on the LCD screen flashes. O I C' On the Surface of the Tape If there is moisture on the lens, no other functions except for tape ejection will work . On the Lens If...
... other functions except for tape ejection will work . Eject the tape, turn off the power and do not use the camcorder for about 1 hour). 45 Turn off the camcorder, and leave it (after about one hour. indicators flash in the viewfinder or on the LCD screen flashes. O I C' On the Surface of the Tape If there is moisture on the lens, no other functions except for tape ejection will work . On the Lens If...
Primary User Manual
Page 47
... fields or mechanical vibration. • Do not push the LCD screen. • If the camcorder is not a malfunction. • Constant bright points of solvent which may heat up the camcorder and operate it any type of light (red, blue, or green) may appear on the power, operate the camera and player sections and play hack a tape for a long time, disconnect the power source and remove the tape.
... fields or mechanical vibration. • Do not push the LCD screen. • If the camcorder is not a malfunction. • Constant bright points of solvent which may heat up the camcorder and operate it any type of light (red, blue, or green) may appear on the power, operate the camera and player sections and play hack a tape for a long time, disconnect the power source and remove the tape.
Primary User Manual
Page 50
... beep sounds continuously The battery is discharged during recording. The tape is attached. Eject the tape. Use a charged battery pack or the AC power adaptor. The tape does not move when a The POWER switch is set to tape transport button is set to ON. Flashing will stop soon. REC LAMP is CAMERA or OFF. Use a charged battery pack. The camcorder is dead. menu system. Rewind the tape or use a new one . The cassette cannot be recharged. The STEADY SHOT function...
... beep sounds continuously The battery is discharged during recording. The tape is attached. Eject the tape. Use a charged battery pack or the AC power adaptor. The tape does not move when a The POWER switch is set to tape transport button is set to ON. Flashing will stop soon. REC LAMP is CAMERA or OFF. Use a charged battery pack. The camcorder is dead. menu system. Rewind the tape or use a new one . The cassette cannot be recharged. The STEADY SHOT function...

Primary User Manual
Page 51
.... The camcorder operates in the menu system. Insert new ones. Clean the lens with correct polarity. The image on Incorporated fluorescent tube is not adjusted. Change locations. An unknown picture is heard when playing back a tape. No sound or only a low sound is displayed. the menu system. The stereo tape is set to AUTO. Exit the Demo mode. the correct polarity. Operation Picture/Sound Symptom Cause Corrective Actions The autofocusing function does Shooting conditions are...
.... The camcorder operates in the menu system. Insert new ones. Clean the lens with correct polarity. The image on Incorporated fluorescent tube is not adjusted. Change locations. An unknown picture is heard when playing back a tape. No sound or only a low sound is displayed. the menu system. The stereo tape is set to AUTO. Exit the Demo mode. the correct polarity. Operation Picture/Sound Symptom Cause Corrective Actions The autofocusing function does Shooting conditions are...

Primary User Manual
Page 53
... NP-66, lithium battery CR2025, cassette E6-120 and shoulder strap Microphone Electret condenser microphone, stereo type Supplied accessories See page 5. Trouble Check/Specifications Specifications Video Camera Recorder System Video recording system Two rotary heads, Helical scanning, FM system Audio recording system Rotary heads, FM system Video signal NTSC color, EIA standards Usable cassette 8 mm video format cassette ( Hi8 or standard 8mm) Tape speed SP mode: Approx. 'Ym inches (1.43 cm)/ second LP mode: Approx. 7". Recording/Playback time SP mode: 2 hours (E6/P6...
... NP-66, lithium battery CR2025, cassette E6-120 and shoulder strap Microphone Electret condenser microphone, stereo type Supplied accessories See page 5. Trouble Check/Specifications Specifications Video Camera Recorder System Video recording system Two rotary heads, Helical scanning, FM system Audio recording system Rotary heads, FM system Video signal NTSC color, EIA standards Usable cassette 8 mm video format cassette ( Hi8 or standard 8mm) Tape speed SP mode: Approx. 'Ym inches (1.43 cm)/ second LP mode: Approx. 7". Recording/Playback time SP mode: 2 hours (E6/P6...
Primary User Manual
Page 63
... power adaptor 6, 22 Adjusting viewfinder 11 AUTO DATE 11 A / V connecting cable .... 36, 38 B BACK LIGHT Battery Battery indicator Battery pack BEEP BRIGHT 32 59 42, 61 6 35 13 C Camera recording Car battery Charging battery Cleaning video heads Connection COUNTER RESET 10 23 6 46 36, 38 11 D DATE/TIME 24 DEMO 60 Digital zoom 12 DISPLAY 19 E EDIT 35 Editing 37 EDITSEARCH 17 EJECT 9 END SEARCH 21 F, G, H, I,J,K FADER 25 Fade-in/Fade-out 25 Fast-forward 18 High-speed shutter mode...
... power adaptor 6, 22 Adjusting viewfinder 11 AUTO DATE 11 A / V connecting cable .... 36, 38 B BACK LIGHT Battery Battery indicator Battery pack BEEP BRIGHT 32 59 42, 61 6 35 13 C Camera recording Car battery Charging battery Cleaning video heads Connection COUNTER RESET 10 23 6 46 36, 38 11 D DATE/TIME 24 DEMO 60 Digital zoom 12 DISPLAY 19 E EDIT 35 Editing 37 EDITSEARCH 17 EJECT 9 END SEARCH 21 F, G, H, I,J,K FADER 25 Fade-in/Fade-out 25 Fast-forward 18 High-speed shutter mode...


