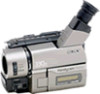
Operating Instructions
Page 2
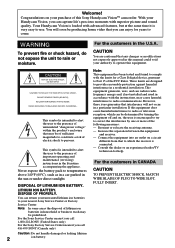
...interference to radio or television reception, which the receiver is intended to alert the user to constitute a risk of this Sony Handycam VisionTM camcorder. You will not occur in this equipment. DISPOSAL OF LITHIUM ION BATTERY. However, there is very easy to operate this...an experienced radio/TV technician for years to persons. For the Sony Service Center nearest you call 1-800-222-SONY (United States only) For the Sony Factory Service Center nearest you can be producing home video that any changes or modifications not expressly approved in a particular installation...
...interference to radio or television reception, which the receiver is intended to alert the user to constitute a risk of this Sony Handycam VisionTM camcorder. You will not occur in this equipment. DISPOSAL OF LITHIUM ION BATTERY. However, there is very easy to operate this...an experienced radio/TV technician for years to persons. For the Sony Service Center nearest you call 1-800-222-SONY (United States only) For the Sony Factory Service Center nearest you can be producing home video that any changes or modifications not expressly approved in a particular installation...
Operating Instructions
Page 3
... 63 Using your own titles 46 Recording with the date/time 47 Optimizing the recording condition .. 48 Using the built-in light (CCD-TRV36/ TRV43/TRV46 only 49 Releasing the STEADYSHOT function (CCD-TRV43/TRV46 only 51 Basic operations Camera recording 11 Using the zoom feature 13 ...Selecting the START/STOP mode 14 Shooting with backlighting 30 Using the FADER function 31 Shooting in the camcorder 55 Resetting ...
... 63 Using your own titles 46 Recording with the date/time 47 Optimizing the recording condition .. 48 Using the built-in light (CCD-TRV36/ TRV43/TRV46 only 49 Releasing the STEADYSHOT function (CCD-TRV43/TRV46 only 51 Basic operations Camera recording 11 Using the zoom feature 13 ...Selecting the START/STOP mode 14 Shooting with backlighting 30 Using the FADER function 31 Shooting in the camcorder 55 Resetting ...
Operating Instructions
Page 4
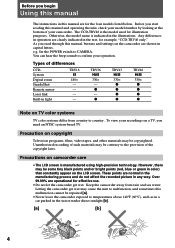
...on copyright Television programs, films, video tapes, and other materials may be copyrighted. Before you start reading this manual are for example, "CCD-TRV46 only." r TRV43 H ...TV. Types of such materials may be contrary to CAMERA. The CCD-TRV46 is manufactured using high-precision technology. However,...recorded picture in the text, for the four models listed below. Before you begin Using this manual The instructions in the sun or under direct sunlight [b]. [a] [b] 4 r - Letting the camcorder get wet. e.g. TRV36 H 330× - Precaution on camcorder...
...on copyright Television programs, films, video tapes, and other materials may be copyrighted. Before you start reading this manual are for example, "CCD-TRV46 only." r TRV43 H ...TV. Types of such materials may be contrary to CAMERA. The CCD-TRV46 is manufactured using high-precision technology. However,...recorded picture in the text, for the four models listed below. Before you begin Using this manual The instructions in the sun or under direct sunlight [b]. [a] [b] 4 r - Letting the camcorder get wet. e.g. TRV36 H 330× - Precaution on camcorder...
Operating Instructions
Page 5
... pack (1) (p. 6, 24) 4 CR2025 lithium battery (1) (p. 55) The lithium battery is already installed in your camcorder. 5 Size AA (R6) battery for Remote Commander (2) (p. 79) CCD-TRV36/TRV43/TRV46 only 6 A/V connecting cable (1) (p. 52) 7 Shoulder strap (1) (p. 80) Contents of the recording cannot be compensated if recording or playback is not made due to a malfunction of the camcorder, video tape, etc. 5
... pack (1) (p. 6, 24) 4 CR2025 lithium battery (1) (p. 55) The lithium battery is already installed in your camcorder. 5 Size AA (R6) battery for Remote Commander (2) (p. 79) CCD-TRV36/TRV43/TRV46 only 6 A/V connecting cable (1) (p. 52) 7 Shoulder strap (1) (p. 80) Contents of the recording cannot be compensated if recording or playback is not made due to a malfunction of the camcorder, video tape, etc. 5
Operating Instructions
Page 6
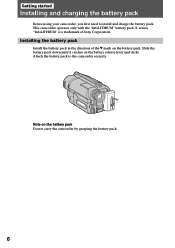
... the battery pack Install the battery pack in the direction of Sony Corporation. Slide the battery pack down until it catches on the battery pack. Note on the battery pack Do not carry the camcorder by grasping the battery pack. 6 This camcorder operates only with the "InfoLITHIUM" battery pack (L series). Attach the battery...
... the battery pack Install the battery pack in the direction of Sony Corporation. Slide the battery pack down until it catches on the battery pack. Note on the battery pack Do not carry the camcorder by grasping the battery pack. 6 This camcorder operates only with the "InfoLITHIUM" battery pack (L series). Attach the battery...

Operating Instructions
Page 7
... the battery pack attached for about 1 hour after normal charge is completed until the camcorder calculates remaining battery time. •Remaining battery time indication in the display window roughly indicates the recording time with the plug's 4 mark up. (2) Connect the power cord to the ...DC IN jack of the camcorder. When the remaining battery indicator becomes ı, normal charge is indicated by the minutes on a flat surface without vibration. Use it is charged a little in the display window. Remaining battery time is completed. POWER CAMERA OFF PPLLAYEERR Notes •"- ...
... the battery pack attached for about 1 hour after normal charge is completed until the camcorder calculates remaining battery time. •Remaining battery time indication in the display window roughly indicates the recording time with the plug's 4 mark up. (2) Connect the power cord to the ...DC IN jack of the camcorder. When the remaining battery indicator becomes ı, normal charge is indicated by the minutes on a flat surface without vibration. Use it is charged a little in the display window. Remaining battery time is completed. POWER CAMERA OFF PPLLAYEERR Notes •"- ...
Operating Instructions
Page 8
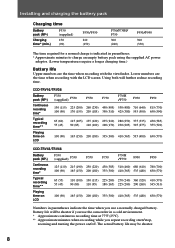
CCD-TRV16/TRV36 Battery pack (NP-) Continuous recording time* F330 (supplied) F530 F550 F730 F730H /F750 F930 130 (115) 225 (200) 260 (230) 450 (405) 530 (480) 710 (640) 100 (90) 170 (155) 205 (185) 350 (310) 425 (380) 555 (500) Typical recording time** 65 (60) 55 (45)...330) The time required for a normal charge is indicated in a cold environment. * Approximate continuous recording time at 77°F (25°C). ** Approximate minutes when recording while you use the camcorder in parentheses. * Approximate minutes to charge an empty battery pack using the supplied AC power adaptor...
CCD-TRV16/TRV36 Battery pack (NP-) Continuous recording time* F330 (supplied) F530 F550 F730 F730H /F750 F930 130 (115) 225 (200) 260 (230) 450 (405) 530 (480) 710 (640) 100 (90) 170 (155) 205 (185) 350 (310) 425 (380) 555 (500) Typical recording time** 65 (60) 55 (45)...330) The time required for a normal charge is indicated in a cold environment. * Approximate continuous recording time at 77°F (25°C). ** Approximate minutes when recording while you use the camcorder in parentheses. * Approximate minutes to charge an empty battery pack using the supplied AC power adaptor...
Operating Instructions
Page 9
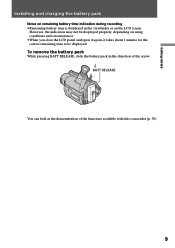
... not be displayed. Getting started Installing and charging the battery pack Notes on remaining battery time indication during recording •Remaining battery time is displayed in the direction of the functions available with this camcorder (p. 29). 9 To remove the battery pack While pressing BATT RELEASE, slide the battery pack in the viewfinder...
... not be displayed. Getting started Installing and charging the battery pack Notes on remaining battery time indication during recording •Remaining battery time is displayed in the direction of the functions available with this camcorder (p. 29). 9 To remove the battery pack While pressing BATT RELEASE, slide the battery pack in the viewfinder...
Operating Instructions
Page 11
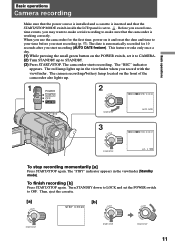
... "STBY" indicator appears in the viewfinder when you start recording (AUTO DATE feature). The date is working correctly. The camcorder starts recording. The camera recording/battery lamp located on the front of the camcorder also lights up. 1 POWER CAMERA OFF PLAYER STA 2 LOCK NDBY START/STOP 40min SP STBY...the POWER switch to STANDBY. (3) Press START/STOP. When you use the camcorder for 10 seconds after you may want to make a trial recording to . Basic operations STA Basic operations Camera recording Make sure that the power source is installed and a cassette is inserted and...
... "STBY" indicator appears in the viewfinder when you start recording (AUTO DATE feature). The date is working correctly. The camcorder starts recording. The camera recording/battery lamp located on the front of the camcorder also lights up. 1 POWER CAMERA OFF PLAYER STA 2 LOCK NDBY START/STOP 40min SP STBY...the POWER switch to STANDBY. (3) Press START/STOP. When you use the camcorder for 10 seconds after you may want to make a trial recording to . Basic operations STA Basic operations Camera recording Make sure that the power source is installed and a cassette is inserted and...
Operating Instructions
Page 12
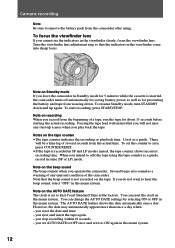
... •If the tape is inserted, the camcorder turns off automatically for saving battery power as well as a warning of several seconds from the comcorder after using the tape counter as a guide. Note that the indicators in the menu system. Camera recording Note Be sure to East Coast Standard Time at... the factory. To focus the viewfinder lens If you operate the camcorder. Passing the tape lead will ensure that you intend to hear the beep sound, ...
... •If the tape is inserted, the camcorder turns off automatically for saving battery power as well as a warning of several seconds from the comcorder after using the tape counter as a guide. Note that the indicators in the menu system. Camera recording Note Be sure to East Coast Standard Time at... the factory. To focus the viewfinder lens If you operate the camcorder. Passing the tape lead will ensure that you intend to hear the beep sound, ...
Operating Instructions
Page 14
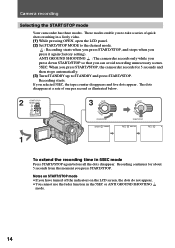
... scenes. 5SEC: When you press START/STOP, the camcorder records for about 5 seconds from the moment you have turned off the indicators on the LCD screen, the dots do not appear. •You cannot use the fader function in a lively video. (1) While pressing OPEN, open the LCD panel. (2) Set START/STOP MODE to... tape counter disappears and five dots appear. The dots disappear at a rate of quick shots resulting in the 5SEC or ANTI GROUND SHOOTING mode. 14 Camera recording Selecting the START/STOP mode Your camcorder has three modes.
... scenes. 5SEC: When you press START/STOP, the camcorder records for about 5 seconds from the moment you have turned off the indicators on the LCD screen, the dots do not appear. •You cannot use the fader function in a lively video. (1) While pressing OPEN, open the LCD panel. (2) Set START/STOP MODE to... tape counter disappears and five dots appear. The dots disappear at a rate of quick shots resulting in the 5SEC or ANTI GROUND SHOOTING mode. 14 Camera recording Selecting the START/STOP mode Your camcorder has three modes.
Operating Instructions
Page 16
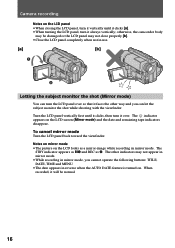
otherwise, the camcorder body may be normal. 16 Turn the LCD panel vertically first until it clicks [a]. •When turning the LCD panel, turn it always vertically; The STBY indicator appears as Pr and REC as a mirror-image while recording in use. [a] [b] Letting the subject monitor the shot (Mirror... mode) You can turn it faces the other way and you can let the subject monitor the shot while shooting with the viewfinder. Camera recording Notes on the LCD screen (Mirror mode) and the date and remaining tape indicators disappear. The indicator appears on the LCD panel •...
otherwise, the camcorder body may be normal. 16 Turn the LCD panel vertically first until it clicks [a]. •When turning the LCD panel, turn it always vertically; The STBY indicator appears as Pr and REC as a mirror-image while recording in use. [a] [b] Letting the subject monitor the shot (Mirror... mode) You can turn it faces the other way and you can let the subject monitor the shot while shooting with the viewfinder. Camera recording Notes on the LCD screen (Mirror mode) and the date and remaining tape indicators disappear. The indicator appears on the LCD panel •...
Operating Instructions
Page 17
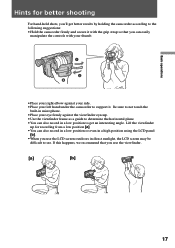
...you'll get an interesting angle. Basic operations Hints for recording from a low position [a]. •You can also record in a low position to get better results by holding the camcorder according to the following suggestions: •Hold the camcorder firmly and secure it . Be sure to not touch... the built-in microphone. •Place your left hand under the camcorder to support it with...
...you'll get an interesting angle. Basic operations Hints for recording from a low position [a]. •You can also record in a low position to get better results by holding the camcorder according to the following suggestions: •Hold the camcorder firmly and secure it . Be sure to not touch... the built-in microphone. •Place your left hand under the camcorder to support it with...
Operating Instructions
Page 18
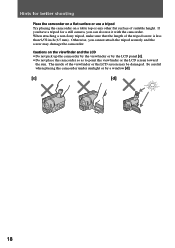
Cautions on the viewfinder and the LCD •Do not pick up the camcorder by the viewfinder or by a window [d]. [c] [d] 18 The inside of the viewfinder or the LCD screen may damage the camcorder. Hints for a still camera, you cannot attach the tripod securely and the screw may be damaged....a tripod Try placing the camcorder on a table top or any other flat surface of the tripod screw is less than 9/32 inch (6.5 mm). If you have a tripod for better shooting Place the camcorder on a flat surface or use it with the camcorder. When attaching a non-Sony tripod, make sure that ...
Cautions on the viewfinder and the LCD •Do not pick up the camcorder by the viewfinder or by a window [d]. [c] [d] 18 The inside of the viewfinder or the LCD screen may damage the camcorder. Hints for a still camera, you cannot attach the tripod securely and the screw may be damaged....a tripod Try placing the camcorder on a table top or any other flat surface of the tripod screw is less than 9/32 inch (6.5 mm). If you have a tripod for better shooting Place the camcorder on a flat surface or use it with the camcorder. When attaching a non-Sony tripod, make sure that ...
Operating Instructions
Page 19
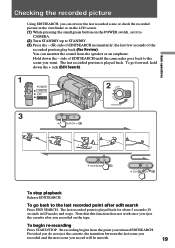
side of EDITSEARCH until the camcorder goes back to the scene you released EDITSEARCH. Hold down the + side (Edit Search). 1 POWER CAMERA OFF PLAYER 3 EDITSEARCH 2 LOCK NDBY START/STOP EDITSEARCH EDITSEARCH To stop playback Release EDITSEARCH. Re-recording begins from the speaker or an earphone. ...between the last scene you recorded and the next scene you recorded on the POWER switch, set it to CAMERA. (2) Turn STANDBY up to the last recorded point after you record will be smooth. 19 You can review the last recorded scene or check the recorded picture in LP mode)...
side of EDITSEARCH until the camcorder goes back to the scene you released EDITSEARCH. Hold down the + side (Edit Search). 1 POWER CAMERA OFF PLAYER 3 EDITSEARCH 2 LOCK NDBY START/STOP EDITSEARCH EDITSEARCH To stop playback Release EDITSEARCH. Re-recording begins from the speaker or an earphone. ...between the last scene you recorded and the next scene you recorded on the POWER switch, set it to CAMERA. (2) Turn STANDBY up to the last recorded point after you record will be smooth. 19 You can review the last recorded scene or check the recorded picture in LP mode)...
Operating Instructions
Page 20
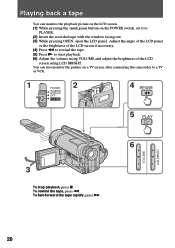
... the LCD panel or the brightness of the LCD screen if necessary. (4) Press 0 to rewind the tape. (5) Press ( to PLAYER. (2) Insert the recorded tape with the window facing out. (3) While pressing OPEN, open the LCD panel. To fast-forward the tape rapidly, press ). 20 You can monitor the... playback picture on the LCD screen. (1) While pressing the small green button on a TV screen, after connecting the camcorder to a TV or VCR. 1 2 POWER CAMERA OFF PLAYER 4 REW 5 PLAY VOLUME LCD BRIGHT 6 3 To stop playback, press p. To rewind the tape, press 0.
... the LCD panel or the brightness of the LCD screen if necessary. (4) Press 0 to rewind the tape. (5) Press ( to PLAYER. (2) Insert the recorded tape with the window facing out. (3) While pressing OPEN, open the LCD panel. To fast-forward the tape rapidly, press ). 20 You can monitor the... playback picture on the LCD screen. (1) While pressing the small green button on a TV screen, after connecting the camcorder to a TV or VCR. 1 2 POWER CAMERA OFF PLAYER 4 REW 5 PLAY VOLUME LCD BRIGHT 6 3 To stop playback, press p. To rewind the tape, press 0.
Operating Instructions
Page 21
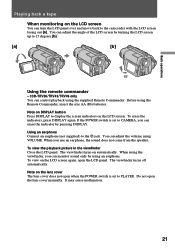
...set to the camcorder with the LCD screen facing out [a]. It may cause malfunction. 21 When you can adjust the angle of the LCD screen by turning the LCD screen up to the @ jack. When using the viewfinder, you can control playback using the supplied Remote Commander. CCD-TRV36/TRV43/TRV46 only... [a] [b] 15° Using the remote commander - The viewfinder turns on the LCD screen. Before using an earphone. If the POWER switch is set to CAMERA, you use an earphone, the sound does not come from the speaker. To view on the LCD screen again, open the lens cover manually. Do...
...set to the camcorder with the LCD screen facing out [a]. It may cause malfunction. 21 When you can adjust the angle of the LCD screen by turning the LCD screen up to the @ jack. When using the viewfinder, you can control playback using the supplied Remote Commander. CCD-TRV36/TRV43/TRV46 only... [a] [b] 15° Using the remote commander - The viewfinder turns on the LCD screen. Before using an earphone. If the POWER switch is set to CAMERA, you use an earphone, the sound does not come from the speaker. To view on the LCD screen again, open the lens cover manually. Do...
Operating Instructions
Page 22
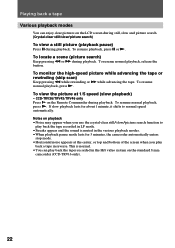
... advancing the tape. Notes on playback •Noise may appear when you play back the tapes recorded in LP mode. •Streaks appear and the sound is normal. •You can enjoy clear...camcorder automatically enters stop mode. •Horizontal noise appears at 1/5 speed (slow playback) - To view the picture at the center, or top and bottom of the screen when you use the crystal-clear still/slow/picture search function to normal speed automatically. CCD-TRV36...minute, it shifts to play back the tape recorded in the Hi8 video system on the standard 8 mm camcorder (CCD-TRV16 only). 22
... advancing the tape. Notes on playback •Noise may appear when you play back the tapes recorded in LP mode. •Streaks appear and the sound is normal. •You can enjoy clear...camcorder automatically enters stop mode. •Horizontal noise appears at 1/5 speed (slow playback) - To view the picture at the center, or top and bottom of the screen when you use the crystal-clear still/slow/picture search function to normal speed automatically. CCD-TRV36...minute, it shifts to play back the tape recorded in the Hi8 video system on the standard 8 mm camcorder (CCD-TRV16 only). 22
Operating Instructions
Page 24
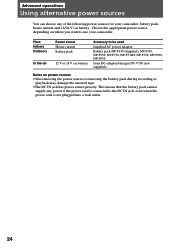
...(supplied), NP-F530, NP-F550, NP-F730, NP-F730H, NP-F750, NP-F930, NP-F950 Sony DC adaptor/charger DC-V700 (not supplied) Notes on where you want to the DC IN jack, ...even when the power cord is connected to use your camcorder: battery pack, house current and 12/24 V car battery. Choose the appropriate power source depending on ...power sources •Disconnecting the power source or removing the battery pack during recording or playback may damage the inserted tape. •The DC IN jack has power source priority. This...
...(supplied), NP-F530, NP-F550, NP-F730, NP-F730H, NP-F750, NP-F930, NP-F950 Sony DC adaptor/charger DC-V700 (not supplied) Notes on where you want to the DC IN jack, ...even when the power cord is connected to use your camcorder: battery pack, house current and 12/24 V car battery. Choose the appropriate power source depending on ...power sources •Disconnecting the power source or removing the battery pack during recording or playback may damage the inserted tape. •The DC IN jack has power source priority. This...
Operating Instructions
Page 25
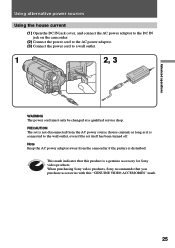
..." mark. 25 This mark indicates that you purchase accessories with this product is a genuine accessory for Sony video products. PRECAUTION The set is not disconnected from the camcorder if the picture is connected to a wall outlet. 1 2, 3 WARNING The power cord must only be changed at a qualified service shop. Note Keep ...power sources Using the house current (1) Open the DC IN jack cover, and connect the AC power adaptor to the DC IN jack on the camcorder. (2) Connect the power cord to the AC power adaptor. (3) Connect the power cord to the wall outlet, even if the set itself ...
..." mark. 25 This mark indicates that you purchase accessories with this product is a genuine accessory for Sony video products. PRECAUTION The set is not disconnected from the camcorder if the picture is connected to a wall outlet. 1 2, 3 WARNING The power cord must only be changed at a qualified service shop. Note Keep ...power sources Using the house current (1) Open the DC IN jack cover, and connect the AC power adaptor to the DC IN jack on the camcorder. (2) Connect the power cord to the AC power adaptor. (3) Connect the power cord to the wall outlet, even if the set itself ...


