

Service Manual
Page 4
... model is already installed in your camcorder. 5 Size AA (R6) battery for Remote Commander (2) CCD-TR516/TR516PK/TR716 CCD-TRV36/TRV36PK/TRV43/TRV46/TRV46PK 6 A / V connecting cable (1) 7 Shoulder strap (1) 8 Video P6-15P HB tape CCD-TR416: US/TR516: US/TR716:US CCD-TRV16:US/TRV36:US/TRV43:US/TRV46:US... 9 2 pin conversion adaptor (1) CCD- TRV16:E,BR,HK,TW/TRV16PK/TRV36PK/ TRV46:E,HK/TRV46PK • Abbreviation Brazilian model is abbreviated as BR...
... model is already installed in your camcorder. 5 Size AA (R6) battery for Remote Commander (2) CCD-TR516/TR516PK/TR716 CCD-TRV36/TRV36PK/TRV43/TRV46/TRV46PK 6 A / V connecting cable (1) 7 Shoulder strap (1) 8 Video P6-15P HB tape CCD-TR416: US/TR516: US/TR716:US CCD-TRV16:US/TRV36:US/TRV43:US/TRV46:US... 9 2 pin conversion adaptor (1) CCD- TRV16:E,BR,HK,TW/TRV16PK/TRV36PK/ TRV46:E,HK/TRV46PK • Abbreviation Brazilian model is abbreviated as BR...

Service Manual
Page 8
...6 3-2. GENERAL This section is extacked from instruction manual of Front Panel Block and Video Light Block .... 2-1 2-2. Removal of CCD-TRV36/TRV43/TRV46. Removal of DD-117 and PJ-90/91 Boards 2-4 2-11. Removal of Zoom Lens Block and VL... function 1-8 Using the PROGRAM AE function 1-9 Focusing manually 1-9 Enjoying picture effect 1-10 Adjusting the exposure 1-10 Superimposing a title 1-11 Making your camcorder abroad 1-17 Truoble check 1-17 Self-diagnosis display 1-18 Identifying the parts 1-18 Warning Indicators 1-20 2-1. VTR/Camera Control Block Diagram 3-9 3-4....
...6 3-2. GENERAL This section is extacked from instruction manual of Front Panel Block and Video Light Block .... 2-1 2-2. Removal of CCD-TRV36/TRV43/TRV46. Removal of DD-117 and PJ-90/91 Boards 2-4 2-11. Removal of Zoom Lens Block and VL... function 1-8 Using the PROGRAM AE function 1-9 Focusing manually 1-9 Enjoying picture effect 1-10 Adjusting the exposure 1-10 Superimposing a title 1-11 Making your camcorder abroad 1-17 Truoble check 1-17 Self-diagnosis display 1-18 Identifying the parts 1-18 Warning Indicators 1-20 2-1. VTR/Camera Control Block Diagram 3-9 3-4....

Service Manual
Page 89
... changing the data, copy the data built in the following tables by manual input. Note : If copy the data built in the different model, the camcorder may not operate. 3) When changing the data, press the PAUSE button of the adjusting remote commander each time when setting new data to FF Initializing...
... changing the data, copy the data built in the following tables by manual input. Note : If copy the data built in the different model, the camcorder may not operate. 3) When changing the data, press the PAUSE button of the adjusting remote commander each time when setting new data to FF Initializing...
Operating Instructions
Page 2
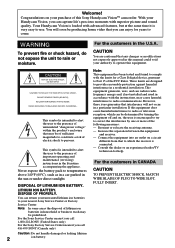
...loaded with superior picture and sound quality. DISPOSE OF PROPERLY. Note: In some areas the disposal of the FCC Rules. Your Handycam Vision is no guarantee that any changes or modifications not expressly approved in the sun or under direct sunlight. CAUTION You are designed...instructions in household or business trash may be producing home video that you can enjoy for years to operate this Sony Handycam VisionTM camcorder. With your Handycam Vision, you call 416-499-SONY (Canada only) Caution: Do not handle damaged or leaking lithium 2 ion battery. These limits are cautioned ...
...loaded with superior picture and sound quality. DISPOSE OF PROPERLY. Note: In some areas the disposal of the FCC Rules. Your Handycam Vision is no guarantee that any changes or modifications not expressly approved in the sun or under direct sunlight. CAUTION You are designed...instructions in household or business trash may be producing home video that you can enjoy for years to operate this Sony Handycam VisionTM camcorder. With your Handycam Vision, you call 416-499-SONY (Canada only) Caution: Do not handle damaged or leaking lithium 2 ion battery. These limits are cautioned ...
Operating Instructions
Page 3
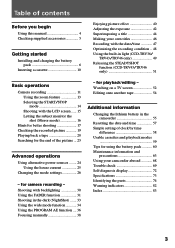
... difference 58 Usable cassettes and playback modes 59 Tips for using the battery pack 60 Maintenance information and precautions 63 Using your camcorder abroad 68 Trouble check 69 Self-diagnosis display 72 Specifications 73 Identifying the parts 74 Warning indicators 82 Index 83 3 Before ...only 49 Releasing the STEADYSHOT function (CCD-TRV43/TRV46 only 51 Basic operations Camera recording 11 Using the zoom feature 13 Selecting the START/STOP mode 14 Shooting with backlighting 30 Using the FADER function 31 Shooting in the camcorder 55 Resetting the date and time 57...
... difference 58 Usable cassettes and playback modes 59 Tips for using the battery pack 60 Maintenance information and precautions 63 Using your camcorder abroad 68 Trouble check 69 Self-diagnosis display 72 Specifications 73 Identifying the parts 74 Warning indicators 82 Index 83 3 Before ...only 49 Releasing the STEADYSHOT function (CCD-TRV43/TRV46 only 51 Basic operations Camera recording 11 Using the zoom feature 13 Selecting the START/STOP mode 14 Shooting with backlighting 30 Using the FADER function 31 Shooting in the camcorder 55 Resetting the date and time 57...
Operating Instructions
Page 4
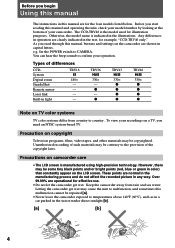
... country. Over 99.99% are clearly indicated in operation are operational for example, "CCD-TRV46 only." Any differences in the text, for effective use. •Do not let the camcorder get wet may be contrary to the provision of such materials may cause the unit... to confirm your recordings on camcorder care •The LCD screen is manufactured using high-precision technology. Unauthorized recording of the copyright laws. Before you begin Using this manual The instructions in light TRV16 h 180× - - - - Before you start...
... country. Over 99.99% are clearly indicated in operation are operational for example, "CCD-TRV46 only." Any differences in the text, for effective use. •Do not let the camcorder get wet may be contrary to the provision of such materials may cause the unit... to confirm your recordings on camcorder care •The LCD screen is manufactured using high-precision technology. Unauthorized recording of the copyright laws. Before you begin Using this manual The instructions in light TRV16 h 180× - - - - Before you start...
Operating Instructions
Page 5
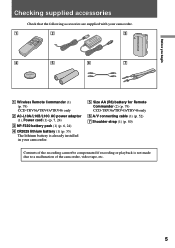
... adaptor (1), Power cord (1) (p. 7, 24) 3 NP-F330 battery pack (1) (p. 6, 24) 4 CR2025 lithium battery (1) (p. 55) The lithium battery is already installed in your camcorder. 5 Size AA (R6) battery for Remote Commander (2) (p. 79) CCD-TRV36/TRV43/TRV46 only 6 A/V connecting cable (1) (p. 52) 7 Shoulder strap (1) (p. 80) Contents of the recording cannot be compensated if recording or playback...
... adaptor (1), Power cord (1) (p. 7, 24) 3 NP-F330 battery pack (1) (p. 6, 24) 4 CR2025 lithium battery (1) (p. 55) The lithium battery is already installed in your camcorder. 5 Size AA (R6) battery for Remote Commander (2) (p. 79) CCD-TRV36/TRV43/TRV46 only 6 A/V connecting cable (1) (p. 52) 7 Shoulder strap (1) (p. 80) Contents of the recording cannot be compensated if recording or playback...
Operating Instructions
Page 6
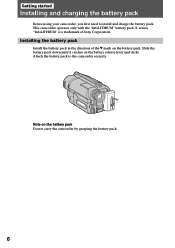
..." is a trademark of the $ mark on the battery pack. Attach the battery pack to install and charge the battery pack. This camcorder operates only with the "InfoLITHIUM" battery pack (L series). Note on the battery release lever and clicks. Slide the battery pack down until... it catches on the battery pack Do not carry the camcorder by grasping the battery pack. 6 Getting started Installing and charging the battery pack Before using your camcorder, you first need to the camcorder securely. Installing the battery pack Install the battery pack in the direction...
..." is a trademark of the $ mark on the battery pack. Attach the battery pack to install and charge the battery pack. This camcorder operates only with the "InfoLITHIUM" battery pack (L series). Note on the battery release lever and clicks. Slide the battery pack down until... it catches on the battery pack Do not carry the camcorder by grasping the battery pack. 6 Getting started Installing and charging the battery pack Before using your camcorder, you first need to the camcorder securely. Installing the battery pack Install the battery pack in the direction...

Operating Instructions
Page 7
... viewfinder. You can also use the battery longer than usual, leave the battery pack attached for about 1 hour after normal charge is completed until the camcorder calculates remaining battery time. •Remaining battery time indication in the factory. (1) Open the DC IN jack cover and connect the supplied AC power adaptor... vibration. For full charge, which allows you to OFF. POWER CAMERA OFF PPLLAYEERR Notes •"- - - It may differ from the DC IN jack of the camcorder. Charging begins. The battery pack is completely charged. Remaining battery time is completed.
... viewfinder. You can also use the battery longer than usual, leave the battery pack attached for about 1 hour after normal charge is completed until the camcorder calculates remaining battery time. •Remaining battery time indication in the factory. (1) Open the DC IN jack cover and connect the supplied AC power adaptor... vibration. For full charge, which allows you to OFF. POWER CAMERA OFF PPLLAYEERR Notes •"- - - It may differ from the DC IN jack of the camcorder. Charging begins. The battery pack is completely charged. Remaining battery time is completed.
Operating Instructions
Page 8
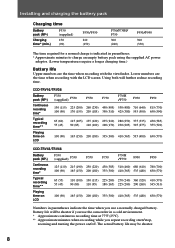
...240) F930/F950 390 (330) The time required for a normal charge is indicated in parentheses indicate the time when you use a normally charged battery. CCD-TRV16/TRV36 Battery pack (NP-) Continuous recording time* F330 (supplied) F530 F550 F730 F730H /F750 F930 130 (115) 225 (200) 260 (230) ... time. Lower numbers are the time when recording with the LCD screen. The actual battery life may be shorter if you use the camcorder in a cold environment. * Approximate continuous recording time at 77°F (25°C). ** Approximate minutes when recording while you repeat recording...
...240) F930/F950 390 (330) The time required for a normal charge is indicated in parentheses indicate the time when you use a normally charged battery. CCD-TRV16/TRV36 Battery pack (NP-) Continuous recording time* F330 (supplied) F530 F550 F730 F730H /F750 F930 130 (115) 225 (200) 260 (230) ... time. Lower numbers are the time when recording with the LCD screen. The actual battery life may be shorter if you use the camcorder in a cold environment. * Approximate continuous recording time at 77°F (25°C). ** Approximate minutes when recording while you repeat recording...
Operating Instructions
Page 9
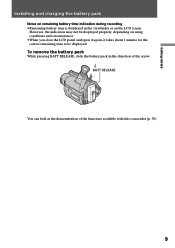
... battery pack Notes on remaining battery time indication during recording •Remaining battery time is displayed in the direction of the functions available with this camcorder (p. 29). 9 To remove the battery pack While pressing BATT RELEASE, slide the battery pack in the viewfinder or on using conditions and circumstances. •When...
... battery pack Notes on remaining battery time indication during recording •Remaining battery time is displayed in the direction of the functions available with this camcorder (p. 29). 9 To remove the battery pack While pressing BATT RELEASE, slide the battery pack in the viewfinder or on using conditions and circumstances. •When...
Operating Instructions
Page 11
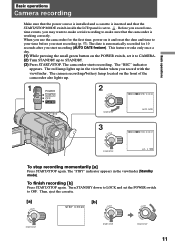
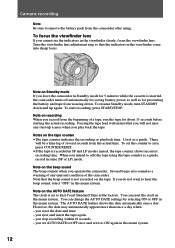
...operations STA Basic operations Camera recording Make sure that the power source is installed and a cassette is inserted and that the camcorder is working correctly. The camcorder starts recording. The red lamp lights up in the viewfinder (Standby mode). Before you record onetime events, you start ...recording (AUTO DATE feature). When you use the camcorder for 10 seconds after you record with the viewfinder. The "REC" indicator appears. STA [a] LOCK NDBY START/STOP [b] STBY 0:35:20...
...operations STA Basic operations Camera recording Make sure that the power source is installed and a cassette is inserted and that the camcorder is working correctly. The camcorder starts recording. The red lamp lights up in the viewfinder (Standby mode). Before you record onetime events, you start ...recording (AUTO DATE feature). When you use the camcorder for 10 seconds after you record with the viewfinder. The "REC" indicator appears. STA [a] LOCK NDBY START/STOP [b] STBY 0:35:20...
Operating Instructions
Page 12
...menu system. 12 However, the date may automatically appear more than once a day when: - To focus the viewfinder lens If you operate the camcorder. Notes on the beep sound The beep sounds when you cannot see the indicators in the viewfinder clearly, focus the viewfinder lens. Camera recording ...Note Be sure to edit the tape using . When you will be a time lag of the camcorder. Note on the tape counter •The tape counter indicates the recording or playback time. The AUTO DATE feature shows the date automatically once a...
...menu system. 12 However, the date may automatically appear more than once a day when: - To focus the viewfinder lens If you operate the camcorder. Notes on the beep sound The beep sounds when you cannot see the indicators in the viewfinder clearly, focus the viewfinder lens. Camera recording ...Note Be sure to edit the tape using . When you will be a time lag of the camcorder. Note on the tape counter •The tape counter indicates the recording or playback time. The AUTO DATE feature shows the date automatically once a...
Operating Instructions
Page 14
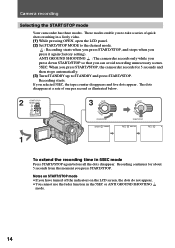
Camera recording Selecting the START/STOP mode Your camcorder has three modes. If you have turned off the indicators on the LCD screen, the...To extend the recording time in the 5SEC or ANTI GROUND SHOOTING mode. 14 ANTI GROUND SHOOTING : The camcorder records only while you press down START/STOP so that you can avoid recording unnecessary scenes. 5SEC: When you press START.../STOP, the camcorder records for about 5 seconds from the moment you to STANDBY and press START/STOP. These modes enable you ...
Camera recording Selecting the START/STOP mode Your camcorder has three modes. If you have turned off the indicators on the LCD screen, the...To extend the recording time in the 5SEC or ANTI GROUND SHOOTING mode. 14 ANTI GROUND SHOOTING : The camcorder records only while you press down START/STOP so that you can avoid recording unnecessary scenes. 5SEC: When you press START.../STOP, the camcorder records for about 5 seconds from the moment you to STANDBY and press START/STOP. These modes enable you ...
Operating Instructions
Page 16
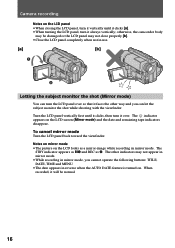
... screen (Mirror mode) and the date and remaining tape indicators disappear. To cancel mirror mode Turn the LCD panel back toward the viewfinder. otherwise, the camcorder body may be normal. 16 Notes on mirror mode •The picture on the LCD looks as r. When recorded, it always vertically; Camera recording Notes...
... screen (Mirror mode) and the date and remaining tape indicators disappear. To cancel mirror mode Turn the LCD panel back toward the viewfinder. otherwise, the camcorder body may be normal. 16 Notes on mirror mode •The picture on the LCD looks as r. When recorded, it always vertically; Camera recording Notes...
Operating Instructions
Page 17
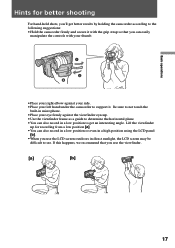
... the horizontal plane. •You can also record in direct sunlight, the LCD screen may be difficult to the following suggestions: •Hold the camcorder firmly and secure it . Lift the viewfinder up for better shooting For hand-held shots, you use the LCD screen outdoors in a low position ...to get better results by holding the camcorder according to see. If this happens, we recommend that you can also record in a low position or even in a high position using the LCD...
... the horizontal plane. •You can also record in direct sunlight, the LCD screen may be difficult to the following suggestions: •Hold the camcorder firmly and secure it . Lift the viewfinder up for better shooting For hand-held shots, you use the LCD screen outdoors in a low position ...to get better results by holding the camcorder according to see. If this happens, we recommend that you can also record in a low position or even in a high position using the LCD...
Operating Instructions
Page 18
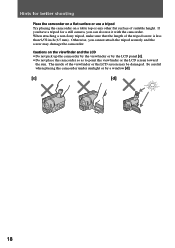
...a non-Sony tripod, make sure that the length of the viewfinder or the LCD screen may damage the camcorder. Cautions on a table top or any other flat surface of suitable height. Be careful when placing the camcorder under sunlight or by the LCD panel [c]. •Do not place the camcorder so as... attach the tripod securely and the screw may be damaged. Otherwise, you can also use a tripod Try placing the camcorder on the viewfinder and the LCD •Do not pick up the camcorder by the viewfinder or by a window [d]. [c] [d] 18 If you have a tripod for better shooting Place the...
...a non-Sony tripod, make sure that the length of the viewfinder or the LCD screen may damage the camcorder. Cautions on a table top or any other flat surface of suitable height. Be careful when placing the camcorder under sunlight or by the LCD panel [c]. •Do not place the camcorder so as... attach the tripod securely and the screw may be damaged. Otherwise, you can also use a tripod Try placing the camcorder on the viewfinder and the LCD •Do not pick up the camcorder by the viewfinder or by a window [d]. [c] [d] 18 If you have a tripod for better shooting Place the...
Operating Instructions
Page 19
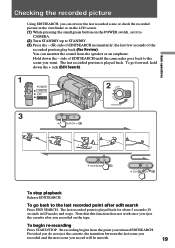
side of EDITSEARCH until the camcorder goes back to the scene you released EDITSEARCH. The last recorded point is played back. Re-recording begins from the speaker or an earphone. Hold ...
side of EDITSEARCH until the camcorder goes back to the scene you released EDITSEARCH. The last recorded point is played back. Re-recording begins from the speaker or an earphone. Hold ...
Operating Instructions
Page 20
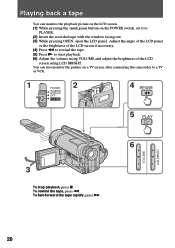
You can monitor the playback picture on the LCD screen. (1) While pressing the small green button on a TV screen, after connecting the camcorder to a TV or VCR. 1 2 POWER CAMERA OFF PLAYER 4 REW 5 PLAY VOLUME LCD BRIGHT 6 3 To stop playback, press p. To rewind the tape, press 0. To fast-forward ...
You can monitor the playback picture on the LCD screen. (1) While pressing the small green button on a TV screen, after connecting the camcorder to a TV or VCR. 1 2 POWER CAMERA OFF PLAYER 4 REW 5 PLAY VOLUME LCD BRIGHT 6 3 To stop playback, press p. To rewind the tape, press 0. To fast-forward ...
Operating Instructions
Page 21
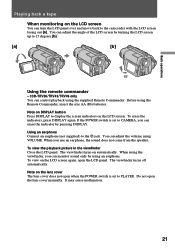
... move back to display the screen indicators on the LCD screen again, open the lens cover manually. Note on DISPLAY button Press DISPLAY to the camcorder with the LCD screen facing out [a]. To view on the LCD screen. If the POWER switch is set to the @ jack...
... move back to display the screen indicators on the LCD screen again, open the lens cover manually. Note on DISPLAY button Press DISPLAY to the camcorder with the LCD screen facing out [a]. To view on the LCD screen. If the POWER switch is set to the @ jack...


