Operating Instructions
Page 1
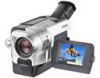
Refer to these numbers whenever you call upon your Sony dealer regarding this manual thoroughly, and retain it for future reference. Serial No. Model No. -TRV Model No. Serial No. Owner's Record The model and serial numbers are located on the bottom. Record the serial number in the space provided below. DCR-TRV350 TM SERIES DCR-TRV150/TRV250/TRV350/TRV351 CCD-TRV118/TRV318/TRV418 ©2003 Sony Corporation AC- 3-079-467-13 (1) Digital Video Camera Recorder Video Camera Recorder Operating Instructions Before operating the unit, please read this product.
Refer to these numbers whenever you call upon your Sony dealer regarding this manual thoroughly, and retain it for future reference. Serial No. Model No. -TRV Model No. Serial No. Owner's Record The model and serial numbers are located on the bottom. Record the serial number in the space provided below. DCR-TRV350 TM SERIES DCR-TRV150/TRV250/TRV350/TRV351 CCD-TRV118/TRV318/TRV418 ©2003 Sony Corporation AC- 3-079-467-13 (1) Digital Video Camera Recorder Video Camera Recorder Operating Instructions Before operating the unit, please read this product.
Operating Instructions
Page 51
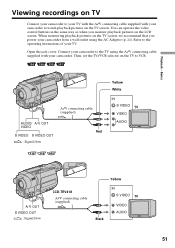
... you power your camcorder. When monitoring playback pictures on the LCD screen. Open the jack cover. A/V connecting cable (supplied) AUDIO/ A/ V OUT VIDEO Red S VIDEO S VIDEO OUT : Signal flow Yellow White IN S VIDEO TV VIDEO AUDIO A/ V OUT S VIDEO OUT : Signal flow CCD-TRV418 A/V connecting cable (supplied) Yellow IN S VIDEO TV Black VIDEO AUDIO 51 Refer to the operating instructions of your camcorder to watch playback pictures on the TV to VCR. Basics Viewing recordings on TV Connect your camcorder to the TV using the AC Adaptor (p. 24). Connect your camcorder...
... you power your camcorder. When monitoring playback pictures on the LCD screen. Open the jack cover. A/V connecting cable (supplied) AUDIO/ A/ V OUT VIDEO Red S VIDEO S VIDEO OUT : Signal flow Yellow White IN S VIDEO TV VIDEO AUDIO A/ V OUT S VIDEO OUT : Signal flow CCD-TRV418 A/V connecting cable (supplied) Yellow IN S VIDEO TV Black VIDEO AUDIO 51 Refer to the operating instructions of your camcorder to watch playback pictures on the TV to VCR. Basics Viewing recordings on TV Connect your camcorder to the TV using the AC Adaptor (p. 24). Connect your camcorder...
Operating Instructions
Page 105
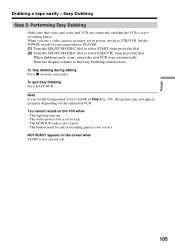
... IR SETUP code is not correct. The button used to VTR/VCR. Set the POWER switch of your camcorder and VCR stop dubbing during editing Press x on the screen when START is set its power switch to cancel recording pause is not correct. - Note If you use a video camera recorder, set to FADE in Step 3 (p. 103), the picture may not appear properly depending on the VCR when: - You cannot record on the connected VCR. The tape has run...
... IR SETUP code is not correct. The button used to VTR/VCR. Set the POWER switch of your camcorder and VCR stop dubbing during editing Press x on the screen when START is set its power switch to cancel recording pause is not correct. - Note If you use a video camera recorder, set to FADE in Step 3 (p. 103), the picture may not appear properly depending on the VCR when: - You cannot record on the connected VCR. The tape has run...
Operating Instructions
Page 107
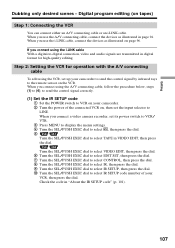
... you connect a video camera recorder, set the input selector to the remote sensor on the VCR. Digital program editing (on page 96. When you connect using the i.LINK cable With a digital-to select TAPE in page 94. If you use the A/V connecting cable, connect the devices as illustrated on tapes) Step 1: Connecting the VCR You can connect either an A/V connecting cable or an i.LINK cable. Check the code in digital format for operation with the A/V connecting cable To edit using the VCR, set up your camcorder to...
... you connect a video camera recorder, set the input selector to the remote sensor on the VCR. Digital program editing (on page 96. When you connect using the i.LINK cable With a digital-to select TAPE in page 94. If you use the A/V connecting cable, connect the devices as illustrated on tapes) Step 1: Connecting the VCR You can connect either an A/V connecting cable or an i.LINK cable. Check the code in digital format for operation with the A/V connecting cable To edit using the VCR, set up your camcorder to...
Operating Instructions
Page 151
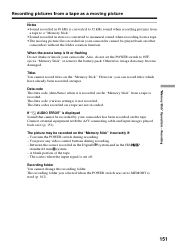
... remove the battery pack. The scenes when the input signal is lit or flashing Do not shake or knock your camcorder cannot be played back on your camcorder. The data code (various settings) is converted to a "Memory Stick." •Sound recorded in the Hi8 / standard 8 mm system. - Recording Recording pictures from a tape to 32 kHz sound when recording pictures from a tape as a moving picture files recorded on other camcorders without the folder creation function. You press any video control buttons...
... remove the battery pack. The scenes when the input signal is lit or flashing Do not shake or knock your camcorder cannot be played back on your camcorder. The data code (various settings) is converted to a "Memory Stick." •Sound recorded in the Hi8 / standard 8 mm system. - Recording Recording pictures from a tape to 32 kHz sound when recording pictures from a tape as a moving picture files recorded on other camcorders without the folder creation function. You press any video control buttons...
Operating Instructions
Page 156
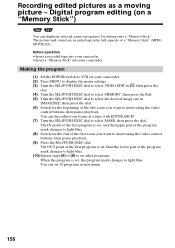
... desired image size in maximum. 156 Making the program (1) Set the POWER switch to insert using the video control buttons, then pause playback. You can fine-adjust one frame at a time with EDITSEARCH. (7) Turn the SEL/PUSH EXEC dial to light blue. Digital program editing (on your camcorder. You can set , the program mark changes to select MARK, then press the dial. Recording edited pictures as a moving picture - The picture and sound are recorded up...
... desired image size in maximum. 156 Making the program (1) Set the POWER switch to insert using the video control buttons, then pause playback. You can fine-adjust one frame at a time with EDITSEARCH. (7) Turn the SEL/PUSH EXEC dial to light blue. Digital program editing (on your camcorder. You can set , the program mark changes to select MARK, then press the dial. Recording edited pictures as a moving picture - The picture and sound are recorded up...
Operating Instructions
Page 193
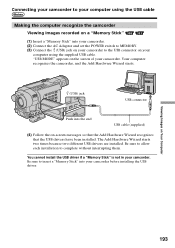
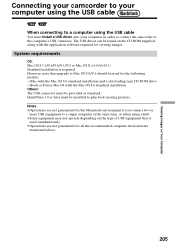
... your camcorder. (2) Connect the AC Adaptor and set the POWER switch to MEMORY. (3) Connect the (USB) jack on your camcorder to the USB connector on your camcorder. Be sure to allow each installation to complete without interrupting them. Connecting your camcorder to your computer using the supplied USB cable. You cannot install the USB driver if a "Memory Stick" is not in your computer using the USB cable Making the computer recognize the camcorder Viewing images recorded on a "Memory Stick" (1) Insert a "Memory Stick" into...
... your camcorder. (2) Connect the AC Adaptor and set the POWER switch to MEMORY. (3) Connect the (USB) jack on your camcorder to the USB connector on your camcorder. Be sure to allow each installation to complete without interrupting them. Connecting your camcorder to your computer using the supplied USB cable. You cannot install the USB driver if a "Memory Stick" is not in your computer using the USB cable Making the computer recognize the camcorder Viewing images recorded on a "Memory Stick" (1) Insert a "Memory Stick" into...
Operating Instructions
Page 194
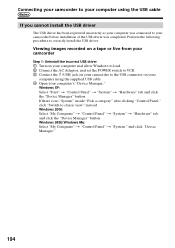
... view" instead. Connecting your camcorder to your computer using the supplied USB cable. 4 Open your camcorder before installation of the USB driver was connected to your computer's "Device Manager." Windows 98SE/Windows Me: Select "My Computer" t "Control Panel" t "System," and click "Device Manager." 194 Viewing images recorded on a tape or live from your camcorder Step 1: Uninstall the incorrect USB driver 1 Turn on your computer and allow Windows to load. 2 Connect the AC Adaptor, and set the POWER switch to VCR. 3 Connect the (USB...
... view" instead. Connecting your camcorder to your computer using the supplied USB cable. 4 Open your camcorder before installation of the USB driver was connected to your computer's "Device Manager." Windows 98SE/Windows Me: Select "My Computer" t "Control Panel" t "System," and click "Device Manager." 194 Viewing images recorded on a tape or live from your camcorder Step 1: Uninstall the incorrect USB driver 1 Turn on your computer and allow Windows to load. 2 Connect the AC Adaptor, and set the POWER switch to VCR. 3 Connect the (USB...
Operating Instructions
Page 196
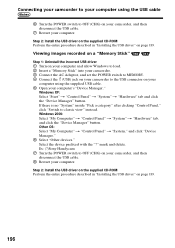
... incorrect USB driver 1 Turn on your computer and allow Windows to load. 2 Insert a "Memory Stick" into your camcorder. 3 Connect the AC Adaptor, and set the POWER switch to MEMORY. 4 Connect the (USB) jack on your camcorder to the USB connector on your computer using the USB cable 6 Turn the POWER switch to OFF (CHG) on page 189. 196 Windows 2000: Select "My Computer" t "Control Panel" t "System" t "Hardware" tab, and click the "Device Manager" button. Ex: (?)Sony Handycam 7 Turn the POWER switch...
... incorrect USB driver 1 Turn on your computer and allow Windows to load. 2 Insert a "Memory Stick" into your camcorder. 3 Connect the AC Adaptor, and set the POWER switch to MEMORY. 4 Connect the (USB) jack on your camcorder to the USB connector on your computer using the USB cable 6 Turn the POWER switch to OFF (CHG) on page 189. 196 Windows 2000: Select "My Computer" t "Control Panel" t "System" t "Hardware" tab, and click the "Device Manager" button. Ex: (?)Sony Handycam 7 Turn the POWER switch...
Operating Instructions
Page 197
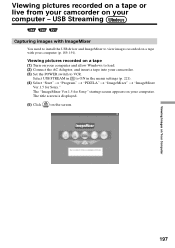
... VCR. USB Streaming Capturing images with ImageMixer You need to install the USB driver and ImageMixer to view images recorded on your computer. The "ImageMixer Ver.1.5 for Sony." Viewing Images on your computer - Viewing pictures recorded on a tape or live from your camcorder on Your Computer 197 Viewing pictures recorded on a tape (1) Turn on the screen. The title screen is displayed. (5) Click on your computer and allow Windows to load. (2) Connect the AC Adaptor, and insert a tape into your camcorder. (3) Set the POWER switch...
... VCR. USB Streaming Capturing images with ImageMixer You need to install the USB driver and ImageMixer to view images recorded on your computer. The "ImageMixer Ver.1.5 for Sony." Viewing Images on your computer - Viewing pictures recorded on a tape or live from your camcorder on Your Computer 197 Viewing pictures recorded on a tape (1) Turn on the screen. The title screen is displayed. (5) Click on your computer and allow Windows to load. (2) Connect the AC Adaptor, and insert a tape into your camcorder. (3) Set the POWER switch...
Operating Instructions
Page 203
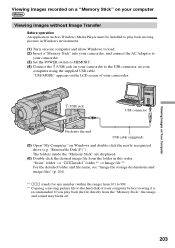
... camcorder, and connect the AC Adaptor to your camcorder. (3) Set the POWER switch to MEMORY. (4) Connect the (USB) jack on your camcorder to the USB connector on Your Computer 203 Viewing Images on your computer using the supplied USB cable. Viewing images recorded on a "Memory Stick" on your computer Viewing images without Image Transfer Before operation An application such as Windows Media Player must be installed to play back the file directly from the "Memory Stick," the image and sound may break off. "Removable Disk (F:)"). "USB MODE" appears on the LCD screen...
... camcorder, and connect the AC Adaptor to your camcorder. (3) Set the POWER switch to MEMORY. (4) Connect the (USB) jack on your camcorder to the USB connector on Your Computer 203 Viewing Images on your computer using the supplied USB cable. Viewing images recorded on a "Memory Stick" on your computer Viewing images without Image Transfer Before operation An application such as Windows Media Player must be installed to play back the file directly from the "Memory Stick," the image and sound may break off. "Removable Disk (F:)"). "USB MODE" appears on the LCD screen...
Operating Instructions
Page 205
... camcorder to your computer using the USB cable When connecting to a computer using a hub. •Some equipment may not operate depending on the CD-ROM supplied, along with the application software required for the following models: - iMac with the Mac OS 8.6 standard installation Others: The USB connector must be provided as standard. iBook or Power Mac G4 with the Mac OS 8.6 standard installation and a slot loading type CD-ROM drive...
... camcorder to your computer using the USB cable When connecting to a computer using a hub. •Some equipment may not operate depending on the CD-ROM supplied, along with the application software required for the following models: - iMac with the Mac OS 8.6 standard installation Others: The USB connector must be provided as standard. iBook or Power Mac G4 with the Mac OS 8.6 standard installation and a slot loading type CD-ROM drive...
Operating Instructions
Page 207
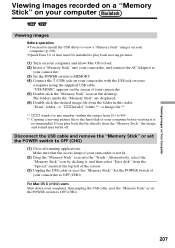
... need to install the USB driver to view a "Memory Stick" images on your computer (p. 206). •QuickTime 3.0 or later must be installed to play back the file directly from the folder in this order. If you play back moving picture file to the hard disk of your computer before viewing it , and then select "Eject disk" from the "Special" menu at the top left of the screen. (3) Unplug the USB cable or eject the "Memory Stick." Set the POWER switch...
... need to install the USB driver to view a "Memory Stick" images on your computer (p. 206). •QuickTime 3.0 or later must be installed to play back the file directly from the folder in this order. If you play back moving picture file to the hard disk of your computer before viewing it , and then select "Eject disk" from the "Special" menu at the top left of the screen. (3) Unplug the USB cable or eject the "Memory Stick." Set the POWER switch...
Operating Instructions
Page 224
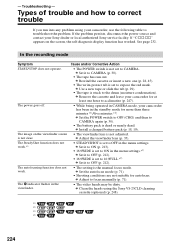
... operated in the menu settings.*1) c Set it to OFF (p. 212). • 16:9WIDE is not set to focus manually (p. 71). • The video heads may be dirty. c Set it to ON (p. 213). • 16:9WIDE is set to CAMERA. Troubleshooting - If the problem persists, disconnect the power source and contact your camcorder has been in the viewfinder. The image on the screen, the self-diagnosis display function has worked. c Rewind the cassette...
... operated in the menu settings.*1) c Set it to OFF (p. 212). • 16:9WIDE is not set to focus manually (p. 71). • The video heads may be dirty. c Set it to ON (p. 213). • 16:9WIDE is set to CAMERA. Troubleshooting - If the problem persists, disconnect the power source and contact your camcorder has been in the viewfinder. The image on the screen, the self-diagnosis display function has worked. c Rewind the cassette...
Operating Instructions
Page 229
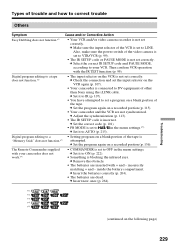
... IR SETUP code or PAUSE MODE is connected to DV equipment of other than Sony using the i.LINK cable. Also, make sure the power switch of the video camera is set correctly. c Select the correct IR SETUP code and PAUSE MODE, according to your camcorder does not work.*4) • COMMANDER is set a program on the VCR again (p. 107). • Your camcorder is not set to OFF in the menu settings.*3) c Set it to AUTO (p. 215). c Set it to...
... IR SETUP code or PAUSE MODE is connected to DV equipment of other than Sony using the i.LINK cable. Also, make sure the power switch of the video camera is set correctly. c Select the correct IR SETUP code and PAUSE MODE, according to your camcorder does not work.*4) • COMMANDER is set a program on the VCR again (p. 107). • Your camcorder is not set to OFF in the menu settings.*3) c Set it to AUTO (p. 215). c Set it to...
Operating Instructions
Page 238
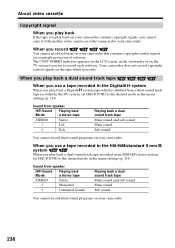
... signals, you cannot copy it records. When you use a tape recorded in the Digital8 system When you play back a Digital8 system tape which is dubbed from speaker HiFi Sound Mode Playing back a stereo tape STEREO Stereo 1 Monaural 2 Unnatural Sound Playing back a dual sound track tape Main sound and sub sound Main sound Sub sound You cannot record dual sound programs on the tape when it with another video camera recorder connected to your camcorder that contains copyright...
... signals, you cannot copy it records. When you use a tape recorded in the Digital8 system When you play back a Digital8 system tape which is dubbed from speaker HiFi Sound Mode Playing back a stereo tape STEREO Stereo 1 Monaural 2 Unnatural Sound Playing back a dual sound track tape Main sound and sub sound Main sound Sub sound You cannot record dual sound programs on the tape when it with another video camera recorder connected to your camcorder that contains copyright...
Operating Instructions
Page 253
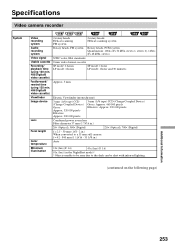
Specifications Video camera recorder System Video recording system Audio recording system Video signal Usable cassette Recording/ playback time (using 120 min. Electric Viewfinder (monochrome) 3 mm (1/6 type) CCD (Charge Coupled Device) Gross: Approx. 320 000 pixels Effective: Approx. 200 000 pixels 3 mm (1/6 type) CCD (Charge Coupled Device) Gross: Approx. 460 000 pixels Effective: Approx. 290 000 pixels Combined power zoom lens Filter diameter 37 mm (1 7/16 in.) 20× (Optical), 560× (Digital) 20× (Optical), 700×...
Specifications Video camera recorder System Video recording system Audio recording system Video signal Usable cassette Recording/ playback time (using 120 min. Electric Viewfinder (monochrome) 3 mm (1/6 type) CCD (Charge Coupled Device) Gross: Approx. 320 000 pixels Effective: Approx. 200 000 pixels 3 mm (1/6 type) CCD (Charge Coupled Device) Gross: Approx. 460 000 pixels Effective: Approx. 290 000 pixels Combined power zoom lens Filter diameter 37 mm (1 7/16 in.) 20× (Optical), 560× (Digital) 20× (Optical), 700×...

Operating Instructions
Page 267
... 214 AUDIO MODE 219 AUTO SHTR 211 A/V connecting cable ........... 51, 94, 119, 138, 152, 208 BACK LIGHT 38 BATTERY INFO 20 Battery pack 18 BEEP 222 BOUNCE 61 Built-in light 79 C, D Camera chroma key 140 Charging battery 19 Charging built-in rechargeable battery 249 Cleaning cassette indicator 248 Clock set 26 Color Slow Shutter 40 Data code 47 Date search 90 DEMO 221 DIGITAL EFFECT 65, 85 Digital8 system 237 Digital program editing 106, 156 DISPLAY...
... 214 AUDIO MODE 219 AUTO SHTR 211 A/V connecting cable ........... 51, 94, 119, 138, 152, 208 BACK LIGHT 38 BATTERY INFO 20 Battery pack 18 BEEP 222 BOUNCE 61 Built-in light 79 C, D Camera chroma key 140 Charging battery 19 Charging built-in rechargeable battery 249 Cleaning cassette indicator 248 Clock set 26 Color Slow Shutter 40 Data code 47 Date search 90 DEMO 221 DIGITAL EFFECT 65, 85 Digital8 system 237 Digital program editing 106, 156 DISPLAY...

Marketing Specifications
Page 1
.... Built-In White LED Light Brighten your videos with Hi-Fi sound on a single full charge, providing extra long battery life. Easy Handycam Button Using a camcorder can continuously record for recording operational. Images and video are directly recorded to 16 hours on affordable 8mm and Hi8 tapes. Titling Add professional looking titles to bring the action close up to DVD-R/-RW/+RW/+R DL media formats. Sony's exclusive AccuPower™ meter displays the battery time remaining in...
.... Built-In White LED Light Brighten your videos with Hi-Fi sound on a single full charge, providing extra long battery life. Easy Handycam Button Using a camcorder can continuously record for recording operational. Images and video are directly recorded to 16 hours on affordable 8mm and Hi8 tapes. Titling Add professional looking titles to bring the action close up to DVD-R/-RW/+RW/+R DL media formats. Sony's exclusive AccuPower™ meter displays the battery time remaining in...
Marketing Specifications
Page 2
H8) Video Actual: 200K Pixels Still Actual: N/A Audio Dolby® Digital Output: AFM Hi-Fi Mono Recording Format: Monaural Convenience USB Streaming: N/A SteadyShot® Image Stabilization: N/A Accessory Shoe: N/A White Balance: Auto Memory Stick PRO™ Media Compatibility: N/A Still Image Mode(s): N/A Minimum Illumination: 1 Lux (0 Lux with NightShot® Infrared System) Convenience Features Easy Operation: Easy Dubbing, Easy Handycam® Button, End Search Multiple Language Display: Yes Remote Control: N/A Slide Show Mode: N/A Titling: Yes Light/Flash: Built-in Light (White LED)/...
H8) Video Actual: 200K Pixels Still Actual: N/A Audio Dolby® Digital Output: AFM Hi-Fi Mono Recording Format: Monaural Convenience USB Streaming: N/A SteadyShot® Image Stabilization: N/A Accessory Shoe: N/A White Balance: Auto Memory Stick PRO™ Media Compatibility: N/A Still Image Mode(s): N/A Minimum Illumination: 1 Lux (0 Lux with NightShot® Infrared System) Convenience Features Easy Operation: Easy Dubbing, Easy Handycam® Button, End Search Multiple Language Display: Yes Remote Control: N/A Slide Show Mode: N/A Titling: Yes Light/Flash: Built-in Light (White LED)/...


