

Primary User Manual
Page 1
Refer to these numbers whenever you call upon your Sony dealer regarding this manual thoroughly and retain it for future reference. AC-V25/V25A Serial No • 0 4 Photo:CCD-TR28 Video8 Handycam Owner's Record The model and serial numbers are located on the bottom. CCD-TR28/TR30 Serial No Model No. Record the serial number in the space provided below. SONY® 3-758-359-21 (1) Video Camera Recorder 8 CCD-TR28/TR30 Operation Manual Before operating the unit, please read this product. Model No.
Refer to these numbers whenever you call upon your Sony dealer regarding this manual thoroughly and retain it for future reference. AC-V25/V25A Serial No • 0 4 Photo:CCD-TR28 Video8 Handycam Owner's Record The model and serial numbers are located on the bottom. CCD-TR28/TR30 Serial No Model No. Record the serial number in the space provided below. SONY® 3-758-359-21 (1) Video Camera Recorder 8 CCD-TR28/TR30 Operation Manual Before operating the unit, please read this product. Model No.

Primary User Manual
Page 2
... help . CAUTION You are cautioned that may be of sufficient magnitude to constitute a risk of electric shock to the presence of important operating and maintenance (servicing) instructions in Radio Interference Regulations. DO NOT USE THIS POLARIZED AC PLUG WITH AN EXTENSION CORD,... installed and used in a residential installation. CAUTION TO PREVENT ELECTRIC SHOCK. MUST BE DISPOSED OF PROPERLY. Note: In some areas the disposal of nickelcadmium batteries in this manual could void your nearest Sony Service Center or Factory Service Center for radio noise emissions set...
... help . CAUTION You are cautioned that may be of sufficient magnitude to constitute a risk of electric shock to the presence of important operating and maintenance (servicing) instructions in Radio Interference Regulations. DO NOT USE THIS POLARIZED AC PLUG WITH AN EXTENSION CORD,... installed and used in a residential installation. CAUTION TO PREVENT ELECTRIC SHOCK. MUST BE DISPOSED OF PROPERLY. Note: In some areas the disposal of nickelcadmium batteries in this manual could void your nearest Sony Service Center or Factory Service Center for radio noise emissions set...

Primary User Manual
Page 3
... for Playback 19 Connecting to a TV without Audio/Video Input Jacks 19 Connecting to a TV or VCR with Audio/Video Input Jacks 19 Playing Back a Tape 20 Advanced Operations Using Alternate Power Sources 21 Using House Current 21 Editing onto Another Tape 23 Additional Information Changing the Lithium Battery 24 Resetting the Date and Time 25 Playback Modes 26 Maintenance Information and Precautions 27 Using Your Camcorder Abroad 31 identifying the Parts 32 Remote Commander 36 Specifications 39 Trouble Check 40...
... for Playback 19 Connecting to a TV without Audio/Video Input Jacks 19 Connecting to a TV or VCR with Audio/Video Input Jacks 19 Playing Back a Tape 20 Advanced Operations Using Alternate Power Sources 21 Using House Current 21 Editing onto Another Tape 23 Additional Information Changing the Lithium Battery 24 Resetting the Date and Time 25 Playback Modes 26 Maintenance Information and Precautions 27 Using Your Camcorder Abroad 31 identifying the Parts 32 Remote Commander 36 Specifications 39 Trouble Check 40...

Primary User Manual
Page 4
... get wet. CCD-TR28 and CCD-TR30 are different in function. When you use a PAL-M system based TV, you read the chapters "Getting Started" and "Basic Operations" first. As you will need an NTSC system based TV. Keep the camcorder away from the sand or dust. Before You Begin About This Manual The instructions in this manual, buttons and settings on the camcorder are shown...
... get wet. CCD-TR28 and CCD-TR30 are different in function. When you use a PAL-M system based TV, you read the chapters "Getting Started" and "Basic Operations" first. As you will need an NTSC system based TV. Keep the camcorder away from the sand or dust. Before You Begin About This Manual The instructions in this manual, buttons and settings on the camcorder are shown...
Primary User Manual
Page 6
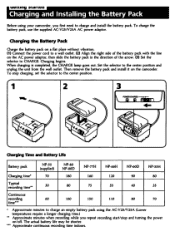
... battery pack using your camcorder, you repeat recording start/stop charging, set the selector to the center position. 1 2 illihr 3 POVENOWI0E-m- To charge the battery pack, use the supplied AC-V25/V25A AC power adaptor. Charging begins. Then remove the battery pack and install it on the AC power adaptor, then slide the battery pack in the direction of the battery pack with the line on the camcorder. uessing astute(' Charging and Installing...
... battery pack using your camcorder, you repeat recording start/stop charging, set the selector to the center position. 1 2 illihr 3 POVENOWI0E-m- To charge the battery pack, use the supplied AC-V25/V25A AC power adaptor. Charging begins. Then remove the battery pack and install it on the AC power adaptor, then slide the battery pack in the direction of the battery pack with the line on the camcorder. uessing astute(' Charging and Installing...
Primary User Manual
Page 7
... used up the battery, remove the cassette and set the POWER switch to CAMERA with the battery attached, and leave the camcorder until the .Cci indicator and the red lamp flash in the direction of battery capacity. Repeated charging while some capacity remains causes a lowering of the arrow (see drawing). After about one minute, reconnect the power cord and set the selector to CHARGE again. • You cannot operate the camcorder using...
... used up the battery, remove the cassette and set the POWER switch to CAMERA with the battery attached, and leave the camcorder until the .Cci indicator and the red lamp flash in the direction of battery capacity. Repeated charging while some capacity remains causes a lowering of the arrow (see drawing). After about one minute, reconnect the power cord and set the selector to CHARGE again. • You cannot operate the camcorder using...
Primary User Manual
Page 9
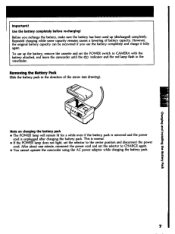
... in the camcorder to Replace the Battery Pack While you are recording, set the POWER switch to indicator appears and starts a 3 flashing in cold environment. Leave the tape in the viewfinder changes from that of your camcorder, the remaining battery indicator decreases gradually as you are using your battery pack. To Save Battery Power Turn STANDBY on the remaining battery indicator The remaining battery indicator of the battery pack is used up...
... in the camcorder to Replace the Battery Pack While you are recording, set the POWER switch to indicator appears and starts a 3 flashing in cold environment. Leave the tape in the viewfinder changes from that of your camcorder, the remaining battery indicator decreases gradually as you are using your battery pack. To Save Battery Power Turn STANDBY on the remaining battery indicator The remaining battery indicator of the battery pack is used up...
Primary User Manual
Page 10
... should remove the tape, set to use up , and leave the camcorder until the battery indicator flashes rapidly. • When you use the discharging function. • Charging the usable battery causes a lowering of storage. Before Recharging a Used Battery Pack • Make sure to OFF, which shortens battery life. • The battery pack is always discharging even when it again, but not used up . Charge it is set the POWER switch...
... should remove the tape, set to use up , and leave the camcorder until the battery indicator flashes rapidly. • When you use the discharging function. • Charging the usable battery causes a lowering of storage. Before Recharging a Used Battery Pack • Make sure to OFF, which shortens battery life. • The battery pack is always discharging even when it again, but not used up . Charge it is set the POWER switch...

Primary User Manual
Page 15
... 499 AUTO DATE O* 4:9 REC 0:00:01 SI 1E im JUL4 1994 No * To Stop Recording Momentarily Press START/STOP again. This prevents wearing down and turn the POWER switch to CLOSE and eject the tape (p. 12). To resume Standby mode, turn STANDBY down once and turn it up . You can use the Remote Commander, make sure that the camcorder is set to OPEN. (3) While pressing the green button of the POWER switch, turn...
... 499 AUTO DATE O* 4:9 REC 0:00:01 SI 1E im JUL4 1994 No * To Stop Recording Momentarily Press START/STOP again. This prevents wearing down and turn the POWER switch to CLOSE and eject the tape (p. 12). To resume Standby mode, turn STANDBY down once and turn it up . You can use the Remote Commander, make sure that the camcorder is set to OPEN. (3) While pressing the green button of the POWER switch, turn...
Primary User Manual
Page 16
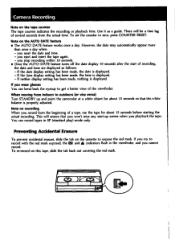
... indicators flash in SP (standard play) mode only. Preventing Accidental Erasure To prevent accidental erasure, slide the tab on the AUTO DATE feature • The AUTO DATE feature works once a day. If the date display setting has been made, the date is properly adjusted. If you record from the actual time. To re-record on the tape counter The tape counter indicates the recording or playback time. Camera Recording Note on this tape, slide...
... indicators flash in SP (standard play) mode only. Preventing Accidental Erasure To prevent accidental erasure, slide the tab on the AUTO DATE feature • The AUTO DATE feature works once a day. If the date display setting has been made, the date is properly adjusted. If you record from the actual time. To re-record on the tape counter The tape counter indicates the recording or playback time. Camera Recording Note on this tape, slide...

Primary User Manual
Page 19
... A/V connecting cable (not supplied). angalli!obr, 1, AUDIONIDEO OUTPUT 0 : Signal flow AUDIONIDEO INPUT NO. • VIDEO • AUDIO co)/ 6upicom mule) Make sure that the TV is not active in your TV for Playback You can use this camcorder as a VCR by connecting it directly to VCR. Set the TVNCR selector on the RFU adaptor and your TV to VHF CH3 or CH4, whichever is turned...
... A/V connecting cable (not supplied). angalli!obr, 1, AUDIONIDEO OUTPUT 0 : Signal flow AUDIONIDEO INPUT NO. • VIDEO • AUDIO co)/ 6upicom mule) Make sure that the TV is not active in your TV for Playback You can use this camcorder as a VCR by connecting it directly to VCR. Set the TVNCR selector on the RFU adaptor and your TV to VHF CH3 or CH4, whichever is turned...
Primary User Manual
Page 20
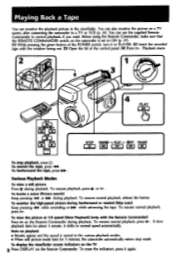
... playback. To view the picture at 1/5 speed (Slow Playback) (only with the window facing out. (3) Open the lid of the control panel. (4) Press (::>. To display the viewfinder screen indicators on the TV El Press DISPLAY on the Remote Commander during playback. To fastforward the tape, press WIPP.. press ►. Playing Back a Tape You can also monitor the picture on a TV screen, after connecting the camcorder to a TV or VCR (p. 19). Various Playback Modes n To view...
... playback. To view the picture at 1/5 speed (Slow Playback) (only with the window facing out. (3) Open the lid of the control panel. (4) Press (::>. To display the viewfinder screen indicators on the TV El Press DISPLAY on the Remote Commander during playback. To fastforward the tape, press WIPP.. press ►. Playing Back a Tape You can also monitor the picture on a TV screen, after connecting the camcorder to a TV or VCR (p. 19). Various Playback Modes n To view...
Primary User Manual
Page 23
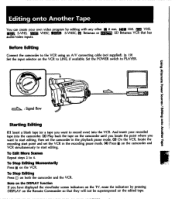
... Connect the camcorder to the VCR using an A/V connecting cable (not supplied). (p. 19) Set the input selector on both the camcorder and the VCR. of 006' (dYER ♦ : Signal flow Starting Editing (1) Insert a blank tape (or a tape you want to record over) into the camcorder. (2) Play back the tape on the camcorder until you locate the point where you want to start editing, then set the camcorder in the playback pause mode...
... Connect the camcorder to the VCR using an A/V connecting cable (not supplied). (p. 19) Set the input selector on both the camcorder and the VCR. of 006' (dYER ♦ : Signal flow Starting Editing (1) Insert a blank tape (or a tape you want to record over) into the camcorder. (2) Play back the tape on the camcorder until you locate the point where you want to start editing, then set the camcorder in the playback pause mode...
Primary User Manual
Page 24
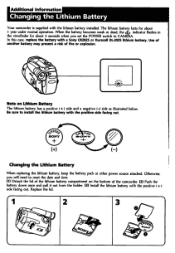
... out 5.20,2 0 45' SONY (+) Changing the Lithium Battery When replacing the lithium battery, keep the battery pack or other power source attached. Otherwise, you set the POWER switch to install the lithium battery with the positive (+) side facing out. When the battery becomes weak or dead, thej indicator flashes in the viewfinder for about 5 seconds when you will need to reset the date and time. (1) Detach the lid...
... out 5.20,2 0 45' SONY (+) Changing the Lithium Battery When replacing the lithium battery, keep the battery pack or other power source attached. Otherwise, you set the POWER switch to install the lithium battery with the positive (+) side facing out. When the battery becomes weak or dead, thej indicator flashes in the viewfinder for about 5 seconds when you will need to reset the date and time. (1) Detach the lid...
Primary User Manual
Page 26
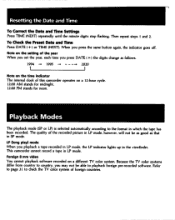
... the recorded picture in LP mode, however, will not be able to check the TV color system of this camcorder operates on a different TV color system. To Check the Preset Date and Time Press DATE (+) or TIME (NEXT). When you press DATE (+) the digits change as that in which the tape has been recorded. Resetting the Date and Time To Correct the Date and Time Settings Press TIME (NEXT) repeatedly until the minute digits stop flashing. LP (long play) mode...
... the recorded picture in LP mode, however, will not be able to check the TV color system of this camcorder operates on a different TV color system. To Check the Preset Date and Time Press DATE (+) or TIME (NEXT). When you press DATE (+) the digits change as that in which the tape has been recorded. Resetting the Date and Time To Correct the Date and Time Settings Press TIME (NEXT) repeatedly until the minute digits stop flashing. LP (long play) mode...
Primary User Manual
Page 29
... not use the camcorder for a long time, disconnect the power source and remove the tape. If there are used to sense the type, thickness of the lens. • Keep the LENS COVER switch set to CLOSE when not using the camera. • Do not wrap up internally. • Keep the camcorder away from a cold place to room conditions over a period of the cassette. On Handling Tapes Do not...
... not use the camcorder for a long time, disconnect the power source and remove the tape. If there are used to sense the type, thickness of the lens. • Keep the LENS COVER switch set to CLOSE when not using the camera. • Do not wrap up internally. • Keep the camcorder away from a cold place to room conditions over a period of the cassette. On Handling Tapes Do not...
Primary User Manual
Page 33
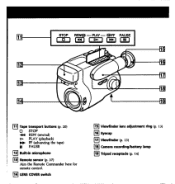
STOP REW® -PLAY- PLAY (playback) Plow FF (advancing the tape) n PAUSE g Built-in microphone g Remote sensor (p. 37) Aim the Remote Commander here for remote control. 14 LENS COVER switch g Viewfinder lens adjustment ring (p. 13) g Eyecup E Viewfinder (p. 13) E Camera recording/battery lamp E Tripod receptacle (p. 14) EE • • 1E ( L EE 1 E Tape transport buttons (p. 20) O STOP .44 REW (rewind) ca. OFF PAUSE 0 D.• 1=1 =1 AO.
STOP REW® -PLAY- PLAY (playback) Plow FF (advancing the tape) n PAUSE g Built-in microphone g Remote sensor (p. 37) Aim the Remote Commander here for remote control. 14 LENS COVER switch g Viewfinder lens adjustment ring (p. 13) g Eyecup E Viewfinder (p. 13) E Camera recording/battery lamp E Tripod receptacle (p. 14) EE • • 1E ( L EE 1 E Tape transport buttons (p. 20) O STOP .44 REW (rewind) ca. OFF PAUSE 0 D.• 1=1 =1 AO.

Primary User Manual
Page 39
...P6-120 and Image device CCD (Charge Coupled Device) shoulder strap Viewfinder Lens Electronic viewfinder (monochrome) Combined 10 x Power zoom lens Microphone Electric condenser microphone, monaural type F f = 1/4 to 2 7/16 inches Supplied accessories .3.4.3 01 (6.2 to +60°C) Dimensions Approx. 4 3/8 x 4 3/8 x 7 1/8 inches (0.72 cm)/s (w/h/d) (109 x 109 x 178 mm) (playback only) Mass Approx. Specifications Video Camera Recorder General Power requirements System On battery mounting surface 6.0 V (battery pack) Video recording system Two rotary heads, Helical scanning...
...P6-120 and Image device CCD (Charge Coupled Device) shoulder strap Viewfinder Lens Electronic viewfinder (monochrome) Combined 10 x Power zoom lens Microphone Electric condenser microphone, monaural type F f = 1/4 to 2 7/16 inches Supplied accessories .3.4.3 01 (6.2 to +60°C) Dimensions Approx. 4 3/8 x 4 3/8 x 7 1/8 inches (0.72 cm)/s (w/h/d) (109 x 109 x 178 mm) (playback only) Mass Approx. Specifications Video Camera Recorder General Power requirements System On battery mounting surface 6.0 V (battery pack) Video recording system Two rotary heads, Helical scanning...
Primary User Manual
Page 40
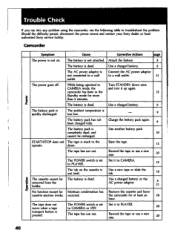
... battery pack is set Set it up again. Rewind the tape or use a new one . The battery is set Set it to PLAYER. Use a charged battery or the AC power adaptor. 6 2I No function except for at least an 28 hour. camcorder has been in Turn STANDBY down once CAMERA mode, the and turn it to CAMERA. quickly discharged. the camcorder for Moisture condensation has Remove the cassette and leave cassette ejection works. Rewind the tape or use...
... battery pack is set Set it up again. Rewind the tape or use a new one . The battery is set Set it to PLAYER. Use a charged battery or the AC power adaptor. 6 2I No function except for at least an 28 hour. camcorder has been in Turn STANDBY down once CAMERA mode, the and turn it to CAMERA. quickly discharged. the camcorder for Moisture condensation has Remove the cassette and leave cassette ejection works. Rewind the tape or use...
Primary User Manual
Page 44
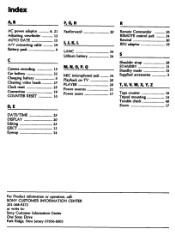
Q STANDBY I5 Standby mode 15 Car battery 22 MIC (microphone) jack 34 Supplied accessories 5 Charging battery 6 Playback on TV 20 Cleaning video heads 27 PLAYER 20 T, U, V, W, X, Y, Z Clock reset 25 Power sources 21 Connection 19 Power zoom 17 Tape counter 16 COUNTER RESET 16 Tripod mounting I4 Trouble check 40 D, E Zoom 17 DATE/TIME DISPLAY Editing EJECT Eyecup 25 20 23 „..»_.12 14 For Product information or operation, call: SONY CUSTOMER INFORMATION CENTER 201-368-9272...
Q STANDBY I5 Standby mode 15 Car battery 22 MIC (microphone) jack 34 Supplied accessories 5 Charging battery 6 Playback on TV 20 Cleaning video heads 27 PLAYER 20 T, U, V, W, X, Y, Z Clock reset 25 Power sources 21 Connection 19 Power zoom 17 Tape counter 16 COUNTER RESET 16 Tripod mounting I4 Trouble check 40 D, E Zoom 17 DATE/TIME DISPLAY Editing EJECT Eyecup 25 20 23 „..»_.12 14 For Product information or operation, call: SONY CUSTOMER INFORMATION CENTER 201-368-9272...


