

Primary User Manual
Page 2
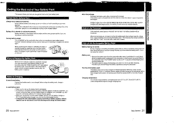
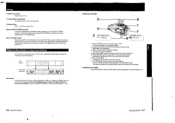
... this Manual Checking Supplied Accessories Before You Start Getting Started Checking the BEEP Switch 6 Charging and Installing the Banery Pack Inserting the lithium Battery 8 Setting the Date and Time 9 Storing a Birth Date in Your Camcorder 10 Inserting a Tape 12 Adjusting the Viewfinder Lens 13 Basic Operation Camera Recording 14 Zooming 16 Playing Back a Tape 17 Using the Remote Commander 19 Getting the Most out of Your Battery Pack 20 Advanced Operation Alternative Power Sources 22 Using the...
... this Manual Checking Supplied Accessories Before You Start Getting Started Checking the BEEP Switch 6 Charging and Installing the Banery Pack Inserting the lithium Battery 8 Setting the Date and Time 9 Storing a Birth Date in Your Camcorder 10 Inserting a Tape 12 Adjusting the Viewfinder Lens 13 Basic Operation Camera Recording 14 Zooming 16 Playing Back a Tape 17 Using the Remote Commander 19 Getting the Most out of Your Battery Pack 20 Advanced Operation Alternative Power Sources 22 Using the...
Primary User Manual
Page 3
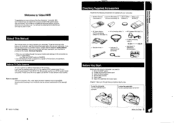
... in capital letters, e.g. If you need to: 1 Check the BEEP switch. 2 Charge and install the battery pack. 3 Insert the lithium battery. 4 Set the date and time. 5 Insert a tape. 6 Adjust the viewfinder lens to provisions of such materials may be contrary to your country. Unauthorized recording of the copyright laws. rjral • S video connecting cable (1) • Shoulder strap (1) • Lens cap (1) (attached to the camcorder) • Jack cover (1) (attached to...
... in capital letters, e.g. If you need to: 1 Check the BEEP switch. 2 Charge and install the battery pack. 3 Insert the lithium battery. 4 Set the date and time. 5 Insert a tape. 6 Adjust the viewfinder lens to provisions of such materials may be contrary to your country. Unauthorized recording of the copyright laws. rjral • S video connecting cable (1) • Shoulder strap (1) • Lens cap (1) (attached to the camcorder) • Jack cover (1) (attached to...
Primary User Manual
Page 4
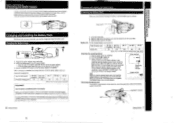
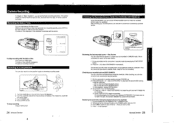
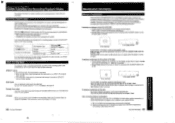
... battery, remove the video cassette and simply slide the POWER switch to CAMERA with the white line on the camcorder. 3 Slide the battery pack to charge and install the battery pack. When charging is completed, the charge indicator on the AC power adaptor. -- The bar of the arrow. 3 Set the CHARGE/VTR switch on the tape. To turn off that you can use up , the bar goes out, the (ST and red lamp flash...
... battery, remove the video cassette and simply slide the POWER switch to CAMERA with the white line on the camcorder. 3 Slide the battery pack to charge and install the battery pack. When charging is completed, the charge indicator on the AC power adaptor. -- The bar of the arrow. 3 Set the CHARGE/VTR switch on the tape. To turn off that you can use up , the bar goes out, the (ST and red lamp flash...

Primary User Manual
Page 5
... and birth dates in the camcorder's memory, as well as NEXT (to set). 4 Adjust the flashing digits of the year, month, day, and hour by pressing DATE (a.). In this case. The clock starts working. i WI •, rt i Aws-For DATE 41 IMIE MX, L92` :. Be sure to superimpose the date and time onto your video. Note that a power source is attached and a lithium battery is...
... and birth dates in the camcorder's memory, as well as NEXT (to set). 4 Adjust the flashing digits of the year, month, day, and hour by pressing DATE (a.). In this case. The clock starts working. i WI •, rt i Aws-For DATE 41 IMIE MX, L92` :. Be sure to superimpose the date and time onto your video. Note that a power source is attached and a lithium battery is...
Primary User Manual
Page 8
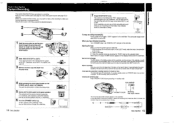
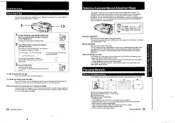
... the display window and the viewfinder, and the red lamp in minutes. In the viewfinder ISL TAPE/BATT.CHECK Remaining tape length indicator The remaining tape length indicator appears in camera recording mode. 5 Set the AUTO LOCK switch to ON. Chapter 2: Basic Operation Camera Recording This section describes the basic procedure for 5 minutes or more The camcorder goes off automatically. Keep the lens clean or the focus cannot be adjusted properly...
... the display window and the viewfinder, and the red lamp in minutes. In the viewfinder ISL TAPE/BATT.CHECK Remaining tape length indicator The remaining tape length indicator appears in camera recording mode. 5 Set the AUTO LOCK switch to ON. Chapter 2: Basic Operation Camera Recording This section describes the basic procedure for 5 minutes or more The camcorder goes off automatically. Keep the lens clean or the focus cannot be adjusted properly...
Primary User Manual
Page 9
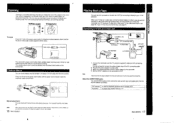
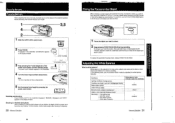
... speed zooming and softly for wide-angle (subject appears farther away), Wide-angle -1.eL I I Connect the camcorder and the TV using the supplied S video and AN connecting cables. About the AUDIO/VIDEO jacks The AUDIO/VIDEO jacks on another VCR or a TV 17 Basic Operation For more professional-looking recordings, use a tripod 16 Basic Operation Playing Back a Tape You can shoot with the power zoom button on the camcorder to OUT. Use "Zoom-in sharp focus) is a recording...
... speed zooming and softly for wide-angle (subject appears farther away), Wide-angle -1.eL I I Connect the camcorder and the TV using the supplied S video and AN connecting cables. About the AUDIO/VIDEO jacks The AUDIO/VIDEO jacks on another VCR or a TV 17 Basic Operation For more professional-looking recordings, use a tripod 16 Basic Operation Playing Back a Tape You can shoot with the power zoom button on the camcorder to OUT. Use "Zoom-in sharp focus) is a recording...

Primary User Manual
Page 10
... the camcorder does not operate properly, the batteries might be sure to set the e REMOTE COMMANDER switch to ON. Replace both batteries with your friends or family, or conveniently control the playback of your tape from other Sony VCRs ro avoid misoperation. A commander mode is used to distinguish this to Use the Remote Commander 1 Insert two size AA(R6) batteries with an RFU adaptor (page 41), turn on the POWER switch, slide...
... the camcorder does not operate properly, the batteries might be sure to set the e REMOTE COMMANDER switch to ON. Replace both batteries with your friends or family, or conveniently control the playback of your tape from other Sony VCRs ro avoid misoperation. A commander mode is used to distinguish this to Use the Remote Commander 1 Insert two size AA(R6) batteries with an RFU adaptor (page 41), turn on the POWER switch, slide...
Primary User Manual
Page 11
... set the POWER switch to save battery power. When to Replace the Battery Pack When the M indicator inside the viewfinder, you are recording in this case the battery life will recover its original capacity. Battery care • Remove the battery pack from slow flashing to do 210 3 times as much recording as you fully discharge and charge the battery again. 20 Basic Operation After long storage Recharge the battery pack after using...
... set the POWER switch to save battery power. When to Replace the Battery Pack When the M indicator inside the viewfinder, you are recording in this case the battery life will recover its original capacity. Battery care • Remove the battery pack from slow flashing to do 210 3 times as much recording as you fully discharge and charge the battery again. 20 Basic Operation After long storage Recharge the battery pack after using...
Primary User Manual
Page 13
... camcorder goes back to record the date or time, store and record an age, re-record a picture and more. Rec Review You can review the last recorded scene or check the recorded picture inside the viewfinder. * side: to start playback. 25 Advanced Operation This section shows you can check the last portion of EDITSEARCH to play back the picture while looking inside the viewfinder. To stop recording with the picture. The date or time displayed...
... camcorder goes back to record the date or time, store and record an age, re-record a picture and more. Rec Review You can review the last recorded scene or check the recorded picture inside the viewfinder. * side: to start playback. 25 Advanced Operation This section shows you can check the last portion of EDITSEARCH to play back the picture while looking inside the viewfinder. To stop recording with the picture. The date or time displayed...
Primary User Manual
Page 15
... the camcorder in standby mode. 2 Press AGE/EVENT to select the Indicator you want to Use Manual Focus In the following cases. • When you set the POWER switch to OFF. • When you make during manual adjustment are retained in focus) • When shooting a stationary subject using manual adjustment functions. I7d,l ; The settings are changed. You can manually adjust focus, white balance, exposure, and shutter speed with the PROGRAM AE button to meet the shooting situations...
... the camcorder in standby mode. 2 Press AGE/EVENT to select the Indicator you want to Use Manual Focus In the following cases. • When you set the POWER switch to OFF. • When you make during manual adjustment are retained in focus) • When shooting a stationary subject using manual adjustment functions. I7d,l ; The settings are changed. You can manually adjust focus, white balance, exposure, and shutter speed with the PROGRAM AE button to meet the shooting situations...
Primary User Manual
Page 16
... white subjects look white and to obtain a more natural color balance for camera recording. Focusing Manually Focusing Manually When adjusting the focus manually, the best way is to first adjust at wide angles after sunset • just before recording, then set the desired zoom angle. 3,5 2 1 Slide the AUTO LOCK switch down. (AUTO LOCK) 2 Press FOCUS. iO appears in the viewfinder, and MANUAL appears in front of field in the display window. For best results, shoot...
... white subjects look white and to obtain a more natural color balance for camera recording. Focusing Manually Focusing Manually When adjusting the focus manually, the best way is to first adjust at wide angles after sunset • just before recording, then set the desired zoom angle. 3,5 2 1 Slide the AUTO LOCK switch down. (AUTO LOCK) 2 Press FOCUS. iO appears in the viewfinder, and MANUAL appears in front of field in the display window. For best results, shoot...

Primary User Manual
Page 21
... connected. Do not use them to record from the TV. From the next time, you only need to attach the connecting plate to AUDIO (L,R) OUT AN connecting cable (supplied) NV 1 Connect the TV and the AC power adaptor using the supplied connecting cable. Playing Back a Tape This section describes several other methods to connect your camcorder to your TV depending on the type of the TV in your area. 4 Plug...
... connected. Do not use them to record from the TV. From the next time, you only need to attach the connecting plate to AUDIO (L,R) OUT AN connecting cable (supplied) NV 1 Connect the TV and the AC power adaptor using the supplied connecting cable. Playing Back a Tape This section describes several other methods to connect your camcorder to your TV depending on the type of the TV in your area. 4 Plug...
Primary User Manual
Page 24
... DATA SCREEN function It you can minimize the picture deterioration that results from editing. Avoid using the edited tape for multiple generations of the scene to be superimposed on both units to replace recordings, set the camcorder into recording pause mode. Before you set EDIT in the direction of the insert is reset to playback pause mode at the beginning of editing. Replacing recordings 2 5 4 3 In the display window I 1 7 In the display window a:Fr.:7OZ 123 v I I (STOP...
... DATA SCREEN function It you can minimize the picture deterioration that results from editing. Avoid using the edited tape for multiple generations of the scene to be superimposed on both units to replace recordings, set the camcorder into recording pause mode. Before you set EDIT in the direction of the insert is reset to playback pause mode at the beginning of editing. Replacing recordings 2 5 4 3 In the display window I 1 7 In the display window a:Fr.:7OZ 123 v I I (STOP...
Primary User Manual
Page 25
... play back foreign pre-recorded software because of the tape • The e indicator flashes in the viewfinder and the display window flashes. When You Play Back The playback mode is turned on the lens No caution indicators will be recorded in the viewfinder I I I I '1 In the display window In such cases, no functions, except for at least 1 hour. Set the Hi-Fi SOUND switch to play back a tape recorded with this condition, the tape may stick...
... play back foreign pre-recorded software because of the tape • The e indicator flashes in the viewfinder and the display window flashes. When You Play Back The playback mode is turned on the lens No caution indicators will be recorded in the viewfinder I I I I '1 In the display window In such cases, no functions, except for at least 1 hour. Set the Hi-Fi SOUND switch to play back a tape recorded with this condition, the tape may stick...

Primary User Manual
Page 26
... your Sony service facility. In this happens: 1 Clean the video heads with the Sony V8-25CLH cleaning cassette (not supplied), referring to its instructions. 2 After cleaning, check to support it with the grip strap so that the length of the arrow, and detach it with the camcorder. Use video light in the opposite direction of the arrow. 50 For Your Information Tips for Better Camera Recording Achieving a Better Camera Recording Assume...
... your Sony service facility. In this happens: 1 Clean the video heads with the Sony V8-25CLH cleaning cassette (not supplied), referring to its instructions. 2 After cleaning, check to support it with the grip strap so that the length of the arrow, and detach it with the camcorder. Use video light in the opposite direction of the arrow. 50 For Your Information Tips for Better Camera Recording Achieving a Better Camera Recording Assume...

Primary User Manual
Page 27
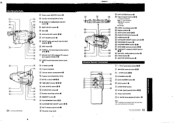
... this manual. soft cloth, or a soft cloth lightly moistened with a dry. EDITSEARCH (and J recording review) button 0 0 e El Viewfinder l] Viewfinder adjustment ring El Eyecup Li RELEASE knob POWER switch CAMERA: for camera recording VTR: for playing back or editing tapes OFF: power off El It REMOTE control connector (stereo mini-minljack) U (headphone) jack (mlnijack) • II] START/STOP button m so STANDBY switch El Grip strap 6) LI Stereo built-in color system This camcorder...
... this manual. soft cloth, or a soft cloth lightly moistened with a dry. EDITSEARCH (and J recording review) button 0 0 e El Viewfinder l] Viewfinder adjustment ring El Eyecup Li RELEASE knob POWER switch CAMERA: for camera recording VTR: for playing back or editing tapes OFF: power off El It REMOTE control connector (stereo mini-minljack) U (headphone) jack (mlnijack) • II] START/STOP button m so STANDBY switch El Grip strap 6) LI Stereo built-in color system This camcorder...
Primary User Manual
Page 28
... 55 Wireless Remote Commander 6 7 2 8 3 9 w 5 10 El DATA SCREEN button 0 0 Ill Tape transport buttons > PLAY (playback) FF (fast-forward) REW (rewind) HI STOP II PAUSE El • e REC (recording) switch El Display window E e e AUTO LOCK switch fi PUSH FOCUS HOLD button g FADER button E EXPOSURE ON/OFF button and dial LI PROGRAM AE button e El COUNTER RESET button 2e el El ZERO MEM (memory) button el el ▪ TAPE/BATE. (battery) CHECK button 00 59 WHT BAL (white balance) button 0 ] FOCUS button op El SHUTTER SPEED button 0 > e e PLAY (play back) button • REW...
... 55 Wireless Remote Commander 6 7 2 8 3 9 w 5 10 El DATA SCREEN button 0 0 Ill Tape transport buttons > PLAY (playback) FF (fast-forward) REW (rewind) HI STOP II PAUSE El • e REC (recording) switch El Display window E e e AUTO LOCK switch fi PUSH FOCUS HOLD button g FADER button E EXPOSURE ON/OFF button and dial LI PROGRAM AE button e El COUNTER RESET button 2e el El ZERO MEM (memory) button el el ▪ TAPE/BATE. (battery) CHECK button 00 59 WHT BAL (white balance) button 0 ] FOCUS button op El SHUTTER SPEED button 0 > e e PLAY (play back) button • REW...

Primary User Manual
Page 29
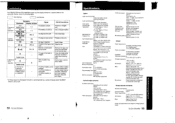
...the battery pack again. pause mode for more than 5 minutes. camcorder is not selected on the TV is connected to a wall outlet. Eject the tape. Adjust the focus manually. Adjust the viewfinder lens. When flashing: "Replace battery or tape." (I) Hi8 mode indicator In the Display Window [j] Playback mode (LP) (k] Tape transport mode/Title mode [I] Tape counter (m] Remaining tape length indicator [n] ZERO MEM is pressed. [o] "Replace tape or no tape inside ." (M) [p] "Trouble has occurred". ( ..) "Clean video heads." (0) [q] Remaining battery indicator [r] Age [s] Date or time...
...the battery pack again. pause mode for more than 5 minutes. camcorder is not selected on the TV is connected to a wall outlet. Eject the tape. Adjust the focus manually. Adjust the viewfinder lens. When flashing: "Replace battery or tape." (I) Hi8 mode indicator In the Display Window [j] Playback mode (LP) (k] Tape transport mode/Title mode [I] Tape counter (m] Remaining tape length indicator [n] ZERO MEM is pressed. [o] "Replace tape or no tape inside ." (M) [p] "Trouble has occurred". ( ..) "Clean video heads." (0) [q] Remaining battery indicator [r] Age [s] Date or time...
Primary User Manual
Page 30
... Audio recording system Rotary head, FM system Video signal NTSC color, EIA standards Cassette type 8 mm video format cassette Tape speed SP modei Approx. 1.43 cm F1/3z inchys LP mode: Approx. 0.72 cm Firs inchys (playback only) Recording time SP mode: 2 h (E6/P6-120) Playback time SP mode: 2 h (E6/P6-120) LP mode, 4 h (E6/P6-120) Fast forward/rewind time Image device Viewfinder Approx. 6 mm 30 0 (66/1. 8.120) CCD (Charge Coupled Device) Electronic viewfinder (black and white) Lens Combined 10 k power zoom lens...
... Audio recording system Rotary head, FM system Video signal NTSC color, EIA standards Cassette type 8 mm video format cassette Tape speed SP modei Approx. 1.43 cm F1/3z inchys LP mode: Approx. 0.72 cm Firs inchys (playback only) Recording time SP mode: 2 h (E6/P6-120) Playback time SP mode: 2 h (E6/P6-120) LP mode, 4 h (E6/P6-120) Fast forward/rewind time Image device Viewfinder Approx. 6 mm 30 0 (66/1. 8.120) CCD (Charge Coupled Device) Electronic viewfinder (black and white) Lens Combined 10 k power zoom lens...
Primary User Manual
Page 31
... Camera recording mode 14 Playback 18 Camera recording lamp 15 Playback on TV 18, 40 Car battery 23 Portrait mode 35 Charging battery 6 Power sources 22 Cleaning video head 50 Power zoom 16 Clock set 9 Program AE 35 Close-up 16 PUSH FOCUS AUTO button 31 COLOR/MODE button 38, 39 Connecting TV 17, 40 R Counter reset 26, 44 Rec review 25 D,E Recording 43 Remote Commander 19 Data screen Date/Time Dew indicator 42 Remote control connector 27 9, 10, 24 Rewind 49 RFU adaptor 18 41 Display window...
... Camera recording mode 14 Playback 18 Camera recording lamp 15 Playback on TV 18, 40 Car battery 23 Portrait mode 35 Charging battery 6 Power sources 22 Cleaning video head 50 Power zoom 16 Clock set 9 Program AE 35 Close-up 16 PUSH FOCUS AUTO button 31 COLOR/MODE button 38, 39 Connecting TV 17, 40 R Counter reset 26, 44 Rec review 25 D,E Recording 43 Remote Commander 19 Data screen Date/Time Dew indicator 42 Remote control connector 27 9, 10, 24 Rewind 49 RFU adaptor 18 41 Display window...


