

Operating Instructions
Page 1
SONY 3-810-988-11(1) Microcassette Transcriber Operating Instructions BM-840T t, 1995 by Sony Corporation BM-840
SONY 3-810-988-11(1) Microcassette Transcriber Operating Instructions BM-840T t, 1995 by Sony Corporation BM-840

Operating Instructions
Page 2
... manual could void your unit that may cause malfunction. • After operating the unit with Part 15 of time. Owner's Record The model and serial numbers are cautioned that any further. Model No. Do not use the AC power adaptor supplied with this will not be connected to disconnect the adaptor from the wall outlet when it may block the ventilation holes. The POWER switch on the unit...
... manual could void your unit that may cause malfunction. • After operating the unit with Part 15 of time. Owner's Record The model and serial numbers are cautioned that any further. Model No. Do not use the AC power adaptor supplied with this will not be connected to disconnect the adaptor from the wall outlet when it may block the ventilation holes. The POWER switch on the unit...

Operating Instructions
Page 3
... the Unit TIME control makes transcribing easy by Operations enabling the reviewing of the last recorded words Transcription 7 each time listening is resumed. Erasing 10 • Two tape speeds (2.4 cm/sec. Operation Flow Chart 4 • Auto-stop function quickly accesses the dictated Setting Up cassette. Power Connection • Auto backspace function with ERASE • and Specifications 11 REW buttons. and 1.2 cm/sec.) Additional Information can he selected according to move the tape Features without using your hands. Troubleshooting Guide...
... the Unit TIME control makes transcribing easy by Operations enabling the reviewing of the last recorded words Transcription 7 each time listening is resumed. Erasing 10 • Two tape speeds (2.4 cm/sec. Operation Flow Chart 4 • Auto-stop function quickly accesses the dictated Setting Up cassette. Power Connection • Auto backspace function with ERASE • and Specifications 11 REW buttons. and 1.2 cm/sec.) Additional Information can he selected according to move the tape Features without using your hands. Troubleshooting Guide...

Operating Instructions
Page 4
... control unit is pressed to play back the tape.) (9) 3 Erase the tape (10). 4 Introduction Operation Flow Chart For details, refer to the pages in ( : Necessary step Optional step Transcription Connect the AC power adaptor to the unit and to an AC outlet (5). 3 Connect the foot control unit (5). 3 Set POWER to ON. 3 Insert the dictated cassette (0). 3 Connect the earphone (9). 3 Set AUTO STOP to OFF. 3 Set TAPE SPEED to the same position as that used for playback...
... control unit is pressed to play back the tape.) (9) 3 Erase the tape (10). 4 Introduction Operation Flow Chart For details, refer to the pages in ( : Necessary step Optional step Transcription Connect the AC power adaptor to the unit and to an AC outlet (5). 3 Connect the foot control unit (5). 3 Set POWER to ON. 3 Insert the dictated cassette (0). 3 Connect the earphone (9). 3 Set AUTO STOP to OFF. 3 Set TAPE SPEED to the same position as that used for playback...

Operating Instructions
Page 5
... to STANDBY. Do not use any other AC power adaptor. to a wall outlet to CONTROL UNIT BM-840 O Foot control unit This unit uses only standard Microcassettes. to DC IN 9V AC power adaptor (supplied) Setting Up the Unit Connecting the Foot Control Unit (supplied) Note "01)0" appears in the tape counter tor about 2 seconds after connecting the AC power adaptor, even if the POWER switch is different. To reuse a cassette To record...
... to STANDBY. Do not use any other AC power adaptor. to a wall outlet to CONTROL UNIT BM-840 O Foot control unit This unit uses only standard Microcassettes. to DC IN 9V AC power adaptor (supplied) Setting Up the Unit Connecting the Foot Control Unit (supplied) Note "01)0" appears in the tape counter tor about 2 seconds after connecting the AC power adaptor, even if the POWER switch is different. To reuse a cassette To record...

Operating Instructions
Page 6
... even if the POWER switch is being removed. Setting Up the Unit (continued) Cassette Insertion 3 4 5 0 0 Microcassette 2 1 Take up . 4 Insert a cassette into the holder completely. 5 Close the cassette compartment lid. To reset the tape counter to STANDBY or a cassette is set to zero Press RESET for listening 6 Setting Up Tape counter: Numerical reference for about a second. The cassette holder pops up any slack in the tape. 2 Set POWER to ON...
... even if the POWER switch is being removed. Setting Up the Unit (continued) Cassette Insertion 3 4 5 0 0 Microcassette 2 1 Take up . 4 Insert a cassette into the holder completely. 5 Close the cassette compartment lid. To reset the tape counter to STANDBY or a cassette is set to zero Press RESET for listening 6 Setting Up Tape counter: Numerical reference for about a second. The cassette holder pops up any slack in the tape. 2 Set POWER to ON...

Operating Instructions
Page 7
... the tape reaches the beginning of the foot control unit pedal depressed to listen to rewind the tape. Transcription Connect the toot control unit. Auto stop the tape Release the pedal. courniitcd,in nrtf pnv. Fast forward 6=0 Rewind Start/Stop (Listen) Foot control unit 5 1 4 3 Note Erase the tape when transcription is heard and the unit automatically shuts off . 4 Set TAPE SPEED to the same tape speed as that used for recording (dictation). 5 Press *4 REW to the tape. 8 Adjust VOLUME and...
... the tape reaches the beginning of the foot control unit pedal depressed to listen to rewind the tape. Transcription Connect the toot control unit. Auto stop the tape Release the pedal. courniitcd,in nrtf pnv. Fast forward 6=0 Rewind Start/Stop (Listen) Foot control unit 5 1 4 3 Note Erase the tape when transcription is heard and the unit automatically shuts off . 4 Set TAPE SPEED to the same tape speed as that used for recording (dictation). 5 Press *4 REW to the tape. 8 Adjust VOLUME and...

Operating Instructions
Page 8
... reviewed for about 5 seconds*. REVERSE TIME : at this point. " Measured at all. Tape playback Next playback will start from this tunction, the length of the tape. Transcription (continued) Convenient Functions O 44, M, SPEED REVERSE TIME SPEED CONTROL AUTO STOP Note It the electronic index signal is detected lvhile the tape is operated by the toot control unit connected. Tape approx. 5 seconds Nur playback Next playback will vary in accordance with this point. 8 Operations Auto backspace function This control operates...
... reviewed for about 5 seconds*. REVERSE TIME : at this point. " Measured at all. Tape playback Next playback will start from this tunction, the length of the tape. Transcription (continued) Convenient Functions O 44, M, SPEED REVERSE TIME SPEED CONTROL AUTO STOP Note It the electronic index signal is detected lvhile the tape is operated by the toot control unit connected. Tape approx. 5 seconds Nur playback Next playback will vary in accordance with this point. 8 Operations Auto backspace function This control operates...

Operating Instructions
Page 9
... the SPEED control. * Tape speed can be disconnected. signal with the use of the operation modes may be delayed. When the SPEED CONTROL selector is set to the cue signals used for details.). 1 Set AUTO STOP to rewind or fast forward the tape. Stop Listen Press II STOP. Fast forward Press IN- to adjust the speed only by the SPEED control*. Notes • When a cassette which was not recorded using a Sony Professional Dictating Machine (BM-577, 850, 890, etc.) is set the AUTO STOP switch...
... the SPEED control. * Tape speed can be disconnected. signal with the use of the operation modes may be delayed. When the SPEED CONTROL selector is set to the cue signals used for details.). 1 Set AUTO STOP to rewind or fast forward the tape. Stop Listen Press II STOP. Fast forward Press IN- to adjust the speed only by the SPEED control*. Notes • When a cassette which was not recorded using a Sony Professional Dictating Machine (BM-577, 850, 890, etc.) is set the AUTO STOP switch...
Operating Instructions
Page 10
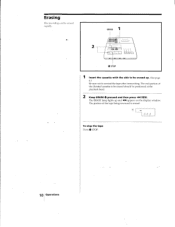
ERASE 0 ■ STOP Insert the cassette with the side to be erased up and 41 appears on the display window. The ERASE lamp lights up . (See page 6.) Be sure not to be erased rapidly. The portion of the dictated cassette to rewind the tape after transcribing. u To stop the tape Press ■ STOP. 10 Operations The end portion of the tape being rewound is erased. Erasing The recording can be erased should he positioned at the playback head. 2 Keep ERASE • pressed and then press *4 REW.
ERASE 0 ■ STOP Insert the cassette with the side to be erased up and 41 appears on the display window. The ERASE lamp lights up . (See page 6.) Be sure not to be erased rapidly. The portion of the dictated cassette to rewind the tape after transcribing. u To stop the tape Press ■ STOP. 10 Operations The end portion of the tape being rewound is erased. Erasing The recording can be erased should he positioned at the playback head. 2 Keep ERASE • pressed and then press *4 REW.

Operating Instructions
Page 11
... CONTROL UNIT connector for foot control unit Power requirements 9 V DC DC IN 9 V jack accepts the supplied AC power adaptor for use . Maintenance Capstan Erase head Pinch roller Playback head Cleaning the heads To produce optimum sound, clean the tape heads after every 10 hours of the above . Disconnect the AC power adaptor. 2 Press EJECT to change without notice. k channel tor sound signals) Tape speed 2.4 cm/s in./s), 1.2 cm/s (I 3,l:2 in./s) Fast winding time...
... CONTROL UNIT connector for foot control unit Power requirements 9 V DC DC IN 9 V jack accepts the supplied AC power adaptor for use . Maintenance Capstan Erase head Pinch roller Playback head Cleaning the heads To produce optimum sound, clean the tape heads after every 10 hours of the above . Disconnect the AC power adaptor. 2 Press EJECT to change without notice. k channel tor sound signals) Tape speed 2.4 cm/s in./s), 1.2 cm/s (I 3,l:2 in./s) Fast winding time...

Operating Instructions
Page 12
...-in speaker • The VOLUME control is set to OFF. The tape does not stop at an electronic index signal even if the AUTO STOP switch is dirty. Troubleshooting Guide Should any problem occur, conduct the following simple tests to ON. • A cassette which was not recorded using a Sony Professional Dictating Machine (BM-577, 850, 890, etc.) is pressed while detecting an electronic index signal during fast forward or rewind. Sound drop...
...-in speaker • The VOLUME control is set to OFF. The tape does not stop at an electronic index signal even if the AUTO STOP switch is dirty. Troubleshooting Guide Should any problem occur, conduct the following simple tests to ON. • A cassette which was not recorded using a Sony Professional Dictating Machine (BM-577, 850, 890, etc.) is pressed while detecting an electronic index signal during fast forward or rewind. Sound drop...

Operating Instructions
Page 13
... alarm system First, release the button, then • Insert a cassette. • Insert a new cassette or cover the safety slot. • Rewind the tape. • Insert a new cassette. • Alarm stops automatically. 13 Additional Information The unit shuts off . • 4 A short beep is heard and E0-70 blinks. Alarm System An alarm sounds and an indication appears on the display window in fast forward or rewind mode).
... alarm system First, release the button, then • Insert a cassette. • Insert a new cassette or cover the safety slot. • Rewind the tape. • Insert a new cassette. • Alarm stops automatically. 13 Additional Information The unit shuts off . • 4 A short beep is heard and E0-70 blinks. Alarm System An alarm sounds and an indication appears on the display window in fast forward or rewind mode).

Operating Instructions
Page 14
El TONE control A VOLUME control M REVERSE TIME control (8) nE SPEED control (9) AUTO STOP selector (9) El TAPE SPEED selector 11 RESET button (6) 15 ERASE • button (10) g • 16 N REW (rewind) STOP LISTEN 19 10410. FF (fast forward) 16 181 19 Left side Left side El CONTROL UNIT connector (5) LI EARPHONE jack (9) Rear 120 21 r 122 Rear Ei DC IN 9 V (5) 14 Additional Information Location and Function of Controls For details, reter to the pages indicated in...
El TONE control A VOLUME control M REVERSE TIME control (8) nE SPEED control (9) AUTO STOP selector (9) El TAPE SPEED selector 11 RESET button (6) 15 ERASE • button (10) g • 16 N REW (rewind) STOP LISTEN 19 10410. FF (fast forward) 16 181 19 Left side Left side El CONTROL UNIT connector (5) LI EARPHONE jack (9) Rear 120 21 r 122 Rear Ei DC IN 9 V (5) 14 Additional Information Location and Function of Controls For details, reter to the pages indicated in...
Operating Instructions
Page 15
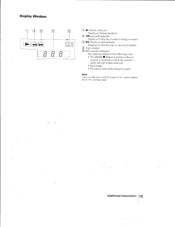
... the watching angle. l] .04 (rewind) indicator Displayed while the cassette is being rewound. 0011. (fast forward) indicator Displayed while the tape is torn while being rewound. Additional Information 15 Display Window Li 31 4 4.1 Q_O nn L6I nI-I_ (listen) indicator Displayed during playback.. LI Tape counter 5 lc-DI(cassette) indicator The indicator blinks in the following cases: • The ERASE • button is pressed when no cassette is inserted or when...
... the watching angle. l] .04 (rewind) indicator Displayed while the cassette is being rewound. 0011. (fast forward) indicator Displayed while the tape is torn while being rewound. Additional Information 15 Display Window Li 31 4 4.1 Q_O nn L6I nI-I_ (listen) indicator Displayed during playback.. LI Tape counter 5 lc-DI(cassette) indicator The indicator blinks in the following cases: • The ERASE • button is pressed when no cassette is inserted or when...


