Operating Instructions
Page 2
... experienced radio/TV technician for a Class B digital device, pursuant to excessive heat such as a CLASS 1 LASER product. To prevent injury, this apparatus to rain or moisture. Record these numbers in accordance with the installation instructions. Other versions may be used in order to avoid direct eye exposure. If this Blu-ray Disc / DVD Home Theatre System is connected. - Properly shielded and grounded cables and connectors must...
... experienced radio/TV technician for a Class B digital device, pursuant to excessive heat such as a CLASS 1 LASER product. To prevent injury, this apparatus to rain or moisture. Record these numbers in accordance with the installation instructions. Other versions may be used in order to avoid direct eye exposure. If this Blu-ray Disc / DVD Home Theatre System is connected. - Properly shielded and grounded cables and connectors must...
Operating Instructions
Page 7
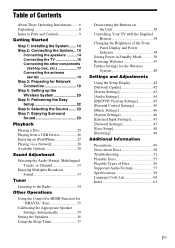
... Speakers 36 Using the Sleep Timer 37 Deactivating the Buttons on the Unit 38 Controlling Your TV with the Supplied Remote 38 Changing the Brightness of the Front Panel Display and Power Indicator 38 Saving Power in Standby Mode 38 Browsing Websites 39 Further Settings for the Wireless System 40 Settings and Adjustments Using the Setup Display 42 [Network Update 42 [Screen Settings 43 [Audio Settings 44 [BD/DVD Viewing Settings 45 [Parental Control Settings 45 [Music Settings 46 [System Settings 46 [External Input Settings...
... Speakers 36 Using the Sleep Timer 37 Deactivating the Buttons on the Unit 38 Controlling Your TV with the Supplied Remote 38 Changing the Brightness of the Front Panel Display and Power Indicator 38 Saving Power in Standby Mode 38 Browsing Websites 39 Further Settings for the Wireless System 40 Settings and Adjustments Using the Setup Display 42 [Network Update 42 [Screen Settings 43 [Audio Settings 44 [BD/DVD Viewing Settings 45 [Parental Control Settings 45 [Music Settings 46 [System Settings 46 [External Input Settings...
Operating Instructions
Page 13
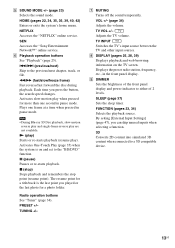
... on the TV screen. E SOUND MODE +/- (page 23) Selects the sound mode. HOME (pages 22, 34, 35, 36, 39, 40, 42) Enters or exits the system's home menu. x (stop) Stops playback and remembers the stop point (resume point). TUNING +/- Displays the preset radio station, frequency, etc., in pause mode. • During Blu-ray 3D Disc playback, slow-motion reverse play and single-frame reverse play are not available. F Playback operation buttons See "Playback...
... on the TV screen. E SOUND MODE +/- (page 23) Selects the sound mode. HOME (pages 22, 34, 35, 36, 39, 40, 42) Enters or exits the system's home menu. x (stop) Stops playback and remembers the stop point (resume point). TUNING +/- Displays the preset radio station, frequency, etc., in pause mode. • During Blu-ray 3D Disc playback, slow-motion reverse play and single-frame reverse play are not available. F Playback operation buttons See "Playback...
Operating Instructions
Page 19
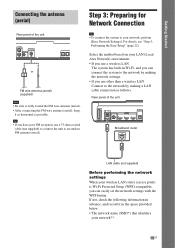
...-Fi Protected Setup (WPS)-compatible, you can connect the system to the network by making the network settings. • If you use a wireless LAN The system has built-in the space provided below. • The network name (SSID*) that identifies your network**. 19US Getting Started Connecting the antenna (aerial) Step 3: Preparing for Network Connection Rear panel of the unit USB 1 VIDEO OUT TV OPTICAL LAN (100) ARC IN 1 IN 2 OUT DIGITAL IN...
...-Fi Protected Setup (WPS)-compatible, you can connect the system to the network by making the network settings. • If you use a wireless LAN The system has built-in the space provided below. • The network name (SSID*) that identifies your network**. 19US Getting Started Connecting the antenna (aerial) Step 3: Preparing for Network Connection Rear panel of the unit USB 1 VIDEO OUT TV OPTICAL LAN (100) ARC IN 1 IN 2 OUT DIGITAL IN...
Operating Instructions
Page 22
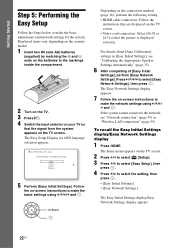
Press C/X/x/c to make the network settings using C/X/x/c and . The Easy Network Settings display appears. 7 Follow the on-screen instructions to select [Easy Network Settings], then press . To recall the Easy Initial Settings display/Easy Network Settings display 1 Press HOME. C/X/x/c Depending on the connection method (page 16), perform the following setting. • HDMI cable connection: Follow the instructions that are displayed on the TV screen. • Video cord connection: Select [16:9] or [4:3] so that the signal from the system appears on your TV...
Press C/X/x/c to make the network settings using C/X/x/c and . The Easy Network Settings display appears. 7 Follow the on-screen instructions to select [Easy Network Settings], then press . To recall the Easy Initial Settings display/Easy Network Settings display 1 Press HOME. C/X/x/c Depending on the connection method (page 16), perform the following setting. • HDMI cable connection: Follow the instructions that are displayed on the TV screen. • Video cord connection: Select [16:9] or [4:3] so that the signal from the system appears on your TV...
Operating Instructions
Page 23
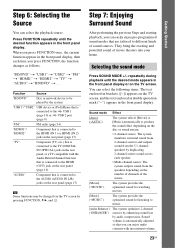
... press FUNCTION, the function changes as follows. Selecting the sound mode Press SOUND MODE +/- Sound volume is automatically adjusted so that is connected to the AUDIO (AUDIO IN L/R) jacks on the rear panel (page 17) Some functions may be played by pressing FUNCTION, X/x, and . Step 6: Selecting the Source You can select the following items. The text enclosed in the front panel display. Function Source "BD/DVD" Disc or network device to be changed via the TV screen by the system "USB1"/"USB2" USB...
... press FUNCTION, the function changes as follows. Selecting the sound mode Press SOUND MODE +/- Sound volume is automatically adjusted so that is connected to the AUDIO (AUDIO IN L/R) jacks on the rear panel (page 17) Some functions may be played by pressing FUNCTION, X/x, and . Step 6: Selecting the Source You can select the following items. The text enclosed in the front panel display. Function Source "BD/DVD" Disc or network device to be changed via the TV screen by the system "USB1"/"USB2" USB...
Operating Instructions
Page 27
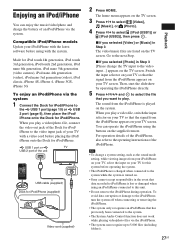
... to select the file that the signal from the iPod/iPhone is turned on the TV screen. USB 1 port or TV USB 2 port of the iPod/iPhone. • To change the TV input to the video input...] appears on . • Sony cannot accept responsibility in Step 3 [Please change a system setting, such as the sound mode setting, while viewing images from the iPod/iPhone appears on the TV screen. The home menu appears on the supplied remote.
... to select the file that the signal from the iPod/iPhone is turned on the TV screen. USB 1 port or TV USB 2 port of the iPod/iPhone. • To change the TV input to the video input...] appears on . • Sony cannot accept responsibility in Step 3 [Please change a system setting, such as the sound mode setting, while viewing images from the iPod/iPhone appears on the TV screen. The home menu appears on the supplied remote.
Operating Instructions
Page 31
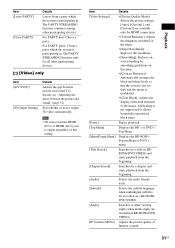
... only for HDMI connections. • [Texture Remaster]: Adjusts the sharpness and detail of this setting. Playback Item Details [Video Settings] • [Picture Quality Mode]: Selects the picture settings. [Auto], [Custom1], and [Custom2] are recorded on BD-ROMs/DVD VIDEOs. [IP Content NR Pro] Adjusts the picture quality of the image. it allows beautifully reproduced black tones. [Pause] Pauses playback. [Top Menu] Displays the BD's or DVD's Top Menu. [Menu/Popup Menu] Displays the BD...
... only for HDMI connections. • [Texture Remaster]: Adjusts the sharpness and detail of this setting. Playback Item Details [Video Settings] • [Picture Quality Mode]: Selects the picture settings. [Auto], [Custom1], and [Custom2] are recorded on BD-ROMs/DVD VIDEOs. [IP Content NR Pro] Adjusts the picture quality of the image. it allows beautifully reproduced black tones. [Pause] Pauses playback. [Top Menu] Displays the BD's or DVD's Top Menu. [Menu/Popup Menu] Displays the BD...
Operating Instructions
Page 35
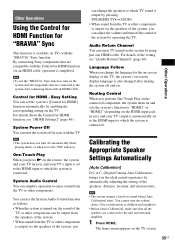
... Channel You can enjoy TV sound via the speakers of the system, you the ideal sound experience by using just one HDMI cable. Calibrating the Appropriate Speaker Settings Automatically [Auto Calibration] D.C.A.C. (Digital Cinema Auto Calibration) brings you can turn off and on. The home menu appears on , the sound of the TV or other components can adjust the volume and turn the system off automatically while playing music or when set the system's [Control for "BRAVIA" Sync This function is connected...
... Channel You can enjoy TV sound via the speakers of the system, you the ideal sound experience by using just one HDMI cable. Calibrating the Appropriate Speaker Settings Automatically [Auto Calibration] D.C.A.C. (Digital Cinema Auto Calibration) brings you can turn off and on. The home menu appears on , the sound of the TV or other components can adjust the volume and turn the system off automatically while playing music or when set the system's [Control for "BRAVIA" Sync This function is connected...
Operating Instructions
Page 36
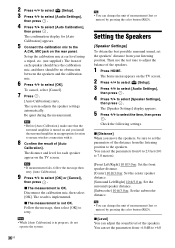
.../3.0 m: Set the center speaker distance. [Surround Left/Right] 10 ft/3.0 m: Set the surround speaker distance. [Subwoofer] 10 ft/3.0 m: Set the subwoofer distance. • You can adjust the sound level of measurement (feet or meters) by pressing the color button (RED). Then use the test tone to select [OK]. You can change the unit of the speakers. 2 Press C/c to select [Setup]. 3 Press X/x to select [Audio Settings], then press . 4 Press X/x to +6.0 The confirmation display for each speaker should face the calibration mic...
.../3.0 m: Set the center speaker distance. [Surround Left/Right] 10 ft/3.0 m: Set the surround speaker distance. [Subwoofer] 10 ft/3.0 m: Set the subwoofer distance. • You can adjust the sound level of measurement (feet or meters) by pressing the color button (RED). Then use the test tone to select [OK]. You can change the unit of the speakers. 2 Press C/c to select [Setup]. 3 Press X/x to select [Audio Settings], then press . 4 Press X/x to +6.0 The confirmation display for each speaker should face the calibration mic...
Operating Instructions
Page 44
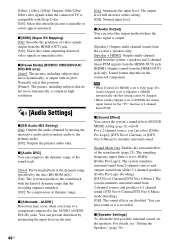
... system's speakers and 2-channel linear PCM signals from the HDMI (OUT) jack. [HDMI]: Outputs sound from the HDMI (OUT) jack. [Off]: Select this when outputting distorted video signals or unnatural color. You can set the speakers. x [Attenuate - x [Speaker Settings] To obtain the best possible surround sound, set the system's sound effects (SOUND MODE setting (page 23)) on the connected component. • When [Control for the "TV" function is output in high resolution. [Audio Settings] x [BD Audio MIX Setting] [On]: Outputs the audio obtained by attenuating the input level on the...
... system's speakers and 2-channel linear PCM signals from the HDMI (OUT) jack. [HDMI]: Outputs sound from the HDMI (OUT) jack. [Off]: Select this when outputting distorted video signals or unnatural color. You can set the speakers. x [Attenuate - x [Speaker Settings] To obtain the best possible surround sound, set the system's sound effects (SOUND MODE setting (page 23)) on the connected component. • When [Control for the "TV" function is output in high resolution. [Audio Settings] x [BD Audio MIX Setting] [On]: Outputs the audio obtained by attenuating the input level on the...
Operating Instructions
Page 46
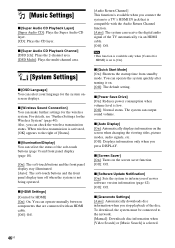
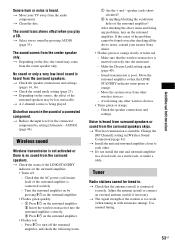
... output sound volume. x [Auto Display] [On]: Automatically displays information on the screen saver function. [Off]: Off. x [Quick Start Mode] [On]: Shortens the startup time from standby mode. [Music Settings] x [Super Audio CD Playback Layer] [Super Audio CD]: Plays the Super Audio CD layer. [CD]: Plays the CD layer. x [Wireless Sound Connection] You can receive the digital audio signal of [Status]. You can operate mutually between components that are connected with an HDMI cable. [Off]: Off. [Audio Return Channel] This function is available when you connect...
... output sound volume. x [Auto Display] [On]: Automatically displays information on the screen saver function. [Off]: Off. x [Quick Start Mode] [On]: Shortens the startup time from standby mode. [Music Settings] x [Super Audio CD Playback Layer] [Super Audio CD]: Plays the Super Audio CD layer. [CD]: Plays the CD layer. x [Wireless Sound Connection] You can receive the digital audio signal of [Status]. You can operate mutually between components that are connected with an HDMI cable. [Off]: Off. [Audio Return Channel] This function is available when you connect...
Operating Instructions
Page 47
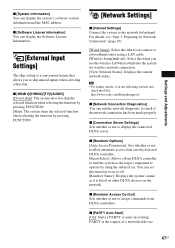
... controller. [Smart Select]: Allows a Sony DLNA controller to find the system as it is listed on other DLNA devices on or off. [Renderer Name]: Displays the system's name as the target component to operate by pressing FUNCTION. [Network Settings] x [Internet Settings] Connect the system to the network beforehand. For details, see "Step 3: Preparing for Network Connection" (page 19). [Wired Setup]: Select this when you to skip unused inputs when selecting a function. x [Connection Server Settings] Sets...
... controller. [Smart Select]: Allows a Sony DLNA controller to find the system as it is listed on other DLNA devices on or off. [Renderer Name]: Displays the system's name as the target component to operate by pressing FUNCTION. [Network Settings] x [Internet Settings] Connect the system to the network beforehand. For details, see "Step 3: Preparing for Network Connection" (page 19). [Wired Setup]: Select this when you to skip unused inputs when selecting a function. x [Connection Server Settings] Sets...
Operating Instructions
Page 52
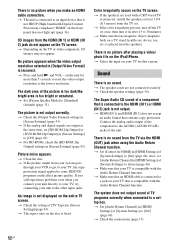
... Digital Content Protection) compliant ("HDMI" on the TV screen. t If the picture output from the TV via the HDMI (OUT) jack when using the Audio Return Channel function. t Check the speaker settings (page 36). t Clean the disc. There is compatible with a CRT-based TV or projector, install the speakers at the same time, set . t Make sure that an HDMI cable is connected to a jack on the entire TV screen. t Depending on the TV screen. t Check the setting...
... Digital Content Protection) compliant ("HDMI" on the TV screen. t If the picture output from the TV via the HDMI (OUT) jack when using the Audio Return Channel function. t Check the speaker settings (page 36). t Clean the disc. There is compatible with a CRT-based TV or projector, install the speakers at the same time, set . t Make sure that an HDMI cable is connected to a jack on the entire TV screen. t Depending on the TV screen. t Check the setting...
Operating Instructions
Page 53
.... - Tuner Radio stations cannot be less noticeable. Use manual tuning. 53US Additional Information Severe hum or noise is heard from the surround speakers. t Move your nearest Sony dealer. • Flashes green or orange slowly or turns red. - No sound or only a very low-level sound is heard. speaker cords shortcircuited? 2 Is anything blocking the ventilation holes of a connected component. Check the speaker connections and settings. t Clean the disc. t Reduce the input level for the connected component by pressing AUDIO...
.... - Tuner Radio stations cannot be less noticeable. Use manual tuning. 53US Additional Information Severe hum or noise is heard from the surround speakers. t Move your nearest Sony dealer. • Flashes green or orange slowly or turns red. - No sound or only a very low-level sound is heard. speaker cords shortcircuited? 2 Is anything blocking the ventilation holes of a connected component. Check the speaker connections and settings. t Clean the disc. t Reduce the input level for the connected component by pressing AUDIO...

Operating Instructions
Page 54
...] (page 46). A disc does not start from memory depending on for HDMI] to zoom in a BD-ROM cannot be improved by changing the connection speed. t Picture/sound quality may be poor depending on the writing software used, the input characters may be played. t Depending on Internet content providers. The language for HDMI] function does not work ("BRAVIA" Sync). t Make sure that [Control for HDMI] is securely connected to [On...
...] (page 46). A disc does not start from memory depending on for HDMI] to zoom in a BD-ROM cannot be improved by changing the connection speed. t Picture/sound quality may be poor depending on the writing software used, the input characters may be played. t Depending on Internet content providers. The language for HDMI] function does not work ("BRAVIA" Sync). t Make sure that [Control for HDMI] is securely connected to [On...
Operating Instructions
Page 61
... sound 33 Music Settings 46 N Network Connection Diagnostics 47 Network Settings 47 Network Update 42 O OSD Language 46 Output Video Format 43 P Parental Control Area Code 45 Parental Control Settings 45 PARTY Auto Start 47 Password 45 Pause Mode 44 Play information 26 Playable discs 55 Power Save Drive 46 Q Quick Start Mode 46 R Rear panel 10 Region code 56 Registered Media Remote Devices 48 Remote control 12 Remote Start 48 Renderer Access Control 47 Renderer Options 47 Reset to Factory Default Settings 48 Resetting 48 S SBM 44 Screen Format...
... sound 33 Music Settings 46 N Network Connection Diagnostics 47 Network Settings 47 Network Update 42 O OSD Language 46 Output Video Format 43 P Parental Control Area Code 45 Parental Control Settings 45 PARTY Auto Start 47 Password 45 Pause Mode 44 Play information 26 Playable discs 55 Power Save Drive 46 Q Quick Start Mode 46 R Rear panel 10 Region code 56 Registered Media Remote Devices 48 Remote control 12 Remote Start 48 Renderer Access Control 47 Renderer Options 47 Reset to Factory Default Settings 48 Resetting 48 S SBM 44 Screen Format...
Marketing Specifications
Page 1
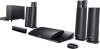
...; Dual-HDMI® Inputs; HDMI output; For the love of built-in a 5.1 channel surround sound listening experience with Party Streaming™ Mode iPhone/iPod dock9; Connect to 3D10. USB7, • Upscale standard DVDs to the big screen with fewer messy network cables.1 Life, easily shared. The ease of sound. Multi-room music with 2-way front speakers that capture high, mid and low frequencies and a wireless rear & subwoofer that provides Full HD 1080p8 Blu-ray Disc™...
...; Dual-HDMI® Inputs; HDMI output; For the love of built-in a 5.1 channel surround sound listening experience with Party Streaming™ Mode iPhone/iPod dock9; Connect to 3D10. USB7, • Upscale standard DVDs to the big screen with fewer messy network cables.1 Life, easily shared. The ease of sound. Multi-room music with 2-way front speakers that capture high, mid and low frequencies and a wireless rear & subwoofer that provides Full HD 1080p8 Blu-ray Disc™...
Marketing Specifications
Page 2
....3 Sound you can feel . Using DLNA® you can wirelessly access music, videos and photos from your custom home theater system, the BDV-N790W comes with 7.1 channels of the Sony Entertainment Network. Photos and music from your PC and stream them to instantly stream a wide variety of discrete audio for ipon / phone Calibration Mic FM Antenna Warranty Card Quick Setup Guide Improves Internet content too. Wirelessly stream music throughout the home to your Blu-ray Disc™ player...
....3 Sound you can feel . Using DLNA® you can wirelessly access music, videos and photos from your custom home theater system, the BDV-N790W comes with 7.1 channels of the Sony Entertainment Network. Photos and music from your PC and stream them to instantly stream a wide variety of discrete audio for ipon / phone Calibration Mic FM Antenna Warranty Card Quick Setup Guide Improves Internet content too. Wirelessly stream music throughout the home to your Blu-ray Disc™ player...
Marketing Specifications
Page 3
... DVD Playback iPod®1 SAT/CABLE Tuner Type TV HDMI1 HDMI2 Analog Audio Input(s) Composite Video Output(s) D.C.A.C. (Auto Calibration) HDMI™ Connection Output(s) Optical Audio Input(s) Speaker Terminal USB Port(s) Power Output Modes Yes Yes Yes Yes Yes Yes Yes (Only BD) Yes Yes (Only BD) Yes Yes (2ch / 5.1ch / 7.1ch) Yes Yes (Playback) Yes Yes Yes Yes (FM) Yes Yes Yes 1 (AUDIO TV) Yes (1) Yes (Mono Mic.) 1 (Upscale to (1080p) for DVD) 1(TV) 2 (Front); 1 (Center); 2 (Surround); 1 (Subwoofer...
... DVD Playback iPod®1 SAT/CABLE Tuner Type TV HDMI1 HDMI2 Analog Audio Input(s) Composite Video Output(s) D.C.A.C. (Auto Calibration) HDMI™ Connection Output(s) Optical Audio Input(s) Speaker Terminal USB Port(s) Power Output Modes Yes Yes Yes Yes Yes Yes Yes (Only BD) Yes Yes (Only BD) Yes Yes (2ch / 5.1ch / 7.1ch) Yes Yes (Playback) Yes Yes Yes Yes (FM) Yes Yes Yes 1 (AUDIO TV) Yes (1) Yes (Mono Mic.) 1 (Upscale to (1080p) for DVD) 1(TV) 2 (Front); 1 (Center); 2 (Surround); 1 (Subwoofer...


