Operating Instructions
Page 3
... grounded cables and connectors must not be co-located or operated in this equipment. Increase the separation between the equipment and receiver. - Connect the equipment into an outlet on the RF transmitter, which can radiate radio frequency energy and, if not installed and used for help. CAUTION You are cautioned that may cause harmful interference to Part 15 of the surround amplifier. These...
... grounded cables and connectors must not be co-located or operated in this equipment. Increase the separation between the equipment and receiver. - Connect the equipment into an outlet on the RF transmitter, which can radiate radio frequency energy and, if not installed and used for help. CAUTION You are cautioned that may cause harmful interference to Part 15 of the surround amplifier. These...
Operating Instructions
Page 5
... years old) is subject to person. Blu-ray Disc/DVD receiver (HBD-N9200W/HBD-N7200W/ HBD-N5200W) Surround amplifier (TA-SA700WR/TA-SA500WR) This device complies with this device must decide what works best. You must accept any discomfort, you believe necessary. Copy Protection • Please be installed and operated keeping the radiator at http://www.cinavia.com. Box 86851, San Diego, CA, 92138...
... years old) is subject to person. Blu-ray Disc/DVD receiver (HBD-N9200W/HBD-N7200W/ HBD-N5200W) Surround amplifier (TA-SA700WR/TA-SA500WR) This device complies with this device must decide what works best. You must accept any discomfort, you believe necessary. Copy Protection • Please be installed and operated keeping the radiator at http://www.cinavia.com. Box 86851, San Diego, CA, 92138...
Operating Instructions
Page 10
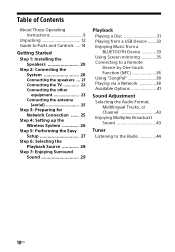
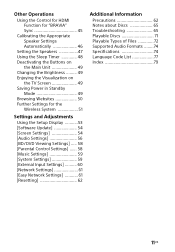
... for Network Connection ...... 25 Step 4: Setting up the Wireless System 26 Step 5: Performing the Easy Setup 27 Step 6: Selecting the Playback Source 28 Step 7: Enjoying Surround Sound 29 Playback Playing a Disc 31 Playing from a USB Device ....... 33 Enjoying Music from a BLUETOOTH Device 33 Using Screen mirroring 35 Connecting to a Remote Device by One-touch Function (NFC 36 Using "SongPal 38 Playing via a Network 38 Available Options 41 Sound Adjustment Selecting the Audio Format, Multilingual Tracks, or Channel 43 Enjoying...
... for Network Connection ...... 25 Step 4: Setting up the Wireless System 26 Step 5: Performing the Easy Setup 27 Step 6: Selecting the Playback Source 28 Step 7: Enjoying Surround Sound 29 Playback Playing a Disc 31 Playing from a USB Device ....... 33 Enjoying Music from a BLUETOOTH Device 33 Using Screen mirroring 35 Connecting to a Remote Device by One-touch Function (NFC 36 Using "SongPal 38 Playing via a Network 38 Available Options 41 Sound Adjustment Selecting the Audio Format, Multilingual Tracks, or Channel 43 Enjoying...
Operating Instructions
Page 11
... Operations Using the Control for HDMI Function for "BRAVIA" Sync 45 Calibrating the Appropriate Speaker Settings Automatically 46 Setting the Speakers 47 Using the Sleep Timer 48 Deactivating the Buttons on the Main Unit 49 Changing the Brightness ......... 49 Enjoying the Visualization on the TV Screen 49 Saving Power in Standby Mode 49 Browsing Websites 50 Further Settings for the Wireless System 51 Settings and Adjustments Using the Setup Display ...........53 [Software Update 54 [Screen Settings 54 [Audio Settings 56 [BD/DVD Viewing Settings...
... Operations Using the Control for HDMI Function for "BRAVIA" Sync 45 Calibrating the Appropriate Speaker Settings Automatically 46 Setting the Speakers 47 Using the Sleep Timer 48 Deactivating the Buttons on the Main Unit 49 Changing the Brightness ......... 49 Enjoying the Visualization on the TV Screen 49 Saving Power in Standby Mode 49 Browsing Websites 50 Further Settings for the Wireless System 51 Settings and Adjustments Using the Setup Display ...........53 [Software Update 54 [Screen Settings 54 [Audio Settings 56 [BD/DVD Viewing Settings...
Operating Instructions
Page 15
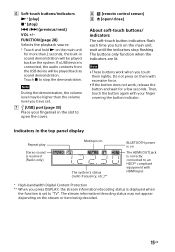
...) VOL +/- G (USB) port (page 33) Place your finger covering the button indicator. F Soft-touch buttons/indicators N* (play Stereo sound is received (Radio only) Muting is on The system's status (radio frequency, etc.)** BLUETOOTH power is on The HDMI (OUT) jack is correctly connected to an HDCP* compliant equipment with HDMI input * High-bandwidth Digital Content Protection ** When you press DISPLAY, the stream information/decoding status is displayed when the function is connected, the audio contents...
...) VOL +/- G (USB) port (page 33) Place your finger covering the button indicator. F Soft-touch buttons/indicators N* (play Stereo sound is received (Radio only) Muting is on The system's status (radio frequency, etc.)** BLUETOOTH power is on The HDMI (OUT) jack is correctly connected to an HDCP* compliant equipment with HDMI input * High-bandwidth Digital Content Protection ** When you press DISPLAY, the stream information/decoding status is displayed when the function is connected, the audio contents...
Operating Instructions
Page 18
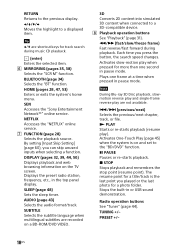
... Accesses the "Sony Entertainment Network™" online service. Plays one second in pause mode. Note During Blu-ray 3D Disc playback, slowmotion reverse play and single-frame reverse play ). m/M (fast/slow/freeze frame) Fast reverse/fast forward during music CD playback. (enter) Enters the selected item. Radio operation buttons See "Tuner" (page 44). B/V/v/b Moves the highlight to the previous display. G FUNCTION (page 28) Selects the playback source. SUBTITLE Selects the subtitle language...
... Accesses the "Sony Entertainment Network™" online service. Plays one second in pause mode. Note During Blu-ray 3D Disc playback, slowmotion reverse play and single-frame reverse play ). m/M (fast/slow/freeze frame) Fast reverse/fast forward during music CD playback. (enter) Enters the selected item. Radio operation buttons See "Tuner" (page 44). B/V/v/b Moves the highlight to the previous display. G FUNCTION (page 28) Selects the playback source. SUBTITLE Selects the subtitle language...
Operating Instructions
Page 28
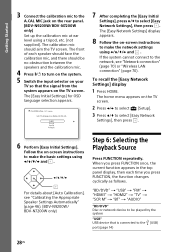
... Settings], press V/v to select [Easy Network Settings], then press . 6 Perform [Easy Initial Settings]. The home menu appears on the TV screen. 2 Press B/b to select [Setup]. 3 Press V/v to select [Easy Network Settings], then press . "BD/DVD" t "USB" t "FM" t "HDMI1" t "HDMI2" t "TV" t "SCR M" t "BT" t "AUDIO" "BD/DVD" Disc or network device to be no obstruction between the speakers and the calibration mic. 4 Press [/1 to the A.CAL MIC jack on the rear panel. (BDV-N9200W/BDV-N7200W only) Set up the calibration mic at ear level using...
... Settings], press V/v to select [Easy Network Settings], then press . 6 Perform [Easy Initial Settings]. The home menu appears on the TV screen. 2 Press B/b to select [Setup]. 3 Press V/v to select [Easy Network Settings], then press . "BD/DVD" t "USB" t "FM" t "HDMI1" t "HDMI2" t "TV" t "SCR M" t "BT" t "AUDIO" "BD/DVD" Disc or network device to be no obstruction between the speakers and the calibration mic. 4 Press [/1 to the A.CAL MIC jack on the rear panel. (BDV-N9200W/BDV-N7200W only) Set up the calibration mic at ear level using...
Operating Instructions
Page 29
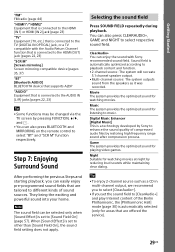
... Audio Return Channel function that is connected to the HDMI (OUT) jack (pages 22, 23) "SCR M" [Screen mirroring] Screen mirroring-compatible device (pages 35, 37) "BT" [Bluetooth AUDIO] BLUETOOTH device that supports A2DP "AUDIO" Equipment that is connected to the AUDIO IN (L/R) jacks (pages 22, 23) Tip • Some functions may be selected only when [Sound Effect] is set the sound field to playback content and function. • 2-channel source: The system will recreate 5.1 channel speaker output. • Multi-channel source...
... Audio Return Channel function that is connected to the HDMI (OUT) jack (pages 22, 23) "SCR M" [Screen mirroring] Screen mirroring-compatible device (pages 35, 37) "BT" [Bluetooth AUDIO] BLUETOOTH device that supports A2DP "AUDIO" Equipment that is connected to the AUDIO IN (L/R) jacks (pages 22, 23) Tip • Some functions may be selected only when [Sound Effect] is set the sound field to playback content and function. • 2-channel source: The system will recreate 5.1 channel speaker output. • Multi-channel source...
Operating Instructions
Page 45
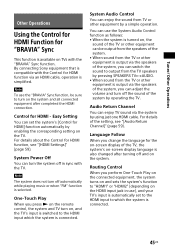
... Power Off You can set to the HDMI input to which the system is connected. Note The system does not turn off the sound of the system by a simple operation. Easy Setting You can turn on, and the TV's input is switched to "HDMI1" or "HDMI2" (depending on the HDMI input jack in sync with the "BRAVIA" Sync function. For details about the Control for HDMI] function automatically by using just one HDMI cable...
... Power Off You can set to the HDMI input to which the system is connected. Note The system does not turn off the sound of the system by a simple operation. Easy Setting You can turn on, and the TV's input is switched to "HDMI1" or "HDMI2" (depending on the HDMI input jack in sync with the "BRAVIA" Sync function. For details about the Control for HDMI] function automatically by using just one HDMI cable...
Operating Instructions
Page 46
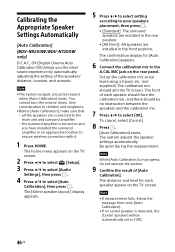
... A.CAL MIC jack on the TV screen. 2 Press B/b to select [Setup]. 3 Press V/v to select [Audio Settings], then press . 4 Press V/v to the main unit and surround amplifier. - The home menu appears on the rear panel. The calibration mic should be automatically set to ensure wireless connection with it. 1 Press HOME. Be quiet during the measurement. Calibrating the Appropriate Speaker Settings Automatically [Auto Calibration] (BDV-N9200W/BDV-N7200W only) D.C.A.C. You cannot turn the volume down. DX (Digital Cinema Auto Calibration DX) brings you have installed the surround...
... A.CAL MIC jack on the TV screen. 2 Press B/b to select [Setup]. 3 Press V/v to select [Audio Settings], then press . 4 Press V/v to the main unit and surround amplifier. - The home menu appears on the rear panel. The calibration mic should be automatically set to ensure wireless connection with it. 1 Press HOME. Be quiet during the measurement. Calibrating the Appropriate Speaker Settings Automatically [Auto Calibration] (BDV-N9200W/BDV-N7200W only) D.C.A.C. You cannot turn the volume down. DX (Digital Cinema Auto Calibration DX) brings you have installed the surround...
Operating Instructions
Page 48
... 3 to select [Off], then press . This setting is only available when [Center Speaker] is set to [On]. [Surround Left/Right] 0.0 dB: Set the surround speaker level. [Subwoofer] 0.0 dB: Set the subwoofer level. Note • The test tone signals are not output from the HDMI (OUT) jack. • The test tone is not emitted from the center speaker if [Center Speaker] is less than 2 minutes, "SLEEP" flashes in the top panel display changes by [Auto Calibration]. [Off]: You can adjust the sound level of the speakers. When...
... 3 to select [Off], then press . This setting is only available when [Center Speaker] is set to [On]. [Surround Left/Right] 0.0 dB: Set the surround speaker level. [Subwoofer] 0.0 dB: Set the subwoofer level. Note • The test tone signals are not output from the HDMI (OUT) jack. • The test tone is not emitted from the center speaker if [Center Speaker] is less than 2 minutes, "SLEEP" flashes in the top panel display changes by [Auto Calibration]. [Off]: You can adjust the sound level of the speakers. When...
Operating Instructions
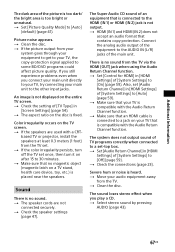
Page 53
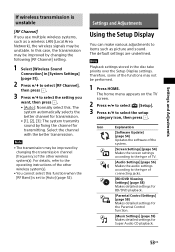
... Control Settings] (page 58) Makes detailed settings for the Parental Control function. [Music Settings] (page 59) Makes detailed settings for transmitting. Icon Explanation [Software Update] (page 54) Updates the software of the system. [Screen Settings] (page 54) Makes the screen settings according to the type of TV. [Audio Settings] (page 56) Makes the audio settings according to the type of the functions may be improved by changing the following [RF Channel] setting. 1 Select [Wireless Sound Connection] in the disc take priority over the Setup Display settings...
... Control Settings] (page 58) Makes detailed settings for the Parental Control function. [Music Settings] (page 59) Makes detailed settings for transmitting. Icon Explanation [Software Update] (page 54) Updates the software of the system. [Screen Settings] (page 54) Makes the screen settings according to the type of TV. [Audio Settings] (page 56) Makes the audio settings according to the type of the functions may be improved by changing the following [RF Channel] setting. 1 Select [Wireless Sound Connection] in the disc take priority over the Setup Display settings...

Operating Instructions
Page 56
... range of video signals output from the HDMI (OUT) jack. [Off]: Select this . This setting does not work for Internet content. x [Pause Mode] [Auto]: Normally select this when outputting distorted video signals or unnatural color. x [4K Output] [Auto1]: Outputs 2K (1920 × 1080) video signals during video playback and 4K video signals during photo play when connecting to a non-Sony 4K-compatible equipment. x [IP Content NR Pro] [Video3]/[Video2]/[Video1]/ [Film1]/[Film2]/[Film3]: Adjusts the video quality for...
... range of video signals output from the HDMI (OUT) jack. [Off]: Select this . This setting does not work for Internet content. x [Pause Mode] [Auto]: Normally select this when outputting distorted video signals or unnatural color. x [4K Output] [Auto1]: Outputs 2K (1920 × 1080) video signals during video playback and 4K video signals during photo play when connecting to a non-Sony 4K-compatible equipment. x [IP Content NR Pro] [Video3]/[Video2]/[Video1]/ [Film1]/[Film2]/[Film3]: Adjusts the video quality for...
Operating Instructions
Page 57
...) (Dolby Pro Logic decoding). [DTS Neo:6 Cinema]/[DTS Neo:6 Music]: The system simulates surround sound from 2-channel sources and produces multi-channel sound (DTS Neo:6 Cinema/DTS Neo:6 Music mode decoding). [2ch Stereo]: This system outputs the sound from the HDMI (OUT) jack only. Multi-channel surround formats are disabled. Note When [Control for HDMI] is set to [On] (page 59), [Audio Output] is output. [Speaker]: Outputs multi-channel sound from the system's speakers only. [Speaker + HDMI]: Outputs multichannel sound from the system's speakers and 2-channel linear PCM signals...
...) (Dolby Pro Logic decoding). [DTS Neo:6 Cinema]/[DTS Neo:6 Music]: The system simulates surround sound from 2-channel sources and produces multi-channel sound (DTS Neo:6 Cinema/DTS Neo:6 Music mode decoding). [2ch Stereo]: This system outputs the sound from the HDMI (OUT) jack only. Multi-channel surround formats are disabled. Note When [Control for HDMI] is set to [On] (page 59), [Audio Output] is output. [Speaker]: Outputs multi-channel sound from the system's speakers only. [Speaker + HDMI]: Outputs multichannel sound from the system's speakers and 2-channel linear PCM signals...

Operating Instructions
Page 59
... change the text display. x [HDMI Settings] [Control for the wireless system. x [Closed Captions Settings] (USA model only) You can set to [On]. [Auto]: The system can receive the digital audio signal of Closed Captions (CC) that displays on -screen display. x [NFC] [On]: Turns on NFC function to the right of font's edge. [Edge Color]: Sets the edge's color. Settings and Adjustments [Music Settings] x [Super Audio CD Playback Layer] [Super Audio CD]: Plays the Super Audio CD layer. [CD]: Plays...
... change the text display. x [HDMI Settings] [Control for the wireless system. x [Closed Captions Settings] (USA model only) You can set to [On]. [Auto]: The system can receive the digital audio signal of Closed Captions (CC) that displays on -screen display. x [NFC] [On]: Turns on NFC function to the right of font's edge. [Edge Color]: Sets the edge's color. Settings and Adjustments [Music Settings] x [Super Audio CD Playback Layer] [Super Audio CD]: Plays the Super Audio CD layer. [CD]: Plays...

Operating Instructions
Page 61
... a device linked via network. [Easy Network Settings] Runs [Easy Network Settings] to make the connection directly from the BLUETOOTH device even though you connect to a broadband router using a LAN cable. Tip For further details, visit the following website and check the FAQ: http://www.sony.com/blurayhtsupport/ x [Registered Remote Devices] Displays a list of the system for Network Connection" (page 25). [Wired Setup]: Select this case, press BLUETOOTH. A paired BLUETOOTH device can always...
... a device linked via network. [Easy Network Settings] Runs [Easy Network Settings] to make the connection directly from the BLUETOOTH device even though you connect to a broadband router using a LAN cable. Tip For further details, visit the following website and check the FAQ: http://www.sony.com/blurayhtsupport/ x [Registered Remote Devices] Displays a list of the system for Network Connection" (page 25). [Wired Setup]: Select this case, press BLUETOOTH. A paired BLUETOOTH device can always...
Operating Instructions
Page 66
... on the TV screen. "LOCKED" flashes in the top panel display when you make an HDMI cable connection. t Contact your system (page 22). t Contact your nearest Sony dealer or local authorized Sony service facility. Picture There is not output correctly. t For BD-ROMs, check the [BD-ROM 24p Output] settings in the top panel display. "PRTECT", "PUSH" and "POWER" appear alternately in the top panel does not light up) (page 22...
... on the TV screen. "LOCKED" flashes in the top panel display when you make an HDMI cable connection. t Contact your system (page 22). t Contact your nearest Sony dealer or local authorized Sony service facility. Picture There is not output correctly. t For BD-ROMs, check the [BD-ROM 24p Output] settings in the top panel display. "PRTECT", "PUSH" and "POWER" appear alternately in the top panel does not light up) (page 22...
Operating Instructions
Page 67
t Set [Picture Quality Mode] to a set [Audio Return Channel] in [HDMI Settings] of the main unit. t Clean the disc. t Set [Control for HDMI] in [HDMI Settings] of TV programs correctly when connected to [Auto] (default) (page 41). The system does not output sound of [System Settings] to [Auto] (page 59). t Check the connections (page 23). t Move your TV is compatible with the Audio Return Channel function. t Make sure that is placed near the speakers. Also, set -top box. The sound loses stereo effect when...
t Set [Picture Quality Mode] to a set [Audio Return Channel] in [HDMI Settings] of the main unit. t Clean the disc. t Set [Control for HDMI] in [HDMI Settings] of TV programs correctly when connected to [Auto] (default) (page 41). The system does not output sound of [System Settings] to [Auto] (page 59). t Check the connections (page 23). t Move your TV is compatible with the Audio Return Channel function. t Make sure that is placed near the speakers. Also, set -top box. The sound loses stereo effect when...

Operating Instructions
Page 70
.... t Picture/sound quality may change automatically if you change the wireless settings of at least 2.5 Mbps for standarddefinition video and 10 Mbps for HDMI] function does not work ("BRAVIA" Sync). t Not all videos contain sound. t If you use a 2.4 GHz frequency band, such as a microwave, BLUETOOTH, or digital cordless device, may be improved by changing the connection speed. In this case, change the HDMI connection, turn off and on the usage environment, including the wall...
.... t Picture/sound quality may change automatically if you change the wireless settings of at least 2.5 Mbps for standarddefinition video and 10 Mbps for HDMI] function does not work ("BRAVIA" Sync). t Not all videos contain sound. t If you use a 2.4 GHz frequency band, such as a microwave, BLUETOOTH, or digital cordless device, may be improved by changing the connection speed. In this case, change the HDMI connection, turn off and on the usage environment, including the wall...
Operating Instructions
Page 80
... Code 58 Parental Control Settings 58 Password 58 Pause Mode 56 Play information 32 Playable discs 71 Power Save Drive 60 Q Quick Start Mode 60 R Rear panel 16 Region code 72 Registered Remote Devices 61 Remote control 17 Remote Start 61 Renderer Access Control 61 Reset to Factory Default Settings 62 Resetting 62 S SBM 56 Screen Format 55 Screen mirroring 35, 37 Screen Saver 60 Screen Settings 54 SLEEP 48 Slideshow 42 Software License Information 60 Software Update 54 SongPal 38 Sound Effect 57 Speaker Settings...
... Code 58 Parental Control Settings 58 Password 58 Pause Mode 56 Play information 32 Playable discs 71 Power Save Drive 60 Q Quick Start Mode 60 R Rear panel 16 Region code 72 Registered Remote Devices 61 Remote control 17 Remote Start 61 Renderer Access Control 61 Reset to Factory Default Settings 62 Resetting 62 S SBM 56 Screen Format 55 Screen mirroring 35, 37 Screen Saver 60 Screen Settings 54 SLEEP 48 Slideshow 42 Software License Information 60 Software Update 54 SongPal 38 Sound Effect 57 Speaker Settings...


