Operating Instructions
Page 5
... operating instructions refer only to when the surround amplifier or S-AIR receiver is compatible with the system: • Surround amplifier (supplied): You can enjoy surround speaker sound wirelessly. • Surround back amplifier (optional): You can enjoy surround back...
... operating instructions refer only to when the surround amplifier or S-AIR receiver is compatible with the system: • Surround amplifier (supplied): You can enjoy surround speaker sound wirelessly. • Surround back amplifier (optional): You can enjoy surround back...

Operating Instructions
Page 6
... of Contents About This Operating Instructions.......... 4 About the S-AIR function 5 Index to Parts and Control 7 Getting Started Step 1: Assembling the Speakers 18 Step 2: Positioning the System ...28 Step 3: Connecting the System ...43 Step 4: Setting up the Wireless System 58 Step 5: Performing... 89 Other Operations Using the Control for HDMI Function for "BRAVIA" Sync 95 Calibrating the Appropriate Settings Automatically 98 Setting the Speakers 100 Controlling the TV or Other Components with the Supplied Remote 101 Using the Sound Effect 105 Using the Sleep Timer 106 Deactivating...
... of Contents About This Operating Instructions.......... 4 About the S-AIR function 5 Index to Parts and Control 7 Getting Started Step 1: Assembling the Speakers 18 Step 2: Positioning the System ...28 Step 3: Connecting the System ...43 Step 4: Setting up the Wireless System 58 Step 5: Performing... 89 Other Operations Using the Control for HDMI Function for "BRAVIA" Sync 95 Calibrating the Appropriate Settings Automatically 98 Setting the Speakers 100 Controlling the TV or Other Components with the Supplied Remote 101 Using the Sound Effect 105 Using the Sleep Timer 106 Deactivating...

Operating Instructions
Page 13
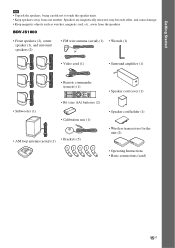
Surround amplifier Front panel POWER POWER/ON LINE PHONES Rear panel EZW-RT10 S-AIR ID A B C PAIRING SPEAKER L SURROUND SELECTOR R SURROUND SURROUND BACK A PHONES jack (58) B POWER (ON/OFF) (58, 92) C POWER / ON LINE indicator (58, 89) D PAIRING indicator (92) E PAIRING (92) F Wireless transceiver (EZW-RT10) slot (54) G S-AIR ID switch (58, 89) H SPEAKER L jack (45) I SPEAKER R jack (45) J SURROUND SELECTOR switch (58, 92) 13US
Surround amplifier Front panel POWER POWER/ON LINE PHONES Rear panel EZW-RT10 S-AIR ID A B C PAIRING SPEAKER L SURROUND SELECTOR R SURROUND SURROUND BACK A PHONES jack (58) B POWER (ON/OFF) (58, 92) C POWER / ON LINE indicator (58, 89) D PAIRING indicator (92) E PAIRING (92) F Wireless transceiver (EZW-RT10) slot (54) G S-AIR ID switch (58, 89) H SPEAKER L jack (45) I SPEAKER R jack (45) J SURROUND SELECTOR switch (58, 92) 13US

Operating Instructions
Page 14
Getting Started Getting Started Unpacking BDV-IT1000ES • Front speakers (2) • Foot pads (thick 2, thin 2) • Video cord (1) • Surround speakers (2) • Center speaker (1) • Subwoofer (1) • Desktop stands (4) • Wall mounting brackets (top) (5) • Remote commander (remote) (1) • Wall mounting brackets (bottom) (5) • Bracket covers (10) • Screws (5) &#...
Getting Started Getting Started Unpacking BDV-IT1000ES • Front speakers (2) • Foot pads (thick 2, thin 2) • Video cord (1) • Surround speakers (2) • Center speaker (1) • Subwoofer (1) • Desktop stands (4) • Wall mounting brackets (top) (5) • Remote commander (remote) (1) • Wall mounting brackets (bottom) (5) • Bracket covers (10) • Screws (5) &#...
Operating Instructions
Page 15
...; Keep magnetic objects such as watches, magnetic card, etc., away from one another. BDV-IS1000 • Front speakers (2), center speaker (1), and surround speakers (2) • FM wire antenna (aerial) (1) • Wrench (1) or • Video cord (1) • Surround amplifier (1) • Remote commander (remote) (1) • Speaker cord cover (1) • Subwoofer (1) • R6 (size AA) batteries (2) • Calibration mic...
...; Keep magnetic objects such as watches, magnetic card, etc., away from one another. BDV-IS1000 • Front speakers (2), center speaker (1), and surround speakers (2) • FM wire antenna (aerial) (1) • Wrench (1) or • Video cord (1) • Surround amplifier (1) • Remote commander (remote) (1) • Speaker cord cover (1) • Subwoofer (1) • R6 (size AA) batteries (2) • Calibration mic...
Operating Instructions
Page 17
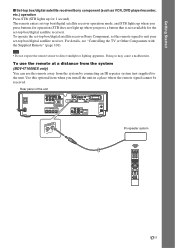
... S-VIDEO Y PB / CB PR / CR SAT/CABLE COMPONENT VIDEO IN DC5V 500mA MAX EXTERNAL FRONT R SPEAKER FRONT L CENTER WOOFER HDMI IR REMOTE TV OPTICAL SAT/CABLE DIGITAL IN OUT IN IN 1 IN 2 COAXIAL... -top box/digital satellite receiver). To use the remote at a distance from the system (BDV-IT1000ES only) You can use the remote away from the system by connecting an IR repeater system ... with the Supplied Remote" (page 101). Getting Started x Set-top box/digital satellite receiver/Sony component (such as VCR, DVD player/recorder, etc.) operation Press STB (STB lights up when...
... S-VIDEO Y PB / CB PR / CR SAT/CABLE COMPONENT VIDEO IN DC5V 500mA MAX EXTERNAL FRONT R SPEAKER FRONT L CENTER WOOFER HDMI IR REMOTE TV OPTICAL SAT/CABLE DIGITAL IN OUT IN IN 1 IN 2 COAXIAL... -top box/digital satellite receiver). To use the remote at a distance from the system (BDV-IT1000ES only) You can use the remote away from the system by connecting an IR repeater system ... with the Supplied Remote" (page 101). Getting Started x Set-top box/digital satellite receiver/Sony component (such as VCR, DVD player/recorder, etc.) operation Press STB (STB lights up when...
Operating Instructions
Page 18
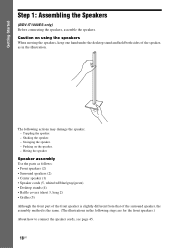
..., see page 45. 18US Toppling the speaker. - Shaking the speaker. - Swinging the speaker. - Getting Started Step 1: Assembling the Speakers (BDV-IT1000ES only) Before connecting the speakers, assemble the speakers. Hitting the speaker Speaker assembly Use the parts as in the following actions may damage the speaker. - Pushing on using the speakers When moving the speakers, keep one hand under the desktop stand and...
..., see page 45. 18US Toppling the speaker. - Shaking the speaker. - Swinging the speaker. - Getting Started Step 1: Assembling the Speakers (BDV-IT1000ES only) Before connecting the speakers, assemble the speakers. Hitting the speaker Speaker assembly Use the parts as in the following actions may damage the speaker. - Pushing on using the speakers When moving the speakers, keep one hand under the desktop stand and...

Operating Instructions
Page 19
... to attach the desktop stand to identify the speakers Check the label on the speaker. • Front left speaker (L): FRONT L (white) • Front right speaker (R): FRONT R (red) • Surround left speaker (L): SUR L (blue) • Surround right speaker (R): SUR R (gray) • Center speaker: CENTER (green) Front and surround speakers 1 Thread the speaker cord through the hole in the bottom of...
... to attach the desktop stand to identify the speakers Check the label on the speaker. • Front left speaker (L): FRONT L (white) • Front right speaker (R): FRONT R (red) • Surround left speaker (L): SUR L (blue) • Surround right speaker (R): SUR R (gray) • Center speaker: CENTER (green) Front and surround speakers 1 Thread the speaker cord through the hole in the bottom of...

Operating Instructions
Page 20
Be sure not to touch the speaker unit. 20US The removed screw is used when attaching the desktop stand. Getting Started 2 Remove the screw from the speaker. Screw Front speaker Surround speaker Note • When assembling, take care not to lose the screw.
Be sure not to touch the speaker unit. 20US The removed screw is used when attaching the desktop stand. Getting Started 2 Remove the screw from the speaker. Screw Front speaker Surround speaker Note • When assembling, take care not to lose the screw.

Operating Instructions
Page 21
... removing the speaker cords from the speaker terminals, pull out the speaker cords while pressing the white button on the speakers: the speaker cord with a tool such as a flathead screwdriver. 21US Do not catch the speaker cord insulation in the speaker terminals. Use the speaker cords as they will go. Surround speaker Insert the speaker cords into the speaker terminal of...
... removing the speaker cords from the speaker terminals, pull out the speaker cords while pressing the white button on the speakers: the speaker cord with a tool such as a flathead screwdriver. 21US Do not catch the speaker cord insulation in the speaker terminals. Use the speaker cords as they will go. Surround speaker Insert the speaker cords into the speaker terminal of...

Operating Instructions
Page 22
... Slot Note • When assembling, take care not to touch the speaker unit. 5 Take up slack in Step 2. Speaker cord Bottom of the cord. Secure the speaker with the orientation of the desktop stand and secure the speaker cord by running it through the slot. Be careful with the screw ...removed in the speaker cord by pulling from the bottom of the desktop stand and speaker. Screw Note • When assembling, take care not to the desktop stand....
... Slot Note • When assembling, take care not to touch the speaker unit. 5 Take up slack in Step 2. Speaker cord Bottom of the cord. Secure the speaker with the orientation of the desktop stand and secure the speaker cord by running it through the slot. Be careful with the screw ...removed in the speaker cord by pulling from the bottom of the desktop stand and speaker. Screw Note • When assembling, take care not to the desktop stand....

Operating Instructions
Page 23
...assembling, take care not to touch the speaker units. • Be sure to use the speakers with the orientation of the baffle cover over the pin(s), then press down to the speaker. Front speaker Surround speaker Grille Grille "SONY" mark "SONY" mark Note • When assembling, take... care not to touch the speaker units. 7 Attach the grille to flush fit the speaker front. It may cause damage to the speaker. Be careful with their ...
...assembling, take care not to touch the speaker units. • Be sure to use the speakers with the orientation of the baffle cover over the pin(s), then press down to the speaker. Front speaker Surround speaker Grille Grille "SONY" mark "SONY" mark Note • When assembling, take... care not to touch the speaker units. 7 Attach the grille to flush fit the speaker front. It may cause damage to the speaker. Be careful with their ...

Operating Instructions
Page 24
...assembling, take care not to touch the speaker units. To replace the cover, see Step 3. Be sure to match the speaker cords to #. Be sure not to the speaker. Do not catch the speaker cord insulation in the cover. Check the polarity on the speakers: the speaker cord with the color tube to 3,... and the speaker cord without the color tube to the appropriate terminals...
...assembling, take care not to touch the speaker units. To replace the cover, see Step 3. Be sure to match the speaker cords to #. Be sure not to the speaker. Do not catch the speaker cord insulation in the cover. Check the polarity on the speakers: the speaker cord with the color tube to 3,... and the speaker cord without the color tube to the appropriate terminals...

Operating Instructions
Page 25
Center speaker Slot Cover , Speaker cords 4 Attach the baffle cover to flush fit the speaker front. , Baffle cover (short) 25US Use the baffle cover (short). Press the ends of the baffle cover over the pin, then press down to the speaker. Getting Started 3 Secure the speaker cord by running it through the slot, then attach the cover to the speaker.
Center speaker Slot Cover , Speaker cords 4 Attach the baffle cover to flush fit the speaker front. , Baffle cover (short) 25US Use the baffle cover (short). Press the ends of the baffle cover over the pin, then press down to the speaker. Getting Started 3 Secure the speaker cord by running it through the slot, then attach the cover to the speaker.

Operating Instructions
Page 26
...attached grille. Foot pads (thick) Bottom of the speaker. Attach the foot pads (thick) to the front of the speaker and the foot pads (thin) to the bottom of the center speaker Side view Foot pads (thin) Foot pads (thin) Foot pads (thick) 26US "SONY" mark Grille Note • When assembling, take... care not to touch the speaker units. • Be sure to the...
...attached grille. Foot pads (thick) Bottom of the speaker. Attach the foot pads (thick) to the front of the speaker and the foot pads (thin) to the bottom of the center speaker Side view Foot pads (thin) Foot pads (thin) Foot pads (thick) 26US "SONY" mark Grille Note • When assembling, take... care not to touch the speaker units. • Be sure to the...

Operating Instructions
Page 27
Front speaker 27US Ex. Getting Started Fully-assembled illustration Front left speaker (L): White label Front right speaker (R): Surround left speaker (L): Surround right speaker (R): Red label Blue label Gray label White Red Blue Gray Green Center speaker: Green label Note • When moving the front or surround speaker, hold the desktop stand part (1), not the speaker part (2).
Front speaker 27US Ex. Getting Started Fully-assembled illustration Front left speaker (L): White label Front right speaker (R): Surround left speaker (L): Surround right speaker (R): Red label Blue label Gray label White Red Blue Gray Green Center speaker: Green label Note • When moving the front or surround speaker, hold the desktop stand part (1), not the speaker part (2).
Operating Instructions
Page 28
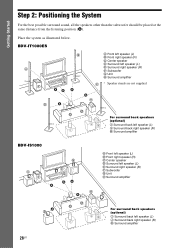
... from the listening position (A). BDV-IT1000ES B A Front left speaker (L) B Front right speaker (R) C Center speaker D Surround left speaker (L) J Surround back right speaker (R) K Surround amplifier 28US Place the system as illustrated below. A H D A A A JK I For surround back speakers (optional) I Surround back left speaker (L) J Surround back right speaker (R) K Surround amplifier BDV-IS1000 A F B C G AA A A A Front left speaker (L) B Front right speaker (R) C Center speaker D Surround left speaker (L) E Surround right speaker (R) F Subwoofer G Unit H Surround...
... from the listening position (A). BDV-IT1000ES B A Front left speaker (L) B Front right speaker (R) C Center speaker D Surround left speaker (L) J Surround back right speaker (R) K Surround amplifier 28US Place the system as illustrated below. A H D A A A JK I For surround back speakers (optional) I Surround back left speaker (L) J Surround back right speaker (R) K Surround amplifier BDV-IS1000 A F B C G AA A A A Front left speaker (L) B Front right speaker (R) C Center speaker D Surround left speaker (L) E Surround right speaker (R) F Subwoofer G Unit H Surround...

Operating Instructions
Page 29
...) • When using the optional stand, we recommend that you change the positions of the speakers, Sony recommends that the speakers are : - Dusty or dirty - The speakers may fall down. • Do not bend, twist, or fold the speaker grille. (BDV-IT1000ES only) • Do not insert an object (especially metal) into a hole on the front part...
...) • When using the optional stand, we recommend that you change the positions of the speakers, Sony recommends that the speakers are : - Dusty or dirty - The speakers may fall down. • Do not bend, twist, or fold the speaker grille. (BDV-IT1000ES only) • Do not insert an object (especially metal) into a hole on the front part...

Operating Instructions
Page 30
Close to a wall Note • If the subwoofer is placed outside (3). Getting Started Using the subwoofer efficiently To reinforce the bass sound, place the subwoofer as close as possible to be placed ahead of the distance from the listening position. 3 3 30US You need to adjust the setting of the front speaker, the distance should be less than 0.5 m (1.6 ft).* * • You may not get the bass sound efficiently when the subwoofer is to a wall.
Close to a wall Note • If the subwoofer is placed outside (3). Getting Started Using the subwoofer efficiently To reinforce the bass sound, place the subwoofer as close as possible to be placed ahead of the distance from the listening position. 3 3 30US You need to adjust the setting of the front speaker, the distance should be less than 0.5 m (1.6 ft).* * • You may not get the bass sound efficiently when the subwoofer is to a wall.

Operating Instructions
Page 31
TV etc. 31US Middle range sound will fall. Getting Started • Do not place objects on the top of the subwoofer where the speaker unit is installed. • Do not place the subwoofer under a desk or in a cabinet, etc. • Do not place the subwoofer back of the obstruction, such as TV, etc.
TV etc. 31US Middle range sound will fall. Getting Started • Do not place objects on the top of the subwoofer where the speaker unit is installed. • Do not place the subwoofer under a desk or in a cabinet, etc. • Do not place the subwoofer back of the obstruction, such as TV, etc.


