Operating Instructions
Page 3
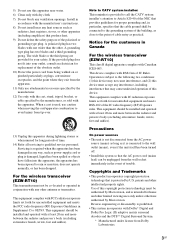
... apparatus. Reverse engineering or disassembly is subject to the wall outlet (mains), even if the unit itself has been turned off. • Install this system so that the cable ground shall be installed and operated with dry cloth. 7) Do not block any heat sources such as power-supply cord or plug is connected to the following two conditions: (1) this device may...
... apparatus. Reverse engineering or disassembly is subject to the wall outlet (mains), even if the unit itself has been turned off. • Install this system so that the cable ground shall be installed and operated with dry cloth. 7) Do not block any heat sources such as power-supply cord or plug is connected to the following two conditions: (1) this device may...

Operating Instructions
Page 6
... Supplied Remote 101 Using the Sound Effect 105 Using the Sleep Timer 106 Deactivating the Buttons on the Unit 106 Settings and Adjustments Using the Setup Display 107 [Network Update 108 [Video Settings 109 [Audio Settings 111 [BD/DVD Viewing Settings 112 [Photo Settings 114 [HDMI Settings 114 [System Settings 116 [Network Settings 117 [Easy Setup 118 [Resetting 119 Additional Information Precautions 120 Notes about the Discs 121 Troubleshooting 122 Self-diagnosis Function 129 Playable Discs 130 Supported Audio Formats 133 Video Output Resolution 134 Specifications 135...
... Supplied Remote 101 Using the Sound Effect 105 Using the Sleep Timer 106 Deactivating the Buttons on the Unit 106 Settings and Adjustments Using the Setup Display 107 [Network Update 108 [Video Settings 109 [Audio Settings 111 [BD/DVD Viewing Settings 112 [Photo Settings 114 [HDMI Settings 114 [System Settings 116 [Network Settings 117 [Easy Setup 118 [Resetting 119 Additional Information Precautions 120 Notes about the Discs 121 Troubleshooting 122 Self-diagnosis Function 129 Playable Discs 130 Supported Audio Formats 133 Video Output Resolution 134 Specifications 135...
Operating Instructions
Page 7
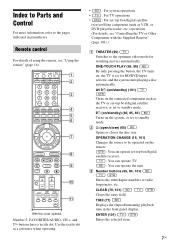
... TV INPUT SCENE SEARCH TONE NIGHT DISPLAY RED GREEN BLUE YELLOW IDEMENU POP UP 1 2 3 4 5 6 7 TOP GU TOOPOTLISONS /MENU RETURN HOME FUNCTION SOUND MODE PRESET REPLAY ADVANCE PRESET TUNING TUNING S-AIR MODE VOLUME CH MUTING 8 9 0 SLEEP TUNER MENU DIRECT TUNING A/V DECODING DVD RECORDER SYNC MODE HDD DVD DISPLAY qa With the cover opened. Number 5, FAVORITES/AUDIO, CH +, and H buttons have a tactile dot. ONE-TOUCH PLAY (65, 96) By only pressing the button, the TV turns on the connected component such as VCR, or DVD player/recorder, etc.) operations...
... TV INPUT SCENE SEARCH TONE NIGHT DISPLAY RED GREEN BLUE YELLOW IDEMENU POP UP 1 2 3 4 5 6 7 TOP GU TOOPOTLISONS /MENU RETURN HOME FUNCTION SOUND MODE PRESET REPLAY ADVANCE PRESET TUNING TUNING S-AIR MODE VOLUME CH MUTING 8 9 0 SLEEP TUNER MENU DIRECT TUNING A/V DECODING DVD RECORDER SYNC MODE HDD DVD DISPLAY qa With the cover opened. Number 5, FAVORITES/AUDIO, CH +, and H buttons have a tactile dot. ONE-TOUCH PLAY (65, 96) By only pressing the button, the TV turns on the connected component such as VCR, or DVD player/recorder, etc.) operations...
Operating Instructions
Page 28
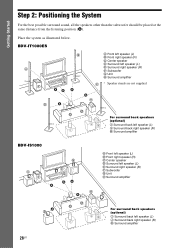
... best possible surround sound, all the speakers other than the subwoofer should be placed at the same distance from the listening position (A). BDV-IT1000ES B A Front left speaker (L) B Front right speaker (R) C Center speaker D Surround left speaker (L) J Surround back right speaker (R) K Surround amplifier 28US A H D A A A JK I For surround back speakers (optional) I Surround back left speaker (L) J Surround back right speaker (R) K Surround amplifier BDV-IS1000 A F B C G AA A A A Front left speaker (L) B Front right speaker (R) C Center speaker D Surround left speaker...
... best possible surround sound, all the speakers other than the subwoofer should be placed at the same distance from the listening position (A). BDV-IT1000ES B A Front left speaker (L) B Front right speaker (R) C Center speaker D Surround left speaker (L) J Surround back right speaker (R) K Surround amplifier 28US A H D A A A JK I For surround back speakers (optional) I Surround back left speaker (L) J Surround back right speaker (R) K Surround amplifier BDV-IS1000 A F B C G AA A A A Front left speaker (L) B Front right speaker (R) C Center speaker D Surround left speaker...
Operating Instructions
Page 58
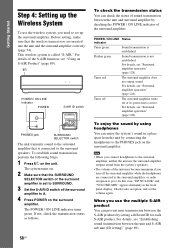
... wireless system is connected to the surround speakers. To establish sound transmission, perform the following Steps. 1 Press "/1 on the surround amplifier. Note • When you use the wireless system, you turn off . Getting Started Step 4: Setting up the surround amplifier. Before setting, make sure that the SURROUND SELECTOR switch of the surround amplifier. The POWER / ON LINE indicator turns green. Flashes green. When you connect headphones to the surround amplifier, neither the unit nor the surround amplifier outputs sound...
... wireless system is connected to the surround speakers. To establish sound transmission, perform the following Steps. 1 Press "/1 on the surround amplifier. Note • When you use the wireless system, you turn off . Getting Started Step 4: Setting up the surround amplifier. Before setting, make sure that the SURROUND SELECTOR switch of the surround amplifier. The POWER / ON LINE indicator turns green. Flashes green. When you connect headphones to the surround amplifier, neither the unit nor the surround amplifier outputs sound...

Operating Instructions
Page 60
... model. 123 456 789 0 "/1 C/X/x/c, FUNCTION HOME 1 Turn on the TV. 2 Press [/1 on the unit, and POWER on the surround amplifier. 3 Switch the input selector on your TV. • When you connect the unit and TV with the component video cord, select [Component Video], go to be displayed by this unit and the TV. Easy Setup - The system displays the menu and subtitles in [Setup] setting. 6 Press or c. Component Video Video or S Video 7 Press X/x to select the cable used to select...
... model. 123 456 789 0 "/1 C/X/x/c, FUNCTION HOME 1 Turn on the TV. 2 Press [/1 on the unit, and POWER on the surround amplifier. 3 Switch the input selector on your TV. • When you connect the unit and TV with the component video cord, select [Component Video], go to be displayed by this unit and the TV. Easy Setup - The system displays the menu and subtitles in [Setup] setting. 6 Press or c. Component Video Video or S Video 7 Press X/x to select the cable used to select...

Operating Instructions
Page 63
... shows the level of speakers. Note • The environment of the settings, see "Settings and Adjustments" (page 107). The home menu appears on the TV screen. To recall the Easy Setup Display 1 Press HOME. If you use the surround back speakers with the optional surround amplifier, install the speakers in any of the room in the appropriate location. All connections and setup operations are ok, unplug the calibration mic and press X/x to select [Start...
... shows the level of speakers. Note • The environment of the settings, see "Settings and Adjustments" (page 107). The home menu appears on the TV screen. To recall the Easy Setup Display 1 Press HOME. If you use the surround back speakers with the optional surround amplifier, install the speakers in any of the room in the appropriate location. All connections and setup operations are ok, unplug the calibration mic and press X/x to select [Start...
Operating Instructions
Page 66
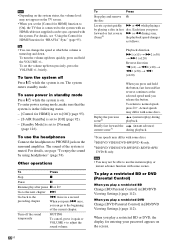
... adjust the sound volume. When you play a restricted BD Change [BD Parental Control] in [BD/DVD Viewing Settings] (page 112). When you press . Actual speeds may differ with some discs. 2)BD/DVD VIDEO/DVD-RW/DVD-R only. 3)BD/DVD VIDEO/DVD-RW/DVD-R/DVD+RW/ DVD+R only. To turn the system off the sound temporarily MUTING To cancel, press it again or VOLUME + to normal speed, press H. To enter power saving mode, make sure that is connected...
... adjust the sound volume. When you play a restricted BD Change [BD Parental Control] in [BD/DVD Viewing Settings] (page 112). When you press . Actual speeds may differ with some discs. 2)BD/DVD VIDEO/DVD-RW/DVD-R only. 3)BD/DVD VIDEO/DVD-RW/DVD-R/DVD+RW/ DVD+R only. To turn the system off the sound temporarily MUTING To cancel, press it again or VOLUME + to normal speed, press H. To enter power saving mode, make sure that is connected...

Operating Instructions
Page 79
... "TUNER FM," the decoding mode that was last applied to the function is automatically applied again when it is returned to. "OMNI-DIR" - Sound Adjustment • "PRO LOGIC," "PLII MOVIE," "PLII MUSIC," "PLIIx MOVIE," "PLIIx MUSIC," "NEO:6 CINEMA," and "NEO:6 MUSIC" are canceled when you set [Fs Limit] in [Audio Settings] (page 111) to [On]. • When changing the decoding mode while using the S-AIR receiver, sound...
... "TUNER FM," the decoding mode that was last applied to the function is automatically applied again when it is returned to. "OMNI-DIR" - Sound Adjustment • "PRO LOGIC," "PLII MOVIE," "PLII MUSIC," "PLIIx MOVIE," "PLIIx MUSIC," "NEO:6 CINEMA," and "NEO:6 MUSIC" are canceled when you set [Fs Limit] in [Audio Settings] (page 111) to [On]. • When changing the decoding mode while using the S-AIR receiver, sound...
Operating Instructions
Page 80
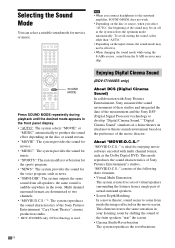
... select a suitable sound mode for movies or music. 123 456 789 0 Note • When you connect headphones to the surround amplifier, SOUND MODE does not work. • Depending on the disc or source, when you select "AUTO," the beginning of the sound may skip. This mode reproduces the sound characteristics of the measurement and the Sony DSP (Digital Signal Processor) technology to develop "Digital Cinema Sound." Enjoying Digital Cinema Sound (BDV-IT1000ES only) About DCS (Digital Cinema Sound) In collaboration with multi channel format...
... select a suitable sound mode for movies or music. 123 456 789 0 Note • When you connect headphones to the surround amplifier, SOUND MODE does not work. • Depending on the disc or source, when you select "AUTO," the beginning of the sound may skip. This mode reproduces the sound characteristics of the measurement and the Sony DSP (Digital Signal Processor) technology to develop "Digital Cinema Sound." Enjoying Digital Cinema Sound (BDV-IT1000ES only) About DCS (Digital Cinema Sound) In collaboration with multi channel format...

Operating Instructions
Page 85
... for preset stations. The last received station is selected. The display for 2 seconds or more. Example: Press the number 3 button once to finish. To erase all displayed characters, press and hold CLEAR for entering characters appears. C/X/x/c, • Select an input function using C/X/x/c, and press . • Enter characters as follows: 1Select a character selection panel using C/X/x/c, and press . 2Select a character using C/c, and press . Available OPTIONS for . 3 Press OPTIONS. Tuner Naming preset stations...
... for preset stations. The last received station is selected. The display for 2 seconds or more. Example: Press the number 3 button once to finish. To erase all displayed characters, press and hold CLEAR for entering characters appears. C/X/x/c, • Select an input function using C/X/x/c, and press . • Enter characters as follows: 1Select a character selection panel using C/X/x/c, and press . 2Select a character using C/c, and press . Available OPTIONS for . 3 Press OPTIONS. Tuner Naming preset stations...
Operating Instructions
Page 97
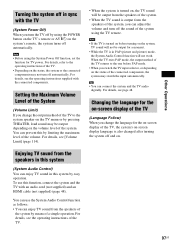
... the connected components, the system may switch the input automatically. You can use this system (System Audio Control) You can prevent this system by easy operation. You can enjoy TV sound in PAP (picture and picture) mode, the System Audio Control function will be output from the speakers of the system by using the POWER button on the TV's remote or AV "/1 on , the TV sound will not work. For details, see the operating instructions...
... the connected components, the system may switch the input automatically. You can use this system (System Audio Control) You can prevent this system by easy operation. You can enjoy TV sound in PAP (picture and picture) mode, the System Audio Control function will be output from the speakers of the system by using the POWER button on the TV's remote or AV "/1 on , the TV sound will not work. For details, see the operating instructions...
Operating Instructions
Page 98
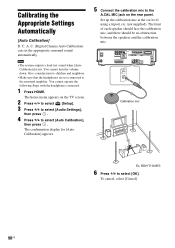
... MIC jack on the TV screen. 2 Press C/c to select [Setup]. 3 Press X/x to select [Audio Settings], then press . 4 Press X/x to select [Auto Calibration], then press . You cannot turn the volume down. Give consideration to children and neighbors. • Make sure that the headphones are not connected to select [OK]. You cannot operate the following Steps with the headphones connected. 1 Press HOME. The home menu appears on the rear panel. BDV-IT1000ES 6 Press X/x to the surround amplifier. LAN(100) COMPONENT VIDEO...
... MIC jack on the TV screen. 2 Press C/c to select [Setup]. 3 Press X/x to select [Audio Settings], then press . 4 Press X/x to select [Auto Calibration], then press . You cannot turn the volume down. Give consideration to children and neighbors. • Make sure that the headphones are not connected to select [OK]. You cannot operate the following Steps with the headphones connected. 1 Press HOME. The home menu appears on the rear panel. BDV-IT1000ES 6 Press X/x to the surround amplifier. LAN(100) COMPONENT VIDEO...

Operating Instructions
Page 99
...), to change the disc. - do not press any button. - do not connect the headphones to select [OK] or [Cancel], then press . Give consideration to children and neighbors. • If an error message appears, follow the message then retry [Auto Calibration]. 9 Press X/x to the surround amplifier. - front speakers are output from the speakers. • The environment of speakers. do not turn the volume down. do not change the function...
...), to change the disc. - do not press any button. - do not connect the headphones to select [OK] or [Cancel], then press . Give consideration to children and neighbors. • If an error message appears, follow the message then retry [Auto Calibration]. 9 Press X/x to the surround amplifier. - front speakers are output from the speakers. • The environment of speakers. do not turn the volume down. do not change the function...
Operating Instructions
Page 105
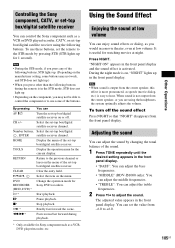
... panel display. Number buttons, Select the set -top box/digital satellite receiver channel. The adjusted value appears in the STB mode, STB does not light up for watching movies at night. RETURN Return to adjust the sound. Controlling the Sony component, CATV, or set-top box/digital satellite receiver You can control the Sony component such as speech (movie dialog, etc.) is not output from the center speaker, or you are using the following buttons, STB lights up. (Depending on the menu...
... panel display. Number buttons, Select the set -top box/digital satellite receiver channel. The adjusted value appears in the STB mode, STB does not light up for watching movies at night. RETURN Return to adjust the sound. Controlling the Sony component, CATV, or set-top box/digital satellite receiver You can control the Sony component such as speech (movie dialog, etc.) is not output from the center speaker, or you are using the following buttons, STB lights up. (Depending on the menu...

Operating Instructions
Page 107
...in the disc take priority over the Setup Display settings and not all the functions described may work. 1 Press HOME. Network Update Setup Video Settings Audio Settings BD/DVD Viewing Settings Photo Settings 3 Press X/x to select the setup category icon to select an item, then press . Example: [Video Settings] Setup TV Type Set the screen aspect ratio of the system. Screen Format Original DVD Aspect Ratio Letter Box Cinema Conversion Mode Auto You can make various adjustments of connecting jacks. [BD/DVD Viewing Settings] (page 112) Makes detailed settings for BD/ DVD playback...
...in the disc take priority over the Setup Display settings and not all the functions described may work. 1 Press HOME. Network Update Setup Video Settings Audio Settings BD/DVD Viewing Settings Photo Settings 3 Press X/x to select the setup category icon to select an item, then press . Example: [Video Settings] Setup TV Type Set the screen aspect ratio of the system. Screen Format Original DVD Aspect Ratio Letter Box Cinema Conversion Mode Auto You can make various adjustments of connecting jacks. [BD/DVD Viewing Settings] (page 112) Makes detailed settings for BD/ DVD playback...
Operating Instructions
Page 111
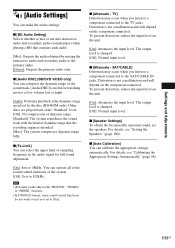
... component connected. x [BD Audio Setting] Selects whether to 192kHz. Note • [Fs Limit] works only for watching movies at low volume late at night. [Auto]: Performs playback at the "Standard" level. [Off]: No compression of dynamic range. [Standard]: The system reproduces the sound track with the kind of sampling frequency in the audio signal for full sound adjustment. [On]: Sets to 48kHz. x [Audio DRC] (BD/DVD VIDEO only) You can operate...
... component connected. x [BD Audio Setting] Selects whether to 192kHz. Note • [Fs Limit] works only for watching movies at low volume late at night. [Auto]: Performs playback at the "Standard" level. [Off]: No compression of dynamic range. [Standard]: The system reproduces the sound track with the kind of sampling frequency in the audio signal for full sound adjustment. [On]: Sets to 48kHz. x [Audio DRC] (BD/DVD VIDEO only) You can operate...

Operating Instructions
Page 116
... can operate the system quickly after turning it on the surrounding temperature. x [S-AIR Standby] You can display information when switching audio modes or during playback. [On]: Automatically displays information on the screen when changing the viewing titles, picture modes, audio signals, etc. [Off]: Displays information only when you turn on depending on . [Normal]: The default setting. For details, see "If sound transmission is in standby mode. For details, see "Enjoying the S-AIR receiver while the...
... can operate the system quickly after turning it on the surrounding temperature. x [S-AIR Standby] You can display information when switching audio modes or during playback. [On]: Automatically displays information on the screen when changing the viewing titles, picture modes, audio signals, etc. [Off]: Displays information only when you turn on depending on . [Normal]: The default setting. For details, see "If sound transmission is in standby mode. For details, see "Enjoying the S-AIR receiver while the...
Operating Instructions
Page 140
... passwords associated with the Software. The Software is Sony Electronics Inc., 16530 Via Esprillo, San Diego, CA 92127. 140US The Software may require that you any upgrades of the Software and this Agreement. Dependent Software. The software, network services or other products other breach of security related to restriction as set forth in other changes offered by Sony through the Service's Internet homepage (the "Site"). Rental. Sony...
... passwords associated with the Software. The Software is Sony Electronics Inc., 16530 Via Esprillo, San Diego, CA 92127. 140US The Software may require that you any upgrades of the Software and this Agreement. Dependent Software. The software, network services or other products other breach of security related to restriction as set forth in other changes offered by Sony through the Service's Internet homepage (the "Site"). Rental. Sony...

Operating Instructions
Page 154
... Playable discs 130 POP UP/MENU 69 Progressive format 153 R Rear panel 12 Region code 131 Remote 16 Resetting 119 Resume Play 68 S S-AIR 5, 89, 153 S-AIR ID 89, 116 S-AIR Pairing 92, 116 S-AIR receiver 89 S-AIR RF Change 94, 116 S-AIR Standby 92, 116 Screen Format 109 Screen Saver 116 Slideshow Speed 114 Sound Mode 80 Speaker Settings 100, 111 Connection 100 Distance 100 Level 101 Standby Mode 116 Subtitle 112 Surround amplifier 13...
... Playable discs 130 POP UP/MENU 69 Progressive format 153 R Rear panel 12 Region code 131 Remote 16 Resetting 119 Resume Play 68 S S-AIR 5, 89, 153 S-AIR ID 89, 116 S-AIR Pairing 92, 116 S-AIR receiver 89 S-AIR RF Change 94, 116 S-AIR Standby 92, 116 Screen Format 109 Screen Saver 116 Slideshow Speed 114 Sound Mode 80 Speaker Settings 100, 111 Connection 100 Distance 100 Level 101 Standby Mode 116 Subtitle 112 Surround amplifier 13...


