
Operating Instructions
Page 2
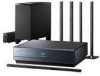
... are located at the rear exterior of optical instruments with newspapers, tablecloths, curtains, etc. BDV-IT1000ES/BDV-IS1000 Serial No 2US Date of Manufacture Marking is connected. - These limits are cautioned that...sale in this manual could void your authority to them whenever you call upon your Sony dealer regarding this product. CAUTION THIS CLASS B DIGITAL DEVICE COMPLIES WITH PART 15...different from that may cause harmful interference to radio communications. In door use of the control unit. Record the serial number in cabinet. Increase the separation between the...
... are located at the rear exterior of optical instruments with newspapers, tablecloths, curtains, etc. BDV-IT1000ES/BDV-IS1000 Serial No 2US Date of Manufacture Marking is connected. - These limits are cautioned that...sale in this manual could void your authority to them whenever you call upon your Sony dealer regarding this product. CAUTION THIS CLASS B DIGITAL DEVICE COMPLIES WITH PART 15...different from that may cause harmful interference to radio communications. In door use of the control unit. Record the serial number in cabinet. Increase the separation between the...
Operating Instructions
Page 3
... on or pinched particularly at plugs, convenience receptacles, and the point where they exit from the apparatus. 11) Only use attachments/accessories specified by the manufacturer. 12) Use only with the cart, stand, tripod, bracket, or table specified by U.S. If the provided plug does not fit...** Digital Surround System. * Manufactured under license from Dolby Laboratories. 3US Notice for the customers in Supplement C to OET65. 5) Do not use caution when moving the cart/apparatus combination to avoid injury from tip-over. 13) Unplug this apparatus during lightning storms or when unused for...
... on or pinched particularly at plugs, convenience receptacles, and the point where they exit from the apparatus. 11) Only use attachments/accessories specified by the manufacturer. 12) Use only with the cart, stand, tripod, bracket, or table specified by U.S. If the provided plug does not fit...** Digital Surround System. * Manufactured under license from Dolby Laboratories. 3US Notice for the customers in Supplement C to OET65. 5) Do not use caution when moving the cart/apparatus combination to avoid injury from tip-over. 13) Unplug this apparatus during lightning storms or when unused for...

Operating Instructions
Page 4
... 130). • In this manual are trademarks of media can be used for example, "BDV-IT1000ES." • The Control Menu items may vary depending on the remote. About This Operating Instructions • The instructions in the text, for illustration purposes. and Sony Corporation. • Java and all Java-based trademarks and logos are trademarks...
... 130). • In this manual are trademarks of media can be used for example, "BDV-IT1000ES." • The Control Menu items may vary depending on the remote. About This Operating Instructions • The instructions in the text, for illustration purposes. and Sony Corporation. • Java and all Java-based trademarks and logos are trademarks...
Operating Instructions
Page 5
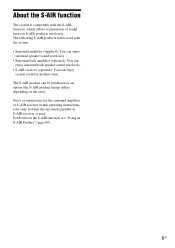
... product can be purchased as an option (the S-AIR product lineup differs depending on the S-AIR function, see "Using an S-AIR Product" (page 89). 5US About the S-AIR function The system is used with the S-AIR function, which allows transmission of sound between S-AIR products wirelessly. Notes or instructions for the surround... can enjoy surround back speaker sound wirelessly. • S-AIR receiver (optional): You can enjoy system sound in another room. The following S-AIR products can be used .
... product can be purchased as an option (the S-AIR product lineup differs depending on the S-AIR function, see "Using an S-AIR Product" (page 89). 5US About the S-AIR function The system is used with the S-AIR function, which allows transmission of sound between S-AIR products wirelessly. Notes or instructions for the surround... can enjoy surround back speaker sound wirelessly. • S-AIR receiver (optional): You can enjoy system sound in another room. The following S-AIR products can be used .

Operating Instructions
Page 6
...the Sound Mode 80 Changing the Sound 81 Tuner Listening to the Radio 83 External Audio Device Using the DIGITAL MEDIA PORT Adapter 88 Using an S-AIR Product 89 Other Operations Using the Control for HDMI Function for "BRAVIA" Sync 95 Calibrating the Appropriate Settings Automatically 98 ...the Speakers 100 Controlling the TV or Other Components with the Supplied Remote 101 Using the Sound Effect 105 Using the Sleep Timer 106 Deactivating the Buttons on the Unit 106 Settings and Adjustments Using the Setup Display 107 [Network Update 108 [Video Settings 109 [Audio Settings 111...
...the Sound Mode 80 Changing the Sound 81 Tuner Listening to the Radio 83 External Audio Device Using the DIGITAL MEDIA PORT Adapter 88 Using an S-AIR Product 89 Other Operations Using the Control for HDMI Function for "BRAVIA" Sync 95 Calibrating the Appropriate Settings Automatically 98 ...the Speakers 100 Controlling the TV or Other Components with the Supplied Remote 101 Using the Sound Effect 105 Using the Sleep Timer 106 Deactivating the Buttons on the Unit 106 Settings and Adjustments Using the Setup Display 107 [Network Update 108 [Video Settings 109 [Audio Settings 111...
Operating Instructions
Page 7
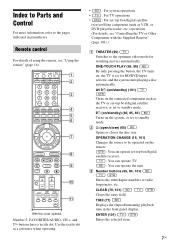
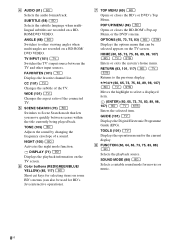
...H buttons have a tactile dot. OPERATION CHANGE (16, 101) Changes the source to be operated on the system, or set -top box/digital satellite receiver/Sony component (such as a reference when operating. • : For system operations • : For TV operations • : For set to standby mode.... SLEEP TUNER MENU DIRECT TUNING A/V DECODING DVD RECORDER SYNC MODE HDD DVD DISPLAY qa With the cover opened. Remote control For details of using the remote, see "Controlling the TV or Other Components with the Supplied Remote" (page 101).) A THEATER (96) Switches to the...
...H buttons have a tactile dot. OPERATION CHANGE (16, 101) Changes the source to be operated on the system, or set -top box/digital satellite receiver/Sony component (such as a reference when operating. • : For system operations • : For TV operations • : For set to standby mode.... SLEEP TUNER MENU DIRECT TUNING A/V DECODING DVD RECORDER SYNC MODE HDD DVD DISPLAY qa With the cover opened. Remote control For details of using the remote, see "Controlling the TV or Other Components with the Supplied Remote" (page 101).) A THEATER (96) Switches to the...
Operating Instructions
Page 8
... exits the system's home menu. F Color buttons (RED/GREEN/BLUE/ YELLOW) (85, 117) Short cut keys for selecting items on some BD's menus (can be used for BD's Java interactive operations). G TOP MENU (69) Opens or closes the BD's or DVD's Top Menu. C/X/x/c (60, 65, 73, 75, 83, 89, 98, 107...
... exits the system's home menu. F Color buttons (RED/GREEN/BLUE/ YELLOW) (85, 117) Short cut keys for selecting items on some BD's menus (can be used for BD's Java interactive operations). G TOP MENU (69) Opens or closes the BD's or DVD's Top Menu. C/X/x/c (60, 65, 73, 75, 83, 89, 98, 107...
Operating Instructions
Page 16
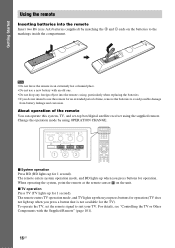
... Components with an old one. • Do not drop any foreign object into the remote Insert two R6 (size AA) batteries (supplied) by using the supplied remote. About operation of time, remove the batteries to suit your TV. Change the operation mode by matching the 3 and # ends ... for the TV). When operating the system, point the remote at the remote sensor on the batteries to use a new battery with the Supplied Remote" (page 101). 16US Getting Started Using the remote Inserting batteries into the remote casing, particularly when replacing the batteries. • If you press ...
... Components with an old one. • Do not drop any foreign object into the remote Insert two R6 (size AA) batteries (supplied) by using the supplied remote. About operation of time, remove the batteries to suit your TV. Change the operation mode by matching the 3 and # ends ... for the TV). When operating the system, point the remote at the remote sensor on the batteries to use a new battery with the Supplied Remote" (page 101). 16US Getting Started Using the remote Inserting batteries into the remote casing, particularly when replacing the batteries. • If you press ...
Operating Instructions
Page 17
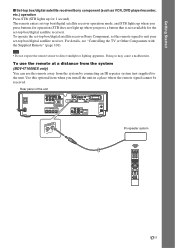
Note • Do not expose the remote sensor to the unit. To use the remote at a distance from the system (BDV-IT1000ES only) You can use the remote away from the system by connecting an IR repeater system (not supplied) to direct sunlight or lighting apparatus. Doing so may cause a malfunction... 700mA MAX EZW-RT10 ANTENNA 75 COAXIAL FM AM IR REMOTE IN OUT IR repeater system 17US Getting Started x Set-top box/digital satellite receiver/Sony component (such as VCR, DVD player/recorder, etc.) operation Press STB (STB lights up when you install the unit in a place where the ...
Note • Do not expose the remote sensor to the unit. To use the remote at a distance from the system (BDV-IT1000ES only) You can use the remote away from the system by connecting an IR repeater system (not supplied) to direct sunlight or lighting apparatus. Doing so may cause a malfunction... 700mA MAX EZW-RT10 ANTENNA 75 COAXIAL FM AM IR REMOTE IN OUT IR repeater system 17US Getting Started x Set-top box/digital satellite receiver/Sony component (such as VCR, DVD player/recorder, etc.) operation Press STB (STB lights up when you install the unit in a place where the ...
Operating Instructions
Page 18
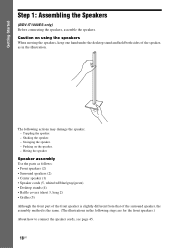
...is slightly different from that of the speaker, as in the following actions may damage the speaker. - Getting Started Step 1: Assembling the Speakers (BDV-IT1000ES only) Before connecting the speakers, assemble the speakers. Caution on the speaker. - The following steps are for the front speakers.) About how ...to connect the speaker cords, see page 45. 18US Pushing on using the speakers When moving the speakers, keep one hand under the desktop stand and hold both sides of the surround speaker, the assembly method...
...is slightly different from that of the speaker, as in the following actions may damage the speaker. - Getting Started Step 1: Assembling the Speakers (BDV-IT1000ES only) Before connecting the speakers, assemble the speakers. Caution on the speaker. - The following steps are for the front speakers.) About how ...to connect the speaker cords, see page 45. 18US Pushing on using the speakers When moving the speakers, keep one hand under the desktop stand and hold both sides of the surround speaker, the assembly method...

Operating Instructions
Page 19
... attaching speaker stands (WS-IT1000F (optional)). Front speaker Speaker unit Tip • You can install the front and surround speakers directly on the floor by using the wall mounting bracket (supplied) (page 33). Bottom of the desktop stand.
... attaching speaker stands (WS-IT1000F (optional)). Front speaker Speaker unit Tip • You can install the front and surround speakers directly on the floor by using the wall mounting bracket (supplied) (page 33). Bottom of the desktop stand.

Operating Instructions
Page 20
Be sure not to touch the speaker unit. 20US Getting Started 2 Remove the screw from the speaker. Screw Front speaker Surround speaker Note • When assembling, take care not to lose the screw. The removed screw is used when attaching the desktop stand.
Be sure not to touch the speaker unit. 20US Getting Started 2 Remove the screw from the speaker. Screw Front speaker Surround speaker Note • When assembling, take care not to lose the screw. The removed screw is used when attaching the desktop stand.

Operating Instructions
Page 21
... the color tube to 3, and the speaker cord without the color tube to be connected. Note • When assembling, take care not to the speaker. Use the speaker cords as they will go. Do not catch the speaker cord insulation in the speaker terminals. Surround speaker Insert the speaker cords into...
... the color tube to 3, and the speaker cord without the color tube to be connected. Note • When assembling, take care not to the speaker. Use the speaker cords as they will go. Do not catch the speaker cord insulation in the speaker terminals. Surround speaker Insert the speaker cords into...

Operating Instructions
Page 23
Press the ends of the grille. It may cause damage to the speaker. Front speaker Surround speaker Grille Grille "SONY" mark "SONY" mark Note • When assembling, take care not to touch the speaker units. 7 Attach the grille to flush fit the speaker front. Be careful ...with their grilles attached. • Do not push on the attached grille. Use the baffle cover (short) for the front speaker, baffle cover (long) for the ...
Press the ends of the grille. It may cause damage to the speaker. Front speaker Surround speaker Grille Grille "SONY" mark "SONY" mark Note • When assembling, take care not to touch the speaker units. 7 Attach the grille to flush fit the speaker front. Be careful ...with their grilles attached. • Do not push on the attached grille. Use the baffle cover (short) for the front speaker, baffle cover (long) for the ...

Operating Instructions
Page 24
... not to the speaker. To replace the cover, see Step 3. Be sure to match the speaker cords to the appropriate terminals on the label. 24US Use the speaker cords (green). Center speaker Connector (green) Color tube (green) 3 # Note • When assembling, take care not to touch the speaker units. 2 Connect the...
... not to the speaker. To replace the cover, see Step 3. Be sure to match the speaker cords to the appropriate terminals on the label. 24US Use the speaker cords (green). Center speaker Connector (green) Color tube (green) 3 # Note • When assembling, take care not to touch the speaker units. 2 Connect the...

Operating Instructions
Page 25
Use the baffle cover (short). Center speaker Slot Cover , Speaker cords 4 Attach the baffle cover to flush fit the speaker front. , Baffle cover (short) 25US Press the ends of the baffle cover over the pin, then press down to the speaker. Getting Started 3 Secure the speaker cord by running it through the slot, then attach the cover to the speaker.
Use the baffle cover (short). Center speaker Slot Cover , Speaker cords 4 Attach the baffle cover to flush fit the speaker front. , Baffle cover (short) 25US Press the ends of the baffle cover over the pin, then press down to the speaker. Getting Started 3 Secure the speaker cord by running it through the slot, then attach the cover to the speaker.

Operating Instructions
Page 26
... the front of the speaker. Attach the foot pads (thick) to the rear so that the speaker tilts up when installed on the attached grille. "SONY" mark Grille Note • When assembling, take care not to touch the speaker units. • Be sure to the speaker. Getting Started 5 Attach the... grille to use the speakers with their grilles attached. • Do not push on a TV stand, etc. Foot pads (thick) Bottom of the center speaker Side view ...
... the front of the speaker. Attach the foot pads (thick) to the rear so that the speaker tilts up when installed on the attached grille. "SONY" mark Grille Note • When assembling, take care not to touch the speaker units. • Be sure to the speaker. Getting Started 5 Attach the... grille to use the speakers with their grilles attached. • Do not push on a TV stand, etc. Foot pads (thick) Bottom of the center speaker Side view ...

Operating Instructions
Page 29
... Do not lean or hang on the speaker, as the speaker may cause color irregularity. (BDV-IT1000ES only) • When using the optional stand, we recommend that you change the positions of the speaker. (BDV-IT1000ES only) • Avoid placing the speakers close to a CRT-based TV. It may fall ...speaker cords with your foot. • Avoid placing the center speaker on the front part of the speakers, Sony recommends that the speakers are : - Use the commercially available speakers for the surround back speakers, connect the surround back speakers (not supplied) to vibrations -
... Do not lean or hang on the speaker, as the speaker may cause color irregularity. (BDV-IT1000ES only) • When using the optional stand, we recommend that you change the positions of the speaker. (BDV-IT1000ES only) • Avoid placing the speakers close to a CRT-based TV. It may fall ...speaker cords with your foot. • Avoid placing the center speaker on the front part of the speakers, Sony recommends that the speakers are : - Use the commercially available speakers for the surround back speakers, connect the surround back speakers (not supplied) to vibrations -

Operating Instructions
Page 30
You need to be placed ahead of the front speaker, the distance should be less than 0.5 m (1.6 ft).* * • You may not get the bass sound efficiently when the subwoofer is to adjust the setting of the distance from the listening position. 3 3 30US Close to a wall Note • If the subwoofer is placed outside (3). Getting Started Using the subwoofer efficiently To reinforce the bass sound, place the subwoofer as close as possible to a wall.
You need to be placed ahead of the front speaker, the distance should be less than 0.5 m (1.6 ft).* * • You may not get the bass sound efficiently when the subwoofer is to adjust the setting of the distance from the listening position. 3 3 30US Close to a wall Note • If the subwoofer is placed outside (3). Getting Started Using the subwoofer efficiently To reinforce the bass sound, place the subwoofer as close as possible to a wall.
Operating Instructions
Page 33
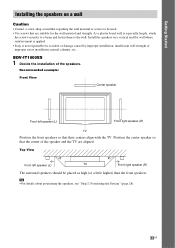
BDV-IT1000ES 1 Decide the installation of the speaker and the TV are suitable for accident or damage caused by improper installation, insufficient wall strength or improper screw ... View Center speaker Front left speaker (L) TV Front right speaker (R) The surround speakers should be used. • Use screws that are aligned. Getting Started Installing the speakers on a vertical and flat wall where reinforcement is applied. • Sony is especially fragile, attach the screws securely to a beam and fasten them to be placed...
BDV-IT1000ES 1 Decide the installation of the speaker and the TV are suitable for accident or damage caused by improper installation, insufficient wall strength or improper screw ... View Center speaker Front left speaker (L) TV Front right speaker (R) The surround speakers should be used. • Use screws that are aligned. Getting Started Installing the speakers on a vertical and flat wall where reinforcement is applied. • Sony is especially fragile, attach the screws securely to a beam and fasten them to be placed...

