
Blu-ray Disc™ Home Theatre System Owners: What You Need to Know
Page 1
...the front panel display. BD-LIVE™ technology brings the power of your system. Check your unit to www.esupport.sony.com and enter in the model of the Internet to your system. Certain circumstances may limit/prevent Blu-ray Disc media or DVD playback. © 2009 Sony Corporation ...via the Internet, including upcoming movie previews and exclusive special features, live events, peer-to operate. 4-151-512-11(1) (1) Blu-ray Disc™ Home Theatre System Owners: What You Need to Know Keeping Your Firmware Up-to Update! This technology lets you know? HDMI™ Cable ...
...the front panel display. BD-LIVE™ technology brings the power of your system. Check your unit to www.esupport.sony.com and enter in the model of the Internet to your system. Certain circumstances may limit/prevent Blu-ray Disc media or DVD playback. © 2009 Sony Corporation ...via the Internet, including upcoming movie previews and exclusive special features, live events, peer-to operate. 4-151-512-11(1) (1) Blu-ray Disc™ Home Theatre System Owners: What You Need to Know Keeping Your Firmware Up-to Update! This technology lets you know? HDMI™ Cable ...
Operating Instructions
Page 6
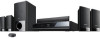
...the Speakers 67 Controlling Your TV with the Supplied Remote 69 Using the Sleep Timer 71 Changing the Brightness of the Front Panel Display 71 Deactivating the Buttons on the Unit ... 72 About the demonstration 72 Saving Power in Standby Mode 73 Settings and... Settings 80 [Photo Settings 82 [HDMI Settings 82 [System Settings 83 [Network Settings 84 [Easy Setup 85 [Resetting 86 Additional Information Precautions 87 Notes about the Discs 88 Troubleshooting 89 Self-diagnosis Function 95 Playable Discs 96 Supported Audio Formats 98 Video Output Resolution 99 Specifications...
...the Speakers 67 Controlling Your TV with the Supplied Remote 69 Using the Sleep Timer 71 Changing the Brightness of the Front Panel Display 71 Deactivating the Buttons on the Unit ... 72 About the demonstration 72 Saving Power in Standby Mode 73 Settings and... Settings 80 [Photo Settings 82 [HDMI Settings 82 [System Settings 83 [Network Settings 84 [Easy Setup 85 [Resetting 86 Additional Information Precautions 87 Notes about the Discs 88 Troubleshooting 89 Self-diagnosis Function 95 Playable Discs 96 Supported Audio Formats 98 Video Output Resolution 99 Specifications...
Operating Instructions
Page 11
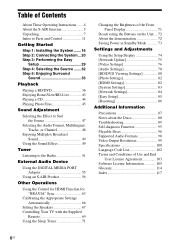
...system operations • : For TV operations (For details, see "Controlling Your TV with the Supplied Remote" (page 69).) A THEATER...system or sets it to standby mode. DYNAMIC BASS (page 49) Reinforces bass frequencies. Remote control TOP ONE-TOUCH THEATER... PLAY TV BRAVIA Sync S-AIR DYNAMIC MODE NIGHT BASS TV 123 456 789 ENTER CLEAR 0 TIME FAVORITES CC WIDE SYSTEM... AUDIO SUBTITLE ANGLE MENU D.TUNING RED GREEN BLUE YELLOW DISPLAY U P 1 2 3 4 5 6 GUIDE MEN OP UP/MENU RETURN TOOOPLTISONS 0 FUNCTION HOME...in the front panel display. (page 69) Inputs ...
...system operations • : For TV operations (For details, see "Controlling Your TV with the Supplied Remote" (page 69).) A THEATER...system or sets it to standby mode. DYNAMIC BASS (page 49) Reinforces bass frequencies. Remote control TOP ONE-TOUCH THEATER... PLAY TV BRAVIA Sync S-AIR DYNAMIC MODE NIGHT BASS TV 123 456 789 ENTER CLEAR 0 TIME FAVORITES CC WIDE SYSTEM... AUDIO SUBTITLE ANGLE MENU D.TUNING RED GREEN BLUE YELLOW DISPLAY U P 1 2 3 4 5 6 GUIDE MEN OP UP/MENU RETURN TOOOPLTISONS 0 FUNCTION HOME...in the front panel display. (page 69) Inputs ...
Operating Instructions
Page 12
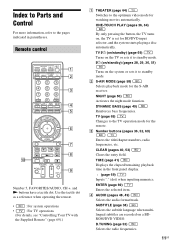
...BD's menus (can also be used for the current display. ANGLE (page 38) Switches to other input sources. SYSTEM MENU (pages 33, 42, 49, 53, 56, 71) Enters the system menu. FAVORITES (page 69) Displays the favorite channel list. DISPLAY (page 41) Displays the playback information on the... TV screen. HOME (pages 29, 36, 44, 45, 51, 66, 74) Enters or exits the system's home menu. TUNING +/- I MUTING (pages 36, 44, 69) Turns off the sound temporarily. DISPLAY (page 51) Changes...
...BD's menus (can also be used for the current display. ANGLE (page 38) Switches to other input sources. SYSTEM MENU (pages 33, 42, 49, 53, 56, 71) Enters the system menu. FAVORITES (page 69) Displays the favorite channel list. DISPLAY (page 41) Displays the playback information on the... TV screen. HOME (pages 29, 36, 44, 45, 51, 66, 74) Enters or exits the system's home menu. TUNING +/- I MUTING (pages 36, 44, 69) Turns off the sound temporarily. DISPLAY (page 51) Changes...
Operating Instructions
Page 13
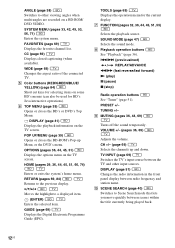
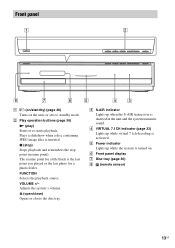
...played or the last photo for a title/track is inserted in the unit and the system transmits sound. FUNCTION Selects the playback source. Plays a slideshow when a disc containing JPEG image files is activated. Front panel FUNCTION VOLUME A "/1 (on/standby) (page 36) Turns on . Z (open...) N (play) Starts or re-starts playback. D VIRTUAL 7.1CH indicator (page 33) Lights up while the system is turned on the unit, or sets to standby mode. F Front panel display G Disc tray (page 36) H (remote sensor) 13US x (stop) Stops playback and remembers the stop point (resume ...
...played or the last photo for a title/track is inserted in the unit and the system transmits sound. FUNCTION Selects the playback source. Plays a slideshow when a disc containing JPEG image files is activated. Front panel FUNCTION VOLUME A "/1 (on/standby) (page 36) Turns on . Z (open...) N (play) Starts or re-starts playback. D VIRTUAL 7.1CH indicator (page 33) Lights up while the system is turned on the unit, or sets to standby mode. F Front panel display G Disc tray (page 36) H (remote sensor) 13US x (stop) Stops playback and remembers the stop point (resume ...

Operating Instructions
Page 14
...720p/1080i/ 1080p video signals from the HDMI OUT jack or 720p/1080i video signals from the COMPONENT VIDEO OUT jacks. Front panel display About the indications in the front panel display PL x NEO:6 TUNED ST SLEEP EXT HDMI HD 24P NIGHT BASS A Current surround format B Lights up when a... 71) 14US F Lights up when outputting 1920 × 1080p/24 Hz video signals. M Flashes when the sleep timer is on. (page 49) J Displays system's status such as chapter, title, or track number, time information, radio frequency, playing status, decoding mode, etc. H Lights up when the night mode is ...
...720p/1080i/ 1080p video signals from the HDMI OUT jack or 720p/1080i video signals from the COMPONENT VIDEO OUT jacks. Front panel display About the indications in the front panel display PL x NEO:6 TUNED ST SLEEP EXT HDMI HD 24P NIGHT BASS A Current surround format B Lights up when a... 71) 14US F Lights up when outputting 1920 × 1080p/24 Hz video signals. M Flashes when the sleep timer is on. (page 49) J Displays system's status such as chapter, title, or track number, time information, radio frequency, playing status, decoding mode, etc. H Lights up when the night mode is ...

Operating Instructions
Page 20
Do not catch the speaker cord insulation (rubber covering) in the speaker terminals. Rear panel of the unit Red White (Front right speaker (R)) (Front left speaker (L)) Purple (Subwoofer) SPEAKER CENTER SUBWOOFER COMPONENT VIDEO OUT PR / CR PB / CB Y LAN(1S0PE0A)... the color of the SPEAKER jacks of the speaker Connect the speaker cords to a wall outlet (mains) until it clicks. Getting Started Step 2: Connecting the System For connecting the system, read the information on the type of speaker.
Do not catch the speaker cord insulation (rubber covering) in the speaker terminals. Rear panel of the unit Red White (Front right speaker (R)) (Front left speaker (L)) Purple (Subwoofer) SPEAKER CENTER SUBWOOFER COMPONENT VIDEO OUT PR / CR PB / CB Y LAN(1S0PE0A)... the color of the SPEAKER jacks of the speaker Connect the speaker cords to a wall outlet (mains) until it clicks. Getting Started Step 2: Connecting the System For connecting the system, read the information on the type of speaker.

Operating Instructions
Page 21
...TV with the HDMI cable, you need to using only the video cord connection. Picture quality will be improved compared to the TV both with BDV-T11 only. Video signals from the DIGITAL MEDIA PORT adapter are not output via the COMPONENT VIDEO OUT jack. 21US Getting Started Connecting the TV... cable (C) and video cord (A) connection If your TV does not have an HDMI jack, but has component video input jacks, connect to the TV. Rear panel of the unit SPEAKER CENTER SUBWOOFER B HDMI cable* EZW-T100 COMPONENT VIDEO OUT PR / CR PB / CB Y LAN(1S0PE0A)KER VIDEO OUT HDMI OUT DMPORT...
...TV with the HDMI cable, you need to using only the video cord connection. Picture quality will be improved compared to the TV both with BDV-T11 only. Video signals from the DIGITAL MEDIA PORT adapter are not output via the COMPONENT VIDEO OUT jack. 21US Getting Started Connecting the TV... cable (C) and video cord (A) connection If your TV does not have an HDMI jack, but has component video input jacks, connect to the TV. Rear panel of the unit SPEAKER CENTER SUBWOOFER B HDMI cable* EZW-T100 COMPONENT VIDEO OUT PR / CR PB / CB Y LAN(1S0PE0A)KER VIDEO OUT HDMI OUT DMPORT...
Operating Instructions
Page 22
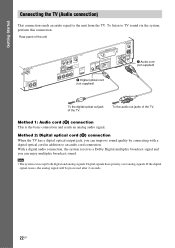
Digital signals have priority over analog signals. Note • The system can enjoy multiplex broadcast sound. With a digital audio connection, the system receives a Dolby Digital multiplex broadcast signal and you can improve sound quality by connecting with a digital optical cord in ... 2 seconds. 22US Getting Started Connecting the TV (Audio connection) This connection sends an audio signal to TV sound via the system, perform this connection. Rear panel of the unit SPEAKER CENTER SUBWOOFER EZW-T100 COMPONENT VIDEO OUT PR / CR PB / CB Y LAN(1S0PE0A)KER VIDEO OUT...
Digital signals have priority over analog signals. Note • The system can enjoy multiplex broadcast sound. With a digital audio connection, the system receives a Dolby Digital multiplex broadcast signal and you can improve sound quality by connecting with a digital optical cord in ... 2 seconds. 22US Getting Started Connecting the TV (Audio connection) This connection sends an audio signal to TV sound via the system, perform this connection. Rear panel of the unit SPEAKER CENTER SUBWOOFER EZW-T100 COMPONENT VIDEO OUT PR / CR PB / CB Y LAN(1S0PE0A)KER VIDEO OUT...
Operating Instructions
Page 23
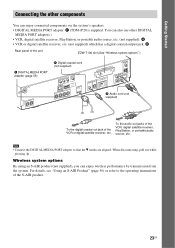
... PORT adapter: F (TDM-iP20 is supplied. You can also use other components You can enjoy wireless performance by transmission from the system. Getting Started Connecting the other DIGITAL MEDIA PORT adapters.) • VCR, digital satellite receiver, PlayStation, or portable audio source, etc... • VCR or digital satellite receiver, etc. (not supplied) which has a digital coaxial output jack: H Rear panel of the unit EZW-T100 slot (See "Wireless system options".) F DIGITAL MEDIA PORT adapter (page 55) SPEAKER CENTER SUBWOOFER H Digital coaxial cord (not supplied) COMPONENT VIDEO...
... PORT adapter: F (TDM-iP20 is supplied. You can also use other components You can enjoy wireless performance by transmission from the system. Getting Started Connecting the other DIGITAL MEDIA PORT adapters.) • VCR, digital satellite receiver, PlayStation, or portable audio source, etc... • VCR or digital satellite receiver, etc. (not supplied) which has a digital coaxial output jack: H Rear panel of the unit EZW-T100 slot (See "Wireless system options".) F DIGITAL MEDIA PORT adapter (page 55) SPEAKER CENTER SUBWOOFER H Digital coaxial cord (not supplied) COMPONENT VIDEO...

Operating Instructions
Page 25
...AM loop antenna (aerial) (supplied) FM wire antenna (aerial) (supplied) Note • Keep the AM loop antenna (aerial) and cord away from the system or other AV components, as noise may result. • Be sure to an outdoor FM antenna (aerial) as possible. Outdoor FM antenna (aerial) Unit ANTENNA... COAXIAL 75 FM AM 25US Connecting the antenna (aerial) To assemble the AM loop antenna (aerial) Getting Started To connect the antenna (aerial) Rear panel of the AM loop antenna (aerial) for best AM broadcast sound. • If you have poor FM reception, use a 75-ohm coaxial cable ...
...AM loop antenna (aerial) (supplied) FM wire antenna (aerial) (supplied) Note • Keep the AM loop antenna (aerial) and cord away from the system or other AV components, as noise may result. • Be sure to an outdoor FM antenna (aerial) as possible. Outdoor FM antenna (aerial) Unit ANTENNA... COAXIAL 75 FM AM 25US Connecting the antenna (aerial) To assemble the AM loop antenna (aerial) Getting Started To connect the antenna (aerial) Rear panel of the AM loop antenna (aerial) for best AM broadcast sound. • If you have poor FM reception, use a 75-ohm coaxial cable ...

Operating Instructions
Page 26
...external memory into the EXT slot. Sony USM2GL (not supplied) Note • Insert the external memory into the EXT slot as far as it . • Do not apply too much pressure to the external memory in the front panel display when turning the system on the disc (page 43). Check that "EXT"... lights up Ex. To remove the external memory 1 Press "/1 to turn the system off when inserting or removing the external memory. • Do not insert ...
...external memory into the EXT slot. Sony USM2GL (not supplied) Note • Insert the external memory into the EXT slot as far as it . • Do not apply too much pressure to the external memory in the front panel display when turning the system on the disc (page 43). Check that "EXT"... lights up Ex. To remove the external memory 1 Press "/1 to turn the system off when inserting or removing the external memory. • Do not insert ...
Operating Instructions
Page 27
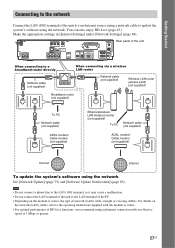
...OPTICAL ANTENNA COAXIAL 75 FM TV L R AUDIO IN AUDIO AM L A. CAL MIC ECM-AC2 R AUDIO IN Rear panel of the unit When connecting to update the system's software using the network. You can also enjoy BD-Live (page 43). Getting Started Connecting to the network Connect ...Ethernet/wireless LAN media converter (not supplied) To PC Network cable (not supplied) ADSL modem/ Cable modem (not supplied) Internet Internet To update the system's software using the network See [Network Update] (page 75) and [Software Update Notification] (page 83). Note • Do not connect a phone...
...OPTICAL ANTENNA COAXIAL 75 FM TV L R AUDIO IN AUDIO AM L A. CAL MIC ECM-AC2 R AUDIO IN Rear panel of the unit When connecting to update the system's software using the network. You can also enjoy BD-Live (page 43). Getting Started Connecting to the network Connect ...Ethernet/wireless LAN media converter (not supplied) To PC Network cable (not supplied) ADSL modem/ Cable modem (not supplied) Internet Internet To update the system's software using the network See [Network Update] (page 75) and [Software Update Notification] (page 83). Note • Do not connect a phone...
Operating Instructions
Page 28
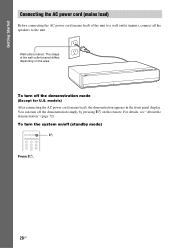
...456 789 "/1 Press "/1. 28US To turn off the demonstration simply by pressing "/1 on /off the demonstration mode (Except for U.S. You can turn the system on the remote. Wall outlet (mains): The shape of the unit to a wall outlet (mains), connect all the speakers to the unit. For ...details, see "About the demonstration" (page 72). models) After connecting the AC power cord (mains lead), the demonstration appears in the front panel display. Getting Started Connecting the AC power cord (mains lead) Before connecting the AC power cord (mains lead) of the wall outlet (mains)...
...456 789 "/1 Press "/1. 28US To turn off the demonstration simply by pressing "/1 on /off the demonstration mode (Except for U.S. You can turn the system on the remote. Wall outlet (mains): The shape of the unit to a wall outlet (mains), connect all the speakers to the unit. For ...details, see "About the demonstration" (page 72). models) After connecting the AC power cord (mains lead), the demonstration appears in the front panel display. Getting Started Connecting the AC power cord (mains lead) Before connecting the AC power cord (mains lead) of the wall outlet (mains)...
Operating Instructions
Page 31
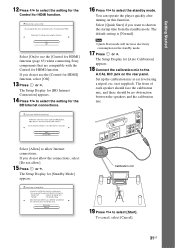
... and there should be no obstruction between the speakers and the calibration mic. The Setup Display for HDMI] function (page 63) when connecting Sony components that are compatible with a TV connected by HDMI. The Setup Display for [Auto Calibration] appears. 18 Connect the calibration mic to select...Setup Display for [Standby Mode] appears. 16 Press X/x to select the setting for the Control for HDMI You can operate the player quickly after turning on the rear panel. Getting Started 12 Press X/x to select the standby mode. If you do not allow the connections, select [Do not allow...
... and there should be no obstruction between the speakers and the calibration mic. The Setup Display for HDMI] function (page 63) when connecting Sony components that are compatible with a TV connected by HDMI. The Setup Display for [Auto Calibration] appears. 18 Connect the calibration mic to select...Setup Display for [Standby Mode] appears. 16 Press X/x to select the setting for the Control for HDMI You can operate the player quickly after turning on the rear panel. Getting Started 12 Press X/x to select the standby mode. If you do not allow the connections, select [Do not allow...
Operating Instructions
Page 32
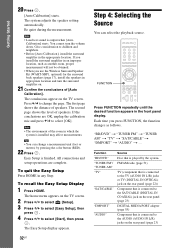
...to the TV (AUDIO IN L/R) jacks or TV (DIGITAL IN OPTICAL) jack on the rear panel (page 22)) Component that is connected to the SAT/CABLE (DIGITAL IN COAXIAL) jack on.... Easy Setup is output when [Auto Calibration] starts. To quit the Easy Setup Press HOME in which the system is played by pressing the color button (RED). 22 Press . The Easy Setup display ..."TUNER FM"/ "TUNER AM" "TV" "SAT/CABLE" "DMPORT" "AUDIO" Source Disc that is installed may affect measurements. The system adjusts the speaker setting automatically. If the conclusions are complete. Give consideration to children and...
...to the TV (AUDIO IN L/R) jacks or TV (DIGITAL IN OPTICAL) jack on the rear panel (page 22)) Component that is connected to the SAT/CABLE (DIGITAL IN COAXIAL) jack on.... Easy Setup is output when [Auto Calibration] starts. To quit the Easy Setup Press HOME in which the system is played by pressing the color button (RED). 22 Press . The Easy Setup display ..."TUNER FM"/ "TUNER AM" "TV" "SAT/CABLE" "DMPORT" "AUDIO" Source Disc that is installed may affect measurements. The system adjusts the speaker setting automatically. If the conclusions are complete. Give consideration to children and...

Operating Instructions
Page 33
... sound of the system's pre-programmed decoding modes. X/x/c, 123 456 789 0 SYSTEM MENU Selecting surround sound effects based on your home. See the table below for surround sound effect descriptions. 5 Press . The system menu turns off. 33US MODE" appears in the front panel display, then press... until the surround sound effect you want appears in the front panel display, then press or c. 3 Press X/x repeatedly until "AUDIO MENU" appears in the front panel display. The setting is made. 6 Press SYSTEM MENU. Getting Started Step 5: Enjoying Surround Sound You can enjoy...
... sound of the system's pre-programmed decoding modes. X/x/c, 123 456 789 0 SYSTEM MENU Selecting surround sound effects based on your home. See the table below for surround sound effect descriptions. 5 Press . The system menu turns off. 33US MODE" appears in the front panel display, then press... until the surround sound effect you want appears in the front panel display, then press or c. 3 Press X/x repeatedly until "AUDIO MENU" appears in the front panel display. The setting is made. 6 Press SYSTEM MENU. Getting Started Step 5: Enjoying Surround Sound You can enjoy...

Operating Instructions
Page 36
... or . The volume level appears on the TV screen and in the front panel display. Playback Playing a BD/DVD 5 Press Z. 6 Place a disc. In this system. 3 Press "/1. When you play an 8 cm disc, place it on other equipment, the title list appears. Refer to the operating...your TV. 2 Switch the input selector on the disc. ONE-TOUCH PLAY "/1 SUBTITLE DISPLAY TOP MENU C/X/x/c, HOME FUNCTION / SCENE SEARCH MUTING VOLUME +/- 123 456 789 0 Number buttons TIME SYSTEM MENU ANGLE POP UP/ MENU OPTIONS ./> N m/M x X 1 Turn on your disc. The system turns on the tray. 7 Press C/c to ...
... or . The volume level appears on the TV screen and in the front panel display. Playback Playing a BD/DVD 5 Press Z. 6 Place a disc. In this system. 3 Press "/1. When you play an 8 cm disc, place it on other equipment, the title list appears. Refer to the operating...your TV. 2 Switch the input selector on the disc. ONE-TOUCH PLAY "/1 SUBTITLE DISPLAY TOP MENU C/X/x/c, HOME FUNCTION / SCENE SEARCH MUTING VOLUME +/- 123 456 789 0 Number buttons TIME SYSTEM MENU ANGLE POP UP/ MENU OPTIONS ./> N m/M x X 1 Turn on your disc. The system turns on the tray. 7 Press C/c to ...

Operating Instructions
Page 41
The displayed information differs depending on the disc type and system status. Tip • You can also check the playback information in the front panel display Press TIME repeatedly. Press DISPLAY during playback. Angle English Dolby Digital Plus Mbps A The current selected angle B Title number or name C The currently selected ...
The displayed information differs depending on the disc type and system status. Tip • You can also check the playback information in the front panel display Press TIME repeatedly. Press DISPLAY during playback. Angle English Dolby Digital Plus Mbps A The current selected angle B Title number or name C The currently selected ...

Operating Instructions
Page 42
.... 1 Press SYSTEM MENU. 2 Press X/x repeatedly until "AUDIO MENU" appears in the front panel display, then press or c. 3 Press X/x repeatedly until "A/V SYNC" appears in the front panel display, then ...discern. Adjusting pictures for different lighting environments. • [Standard] • [Brighter Room] • [Theater Room] [FNR] Reduces random noise appearing in the picture. • [Off] • [Auto]...[Auto] 4 Press C/X/x/c to select [Video Settings], then press . Note • Depending on the disc or the scene being played, [FNR], [BNR], or [MNR] effects may not be hard to ...
.... 1 Press SYSTEM MENU. 2 Press X/x repeatedly until "AUDIO MENU" appears in the front panel display, then press or c. 3 Press X/x repeatedly until "A/V SYNC" appears in the front panel display, then ...discern. Adjusting pictures for different lighting environments. • [Standard] • [Brighter Room] • [Theater Room] [FNR] Reduces random noise appearing in the picture. • [Off] • [Auto]...[Auto] 4 Press C/X/x/c to select [Video Settings], then press . Note • Depending on the disc or the scene being played, [FNR], [BNR], or [MNR] effects may not be hard to ...
